


As I rebuild my IRS I ran into very bad Part quality from a main supplier starting with an S ans ending on G.
The worst were the so called ‘best quality’ rear suspension mounts. Not the Poly ones but high end rubber mounts.
As they are 1 cm higher then the genuine ones, and installing creates a bit of a funnel for the irs cage, it turned out that 1 cm on both front and back added up. The weight of the car could not compress the rubber so that the mounting holes lined up. The irs just could not be reinstalled. After trying, dropping, trying, dropping the IRS 3 times and 6 hours later I gave up. Grabbing the old rubber mounting went straight forward and 30 mins later it was done...
Just wanted to say this....
Disappointed in parts quality
-
Kingkitesurf
Topic author - Posts: 19
- Joined: Sun Mar 18, 2012 7:37 am
- Location: Netherlands

#1 Disappointed in parts quality
Last edited by Kingkitesurf on Sun May 03, 2020 7:49 am, edited 1 time in total.
Job
1968 E-type 4.2 S1.5 FHC
1968 E-type 4.2 S1.5 FHC
| Link: | |
| BBcode: | |
| HTML: | |
| Hide post links |
-
Geoff Allam
- Posts: 201
- Joined: Sat Mar 31, 2018 12:55 am

#2 Re: Disappointed in parts quality
Have you called the vendor and described your problem to give them a chance to rectify it? Seems like the correct way to handle it before venting in public.
Geoff Allam
67 series1 ots under restoration
67 series1 ots under restoration
| Link: | |
| BBcode: | |
| HTML: | |
| Hide post links |


#3 Re: Disappointed in parts quality
Are you taking as « genuine » dimensions the sizes of the ones you removed ?
This potentially worn and tired size is pretty meaningless.
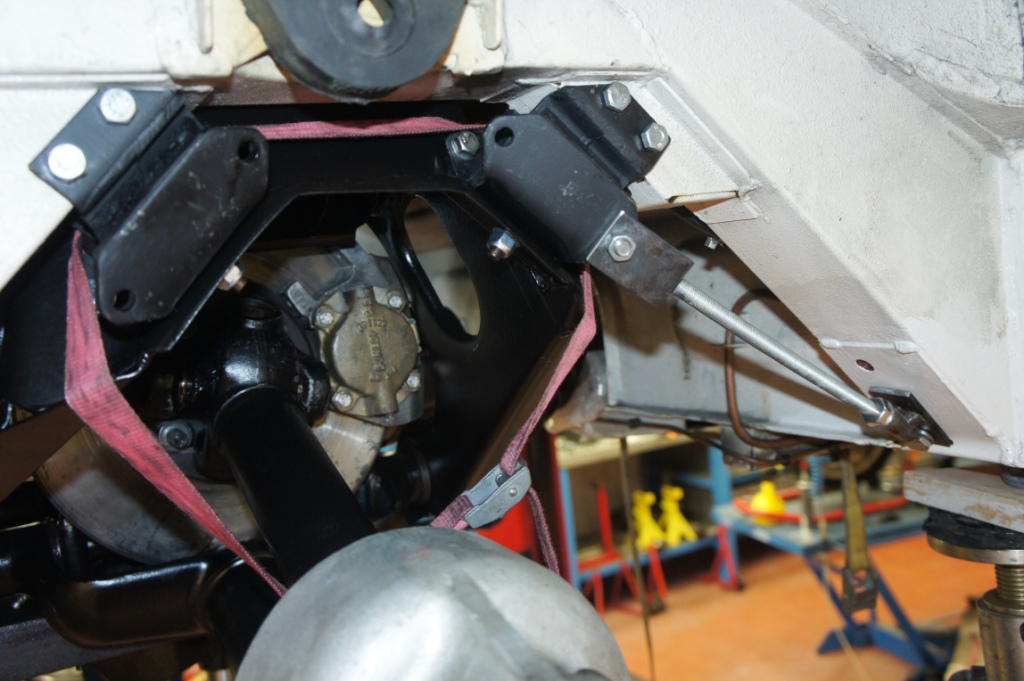
Fitting the IRS with new rubbers (mine came from SNGB too) is NOT an easy task, personally I am convinced the factory would have had fitting aids with levers to speed this up, and if you search the Forum there are some pictures of a very simple screw-jack I made that made lining up the holes a doddle.
viewtopic.php?f=3&t=5843&p=41323#p41323
The rubber-fitting issues and suggestions are covered in Post #6.
The reason that fitting these can never be straightforward is that IF everything lined up straight away, once they were loaded up there would be a considerable permanent shear force front-to-back across the rubbers, whereas the intention would have been that it was just compression.
We have all had rubbish from SNGB, but as far as I am aware nobody who has ever raised an issue has ever not been listened to, or refused a refund.
You might ask Julian why he doesn’t copy Rory’s screw-jack fitting tool, after all the prototype has been sitting on his desk for about a year now.
Here are a few teasers.
Rory
3.8 OTS S1 Opalescent Silver Grey - built May 28th 1962
3.8 OTS S1 Opalescent Silver Grey - built May 28th 1962
| Link: | |
| BBcode: | |
| HTML: | |
| Hide post links |

#4 Re: Disappointed in parts quality
As Rory mentiones above...the IRS mounts are never a straightforward fit......Is this your first attempt at installing an IRS with new mounts or have you done it before....Also you dont mention which model you have..please try to put it with your name in the signature area.....If you have a 2+2 it is far easier to fit the mounts to the body first...then lift the IRS straight up to them....there is far less room between the cage and body in a 2+2....Steve
Steve
69 S2 2+2 (just sold) ..Realm C type replica, 1960 xk150fhc
69 S2 2+2 (just sold) ..Realm C type replica, 1960 xk150fhc
| Link: | |
| BBcode: | |
| HTML: | |
| Hide post links |
#5 Re: Disappointed in parts quality
Great info guys
I have this job to do next week and I also have those sng mounts
That tool will come in handy it seems
Joe
I have this job to do next week and I also have those sng mounts
That tool will come in handy it seems
Joe
1969 series 2 2+2
| Link: | |
| BBcode: | |
| HTML: | |
| Hide post links |
-
 politeperson
- Posts: 1297
- Joined: Tue Jun 07, 2016 8:26 pm
- Location: Boston UK

#6 Re: Disappointed in parts quality
You need a decent pry bar set for many type of jobs like this.
https://www.ebay.co.uk/itm/4-Piece-Podg ... 2422437642
https://www.ebay.co.uk/itm/4-Piece-Podg ... 2422437642
Its true, but Enzo never said it
Too many E types
XK120 SUs
Too many E types
XK120 SUs
| Link: | |
| BBcode: | |
| HTML: | |
| Hide post links |

#7 Re: Disappointed in parts quality
Hi Kingkitesurf,
Managed to post message twice when I edited it, so please read my revised message below.
Regards,
Dave
Managed to post message twice when I edited it, so please read my revised message below.
Regards,
Dave
Last edited by 44DHR on Sun May 03, 2020 10:14 am, edited 1 time in total.
Dave Rose
1967 Series 1 4.2 FHC
1967 Series 1 4.2 FHC
| Link: | |
| BBcode: | |
| HTML: | |
| Hide post links |
#8 Re: Disappointed in parts quality
Hi Kingkitesurf,
It is important to let us know your model and year as the mounting holes were changed over the years to make fitting the cage to the car easier over time.
This matter has been discussed before here :-
viewtopic.php?f=3&t=13181&p=107127#p107127
If you read my post #11 this explains the changes to the cage holes and the eventual slots, plus post #3 details the easiest way to fit the mountings to the car before lifting up the cage.
Regards,
Dave
Dave Rose
1967 Series 1 4.2 FHC
1967 Series 1 4.2 FHC
| Link: | |
| BBcode: | |
| HTML: | |
| Hide post links |

#9 Re: Disappointed in parts quality
Hi
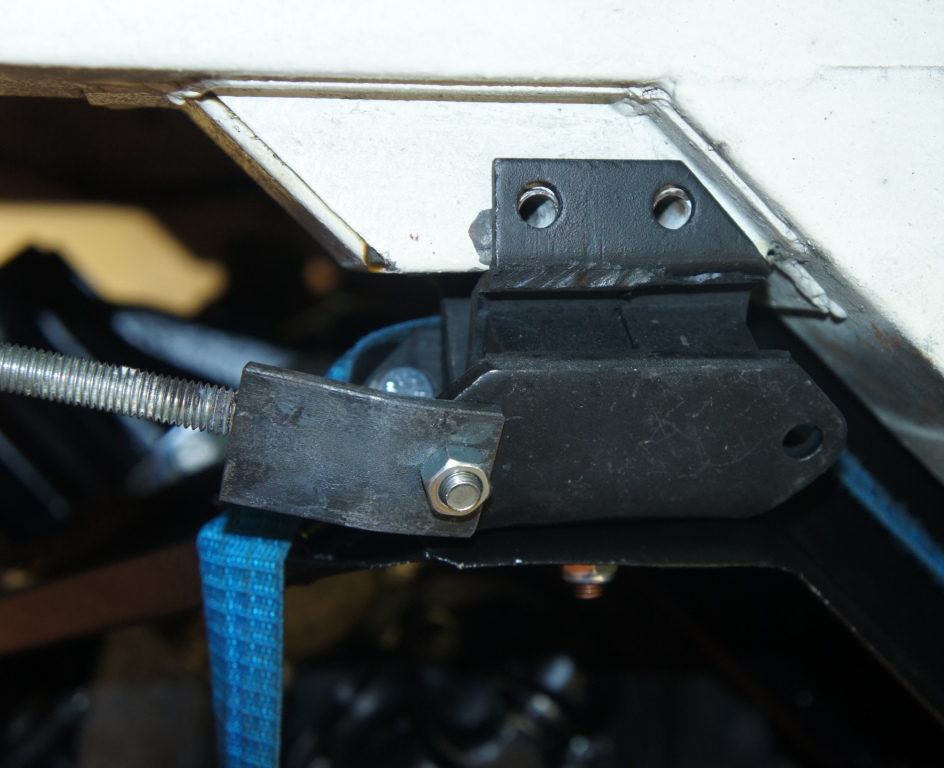
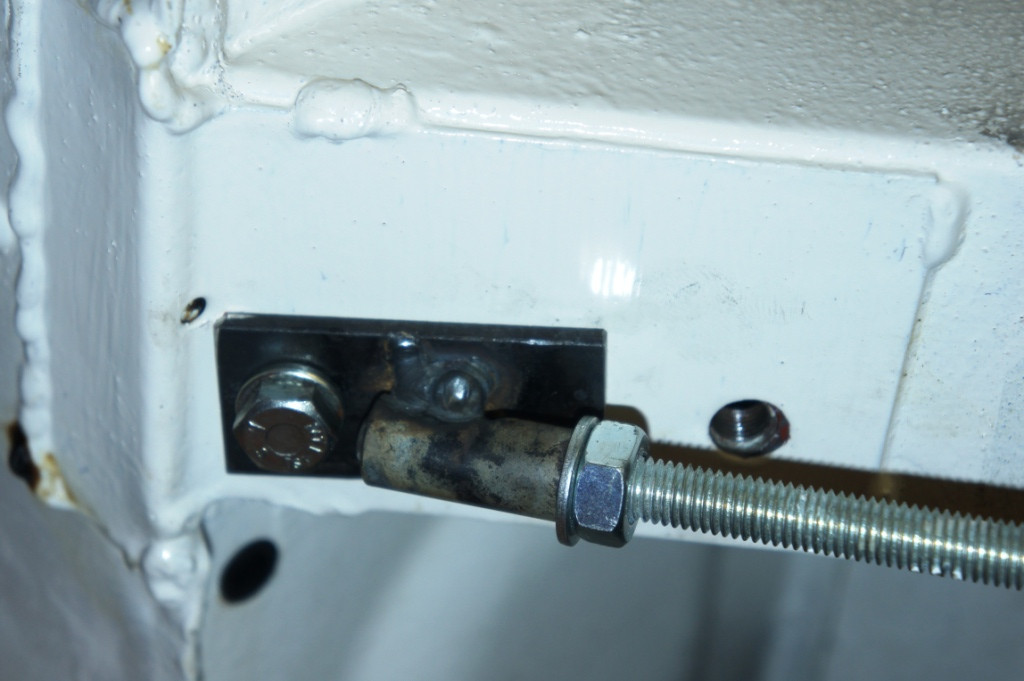
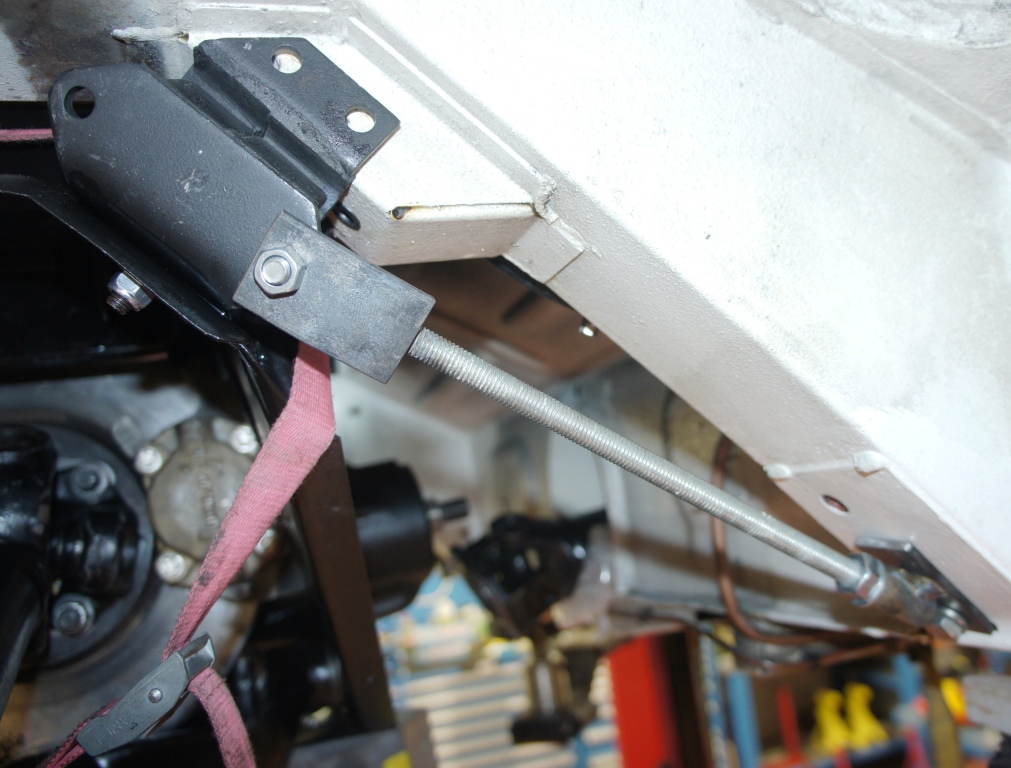
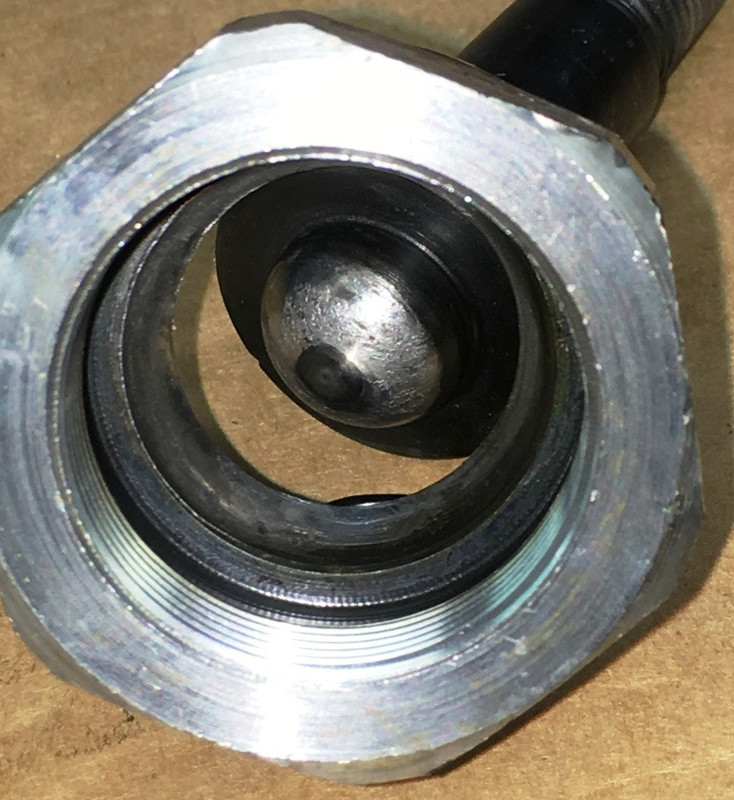
I bought mine from SNG and yes the rubbers were larger but I was expecting that given the age of the items they were replacing. As long as the other dimensions are similar I.e you’ve got the correct versions for your model then as described above, it will be a case of podgers, pry bars and other fiendishly clever tools to get it back in. One set fixed to the cage, the other to the chassis. Mine didn’t line up initially, as you can see but after using a combination of jacks and pry bars it all went back.
I bought mine from SNG and yes the rubbers were larger but I was expecting that given the age of the items they were replacing. As long as the other dimensions are similar I.e you’ve got the correct versions for your model then as described above, it will be a case of podgers, pry bars and other fiendishly clever tools to get it back in. One set fixed to the cage, the other to the chassis. Mine didn’t line up initially, as you can see but after using a combination of jacks and pry bars it all went back.
Richard
Previous owner and restorer of a S1 3.8 FHC Opalescent Golden Sand with Tan Trim 889504 (now sold and headed for Athens)


Previous owner and restorer of a S1 3.8 FHC Opalescent Golden Sand with Tan Trim 889504 (now sold and headed for Athens)
| Link: | |
| BBcode: | |
| HTML: | |
| Hide post links |


#10 Re: Disappointed in parts quality
As has been said, new rubbers are horrible to fit. My first effort left me with a stinking headache so bad I had to walk away and do what I have never done before and leave a load supported on a jack only. That was on the supposedly easier 2+2 shell.
I returned later to make things safe and next day thought it over. I made bullets from bolts filed to a point and heads removed. I used awls, pry bars and anything I could get my hands on, probably the most useful technique was to get the easier bolt of each mount in place with the nylon nut safe but not tight, then remove the jack and re-jack at the nose, then rear of the unit, wiggling the mount until bolts finally went in. I also started with a very stable jack and IRS set up, the IRS was firmly bolted to the jack and could not fall off. I used a home built adapter which was a great help. Design may vary according to the jack design you have.
Not sure if my mounts were SNG, but they probably were. When I removed and reinstalled the unit a couple of years later, it seemed much easier, experience, or the rubber mounts had squashed up to make it easier? Probably both.
Good luck with your next attempt!
Regards,
Simon
Series III FHC
Simon
Series III FHC
| Link: | |
| BBcode: | |
| HTML: | |
| Hide post links |

#11 Re: Disappointed in parts quality
Just supporting many of the posts above...
It is definitely one of those E Type jobs that is hard work the first time. Then you become an expert (and don't need to do it for ten years!)
- I had the luxury of borrowing Rory's alignment tool which was so helpful. It then went to SNGB from me.
- Some good long pry bars help too - forget 12 inches - big long ones.
- It is better with two people
- As the unit is starting to get close use the old bolts to align holes (tapping through with a hammer) then replace with new ones so you do not spoil threads.
- Front V blocks on the IRS, rear ones on the car before you offer up the unit.
- The Radius Arms only line up when you put the wheels on and lower the car back to the ground.
All SNGB parts were used for mine - they were fine. Your original post talks about being 1cm out. There will be times during the process you will be very happy only being 1cm away!!
Good luck and tell us how you get on.
cheers
Ash
Series 2 FHC 1970
1R 20607
1R 20607
| Link: | |
| BBcode: | |
| HTML: | |
| Hide post links |

#12 Re: Disappointed in parts quality
Thank goodness for this forum, is all I can say...dunno how I would have got my IRS mounts in without the cheery reassurance and good advice here... 
Jeremy
1967 S1 4.2 FHC
1967 S1 4.2 FHC
| Link: | |
| BBcode: | |
| HTML: | |
| Hide post links |

#13 Re: Disappointed in parts quality
Rory Wrote:
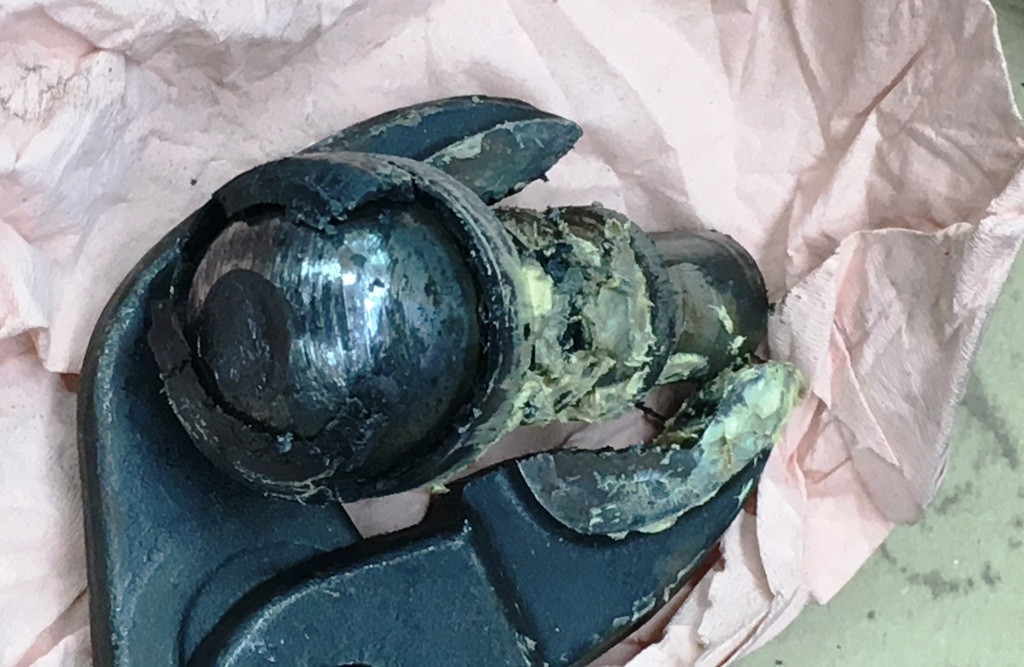
I've never had a problem fitting the IRS of an E Type and I've never had to resort to anything move brutal than a suitable sized Plus Driver to align the minuscule misalignment I've observed with the mounting holes. The caveat though, is that I've been fortunate in having only original manufacture parts to work with. Back in the mid 80s, I purchased a lot of stock from a BLMC dealership that was changing hands and changing brands.
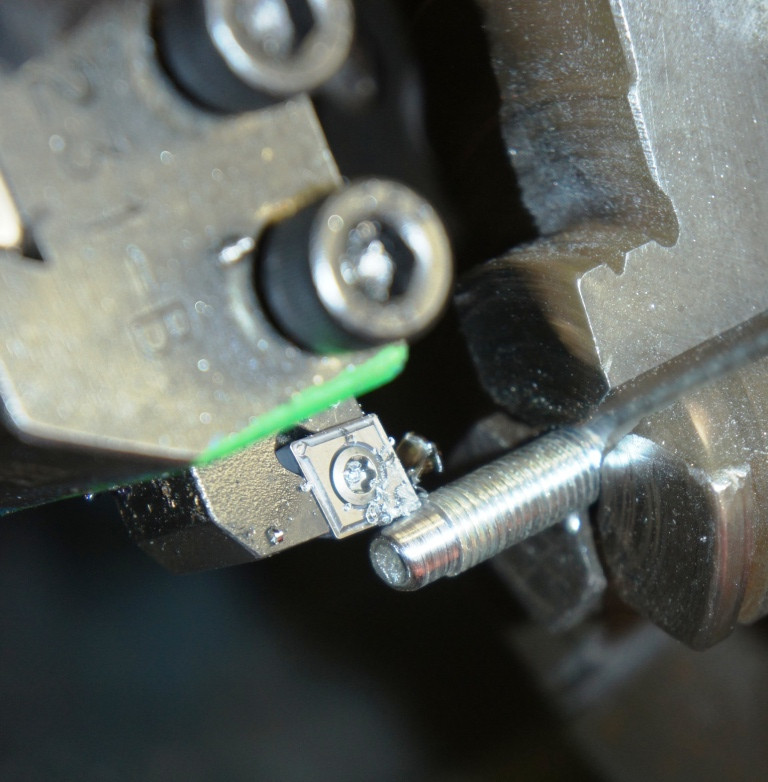
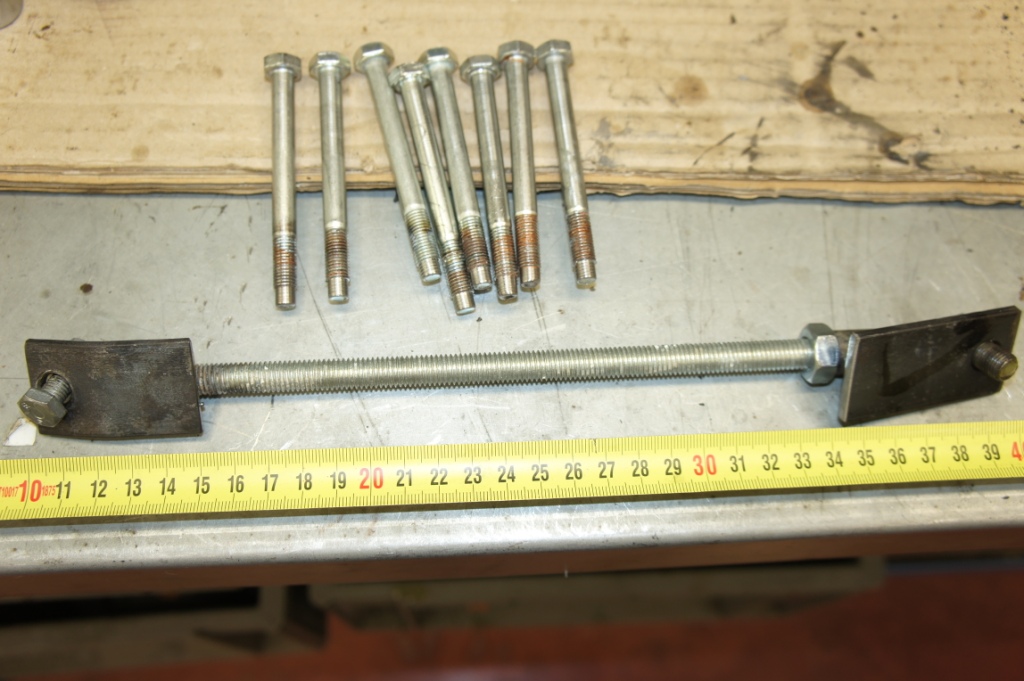
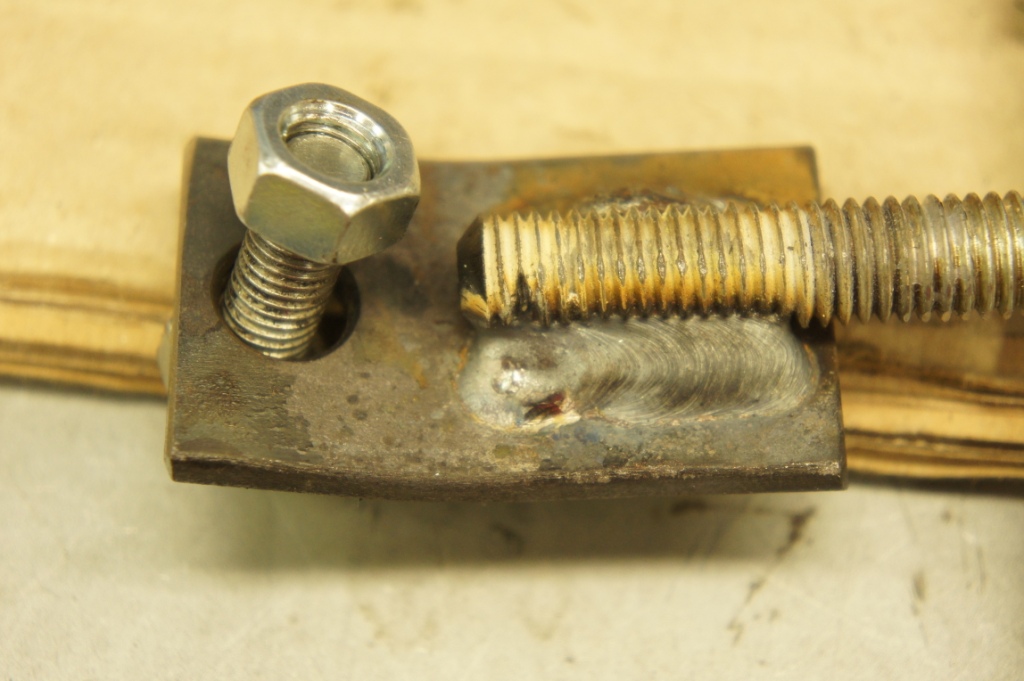
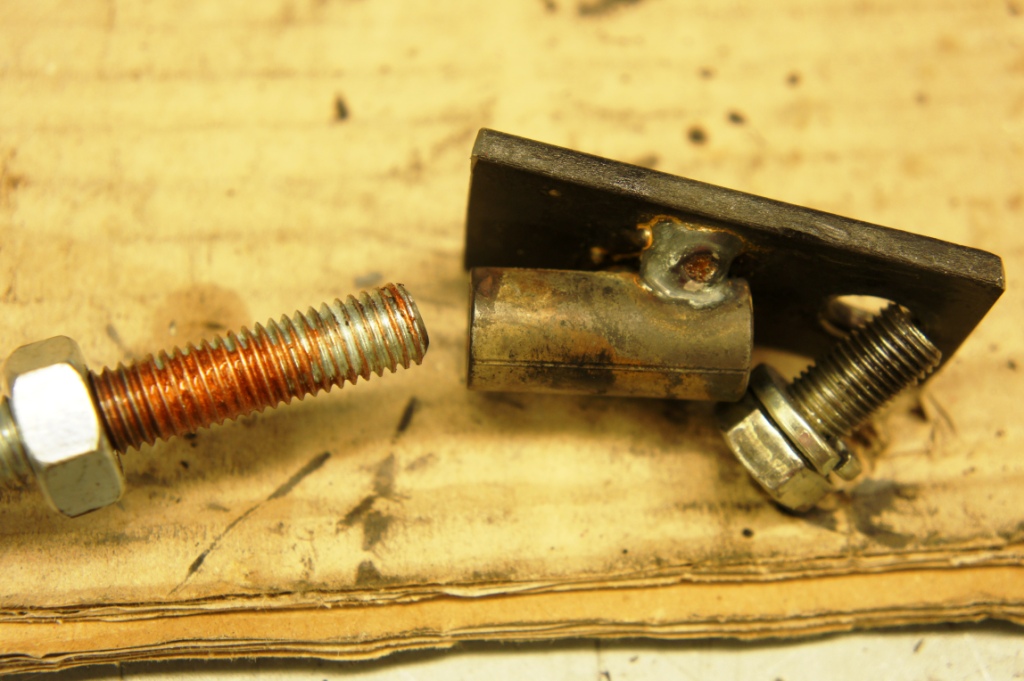
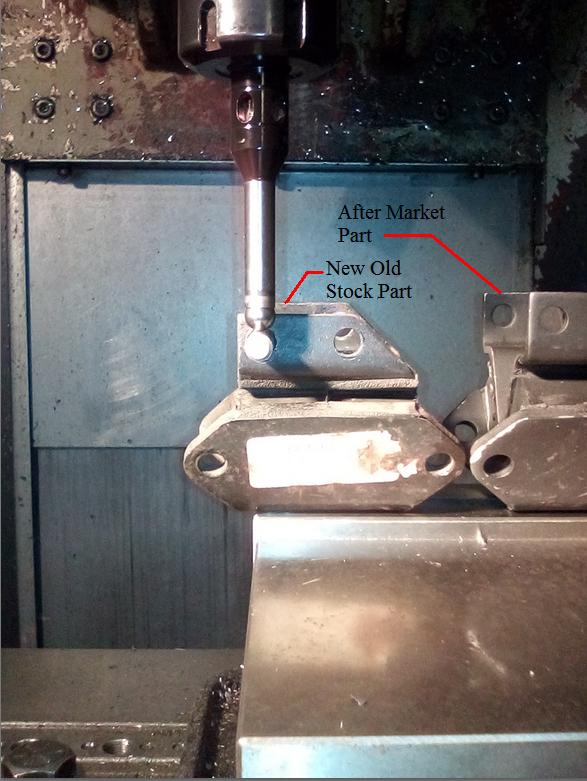
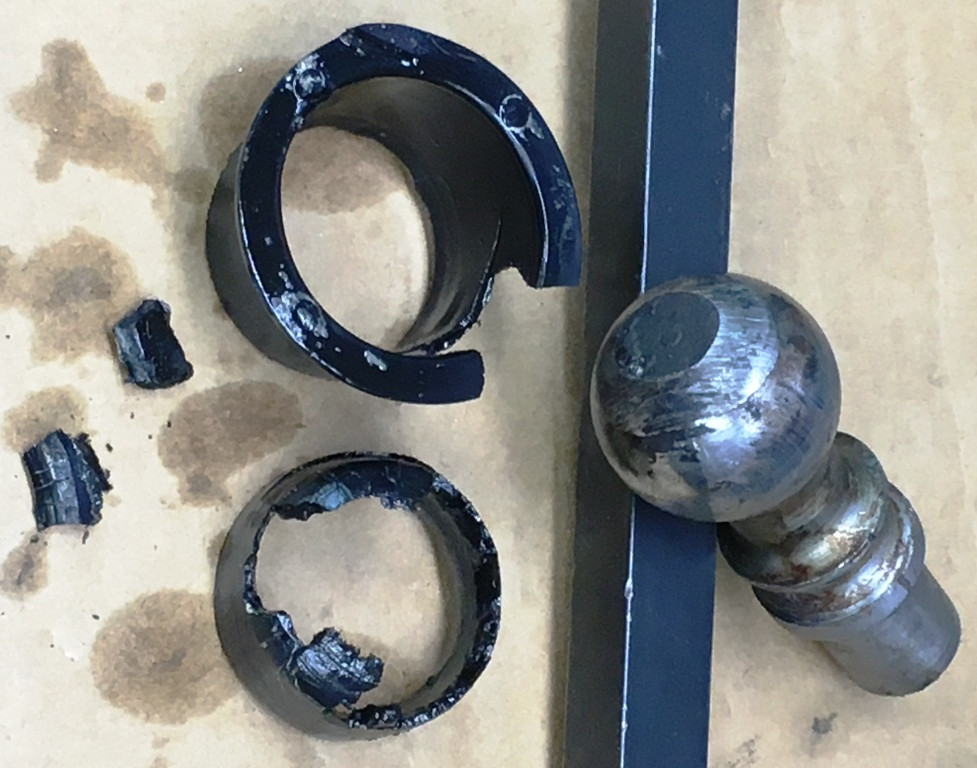
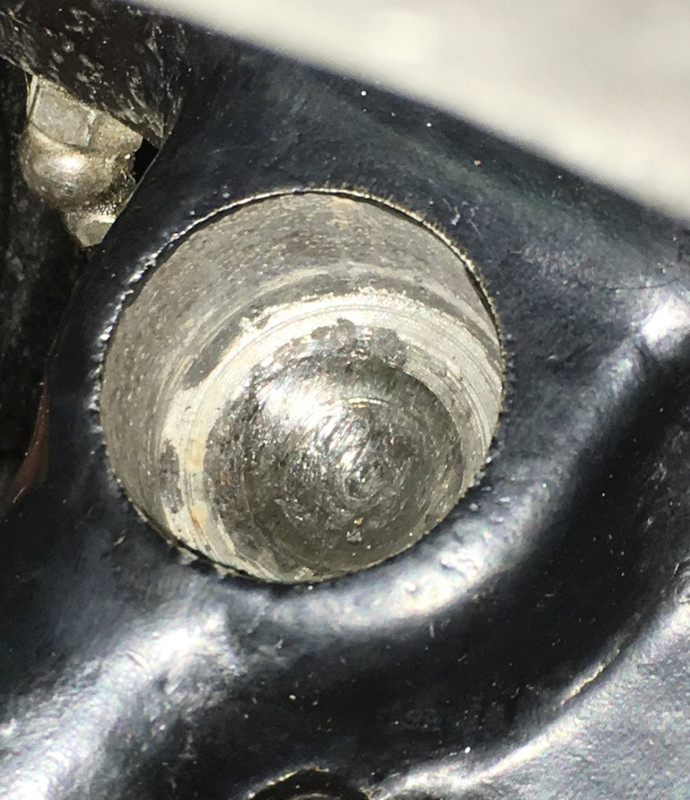
The following pictures are the comparison of an original NOS bracket (on the left) with a current, After Market part.
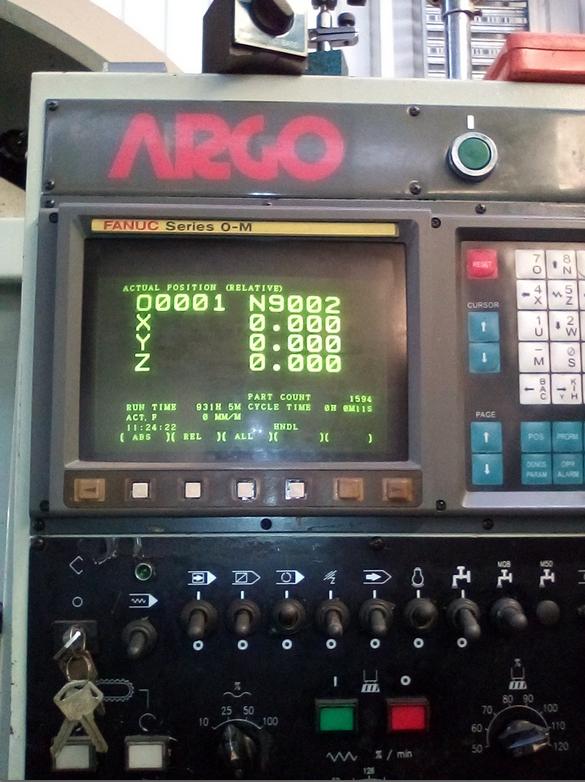
The following picture is the height probing of a neat fitting pin in a hole of the After Market Bracket.
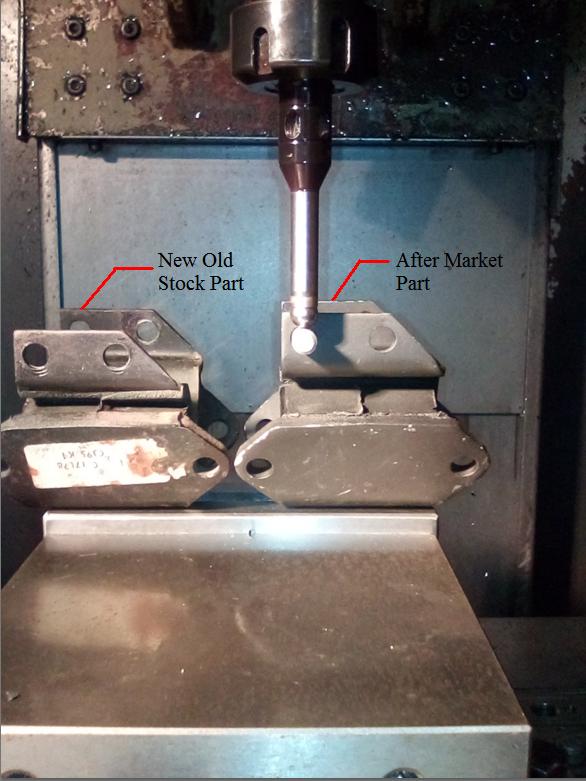
The following Picture is of the Position Display with the Z axis Zeroed as a reference when comparing the height of the respective hole in the NOS Bracket.
The following picture is the height probing of a neat fitting pin in a hole of the New Old Stock Bracket.
The following Picture is of the Position Display with the Z axis displaying the position of the hole in the NOS Bracket, relative to the respective hole in the After Market Part.
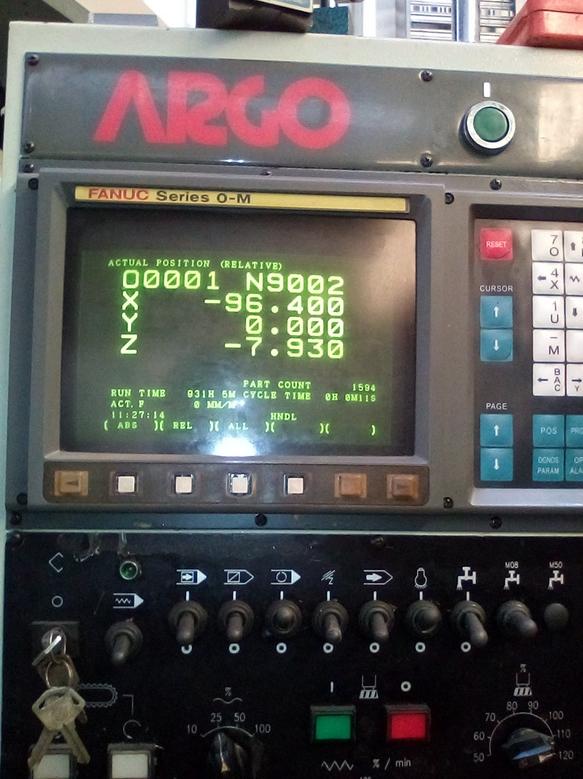
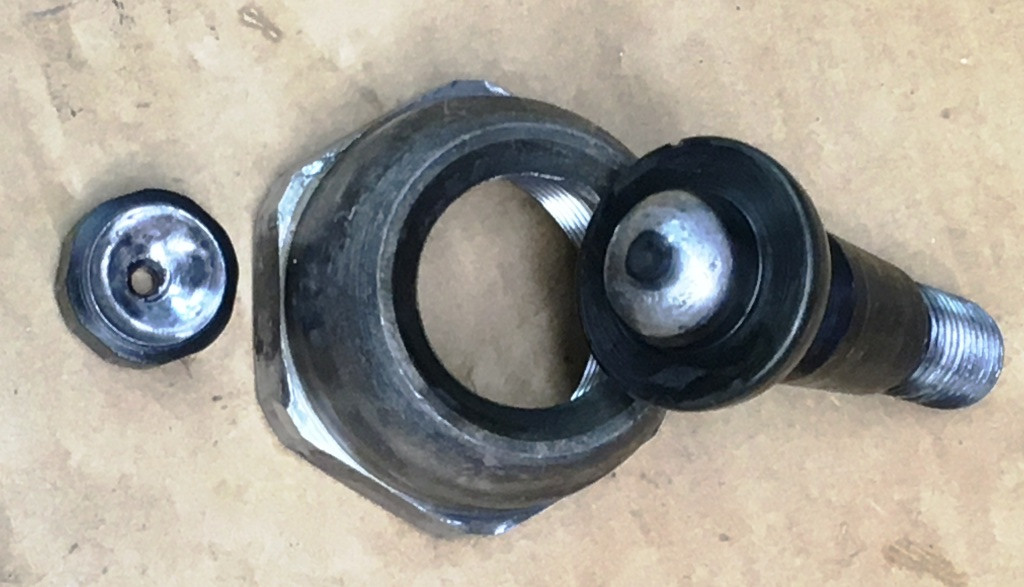
You will note that the hole in the NOS unit is 7.93mm lower, relative to the corresponding hole in the After Market part; closer to the 1cm reported by the OP than not. Neither part shown in the pictures have been part of the assembly of the IRS unit and a car. Accordingly, its apples being compared with apples.
I don't agree that special alignment devices were used during assembly by the factory, nor that the assembly can't/shouldn't be able to be "lined up straight away". As mentioned earlier, I use a Plus Driver to fix any small misalignment with the holes and follow the Driver out with the bolt going in. With the many IRS units I've fitted using NOS original manufacture brackets, it's my observation that the holes in the brackets do indeed line up straight away; the most recent, a 4.2 S1 2+2 last week.
It's my opinion that the requirement for a device to pull, or push the brackets into alignment using the mechanical advantage of a screw thread helix, is a case of the tail wagging the dog and wouldn't be required if correct dimension parts were being used. Reproducing the original parts is not rocket science; its just a matter of copying the original. The more difficult task of designing the parts has already been done.
Julian Barratt and his team have a sympathetic ear; I only wish they had no reason to listen.
Regards,
Bill
Hello Rory,Fitting the IRS with new rubbers (mine came from SNGB too) is NOT an easy task, personally I am convinced the factory would have had fitting aids with levers to speed this up, and if you search the Forum there are some pictures of a very simple screw-jack I made that made lining up the holes a doddle.
viewtopic.php?f=3&t=5843&p=41323#p41323
The rubber-fitting issues and suggestions are covered in Post #6.
The reason that fitting these can never be straightforward is that IF everything lined up straight away, once they were loaded up there would be a considerable permanent shear force front-to-back across the rubbers, whereas the intention would have been that it was just compression.
I've never had a problem fitting the IRS of an E Type and I've never had to resort to anything move brutal than a suitable sized Plus Driver to align the minuscule misalignment I've observed with the mounting holes. The caveat though, is that I've been fortunate in having only original manufacture parts to work with. Back in the mid 80s, I purchased a lot of stock from a BLMC dealership that was changing hands and changing brands.
The following pictures are the comparison of an original NOS bracket (on the left) with a current, After Market part.
The following picture is the height probing of a neat fitting pin in a hole of the After Market Bracket.
The following Picture is of the Position Display with the Z axis Zeroed as a reference when comparing the height of the respective hole in the NOS Bracket.
The following picture is the height probing of a neat fitting pin in a hole of the New Old Stock Bracket.
The following Picture is of the Position Display with the Z axis displaying the position of the hole in the NOS Bracket, relative to the respective hole in the After Market Part.
You will note that the hole in the NOS unit is 7.93mm lower, relative to the corresponding hole in the After Market part; closer to the 1cm reported by the OP than not. Neither part shown in the pictures have been part of the assembly of the IRS unit and a car. Accordingly, its apples being compared with apples.
I don't agree that special alignment devices were used during assembly by the factory, nor that the assembly can't/shouldn't be able to be "lined up straight away". As mentioned earlier, I use a Plus Driver to fix any small misalignment with the holes and follow the Driver out with the bolt going in. With the many IRS units I've fitted using NOS original manufacture brackets, it's my observation that the holes in the brackets do indeed line up straight away; the most recent, a 4.2 S1 2+2 last week.
It's my opinion that the requirement for a device to pull, or push the brackets into alignment using the mechanical advantage of a screw thread helix, is a case of the tail wagging the dog and wouldn't be required if correct dimension parts were being used. Reproducing the original parts is not rocket science; its just a matter of copying the original. The more difficult task of designing the parts has already been done.
Julian Barratt and his team have a sympathetic ear; I only wish they had no reason to listen.
Regards,
Bill
Last edited by angelw on Tue May 05, 2020 1:37 pm, edited 1 time in total.
| Link: | |
| BBcode: | |
| HTML: | |
| Hide post links |
#14 Re: Disappointed in parts quality
Looks like a case of a copy being made of a copy and the original dimensions being lost - not unknown in the classic car world !
Barrie
Barrie
1968 E-type roadster, 1964 E-type fixed head 1995 Ferrari 355 1980 Ferrari 308 1987 V8 90 Landrover 1988 Bedford rascal van 1943 Ford GPW
| Link: | |
| BBcode: | |
| HTML: | |
| Hide post links |
#15 Re: Disappointed in parts quality
Bill ,
Thanks for the pictures and information . Did you take an overall measurement from the holes to the mount bottom face ? [vice jaws] . I have some to fit and would like to check what i have got ,the ones i have measure 67mm to the hole centres ,thanks Steve
Thanks for the pictures and information . Did you take an overall measurement from the holes to the mount bottom face ? [vice jaws] . I have some to fit and would like to check what i have got ,the ones i have measure 67mm to the hole centres ,thanks Steve
Last edited by steve3.8 on Tue May 05, 2020 2:26 pm, edited 1 time in total.
Steve3.8
64 3.8 fhc, 67 4.2 fhc
64 3.8 fhc, 67 4.2 fhc
| Link: | |
| BBcode: | |
| HTML: | |
| Hide post links |
#16 Re: Disappointed in parts quality
Steve Wrote:
No, but I will do tomorrow.
Regards,
Bill
Hello Steve,Did you take an overall measurement from the holes to the mount bottom face ?
No, but I will do tomorrow.
Regards,
Bill
| Link: | |
| BBcode: | |
| HTML: | |
| Hide post links |
#17 Re: Disappointed in parts quality
That is a sobering discovery, Bill, and I stand corrected.
Staggering indeed that something as widely-used (how long ? 40 years was it ? XJ's and everything else ?) as those rubbers could be reproduced today quite so inaccurately.
And ironic that we have had to wait for dimensions from Australia ...........
Also ironic in a week where I noticed the 1979 Mini Van ride heights were looking a little low.
Turns out that the brand-new front suspension knuckle joints fitted less than 5.000 miles ago, incidentally part of an uprated Moulton-approved set of rubber cones, have fallen apart to the extent that they've been ejected from their housings, with the seatings in fragments, such that the steel knuckles are running directly in the steel of suspension arms. I've owned and maintained the car for 40 years, and maybe 150.000 miles, and never had anything remotely like this when using original parts.
I can now see that the rear-knuckle seatings (same parts) are cracked and on the point of falling out, and in dismantling the front hub-swivel ball joints (already been shimmed twice, they were new at the same time) I can see that they are already worn-out too.
Five thousand miles ..........
The irony comes from the fact that TheMiniForum has a very active and well-informed Australian Moke-Specialist, and thanks to him I'm now ordering quality parts, to sort out once and for all these issues, from a Mini specialist .......... in JAPAN !
Mini parts designed and manufactured in JAPAN, can you believe it ?!
Anyway, we're right up for ordering IRS mouning rubbers from you in Oz, Bill, please arrange for immediate manufacture.
Rory
3.8 OTS S1 Opalescent Silver Grey - built May 28th 1962
3.8 OTS S1 Opalescent Silver Grey - built May 28th 1962
| Link: | |
| BBcode: | |
| HTML: | |
| Hide post links |
#18 Re: Disappointed in parts quality
Genuine V mounts are still available from Jaguar.
They’re not all the same, have you got the correct E-type ones?
E-type
https://parts.jaguarlandroverclassic.c ... ubber.html
XJS & XJ
https://parts.jaguarlandroverclassic.c ... 6572864859
DS420
https://parts.jaguarlandroverclassic.c ... 3572864859
They’re not all the same, have you got the correct E-type ones?
E-type
https://parts.jaguarlandroverclassic.c ... ubber.html
XJS & XJ
https://parts.jaguarlandroverclassic.c ... 6572864859
DS420
https://parts.jaguarlandroverclassic.c ... 3572864859
Tom
1970 S2 FHC
1970 S2 FHC
| Link: | |
| BBcode: | |
| HTML: | |
| Hide post links |
-
 JulianBarratt
- Posts: 97
- Joined: Fri Sep 14, 2018 12:49 pm
- Location: Bridgnorth, UK
- Contact:
#19 Re: Disappointed in parts quality
Hi All,
Very interesting thread and the detail from Bill particularly is comprehensive indeed. I have been lucky enough to visit Bill in his workshops and they dont come much more "switched on" than he is.
There are a number of different variants of this part on the market at present (we stock 4 types) so i will ensure we take a look at each to see if we can replicate the issues displayed. As you might imagine, we dont currently have access to all the usual people and facilities (or at least the people arent all in the usual place) so it might not be as quick a response as i would like. In fairness to Bill, it would appear that it has been some years since he purchased an aftermarket version of one of these (unless i am missing something - which is entiely possible!) so i will ensure that we are looking at current stocks.
I know that our customer service team contacted the original poster of this thread so we are already doing something on this - but i will also chase up what has been done so far.
I will report back on this in due course...
MD at SNG Barratt Group
Enthusiastic owner/driver of a couple of complete E-types as well as a warehouse or two of parts...
Enthusiastic owner/driver of a couple of complete E-types as well as a warehouse or two of parts...
| Link: | |
| BBcode: | |
| HTML: | |
| Hide post links |
#20 Re: Disappointed in parts quality
Steve Wrote:
The After Market part that was shown to the Right in pictures in previous Post has a dimension of 69.12mm from hole centre to base (top of vice jaw). The same dimension for the NOS part is 61.19mm'.
Regards,
Bill
Hello Steve,Did you take an overall measurement from the holes to the mount bottom face ? [vice jaws] .
The After Market part that was shown to the Right in pictures in previous Post has a dimension of 69.12mm from hole centre to base (top of vice jaw). The same dimension for the NOS part is 61.19mm'.
Regards,
Bill
| Link: | |
| BBcode: | |
| HTML: | |
| Hide post links |