After a lot of thinking and research, I decided, back in May this year, to tackle the job myself, and to take out the engine, gearbox, etc. and not try a piecemeal approach. In retrospect I'm glad I did it this way, as I think the "one side at a time" approach would just not have been practical - at least on my car.
I bought new frames from a well known fabricator/supplier in the Midlands.
I had access to a large covered working area, plus a good sized pit (longer than the car) and an engine crane.
I took about 100 photographs of the dismantling process. I can't stress enough how important this was in the reassembly processes. I still didn't take enough of the details, and had to re-do a number of steps as the
obvious sequence of reassembly was not the
right sequence - and the Service Manual does not always go into detail when you need it to!
The result is a newly installed set of frames, and work completed on some of the other, normally less accessible bits, mainly involving the clutch and the valve clearances.
The car passed its MOT early in August, with no comments re other work needed, now that advisories on MOTs are no more.
I spent about £3000+ on parts, frame painting, etc, and about ten weeks full time (40-50 hours per week) either directly working on the car, or in cleaning, inspecting and refurbishing or replacing as necessary the parts removed.
Regarding lessons learned,
- The work was not that difficult, just time consuming - probably took about 3 weeks more than I expected. I had a Jaguar Service Manual and a Spare Parts Catalogue with me at all times
- The RHS frame was in overall good shape except for the bit which I first noticed - it had suffered from long-term exposure to brake fluid just below the reservoir, and was holed in a couple of places due to local corrosion
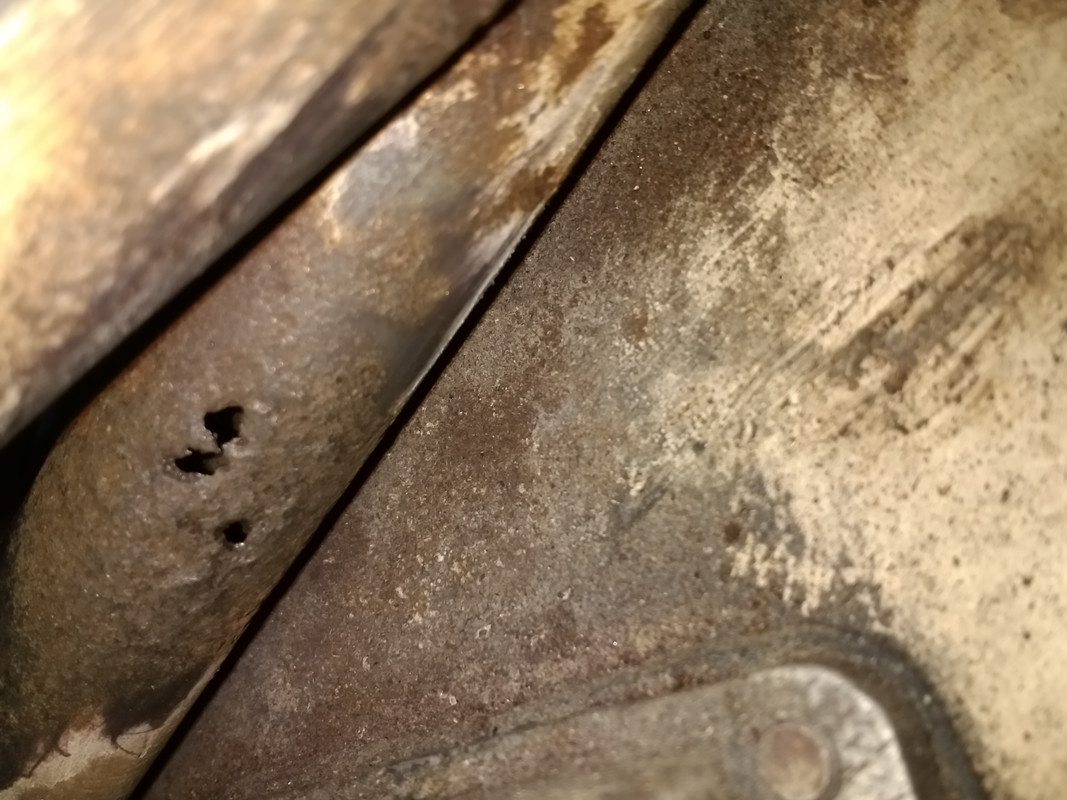
- The LHS frame showed no external signs of corrosion or damage, but had lots of rust flakes and powder inside, so it was only a matter of time till it too would have failed
- The bonnet had been off just a few years ago, so its removal was not difficult, with four people doing the lifting and plenty of old pillows etc to keep the bonnet from contacting other bodywork. I removed the bonnet locating pegs from the bonnet to avoid gouges during removal/refitting
- Engine/gearbox removal would not have been possible without an engine tilting attachment fitted to the crane
- The front of the bulkhead was very sound, with no evidence of corrosion and/or seized/rusted frame bolts
- Placing new frames next to those I had removed to see how good a fit I could expect was quite surprising, and suggested fitting the new ones might be a challenge. I did two trial fittings before sending the frames for final painting. The frame supplier was very helpful at this stage as I visited their premises and saw them do a trial fit of my new frames - which I now suspected might not fit - on another body, and began to appreciate that there was quite a bit of "persuasion" and levering involved in the process, requiring tapered alignment pins etc.
- My second trial fit involved leaving essentially all the frame bolts and fixings pretty much loose, except for the two through bolts on the chassis rails right at the bottom, near the reaction plate, then progressively tightening till the whole frame set, including the picture frame and the bonnet support frame, was tight.
I did a datum check at this point and found the bonnet frame front cross member was level, having checked the body was also level, so the frame went off for painting
- Then it was time for cleaning and inspection of the parts removed from the under-bonnet area. Most of the parts simply needed a good wire brushing or a gentle blasting (is there such a thing?) to get old paint off, and the removed parts were duly primed and finish painted
- Removing the Gearbox from the engine was quite straightforward, but there were a couple of surprises in the clutch.
First, the pressure plate had a couple of blue marks on it, at about 180 degrees apart and about 2 inches (50mm) long, indicating significant(?) local overheating. There had never been any operating problem with the clutch in the 5+ years since the clutch and flywheel were last replaced, nor any deliberate or inadvertent abuse of the clutch while I owned the car.
Second, the release bearing was in the process of failing, in that the carbon thrust element had separated from the carrier so it was rotating free from the carrier. The carbon block was, however, not cracked, spalled or damaged in any other visible way. Perhaps this somehow led to the surface burning marks?
The flywheel clutch surface was smooth, unmarked and flat, with no obvious reason for the burn marks on the pressure plate. The clutch lining had plenty of life left in it.
Release bearing and the clutch assembly were replaced as a matter of course
- Reassembly using the finish painted frames went carefully and reasonably well (with judicious use of tapered bars etc., and the leave it all loose till it's all joined up approach) but some bolts had to be driven into place as the painting had used up any clearance in the frame holes concerned. Very little paint damage to the frames overall, and ready for the torsion bars and front suspension
- Torsion bar installation and setting went surprisingly well, except for the reaction plate which took quite a bit of effort to get it in place and properly aligned to receive the torsion bar "rabbit ears", with some inevitable paint damage. Getting the rabbit ear bolts in place was pretty straightforward; it was getting the annular sleeve properly seated in the reaction plate which was most challenging.
- Re-installation of engine and gearbox went pretty well considering I did it single-handed, but caused a couple of scars on the picture frame, despite padding, plastic sheets and to keep the parts separated, etc.
The engine was reluctant to sit down properly in the space between the frames. This was evident from the fact that the throttle levers at the carbs would not open fully, as they contacted the engine frame top tube. At this time I had re-fitted the rear mount and spring at the back of the gearbox, and loosely assembled the intermediate engine support at the flywheel housing and the main engine mounts. Note that I did not remove the carbs from the manifold at any point in the proceedings as they were working just fine before the start of the job.
Checking of other cars showed that there should be a (surprisingly small?) 8-10 mm clearance between levers and frame top tube.
Eventually, lifting the engine front end, levering and refitting the front and centre engine supports, and general careful jiggling got the engine to sit just that missing 10mm higher than it had been.
- Then it was simply(!!!) a question of re-attaching the various ancillaries, like heater, pipes, tubes radiator, wiring harness, carefully following the photographs I had taken earlier - and realising several of the details had not been photographed, so some of the frame bolts, etc. and other ancillaries had to come off and be reinstalled the right way around
- Getting the horns to work properly took ages - mainly down to a blown fuse, together with poor and/or loose connections
- Finding exactly where the clips for the under-bonnet shields actually fitted and getting them into place took a long time. Pay more attention and do lots of pictures when taking them off
- While the engine was out I took the opportunity to replace and re-set the choke cable system. It was fiddly but nowhere as difficult as it would have been with the carbs and shields in place
- Brake bleeding was pretty simple, but the brake line from the bulkhead back to the rear subframe had some air in it (pretty much inevitably given the layout) so the rear cylinders had to be done by accessing the almost impossible to reach rear caliper bleed points.
Ride height is perfect as-is.
Checking of the front-end alignment by a local garage showed the camber to be spot-on and the castor angle was soon and easily adjusted. The steering rack rod-ends were reset, and the car drove perfectly afterwards - no pulling or steering/braking issues.
I hope this will help anyone else contemplating this kind of work.
I'm sure a professional restorer experienced in E Type work could have done it more quickly, and with fewer parts reinstalled, found to be wrong, and re-fitted correctly. However I have had a good time doing it all and I now have a full knowledge of my much cherished, and still pretty original, car.