Rebuiding SU Carbs

Technical advice Q&A
User avatar

Topic author
ALAN COCHRANE
Posts: 706
Joined: Sun May 06, 2012 9:37 am
Location: Fife
Great Britain

#1 Rebuiding SU Carbs

Post by ALAN COCHRANE » Mon Apr 23, 2018 8:18 pm

Hi Everyone

I've finally decided to rebuild the carbs after discovering that they are all leaking through their respective jet seals.
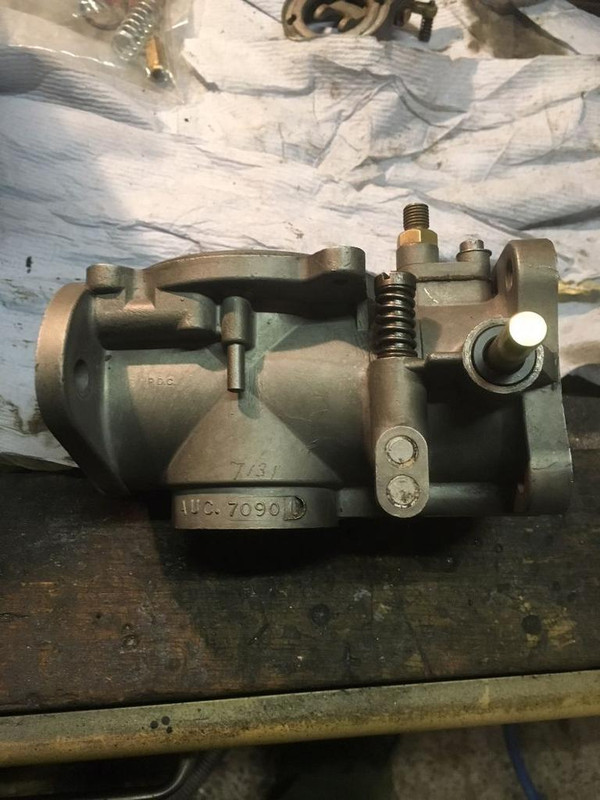
I have a question about the Burlen refurb kit and here's a photo of the parts in question:-

Image

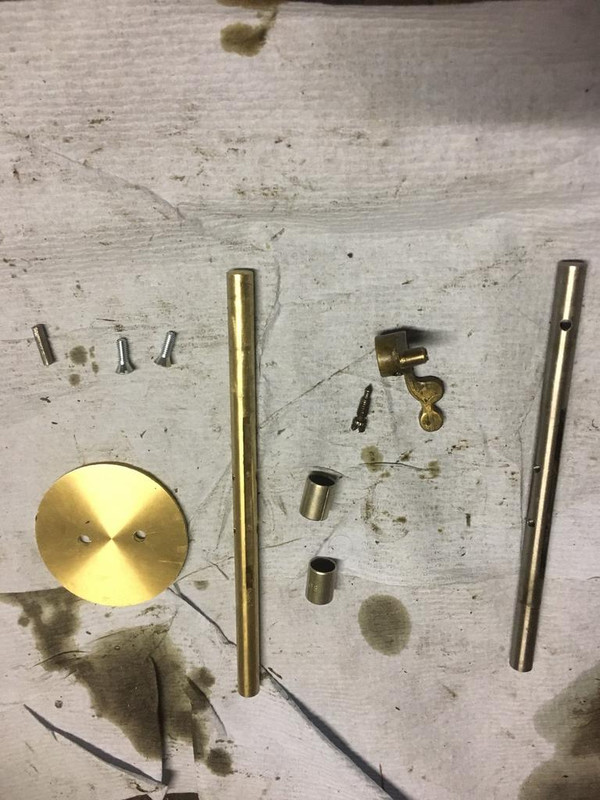
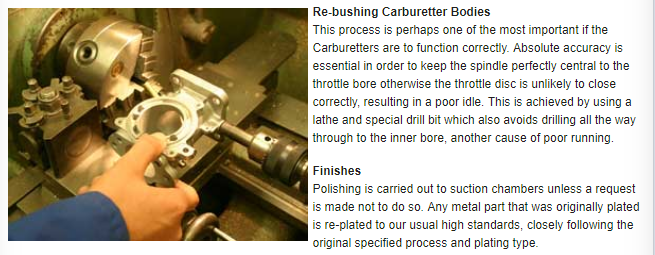
As you can see the new throttle spindle is longer than the old one and also lacks the hole for the throttle stop securing pin. I'm assuming that I'll have to drill this with the throttle shaft, stop and disc are temporarily fitted back in the carb body?
The throttle stop was originally secured by the fancy little screw lying beside it in the photo. I'm assuming the pin on the top left is the correct fixing.

Cheers

Alan
Alan Cochrane

1961 S1 OTS,1968 Triumph TR250, 1971 Triumph GT6 Mk3, 2008 Porsche Boxster RS60 Spyder

Link:
BBcode:
HTML:
Hide post links
Show post links

User avatar

abowie
Posts: 3886
Joined: Wed Sep 07, 2011 9:15 pm
Location: Australia
Contact:
Australia

#2 Re: Rebuiding SU Carbs

Post by abowie » Mon Apr 23, 2018 11:41 pm

Both of your suppositions are correct. The extra length may not be an issue as there's probably room between the carbies for it to fit.
Andrew.
881824, 1E21538. 889457. 1961 4.3l Mk2. 1975 XJS. 1962 MGB
http://www.projectetype.com/index.php/the-blog.html
Adelaide, Australia

Link:
BBcode:
HTML:
Hide post links
Show post links


steve3.8
Posts: 459
Joined: Sun Mar 22, 2009 9:12 pm
Location: nottinghamshire,uk
Great Britain

#3 Re: Rebuiding SU Carbs

Post by steve3.8 » Tue Apr 24, 2018 7:43 pm

Alan ,

You may find the carb bodies need reaming out to fit the new bushes , from memory to .375" ? . Be aware of not reaming straight through into the main venturi bore so to leave a small 1mm or so lip .I achieved that by placing a tube over the ream with washers making up incremental steps.
Aligning one bush to the other is the challenge . I set mine up on an angle plate so i could flip it over exactly 180º . A drill press or Bridgeport is needed
I think Burlen did offer this as a service , IIRC they used a lathe, holding the carb body by hand .
Most avoid replacing the bushes if the originals are serviceable and just replace the seals.

Hope this helps .

Edit Link to Burlen info http://sucarb.co.uk/restoration-and-rebuild


Image
Steve3.8

64 3.8 fhc, 67 4.2 fhc

Link:
BBcode:
HTML:
Hide post links
Show post links


christopher storey
Posts: 5698
Joined: Sun Mar 09, 2008 3:07 pm
Location: cheshire , england
Great Britain

#4 Re: Rebuiding SU Carbs

Post by christopher storey » Wed Apr 25, 2018 2:12 pm

The problem with re-bushing is that the original bushes were cast into the body of the carburetter when it was made, and thus as Steve says you need to be very careful not to break right through to the venturi. I believe that SU , and later Burlen , used a stepped reamer to get round this problem , but where on earth you would get one I don't know, nor do i know what sizes you would need

Link:
BBcode:
HTML:
Hide post links
Show post links

User avatar

mgcjag
Moderator
Posts: 8092
Joined: Fri Jul 09, 2010 6:15 pm
Location: Ludlow Shropshire
Great Britain

#5 Re: Rebuiding SU Carbs

Post by mgcjag » Wed Apr 25, 2018 3:02 pm

Hi Alan...contact David Lonsdale....well known to many on the forum for rebuilding their SUs..have a look at this post his details are on the first page viewtopic.php?t=275 im sure you can get a hand reamer they are about £85...David will help you out im sure...great guy and very helpefull.. Steve
Steve
69 S2 2+2 (just sold) ..Realm C type replica, 1960 xk150fhc

Link:
BBcode:
HTML:
Hide post links
Show post links


steve3.8
Posts: 459
Joined: Sun Mar 22, 2009 9:12 pm
Location: nottinghamshire,uk
Great Britain

#6 Re: Rebuiding SU Carbs

Post by steve3.8 » Wed Apr 25, 2018 7:13 pm

I made a stepped ream Christopher, by tack welding a tube to the shank of the ream, the washers and the short tube in the 2nd photo achieve the desired depth .

Image
The other bits are a chuck centre for keeping the ream square and a drift made to insert the bushes.
The ream is 3/8", a cheap non brand off ebay , plenty good enough for soft materials .
The trickiest part was setting up to make sure both bushes are perfectly in line .
I'm not suggesting this is a job for everyone ,given the cost of a replacement carb body it could work out expensive if it goes wrong x3 , on burlen's site they quote £75 per carb for re bushing .

Image
Steve3.8

64 3.8 fhc, 67 4.2 fhc

Link:
BBcode:
HTML:
Hide post links
Show post links

User avatar

Topic author
ALAN COCHRANE
Posts: 706
Joined: Sun May 06, 2012 9:37 am
Location: Fife
Great Britain

#7 Re: Rebuiding SU Carbs

Post by ALAN COCHRANE » Wed Apr 25, 2018 7:31 pm

Thanks for the replies.
Things have moved on a bit since my original post. I took one of the carbs to my local engineering company and they reamed out one of the bushes and successfully replaced it. I knew I'd come to the right place because they were in the process of honing the bores of a 3.4 & a 3.8 XK block.
They then called me to come in and see the result. I was very impressed although, as you said Christopher, it was a bit of an awkward job removing the old bush. What I did discover was that the old bush could be left in situ and accept the new seal and spacer. There was no discernable play with the new shaft installed so I decided to leave the throttle body with this setup. You could feel slight suction when the spindle was removed so it's probably as tight as would be desired. The new seals are ethanol resistant so should stop any air leaking in.
Apparently it's normal practice to leave the original bushes alone unless they are worn, which is rare. It is much more common for the shaft to show signs of wear which is what I found.
I was under the misapprehension that you needed to change the bushes to fit the new seals, which as I now know is wrong.
So with a bit of luck the other two carbs will be in the same condition.
In the meantime I've bead blasted the first throttle body and it's come up a treat. It's now in the dishwasher getting a thorough clean.
One final question-should I polish the throttle body and float chamber, hopefully the answer is no!

Cheers

Alan
Alan Cochrane

1961 S1 OTS,1968 Triumph TR250, 1971 Triumph GT6 Mk3, 2008 Porsche Boxster RS60 Spyder

Link:
BBcode:
HTML:
Hide post links
Show post links

User avatar

Mich7920
Posts: 756
Joined: Sun Mar 15, 2015 4:43 pm
Location: France
France

#8 Re: Rebuiding SU Carbs

Post by Mich7920 » Thu Apr 26, 2018 3:52 pm

Hi Alan,
If you love the shining aluminium, you can polish the body but you'r going to be a rag slave !
Originals body were not polish neither the float chamber.
The only polish part is the exterior of the suction chamber
Something you must absolutly not polish is the piston and its chamber.
Mich
Michel
1965 E Type FHC - On the road / 1963 E Type OTS - on the road after Angus Restoration

Link:
BBcode:
HTML:
Hide post links
Show post links

User avatar

chrisfell
Posts: 1523
Joined: Tue Oct 06, 2009 9:52 am
Location: Salisbury
St Lucia

#9 Re: Rebuiding SU Carbs

Post by chrisfell » Thu Apr 26, 2018 4:42 pm

"One final question-should I polish the throttle body and float chamber, hopefully the answer is no!"

When I had Burlen refurbish my carbs (which was eye-wateringly expensive) they were returned with the dashpots mirror finished, everything else dull.

I've seen whole carbs polished, S2 cam covers polished, even the pedal box polished, and radiator surround polished. All are (a) non-original and (b) with the possible exception of S2 cam covers, vulgar (IMHO).
Chris '67 S1 2+2

Link:
BBcode:
HTML:
Hide post links
Show post links

User avatar

Topic author
ALAN COCHRANE
Posts: 706
Joined: Sun May 06, 2012 9:37 am
Location: Fife
Great Britain

#10 Re: Rebuiding SU Carbs

Post by ALAN COCHRANE » Thu Apr 26, 2018 8:17 pm

That was the right answer.
I've fitted the first carb body with a new shaft and disc after finally getting the throttle stop securing pin hole drilled. This turned out to be a very tricky excercise but I finally managed it. The first new disc I fitted would not close completely. After a bit of investigation I discovered that the shaft was pulling the disc slightly to one side. I tried another disc and hey presto, it closed and was an almost perfect seal. It just shows that there must be slight differences between similar components even from someone like Burlen.
I also noticed that the old original disc had one screw hole slightly elongated to allow it to rotate freely. So even SU weren't averse to doing a bit of "adjustment".

Cheers

Alan
Alan Cochrane

1961 S1 OTS,1968 Triumph TR250, 1971 Triumph GT6 Mk3, 2008 Porsche Boxster RS60 Spyder

Link:
BBcode:
HTML:
Hide post links
Show post links


christopher storey
Posts: 5698
Joined: Sun Mar 09, 2008 3:07 pm
Location: cheshire , england
Great Britain

#11 Re: Rebuiding SU Carbs

Post by christopher storey » Fri Apr 27, 2018 9:19 am

steve3.8 wrote:
Wed Apr 25, 2018 7:13 pm
I made a stepped ream Christopher, by tack welding a tube to the shank of the ream, the washers and the short tube in the 2nd photo achieve the desired depth .
That's a wonderfully skilful piece of work

Link:
BBcode:
HTML:
Hide post links
Show post links

User avatar

Topic author
ALAN COCHRANE
Posts: 706
Joined: Sun May 06, 2012 9:37 am
Location: Fife
Great Britain

#12 Re: Rebuiding SU Carbs

Post by ALAN COCHRANE » Fri Apr 27, 2018 6:00 pm

Now for the next problem I've now encountered.
The slow running screw does not seat in the throttle body when screwed fully home. It appears to stop 6mm from the end and this was verified when I used an airline to blast through the bypass circuit and could feel it freely coming out of the hole behind the throttle disc.
Comparing it to the other two screws it sits about 5mm higher when fully home which confirmed my earlier measurement.
I've swapped the screws around and they all seat properly in the middle and rear carbs but not in the front. So it appears there's a problem with the casting. Does anyone know what thread is used here? It's not the usual UNF and doesn't look coarse enough to be UNC but I could be wrong.
This may account for my slightly lumpy idle which has been a feature of the car since I bought it.
Here's a photo of the culprit fully screwed home:-
Image
As you can see it's sitting higher than it should.
Any thoughts?

Cheers

Alan
Alan Cochrane

1961 S1 OTS,1968 Triumph TR250, 1971 Triumph GT6 Mk3, 2008 Porsche Boxster RS60 Spyder

Link:
BBcode:
HTML:
Hide post links
Show post links

User avatar

Mich7920
Posts: 756
Joined: Sun Mar 15, 2015 4:43 pm
Location: France
France

#13 Re: Rebuiding SU Carbs

Post by Mich7920 » Sat Apr 28, 2018 7:02 am

Hi Alan,

Did you check there is absolutly nothing into the hole ?
Did you try to screw it without the seal, the washer and the spring ?
It's odd to hurt a thread at the end of it, normaly you make a mistake at the start.

MIch
Michel
1965 E Type FHC - On the road / 1963 E Type OTS - on the road after Angus Restoration

Link:
BBcode:
HTML:
Hide post links
Show post links

User avatar

Topic author
ALAN COCHRANE
Posts: 706
Joined: Sun May 06, 2012 9:37 am
Location: Fife
Great Britain

#14 Re: Rebuiding SU Carbs

Post by ALAN COCHRANE » Sat Apr 28, 2018 8:49 am

Hi Mich

Yes I did try it without the seal and spring but again it stopped about 6mm short of the seat. There doesn't appear to be any obstructions because you can clearly see the seat when you shine a light into the casting.
My plan was to run a tap down the bore and then compare the depth with the other two screw shafts.
It feels like the thread has not been cut all the way down the bore which would point to a manufacturing issue. Although I find it hard to believe that I'm the first to spot this since 1961.
So if I could just find out the thread size I could start my investigations.

Cheers

Alan
Alan Cochrane

1961 S1 OTS,1968 Triumph TR250, 1971 Triumph GT6 Mk3, 2008 Porsche Boxster RS60 Spyder

Link:
BBcode:
HTML:
Hide post links
Show post links

User avatar

mgcjag
Moderator
Posts: 8092
Joined: Fri Jul 09, 2010 6:15 pm
Location: Ludlow Shropshire
Great Britain

#15 Re: Rebuiding SU Carbs

Post by mgcjag » Sat Apr 28, 2018 9:27 am

Hi Alan....a thread guage...similar to fealer guages...should be available from a local motor shop....or on line..only a few quid.... Steve
Steve
69 S2 2+2 (just sold) ..Realm C type replica, 1960 xk150fhc

Link:
BBcode:
HTML:
Hide post links
Show post links

User avatar

Topic author
ALAN COCHRANE
Posts: 706
Joined: Sun May 06, 2012 9:37 am
Location: Fife
Great Britain

#16 Re: Rebuiding SU Carbs

Post by ALAN COCHRANE » Sat Apr 28, 2018 10:52 am

Thanks Steve
I'm now the proud owner of a set of thread gauges, courtesy of our favourite auction site. A fellow E-type owner also came over to lend me a BA tap & dye set only to find it was UNF after all! Dooooo!!
Anyway an initial tap run brought up quite a lot of assorted crap from the threads but the screw still will not seat properly.
So it looks like thread cutting time, but that will have to wait until later. I'm off to pick up my new skis.
I'll update later.

Cheers

Alan
Alan Cochrane

1961 S1 OTS,1968 Triumph TR250, 1971 Triumph GT6 Mk3, 2008 Porsche Boxster RS60 Spyder

Link:
BBcode:
HTML:
Hide post links
Show post links


Gfhug
Posts: 3308
Joined: Thu Jun 19, 2014 3:08 pm
Location: Near Andover, Hampshire,in D.O. Blighty
Great Britain

#17 Re: Rebuiding SU Carbs

Post by Gfhug » Sat Apr 28, 2018 2:58 pm

ALAN COCHRANE wrote:
Sat Apr 28, 2018 10:52 am
I'm off to pick up my new skis.

Alan
I should stick to wire wheels and 185-15 Dunlops :wink:

Geoff
S2 FHC Light Blue
S2 OTS LHD - RHD full restoration

Link:
BBcode:
HTML:
Hide post links
Show post links

User avatar

Topic author
ALAN COCHRANE
Posts: 706
Joined: Sun May 06, 2012 9:37 am
Location: Fife
Great Britain

#18 Re: Rebuiding SU Carbs

Post by ALAN COCHRANE » Sat Apr 28, 2018 6:09 pm

I think the addition of skis to the E-Type will make it a great all weather car.
Anyway back to the carb conundrum-I ran a tap down one of the other two carbs and measured the depth of the thread. I then cut the thread on the front carb to the same depth and bingo the screw now seats correctly. I tried an airline through the bypass circuit and could only detect the slightest draft. Not bad considering the air from an airline will be travelling at a much greater speed and force than during normal induction.
I was definitely cutting new thread by the amount of swarf that was present and the resistance felt. I can only assume that this has been like this since 1961!
If I read this correctly the front carb must have been running very rich at idle while the rear carb's screw was sitting on it's stop and doing virtually nothing. I suppose the balance pipe might have masked a lot of this.
Hopefully the other two carbs will be straight forward rebuilds.

Cheers

Alan
Alan Cochrane

1961 S1 OTS,1968 Triumph TR250, 1971 Triumph GT6 Mk3, 2008 Porsche Boxster RS60 Spyder

Link:
BBcode:
HTML:
Hide post links
Show post links

Post Reply Previous topicNext topic