


Hello Tom, is it possible for you to tell me the exact curves you have plotted, tried and recommend. I have a fully programmable blue tooth 123 distributor, so would like to try various curves.
The one I am trying at the moment, I believe is the E Type curve ?
500@10,800@12,1000@14.4,1200@18.2,1400@21.5,2000@27,3000@32,3200@32.4,4000@34
All based on 10BTDC STATIC.
Distributor curves

#2 Distributor curves
Hi John..The distributor advance info is in the Electrical section of the Service manual....this is for a 4.2....Steve
Steve
69 S2 2+2 (sold) ..Realm C type replica, 1960 xk150fhc
69 S2 2+2 (sold) ..Realm C type replica, 1960 xk150fhc
| Link: | |
| BBcode: | |
| HTML: | |
| Hide post links |
#3 Distributor curves
Hello Steve, thanks for the page from the manual. I remembered, I have a manual from when I had an E Type in 1977. But, the page 363 you have posted, I believe is for a Series 2. There is a Series 1 picture on page 338.
But, not sure it is quite what I wanted. I was looking for the degrees of advance to program my 123 Bluetooth.
But, not sure it is quite what I wanted. I was looking for the degrees of advance to program my 123 Bluetooth.
Jaguar XK120 FHC and Healey 100
| Link: | |
| BBcode: | |
| HTML: | |
| Hide post links |
#4 Distributor curves
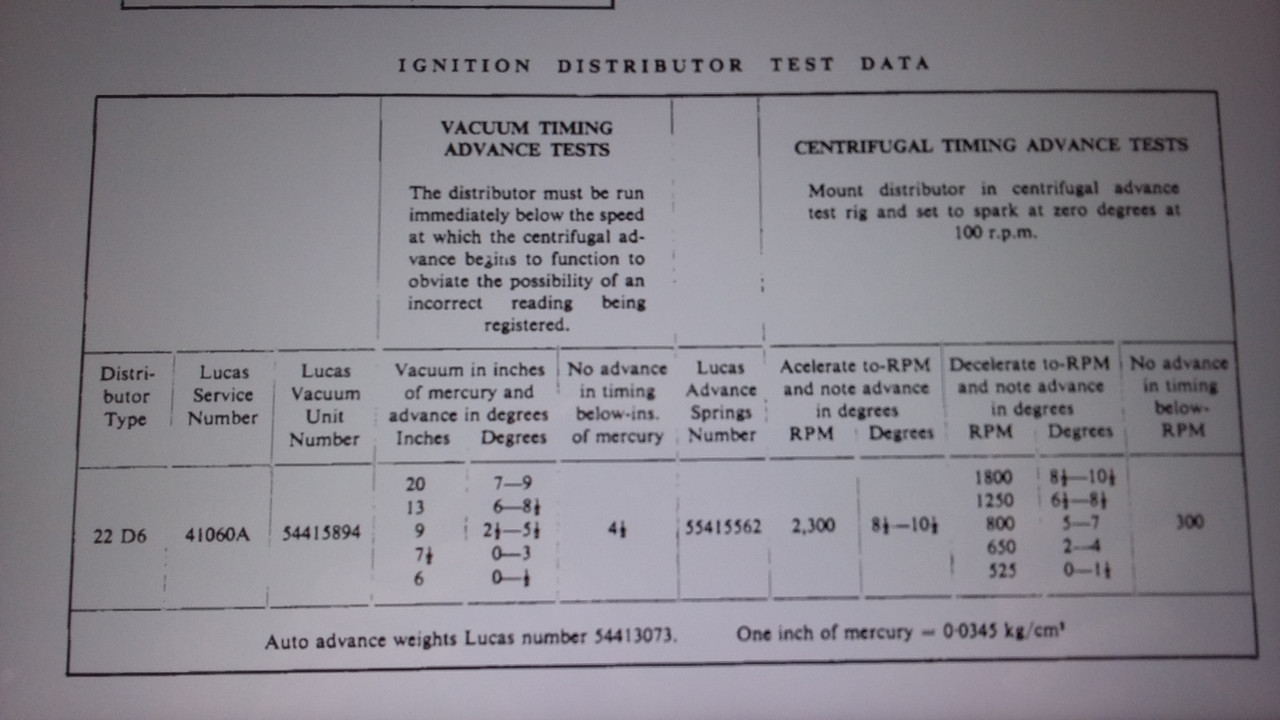
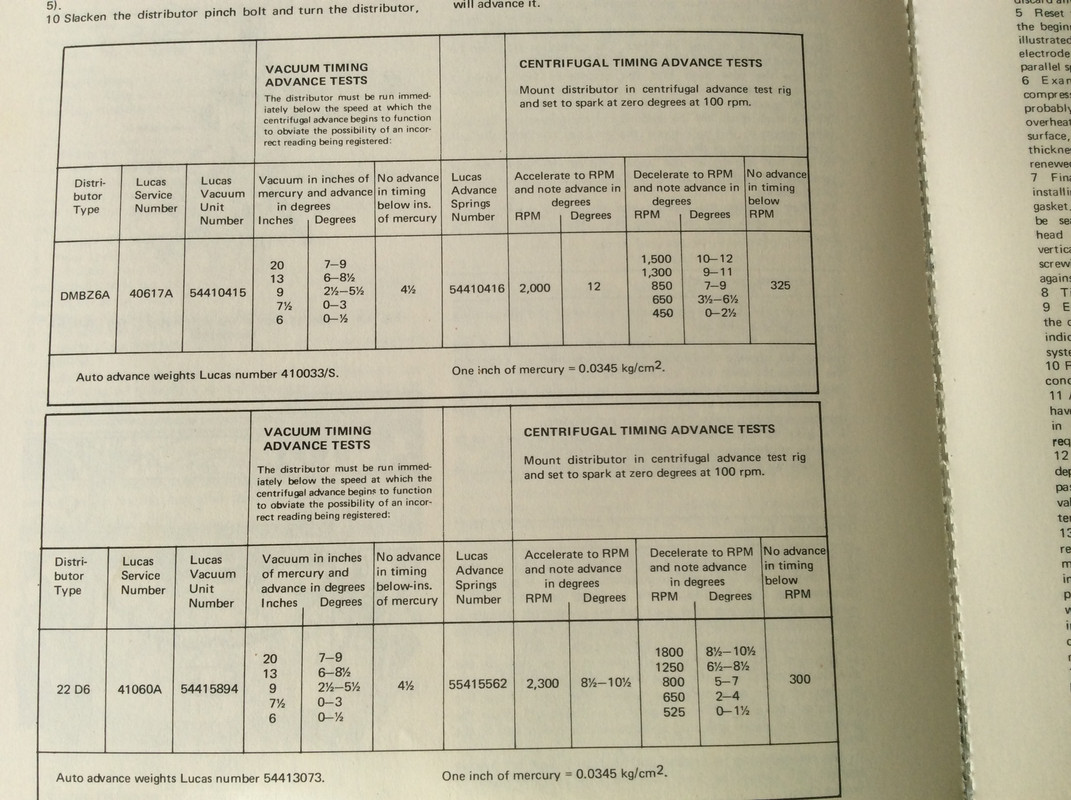
Hi John..the chart above is for 4.2 as i mentioned...S1 & S2 useing 22D6 dizzy....there is a chart for the S1 3.8 with DMBZ 6A Dizzy.......as the crank rotates twice for one turn of the dizzy just double the figures....you then have the E type curve to program into the 123....Steve
Steve
69 S2 2+2 (sold) ..Realm C type replica, 1960 xk150fhc
69 S2 2+2 (sold) ..Realm C type replica, 1960 xk150fhc
| Link: | |
| BBcode: | |
| HTML: | |
| Hide post links |
#5 Distributor curves
Hi Steve, I may being a bit thick, but I don’t understand why the chart numbers would need doubling. Are those figures not the degrees that you would see with a strobe light. No where can I see in the manual does it say to double the numbers ? Or even explain how set up the timing. On my original post in this section my numbers were what I was told for strobe timing, but now I am doubting the information ?
Can you tell me what numbers you use with a strobe light.
Can you tell me what numbers you use with a strobe light.
Jaguar XK120 FHC and Healey 100
| Link: | |
| BBcode: | |
| HTML: | |
| Hide post links |
#6 Distributor curves
Hi John..the service manual does explain how to set timing....and all the figures needed as i posted....it wont tell you about doubling the figures i suppose its becaus your expected to know the crank turns twice for one engine cycle and the distributor only turns once..as iv already mentioned...yes they are the numbers you would see with the strobe...Steve
Steve
69 S2 2+2 (sold) ..Realm C type replica, 1960 xk150fhc
69 S2 2+2 (sold) ..Realm C type replica, 1960 xk150fhc
| Link: | |
| BBcode: | |
| HTML: | |
| Hide post links |
#7 Distributor curves
All I did was to use the pages from the manual as Steve’s shared. These are the specs for testing the distributor on a bench. You need to double the RPM figure to get the crank RPM for that point. You need to double the number of degrees advance, then add on the static advance figure. Do that for each data point, then plot on graph paper or in excel etc rpm vs advance and you’ll get the factory curve. You can then draw the same shape in the 123 software. If you plot both sets of values given in the manual, you’ll have the upper and lower limits of the factory curve.
As for which curve to recommend, I’d start with the curve from the workshop manual appropriate to your car. However, you say your car is modified, you might need to deviate from that slightly to get the most out of it. Also, bear in mind the factory curve was designed for fuel that’s different to that available today. It also had some leeway in it to allow for manufacturing variables and wear, hence the range of advance values given for any rpm point in the manual, so again there might be some deviation required.
To get the best out of it, you’ll be best taking the car to a rolling road. You can experiment yourself, but if you get it wrong and go over the limit, you can very quickly damage your engine!
Tom
1970 S2 FHC
1970 S2 FHC
| Link: | |
| BBcode: | |
| HTML: | |
| Hide post links |
#8 Distributor curves
Hello Steve and Tom, ok I think I have got my brain in gear and finally understood your explanations. I did not properly read that the charts were for calibrating the dizzy. I think the more appropriate curves from the 3.8 engines distributor DMBZ6A is closer to my tuned 3.4.
Attached below are the same charts I also found in my original 1974 Haynes manual and I have drawn out the graphs of the plots from those charts, showing the higher more aggressive curve, more moderate, the E Type curve I was originally shown and am currently using, plus the Twyford Moors suggestion.
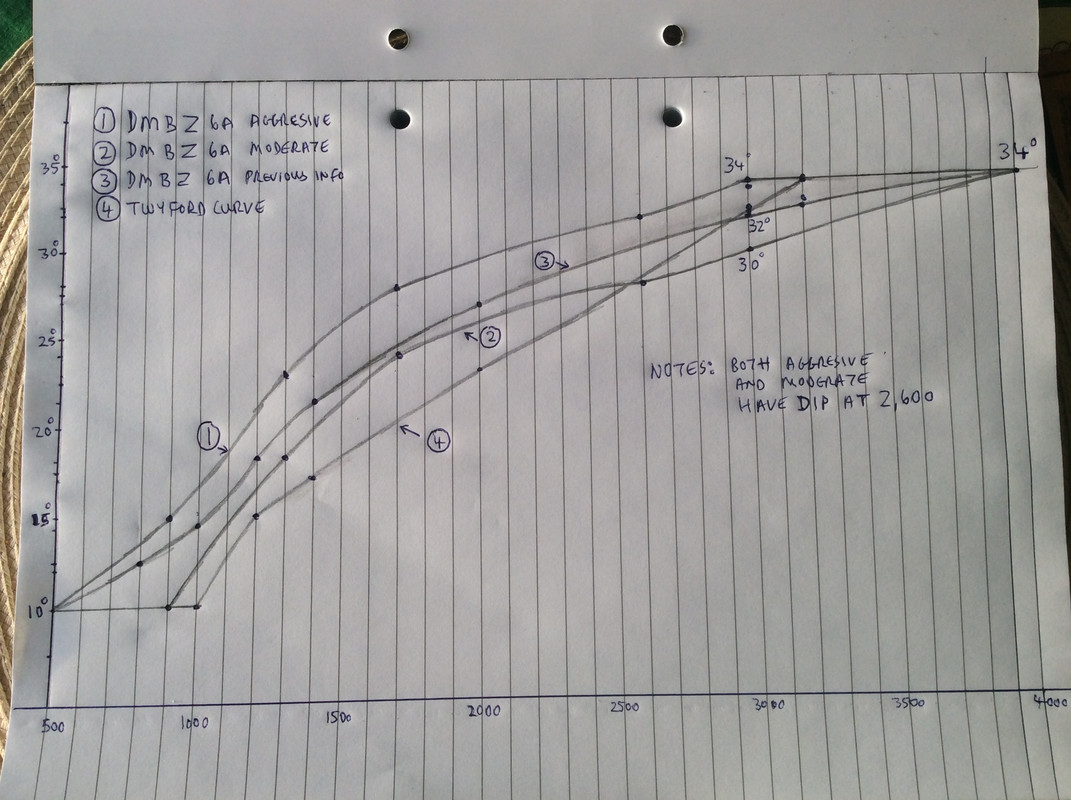
Attached below are the same charts I also found in my original 1974 Haynes manual and I have drawn out the graphs of the plots from those charts, showing the higher more aggressive curve, more moderate, the E Type curve I was originally shown and am currently using, plus the Twyford Moors suggestion.
Jaguar XK120 FHC and Healey 100
| Link: | |
| BBcode: | |
| HTML: | |
| Hide post links |
#9 Distributor curves
What I forgot to put in my last post, was for your opinions on the curves. I cannot remember or find who gave me the E Type curve I am using, but it appears to be in the middle of the aggressive and moderate curves. The two main differences I can see from the Aggressive and moderate are the early advance positions and the quite different positions at 3,000 rpm. I have a feeling that I was told that with higher compressions then you should have less advance. So, I am going to try position 2 moderate as I can program several different curves into the 123 Bluetooth.
Jaguar XK120 FHC and Healey 100
| Link: | |
| BBcode: | |
| HTML: | |
| Hide post links |
#10 Re: Distributor curves
Hi John. What’s the spec of your engine? If it’s modified , it’s unlikely one of the factory curves will the optimum.
Your plot looks like what I was describing. Are you sure you’ve got the lower values right on 1&2 though? It’s unusual for advance to start at 500 rpm on the crankshaft. With this, you’d always have some mechanical advance applied at idle, which would make for an unstable idle. Ideally, you want the advance to start above the idle speed. That way minor fluctuations in idle speed don’t affect the advance value, and therefore influence the idle speed.
To work out your optimum advance curve, you’re best going to a rolling road, but you can get somewhere close yourself if you’re careful. A word of warning, though. If you get this wrong you can do some serious damage to your engine!!! The problem is you can only really find the limit by exceeding it until you hear pinking. On a rolling road, you can measure exactly when the power stops increasing, which might be before it starts pinking. The optimum for each point is either when the power stops increasing, or just before the engine starts pinking, whichever comes first. If your advance is limited by pinking, you need to come slightly back a to give yourself a safety margin.
To begin with draw a modest curve you know your engine is happy with.
First you need to establish the max mechanical advance for your engine. If your engine is currently happy with what you have it set to, for safety I wouldn’t go above this. Jaguar tuning books can also give a guide for the safe maximum.
The next step is to work out how quickly the maximum advance can come in. Start with a safe high RPM value, and work down. Again listening for pinking, whilst trying to tell if things are improving.
Next you need to work out the advance at idle, bearing in mind this needs to be suitable for wide open throttle from the lowest RPM you’ll accelerate from. It’s not just for closed throttle idle. Too high and the engine will give the starter a hard time.
Finally, you need a couple of intermediate points, so you have a curve and not just a gradient.
With the 123 tube, you really have too much freedom, and that why I’d recommend a rolling road session. If your distributor only has preset curves to pick from, it’s not too hard to get to the one that works best out of what you can pick from. However you’ll never know how close to the best it could be is.
Tom
1970 S2 FHC
1970 S2 FHC
| Link: | |
| BBcode: | |
| HTML: | |
| Hide post links |
#11 Re: Distributor curves
Hello Tom, not sure how to answer your comments about the curves at idle. I just followed the numbers, which I think I have extrapolated correctly? I think in one of my previous posts, maybe on the HD8 post, I did mention that the car has been on a rolling road. It produced 180bhp and a very flat torque curve from 1900 up to 4500 of 205lbs. My main priority is just gentle tweaking to get the best possible power and road tractability. I do not think I have ever heard the car pinking, but under power it is quite noisy and on the rolling road quite deafening to stand next to. I will try all your suggestions andI really appreciate your expertise.
P.s. the 123 does have preset curves, but the Bluetooth version can be programmed to any parameter on a laptop or iPad/iPhone.
P.s. the 123 does have preset curves, but the Bluetooth version can be programmed to any parameter on a laptop or iPad/iPhone.
Jaguar XK120 FHC and Healey 100
| Link: | |
| BBcode: | |
| HTML: | |
| Hide post links |
#12 Re: Distributor curves
Hi John...what you havent mentioned in the thread is that your car is an XK120 It is a 3.4 with twin HD8’s & trick cams...I always ask for new members to put their name and car model in the signature area...saves haveing to ask what car they are asking questions about....Steve
Steve
69 S2 2+2 (sold) ..Realm C type replica, 1960 xk150fhc
69 S2 2+2 (sold) ..Realm C type replica, 1960 xk150fhc
| Link: | |
| BBcode: | |
| HTML: | |
| Hide post links |
#13 Re: Distributor curves
If you’ve already had the car set up on a rolling road, it should be very close. Unless of course, they returned it with a list of things that need fixing before they could set it up properly. If it’s just general tweaking, I think you’ll struggle to make any improvements that you’ll notice or measure on the road. Unless there’s any specific trait you’re trying to fix?
It can be quite difficult to hear pinking on the road. A good rolling road operator should be able to detect it though. It is possible for the pinking to start, even before you can actually hear it, and that’s where the damage can start unknown.
It can be quite difficult to hear pinking on the road. A good rolling road operator should be able to detect it though. It is possible for the pinking to start, even before you can actually hear it, and that’s where the damage can start unknown.
Tom
1970 S2 FHC
1970 S2 FHC
| Link: | |
| BBcode: | |
| HTML: | |
| Hide post links |


#14 Re: Distributor curves
Hi John,
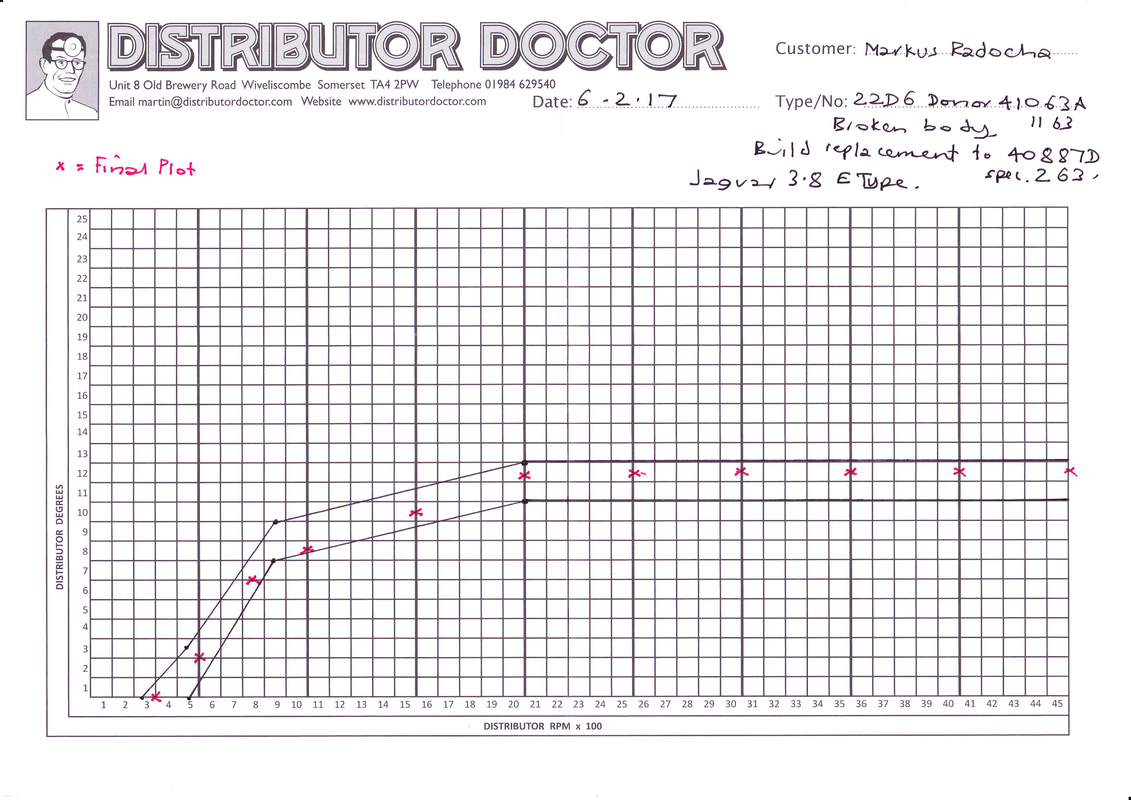
here is the curve from my 3.8 with a standard 22D6 built by distributor doctor; my timing is 12° static, a combination without any side effects
Mark
here is the curve from my 3.8 with a standard 22D6 built by distributor doctor; my timing is 12° static, a combination without any side effects
Mark
Mark
1963 OTS 880436
1963 OTS 880436
| Link: | |
| BBcode: | |
| HTML: | |
| Hide post links |
#15 Re: Distributor curves
Hello Mark, very interesting curves. It seems to me that the curve ramps up quite early on compared to the book figures for that distributor. But still ends up at a similar approx 34 degrees. Does this work well for you ?
Steve, sorry thought people knew what my car was as I think previously mentioned in the HD8 posts ?
Yes, my car is not standard, the cams are Rob Beere design, but fairly similar to standard with similar duration but very slightly higher lift of 0.41 instead of 0.385. They are apparently designed for good torque when running with SU carbs.
Jaguar XK120 FHC and Healey 100
| Link: | |
| BBcode: | |
| HTML: | |
| Hide post links |
#16 Re: Distributor curves
Hello Mark, please ignore my comments about your curves. I was comparing it with the DMBZ6A which I thought was for the 3.8. You are talking about the 22D6, but is this not for the 4.2 engine ? In the original manual I believe this is what it suggests ?
Jaguar XK120 FHC and Healey 100
| Link: | |
| BBcode: | |
| HTML: | |
| Hide post links |
#17 Re: Distributor curves
22D6 is a generic family of Lucas distributors. What makes it unique and tuned specifically for a given engine is the maximum advance of the cam, the strength of the 2 return springs, and the travel and strength of the vacuum capsule.
Tom
1970 S2 FHC
1970 S2 FHC
| Link: | |
| BBcode: | |
| HTML: | |
| Hide post links |
#18 Re: Distributor curves
I am not sure if I am losing the plot or what. The graph from the distributor doctor shows on the bottom line numbers x 100 but says distributor speed ? But the line up the side says degrees. I now look at this and do not understand what I am seeing. I assumed originally that I double the degrees and the bottom line were the engine revs, but clearly not. Can some put me right on how the red crosses correlate to degrees to engine revs.
Also whilst I hear what is said that the 22D6 is the generic distributor. According to my old original manual on the E Type that is for the 4.2 and the DMBZ6A is for the 3.8. The copy I put on the post is from an old Haynes. Manual not the one I was referring to.
Also whilst I hear what is said that the 22D6 is the generic distributor. According to my old original manual on the E Type that is for the 4.2 and the DMBZ6A is for the 3.8. The copy I put on the post is from an old Haynes. Manual not the one I was referring to.
Jaguar XK120 FHC and Healey 100
| Link: | |
| BBcode: | |
| HTML: | |
| Hide post links |
#19 Re: Distributor curves
The parts cat lists part number C14269,type DMBZ / 40617 up to engine RA1381, from then onwards part number C20679, type 22D6 / 40887A. According to Porter, the change was made in April 63. The next change is given in August 64 engine RA6834, distributor part number C20680. I have a table that lists a 22D6 / 41060A for the 4.2 Etype and Mk 10. This is definitely the distributor on a 1970 Mk 10/ 420G that I rebuilt.
Mark
1963 OTS 880436
1963 OTS 880436
| Link: | |
| BBcode: | |
| HTML: | |
| Hide post links |
#20 Re: Distributor curves
It can be a bit confusing trying to correlate distributor curves into what’s measured on the crank pulley. What you want to end up with is the curve plotting crankshaft degrees relative to TDC and engine RPM.
The numbers in the manual are usually distributor degrees and distributor rpm. They certainly are in the genuine Jag manuals, I’m not sure about Haynes. They are this way because this is what you can measure with the distributor mounted on a traditional distributor test machine. Quoting them this way is really useful for comparing one distributor against another, or testing them to a known spec. It’s not enough information to allow you to draw the advance curve as fitted to a given engine, which is what your 123 needs.
Mark’s curve is a copy of the figures as measured on a test machine. I imagine the upper and lower lines are the upper and lower limits from the manual specs, and the red points are what his distributor actually measured at. The RPM scale has single figures x100 on it as there isn’t enough space on the graph paper to write 100, 200, 300, etc.
To explain doubling the figures, first start with RPM. The distributor rotates at half crank speed. So when the distributor test figure quotes 1500rpm, for example, the engine is actually doing 3000rpm.
For angle, firstly, the degrees marks on the pulley are degrees relative to the crankshaft. I.e. if it was fully marked, there’d be 360 marks and they’d wrap around the full circumference. If the distributor has advanced 5 degrees at a given point, that equates to 10 degrees when measured on the crank. This is because again the crank rotates at twice the speed of the distributor. For an event to happen 10 degrees earlier when measured on the distributor, this will measure 20 degrees earlier on the crankshaft.
The final factor to consider when plotting the curve for the engine is static advance. This is always quoted in crankshaft degrees, as it’s purely a product of how the distributor is installed on the engine. It’s not inherent in a mechanical distributor. As it’s a crankshaft value, it shouldn’t be doubled, but it does need to be added to the doubled value from the distributor for any given graph point.
So, to summarise. Your graph should have crankshaft degrees along one axis and crankshaft rpm against the other. To get an rpm point, take a value from the book and double it. To get the corresponding degrees, take the value from the book and double it, then add the static advance.
Tom
1970 S2 FHC
1970 S2 FHC
| Link: | |
| BBcode: | |
| HTML: | |
| Hide post links |