Water Pump seal installation

Technical advice Q&A

Topic author
ysmalkie
Posts: 505
Joined: Fri May 16, 2014 9:11 am
Location: Poland
Poland

#1 Water Pump seal installation

Post by ysmalkie » Tue May 26, 2020 11:24 am

I have made some research on the water pump seals for the series 1 - 3.

SNG (and I guess others) sells a kit for the S1: SBS7272
They sell a separate seal for later S2-S3 engines ADU6170.

The seals are actually French, made by CYCLAM, I have managed to finally communicate with them and got the drawings for the seals.

It's imperative that the seals are compressed sufficiently - without the drawings it's impossible to know how much should they actually be compressed.


S1 seal:
The free working height of the seal is 8.5 mm (see drawing):

Image

The compressed height of the seal should be 6.35mm with 1 mm tolerance.

S2-S3 seal:
The free working height of the seal is 9.5 mm (see drawing):

Image

The compressed height of the seal should be 7 mm with 1 mm tolerance.

These should give you an indication how hard should the impellor press on the seal.

Note also that the compression of the seal has to play along with the distance between the impellor vanes and the waterpump body.

Image

XK120 manual recommends that a distance od 0.015" (0.38 mm) is present between the impellor vanes and the chamfered part of the water pump body.


The recommended surface roughness of the impellor face (the one mating to the seal carbon) according to the seal manufacturer is min. 0.5 µm.


Tadek
Last edited by ysmalkie on Tue May 26, 2020 7:32 pm, edited 1 time in total.
Tadek

e-type S1 3.8 FHC - in restoration phase...
Jaguar XK120 OTS
Austin-Healey 100 BN2

Link:
BBcode:
HTML:
Hide post links
Show post links


angelw
Posts: 634
Joined: Sat Feb 16, 2013 8:27 pm
Location: Ballarat, Vic, Australia
Australia

#2 Re: Water Pump seal installation

Post by angelw » Tue May 26, 2020 3:45 pm

Hello ysmalkie,
I don't believe that the drawing of the S2/S3 Seal relates to the typical Seal supplied by SNG Barratt and is clearly not like the Seal used in their whole pump assembly for the S3. The shaft diameter that interfaces withe the Impeller is 5/8" (15.875) and the Inner Component (Impeller End of the Seal) is an interference fit with the shaft; that wouldn't be the case with the Seal shown in your attached drawing.

For first timers, its not all that difficult to damage the Seal during the installation.

As the respective parts of the Seal Body are interference fits on each of the Bore of the Pump Body and the Shaft of the Bearing Assembly, there comes a time when both the Inner and Outer components of the Seal Body will resist progress. It starts off with just the Inner Components being pressed onto the shaft; accordingly, pressure should be applied to the Inner Component. At a point, the Outer Component makes contact with the Pump Body and further pressure applied to the Inner Component will fully compress the components of the assembly. Depending on how much interference there is between the bore of the Pump Housing and the OD of the Seal, and it does vary, damage to the Seal can occur.

It then becomes a case of alternating between pressing the Inner and Outer Components until the Seal is fully seated in the Pump Housing and the correct compression of the assembly results. As I repair quite a few of these Pumps (S1 thru S3), I have made a set of hollow Mandrels with and Internal Step that will compress the assembly the correct amount and push on the Inner and Outer component simultaneously when initial progress is halted by contact of the Outer Component with the bore of the Pump. The result is that the whole assembly is pressed through the final stage of the Outer Component being pressed into the bore of the Pump Body with the Seal Compressed the correct amount and force is being applied in equal measure to both the Inner and Outer Component of the Seal.

Regards,

Bill

Link:
BBcode:
HTML:
Hide post links
Show post links


Topic author
ysmalkie
Posts: 505
Joined: Fri May 16, 2014 9:11 am
Location: Poland
Poland

#3 Re: Water Pump seal installation

Post by ysmalkie » Tue May 26, 2020 7:14 pm

Bill,


This is the S2/S3 seal SNG sells - why do you say it's not the same one on the drawing?
Image

The seal (to my understanding) is never an interference fit on the bearing shaft.
The seal housing seals against the pump body and the carbon surface seals against the face of the impeller.
The 1st is an interference fit, the 2nd sealing is a pressure sealing.

IF that pressure is not sufficient, the sealing is poor. If the pressure is too high, then damage might occur to the carbon surface.

Maybe you are taking about a different type of seal??

I am just a computer scientist, but I believe this is how it works.. Please correct me if I am wrong.

Tadek

PS. My name is Tadek, btw :-)

PS2. Original seal:
Image
Tadek

e-type S1 3.8 FHC - in restoration phase...
Jaguar XK120 OTS
Austin-Healey 100 BN2

Link:
BBcode:
HTML:
Hide post links
Show post links


johnetype
Posts: 474
Joined: Sun Feb 26, 2012 11:54 pm
Location: Worcestershire
Great Britain

#4 Re: Water Pump seal installation

Post by johnetype » Tue May 26, 2020 7:59 pm

Tadek,

You are correct that the seal is not an interference fit on the bearing shaft.

If you buy a repair kit from SNG these days - as I did recently - it comes with an additional ceramic washer/seal which sits on the face of the impeller and gives you a much smoother face for the graphite of the seal to run on meeting your "min. 0.5 µm", actually probably much better. The spring has to compensate for the graphite wearing away but with the ceramic washer it will last much longer. A new impeller is supplied with the kit whose nose is shorter to compensate for the thickness of the ceramic washer.

From the drawing you've posted you can see that there's at least 2 mm of graphite available to wear away, so the variation on the 0.38mm clearance between impeller and body is irrelevant as to how long the seal will last and that is the only relevant variable available to you as you rebuild the pump.
John

1969 Series 2 FHC

Link:
BBcode:
HTML:
Hide post links
Show post links


angelw
Posts: 634
Joined: Sat Feb 16, 2013 8:27 pm
Location: Ballarat, Vic, Australia
Australia

#5 Re: Water Pump seal installation

Post by angelw » Tue May 26, 2020 9:34 pm

Tadek Wrote:
This is the S2/S3 seal SNG sells - why do you say it's not the same one on the drawing?
Hello Tadek,
I'll take pictures of what I currently have at work and Post tonight.

The new, complete S3 Water Pump purchased from SNG Barratt recently, has a gap of approximately 3mm between the inner face of the Impeller and the Outer face of the Seal, which clearly appears as a pressed metal cover that is an interference fit with the Shaft. You can look through the vanes of the Impeller and see this.

A Seal I had in my hand yesterday for fitting to an S3 Water Pump was constructed in the same way as that of the Seal in the wholly assembled Water Pump from SNGB, where both the ID of the Inner component and the OD of the Outer part are both interference fits with their respective shaft and pump body bore. The two Components are able to counter rotate via Ceramic Disks that are held in interment contact by spring pressure. Repair Kits that I've been purchasing over the past two years have a construction as described here.

I've used the type shown in your drawings and I have a repair kit coming from SNGB, so I'll be interested in how its constructed. I don't mind the type of construction of the Seal I've been using over the past couple of years, as, notwithstanding the generous tolerance of the compressed dimension of the Seal you have described, the type of Seal used in the new pumps supplied by SNGB and that which I've been using in a repair situation, can be pressed home and the correct compression obtained without any reference to the position of the Impeller and therefore, any accumulation of tolerances of the parts.

Regards,

Bill

Link:
BBcode:
HTML:
Hide post links
Show post links


angelw
Posts: 634
Joined: Sat Feb 16, 2013 8:27 pm
Location: Ballarat, Vic, Australia
Australia

#6 Re: Water Pump seal installation

Post by angelw » Wed May 27, 2020 12:35 pm

Hello Tadek,
The following picture is of the complete S3 Water Pump sold by SNGB.

Image

The Seal has a pressed metal cover and is clear from the inside face of the Impeller by approximately 3mm. The bore of the Seal is an interference fit on the shaft.

The following pictures are of each end of the Seal used in the Pump shown in the picture above.

Image

Image

This type of seal is quite common and allows the Seal to be installed with the correct spring compression and the Impeller position optimally without reference to each other.

Regards,

Bill

Link:
BBcode:
HTML:
Hide post links
Show post links


Topic author
ysmalkie
Posts: 505
Joined: Fri May 16, 2014 9:11 am
Location: Poland
Poland

#7 Re: Water Pump seal installation

Post by ysmalkie » Wed May 27, 2020 7:26 pm

Bill, Many thanks - but this is a different seal in comparison to the seal SNG sells. The original was similar to the SNG, I believe, too..

Where is your seal from? Who sells it?

Tadek
Tadek

e-type S1 3.8 FHC - in restoration phase...
Jaguar XK120 OTS
Austin-Healey 100 BN2

Link:
BBcode:
HTML:
Hide post links
Show post links

User avatar

abowie
Posts: 3888
Joined: Wed Sep 07, 2011 9:15 pm
Location: Australia
Contact:
Australia

#8 Re: Water Pump seal installation

Post by abowie » Wed May 27, 2020 11:05 pm

I have had limited success with refurbishing water pumps using the kits. Leaks and premature failures have been common.

I have taken to buying new ones.
Andrew.
881824, 1E21538. 889457. 1961 4.3l Mk2. 1975 XJS. 1962 MGB
http://www.projectetype.com/index.php/the-blog.html
Adelaide, Australia

Link:
BBcode:
HTML:
Hide post links
Show post links


Topic author
ysmalkie
Posts: 505
Joined: Fri May 16, 2014 9:11 am
Location: Poland
Poland

#9 Re: Water Pump seal installation

Post by ysmalkie » Thu May 28, 2020 1:09 pm

A friend of mine had a 50% success, too.

I thought the reason was that no data on how much the seal should be pressed was available and the surface roughness was not defined.

The impeller sold by SNG are very rough.

So, I searched for the data... I will see with my e-type pump it it will work.

Tadek
Tadek

e-type S1 3.8 FHC - in restoration phase...
Jaguar XK120 OTS
Austin-Healey 100 BN2

Link:
BBcode:
HTML:
Hide post links
Show post links


Dawnpatrol
Posts: 147
Joined: Mon Jul 19, 2010 12:09 pm
Location: Lancashire
Great Britain

#10 Re: Water Pump seal installation

Post by Dawnpatrol » Wed Jun 07, 2023 9:57 am

HI,
I'm trying to re-seal an original S1 3.8 waterpump using a bearing assembly of the same shaft dimensions as the original, i.e. 5/8" front and back. The SBS kits sold by the usuals are 5/8 at the front and 1/2" at the rear , so you must use the new impellor supplied with the kit.
The new bearings (5/8 at each end) are intermittently available but what seal to use?
If i understand you guys correctly the seal with the graphite face does NOT actually form a seal to anything as the modern bearings are integrally sealed.
The drawing kindly sourced shows an internal diameter at the impellor end of 14.5mm, that would be too small for the 5/8" (15.8mm) original spec shaft.
So, is the seal drawing shown that which comes with the kit, and therefore suited to the 1/2" shaft of the kit bearing?
Robby's tell me, they have a supplier that rebuilds the pumps to original spec but wont divulge who they are and the supplier wont release the original spec parts to the open market. Somewhat understandably, although frustrating!!
Am I correct in thinking the seal shown does not actually require to seal against the shaft.

Thanks for any input.
Should add hat the pump is original alloy, hence the desire to preserve.

Michael
Michael
1961 OTS LWE, 1965 OTS, 1966 FHC.

Link:
BBcode:
HTML:
Hide post links
Show post links


Gfhug
Posts: 3324
Joined: Thu Jun 19, 2014 3:08 pm
Location: Near Andover, Hampshire,in D.O. Blighty
Great Britain

#11 Re: Water Pump seal installation

Post by Gfhug » Wed Jun 07, 2023 9:59 pm

Speak to Peter Stant at Barratt’s as I have reported the lack of info.

Geoff
S2 FHC Light Blue
S2 OTS LHD - RHD full restoration

Link:
BBcode:
HTML:
Hide post links
Show post links

User avatar

Allrand
Posts: 400
Joined: Tue Dec 08, 2020 10:45 am
Location: Kempton Park, South Africs
South Africa

#12 Re: Water Pump seal installation

Post by Allrand » Thu Jun 08, 2023 5:49 am

"If i understand you guys correctly the seal with the graphite face does NOT actually form a seal to anything as the modern bearings are integrally sealed."

Not correct, if it depended only on the integrally sealed bearing water would leak out of the drain hole below the spindle housing.
Randall Botha
'64 3.8 fhc & '51 Mk 7

Link:
BBcode:
HTML:
Hide post links
Show post links


Dawnpatrol
Posts: 147
Joined: Mon Jul 19, 2010 12:09 pm
Location: Lancashire
Great Britain

#13 Re: Water Pump seal installation

Post by Dawnpatrol » Thu Jun 08, 2023 2:50 pm

OK, that makes sense, so I need a seal that will take the 5/8 dia shaft. Non of the usual's seem to do them unfortunately.
Anybody had any look finding these?
Michael
1961 OTS LWE, 1965 OTS, 1966 FHC.

Link:
BBcode:
HTML:
Hide post links
Show post links


Topic author
ysmalkie
Posts: 505
Joined: Fri May 16, 2014 9:11 am
Location: Poland
Poland

#14 Re: Water Pump seal installation

Post by ysmalkie » Thu Jun 08, 2023 8:58 pm

Hi,

I was wondering if you actually read my initial post?

I have even provided the manufacturer of this seal.

However, I would guess it's easiest to get it from SNG - they sell the CYCLAM seals. They just do not provide the instructions, but if you actually read what I wrote, and take a look at the drawings, the installation specs are there.

No rocket science.

Tadek
Tadek

e-type S1 3.8 FHC - in restoration phase...
Jaguar XK120 OTS
Austin-Healey 100 BN2

Link:
BBcode:
HTML:
Hide post links
Show post links


Dawnpatrol
Posts: 147
Joined: Mon Jul 19, 2010 12:09 pm
Location: Lancashire
Great Britain

#15 Re: Water Pump seal installation

Post by Dawnpatrol » Thu Jun 08, 2023 10:03 pm

Apologies Tadek,
I did read your post and noted the drawing and manufacturer. This is the one provided by the likes of SNG in their kits and it only suits the 1/2" shaft, as indicated by the 14.5mm dia of the smallest spring coil.
My thrust was to see if any of the usuals actually have one to suit the 5/8" dia, its clear that there is a great deal of smoke and mirrors with this subject, plus some misunderstanding.
This before tracking down the French supplier. I'm led to believe that there are engineering companies that will refurb your pump as used by SNG and Robey's using the original shaft dia bearing and therefore must have a suitable seal. They just wont divulge who they are.

With regard to my comments about the sealing and the better standard of the modern bearing. I was referring to the seal or not against the shaft, not as is the case the body to bearing cavity from which there would be evidence of a leak if the outer dia of the seal failed. That seal is not a lip type seal and nothing is rotating against it.
Your right, it is not rocket science, but unless I have missed something the smallest bore of the seal needs to be at least a bit bigger than 5/8" (15.9mm) , your drawing, (which is great find btw) shows the seal suitable for the smaller shaft, I hope there is a similar example available to suit the bigger shaft dia.
It may well be the case that the original impellors do not compress the seal sufficiently as you describe, therefore I need to work it out.

Thanks for your input
Regards.
Michael
1961 OTS LWE, 1965 OTS, 1966 FHC.

Link:
BBcode:
HTML:
Hide post links
Show post links


Dawnpatrol
Posts: 147
Joined: Mon Jul 19, 2010 12:09 pm
Location: Lancashire
Great Britain

#16 Re: Water Pump seal installation

Post by Dawnpatrol » Fri Jun 09, 2023 11:39 am

Sent you a PM Tadek!!
Michael
1961 OTS LWE, 1965 OTS, 1966 FHC.

Link:
BBcode:
HTML:
Hide post links
Show post links

User avatar

lowact
Posts: 630
Joined: Mon Oct 09, 2017 10:05 am
Location: Canberra, Australia
Contact:
Australia

#17 Re: Water Pump seal installation

Post by lowact » Sat Jun 10, 2023 2:35 am

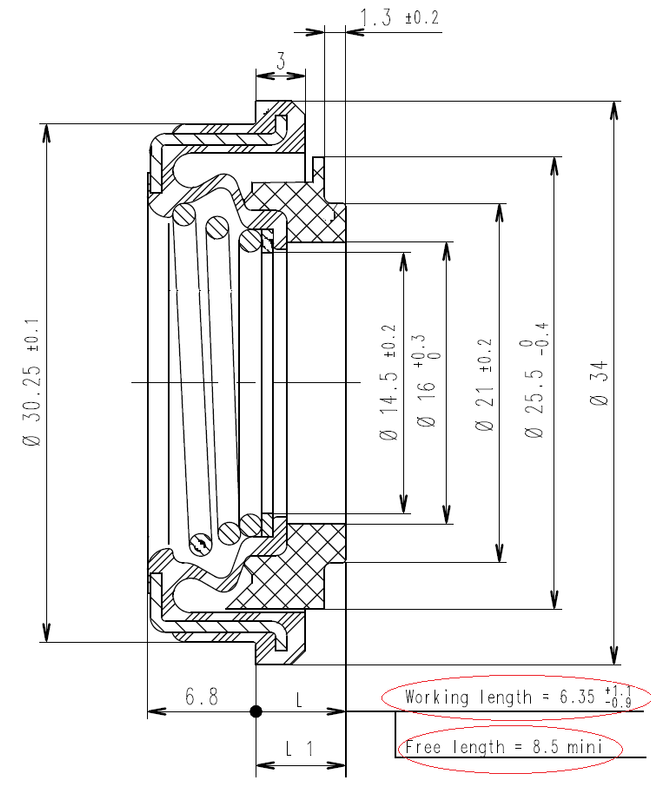
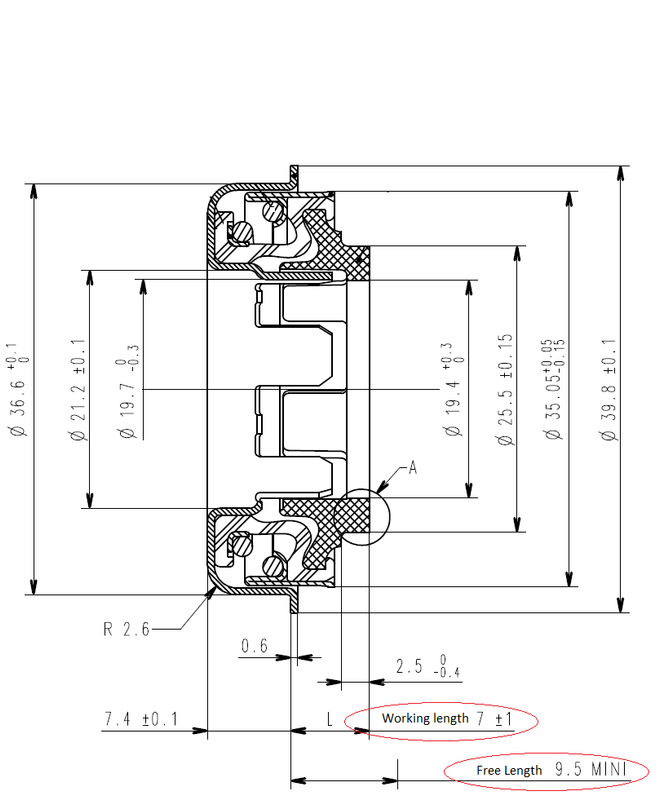
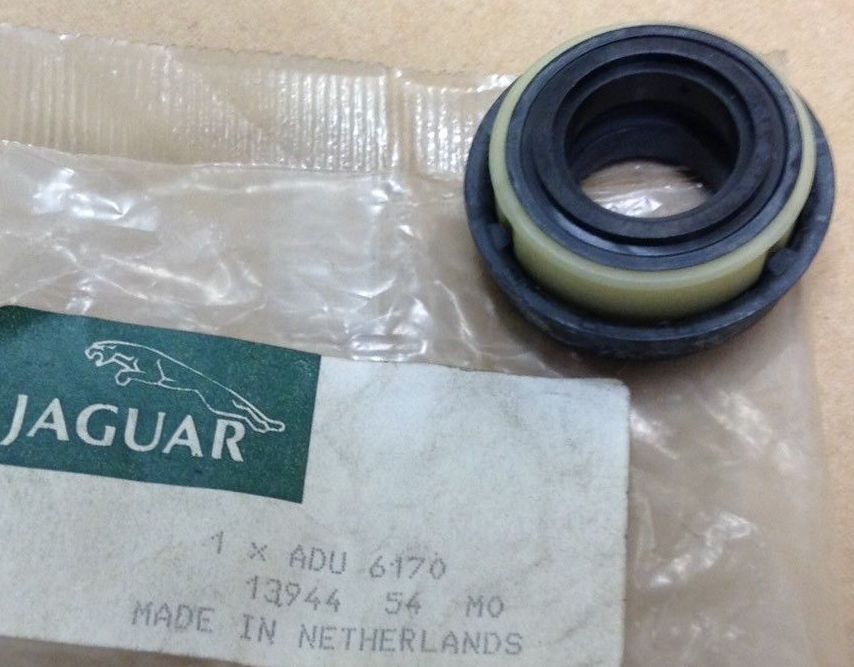
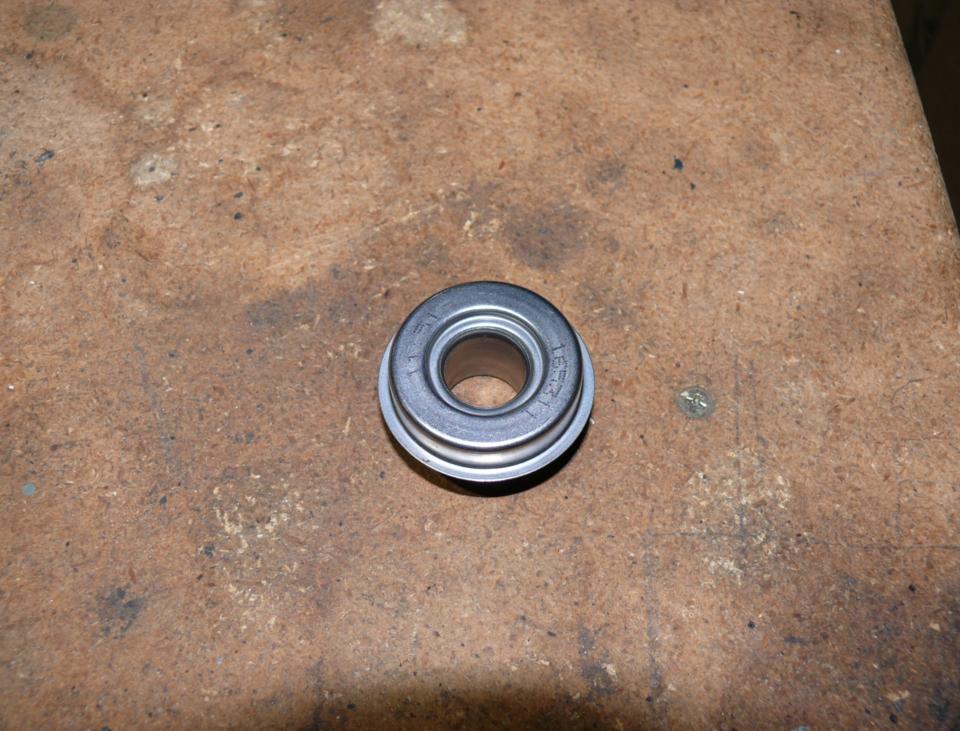
Suitable mechanical seals are very commonly available from almost everywhere. Google “Mechanical Seal”. All you need to know is the shaft and casing diameters and the height. There are very sophisticated types available, Jaguars use the simplest, most basic.

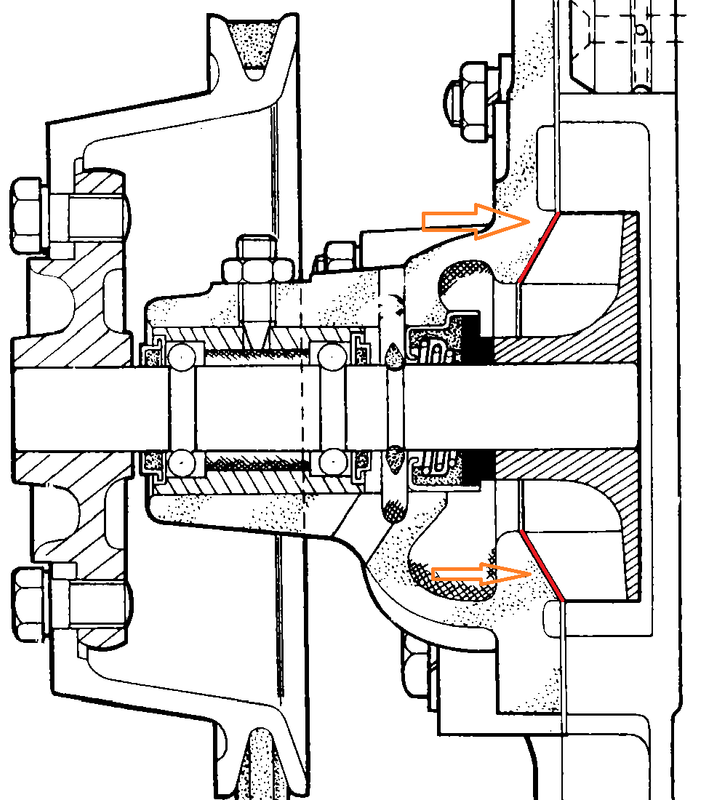
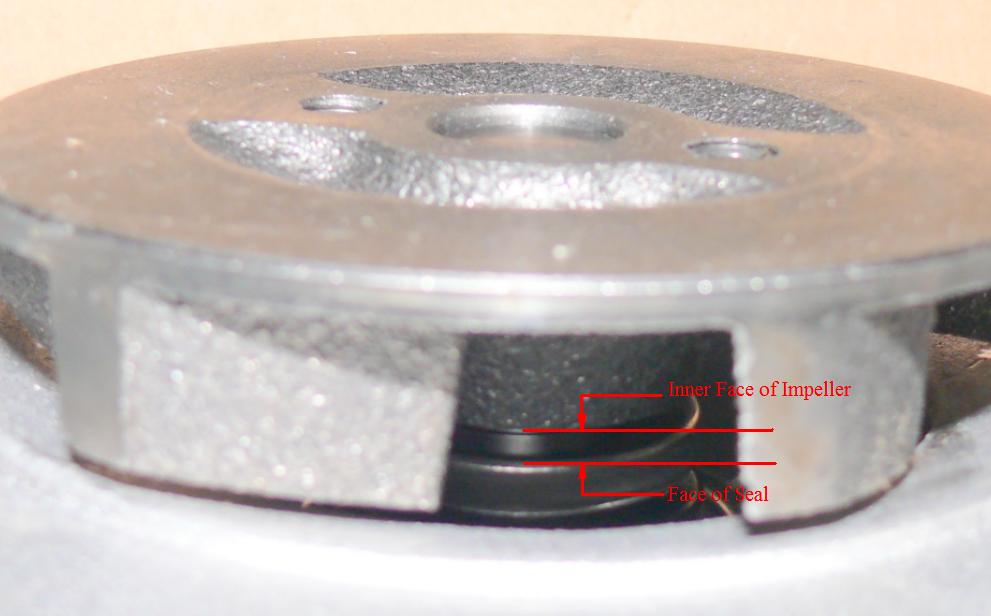
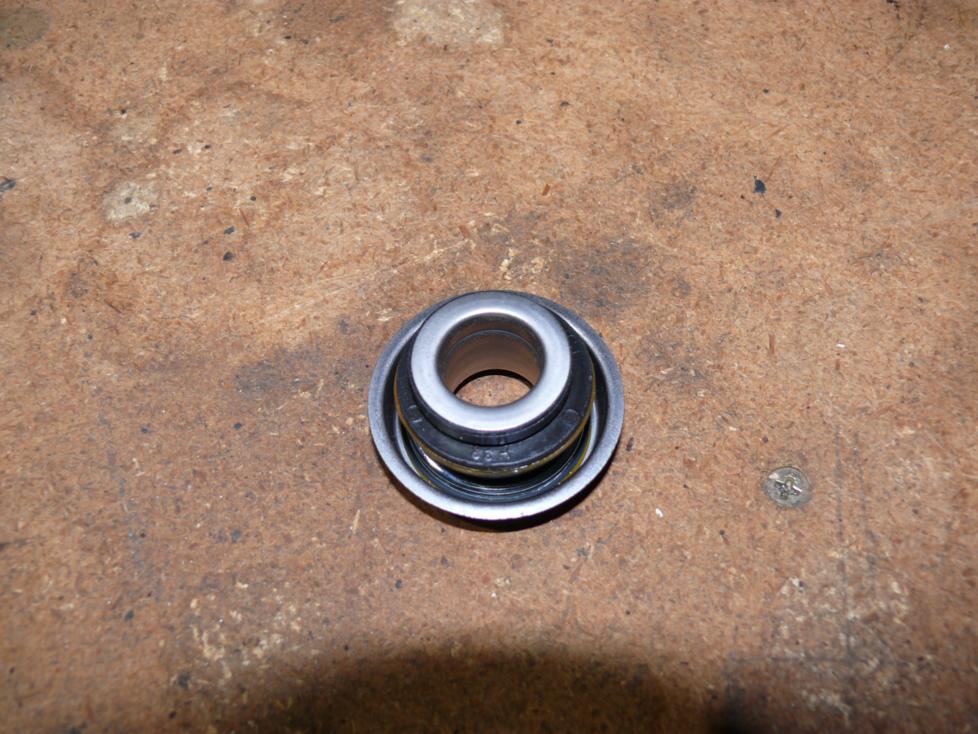
Some, like Tadek’s pics, are just a stationary part that presses into the pump casing, with a spring loaded carbon surface that seals against the rotating impeller. Issue with Jaguar versions is that the relatively soft cast iron impeller wears very quickly. One solution is as per Post #4, ceramic runner accommodated by shortened impeller. Sometimes (XJ6/12) there is a rubber seat between the ceramic runner and the impeller, this is to ensure that the runner spins with the impeller.

Setting this type of seal is tricky, pressing on the impeller simultaneously sets both the seal spring compression and the impeller/casing clearance, i.e. these cannot be set independently. You want the seal spring to be lightly compressed; compression is not so much for sealing as it is to accommodate wear. At the same time you want the gap between the impeller and the casing to be as small as possible without touching, for best pump performance.

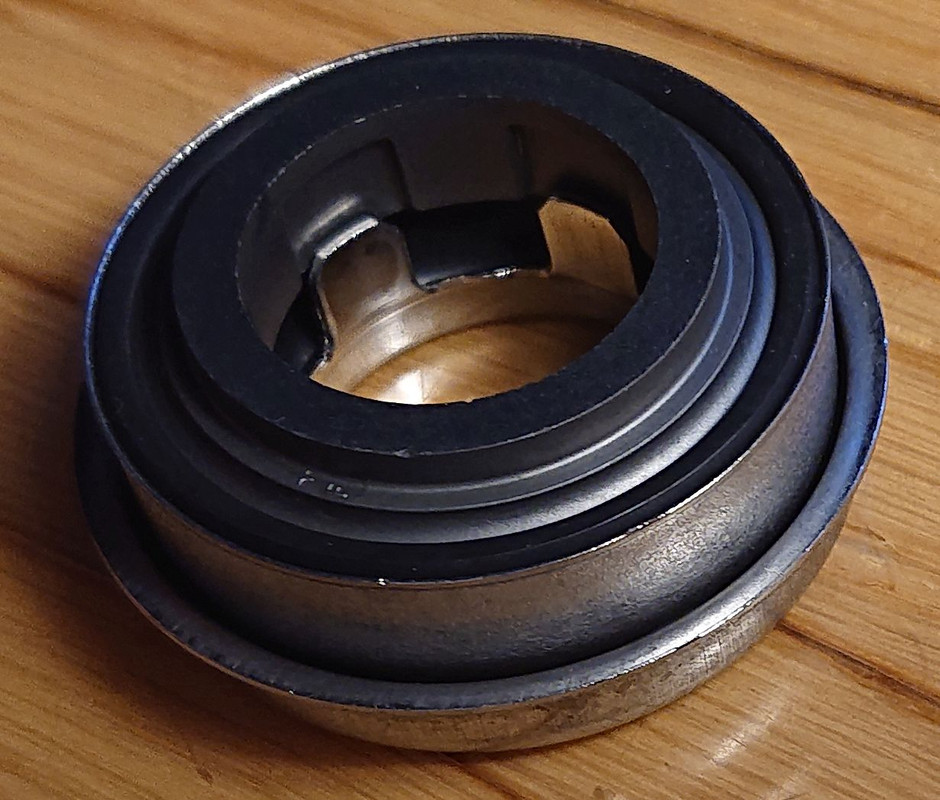
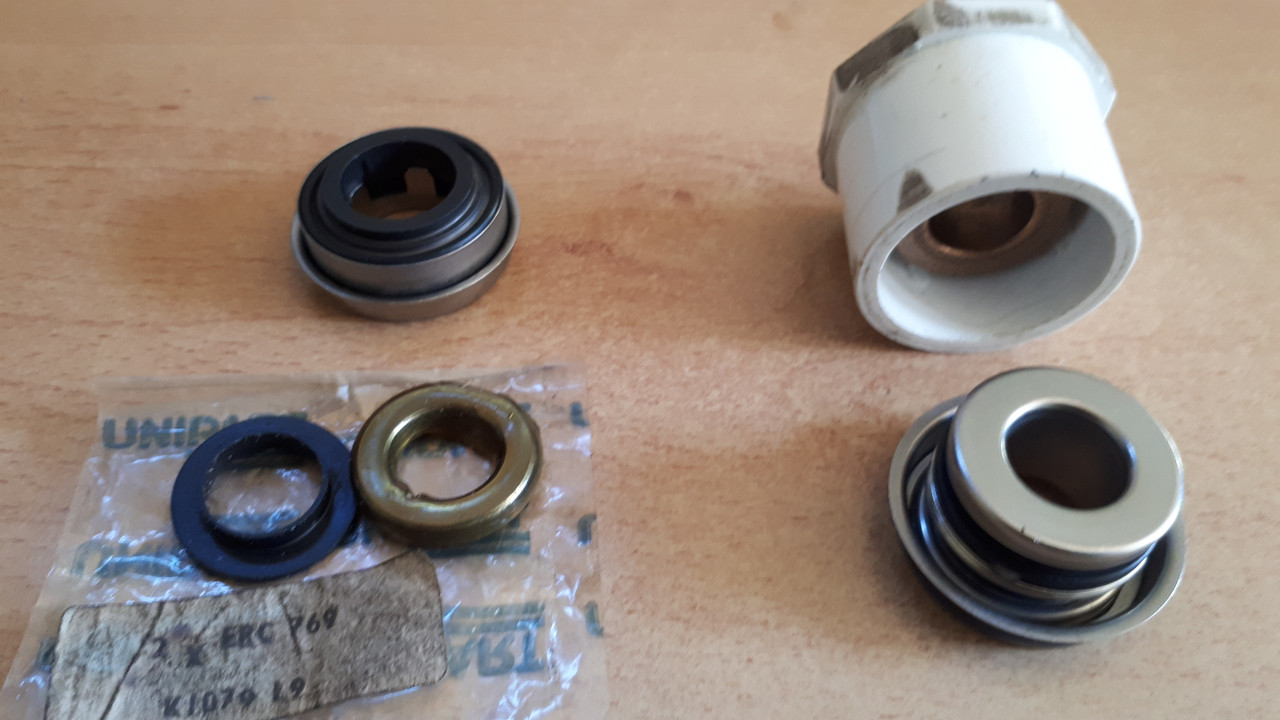
Another type of mechanical seal combines both stationary and rotating parts and press fits to both the casing and the shaft. I.e. this type DOES have an interference fit onto the shaft.
As per Bills posts. Aftermarket for all classic Jaguar; imo newer and vastly superior because the seal and impeller can be set independently. With the appropriate setting tool (e.g. Bill’s mandrels), you can just blindly tap the seal into perfect position. Because the rotating part gets pressed onto the shaft it does not rely on the impeller, the impeller can be separately set to minimise the clearance with the casing, I usually press it on till it starts to scrape then pull it back a hair. Generally requires shortened impeller so that there is plenty of separation (Bill’s 3 mm) between the seal and the impeller.

Photo: On the left are from SNGB (stationary part, runner and rubber seat) on the right is aftermarket combined seal type together with a setting tool.
Image

Imo for my car (S3) biggest issue with seals is the matching (aftermarket) impeller that is usually supplied these days (Bill’s pic). These impellers (disc and vanes) are very much thicker than Jaguar which reduces the flow passage increasing potential for the impeller to “choke” at high speeds, restricting flowrate thereby increasing overheating. Also the vanes are too long, they protrude out of the shroud into the pump inlet where they create “washing machine” turbulence to further disturb/restrict flowrate and thereby potentially increase overheating at all speeds.

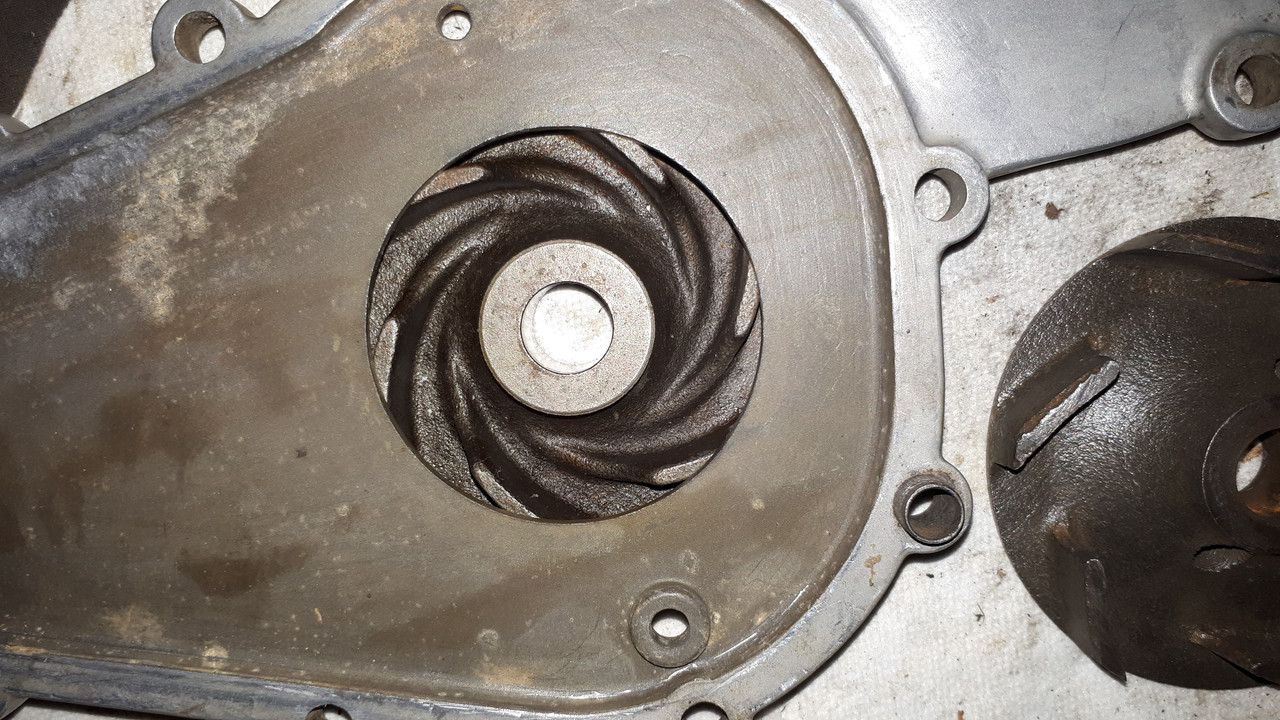
Photos: the first is with the aftermarket impeller, the second is with a genuine Jaguar impeller:
Image
Image
Regards,
ColinL
'72 OTS manual V12

Link:
BBcode:
HTML:
Hide post links
Show post links


Dawnpatrol
Posts: 147
Joined: Mon Jul 19, 2010 12:09 pm
Location: Lancashire
Great Britain

#18 Re: Water Pump seal installation

Post by Dawnpatrol » Mon Jun 12, 2023 9:36 am

Thanks Colin, very useful brief.
It seems that the usual Jaguar suppliers don't have and cant find a suitable seal.
I'll do some more running about but time is against me right now so might have to cave and use the kit solution then continue when I have more time.

Thanks for the input.

Regards,
Michael
Michael
1961 OTS LWE, 1965 OTS, 1966 FHC.

Link:
BBcode:
HTML:
Hide post links
Show post links

Post Reply Previous topicNext topic