


E type series 1 2+2
Have come to the point of starting the car after a rebuild and I can’t get it to fire up?
Really sound daft but I’m struggling to start the car
Carbs have been rebuilt and set as per manual
how do I tell if Number 1 and 6 are at tdc on compression and not exhaust (head is on car)
Is the process as below as the manual is confusing me
Is it a matter of getting number 6 to TDC
Insert distributor and fit rotor arm
Rotate distributor until points just open
Fit Distributor caps with HT lead for cyl 6 where rotor arm is pointing
I’m sure I’m missing something obvious
Any help of checks I can look at please
Thanks
Phil
Distributor and starting car updated
#1 Distributor and starting car updated
Last edited by Spark on Sat Sep 05, 2020 1:01 pm, edited 3 times in total.
| Link: | |
| BBcode: | |
| HTML: | |
| Hide post links |

#2 Re: Distributor and starting car
Hi Phil,
Getting no6 to tdc on the compression stroke can be achieved in a number of ways. Putting your thumb over the plug hole and feeling for the pressure, the use of a rubber/cork bung or as I use, a suitably sized rubber blanking grommet. This pops out when the piston is a tdc, which you can then verify by checking the timing mark.
Are you getting a spark at the plugs when turning over?
Is the dizzy rotor pointing at no6 when points are set?
I found this checklist from abowie useful when I had ignition woes. Mine turned out to be a combination of bad dizzy earth and fouled spark plugs.
Take each step one at a time, in order. At the end of each step try to start the car.
1. Battery flat.
If the car cranks over it is almost certainly OK.
2. Engine earth.
Spark requires a good earth to the negative terminal of the battery. Check that the engine is earthed with an ohmmeter or voltmeter between the battery and the block.
Visually inspect the engine earth lead (LHS behind the reaction tie plate. If in doubt run a thick cable (jumper lead) from the battery negative terminal to the engine.
3. Check power to coil.
Remove the positive connector to the coil. Put a 12v test light in series and turn on the ignition. The light should come on and be steady.
Jiggle ignition key to eliminate switch fault.
If no power, run a wire directly from the positive battery terminal to the positive coil terminal and try ignition. If it works problem is between battery and positive terminal wire. Check fuse 7 and chase wiring with multimeter. Recheck ignition switch. NB starter button will not affect spark.
4. Check points are opening and distributor is turning.
You can do this visually. Remove dizzy cap and get someone to crank the engine. You should see the points open and close. Use a torch; it’s dark down there.
Put a 12v test light between the negative coil terminal and the black/white wire to the distributor. Crank the engine. The light should flash off and on as the points open and close. This should work with electronic ignition modules as well because what you are testing is the circuit through the points (mechanical or electronic) to earth.
Note: the light may stay on or off when not cranking depending on whether the points stop closed (likely) or open (unlikely). This isn’t important.
Check the points gap (14 to 16 thou) and inspect the electrode faces for pitting. If any doubt replace points and reset gap. Even when you’re sure it’s not the points, suspect them. It’s always the points.
5. Condenser.
A dead condenser looks just like a good condenser. Just replace it. They can be tested with an ohmmeter but if you put a new one in and it doesn’t fix the problem it probably isn’t the condenser.
6. Check the coil.
If the points are working and the condenser is OK. Get a spark plug and a plug lead. Connect the plug lead into the HT coil connector. Earth the plug by resting it next to a head nut. Turn on the ignition. Use a nonconductive (plastic) tool and open and close the points manually. (Alternatively you can connect a wire to the negative LV connector and tap this on an earth.) There should be a spark on the plug each time the points open. If you have spark the coil is OK. Move on to 6.
If NO spark AND you are happy with 1-4 above, the coil may be faulty. Check the resistance of the low voltage (primary) circuit by connecting an ohmmeter to the two LV terminals. This should be between 0.5 (low resistance/sports coil) and 3.5 ohm (standard coil). Check the HT (secondary) circuit resistance by measuring between either LV terminal and the centre HT terminal. This should be in of the order of 5000 to 15000 ohm. Note that coil failure can be exacerbated by heat so even if it checks out cold it may be faulty hot.
Replace the coil anyway with a known good one. (You can just sit one next to the old one and connect the 3 wires to it).
7. Leads
Remove the coil HT lead. Inspect for cracking or corrosion. Coolant can leak from the thermostat housing down onto the top of the cap and cause corrosion, especially with “screw in” contacts.
Check resistance with ohmmeter; it should be virtually zero with copper core wires.
Check the resistance of each of the plug leads by removing the plug cap and using a multimeter between the end of the wire and the corresponding contact inside the distributor cap. With copper core wire it should be virtually zero. If not check the cap socket for corrosion.
Modern cable resistance is more complex and you would need to check the figures with the manufacturer. As a general guide though a lead should be between 2000 and 8000 ohm.
8. Plug caps
The original plug caps have a carbon resistor in them. They will have a resistance somewhere between 5000 and 15000 ohm. Modern or reproduction caps should be spot on 5000 ohm. If you suspect the caps, replace or eliminate them. You can solder a ring connector onto a fine 1” self-tapping screw. Screw this into the lead in place of the plug cap. Use the ring connector to connect directly to the threaded end on the spark plug.
9. Spark plugs.
Remove the plugs. Check for fouling and check gaps. If no success, replace with new plugs.
10. Distributor cap
Inspect for cracks or corrosion. The cap really should look brand new inside. Clean up the lead connector sockets if at all corroded. The central contact for the rotor button should have a resistance of the order of 30000 ohm. If the cap looks OK still try replacing it with another one, or a known good cap and set of leads.
11. Rotor button
Inspect and replace if it looks worn, pitted, burnt or otherwise faulty. Try another one anyway if it looks OK.
12. Distributor
Remove the distributor and carefully inspect it. Ensure that it wired correctly. Specifically check the insulators between the points and the coil and capacitor leads are in the correct place.
Check that that the coil lead is connected and conducts to the capacitor lead.
Check that the internal earth lead is connected to the distributor body and the centre plate.
Check that the distributor turns freely and is mechanically intact.
Check that there are no small screws or other foreign parts loose inside or causing a short.
13. Other things
If you have got here and not fixed the problem.
The checklist above is fairly complete. Sometimes though electrical components can look OK but be faulty. Replacing each component, one at a time, with a known good (not necessarily new) component will sometimes smoke out a mystery.
Richard
Previous owner and restorer of a S1 3.8 FHC Opalescent Golden Sand with Tan Trim 889504 (now sold and headed for Athens)


Previous owner and restorer of a S1 3.8 FHC Opalescent Golden Sand with Tan Trim 889504 (now sold and headed for Athens)
| Link: | |
| BBcode: | |
| HTML: | |
| Hide post links |
#3 Re: Distributor and starting car
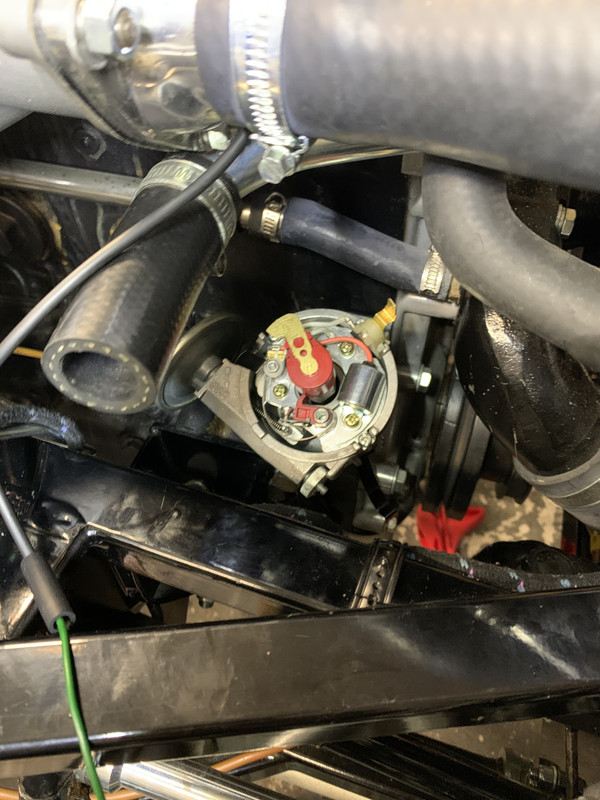
Some pics to show how set up looks
| Link: | |
| BBcode: | |
| HTML: | |
| Hide post links |
#4 Re: Distributor and starting car
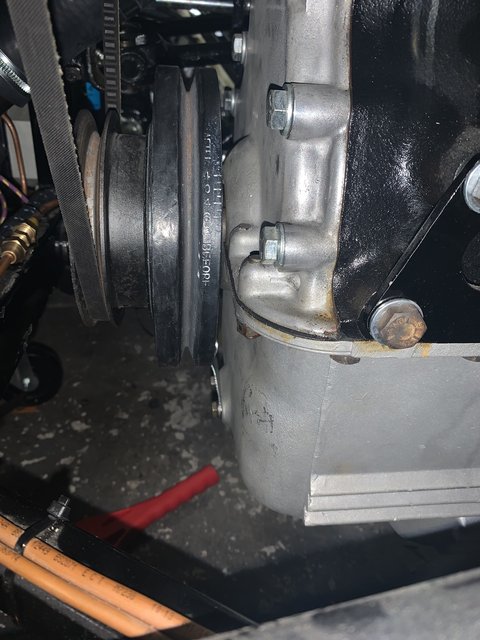
If that’s where your timing marks are when 1&6 are at TDC, then it looks like your crank damper has been replaced with one from an XJ6. They’re interchangeable with the E-type damper, except the timing marks are in a different position. They’re 6 O clock on the e-type damper, and about 2 O clock on the XJ6 damper. You need an XJ6 pointer, which attaches on the front cover, not the sump.
Alternatively, the damper has delaminates and shifted on the centre boss.
Alternatively, the damper has delaminates and shifted on the centre boss.
Tom
1970 S2 FHC
1970 S2 FHC
| Link: | |
| BBcode: | |
| HTML: | |
| Hide post links |

#5 Re: Distributor and starting car
Something looks wrong here.....you timeing pointer is on the front of the sump.....when No6 is on its compression stroke at tdc the pointer should point to tdc on the crank pully.......do u have this as your photo shws timing marks at 3o/c on tne pulley....Steve
Edit just seeing Toms post is your engine from an XJ6
Edit just seeing Toms post is your engine from an XJ6
Steve
69 S2 2+2 (just sold) ..Realm C type replica, 1960 xk150fhc
69 S2 2+2 (just sold) ..Realm C type replica, 1960 xk150fhc
| Link: | |
| BBcode: | |
| HTML: | |
| Hide post links |
#6 Re: Distributor and starting car
Will get an xj6 timing pointer to fit and check
Anything I can check in the mean time
Thanks
Anything I can check in the mean time
Thanks
| Link: | |
| BBcode: | |
| HTML: | |
| Hide post links |
#7 Re: Distributor and starting car
As Tom says looks like the xj6 damper instead of the etype
If that the case the set up shouldn’t be far wrong? Just need to get set at 10 degrees before and try again
Thanks both
If that the case the set up shouldn’t be far wrong? Just need to get set at 10 degrees before and try again
Thanks both
| Link: | |
| BBcode: | |
| HTML: | |
| Hide post links |
#8 Re: Distributor and starting car
First, you need to check the damper’s not shifted, and is an XJ6 part. E-type ones aren’t available new, so it’s not unusual to have to use the XJ6 part. When mine delaminated, it could be easily rotated by hand.
You can make a temporary pointer until the proper one arrives. A piece of wire should suffice, providing it’s securely mounted and doesn’t move or wobble around. You’ll need to set the engine to exactly TDC to accurately set the new pointer. This requires a dial gauge, or the double stop method.
From there you can set the timing as normal.
Tom
1970 S2 FHC
1970 S2 FHC
| Link: | |
| BBcode: | |
| HTML: | |
| Hide post links |
#9 Re: Distributor and starting car
Just going back to basics as there is an e type pointer on the sump and would be odd to replace the damper and not change the pointer but who rebuilt the engine and fitted the head......how did you set the cam timing if you dont know where tdc is?.....Steve
Steve
69 S2 2+2 (just sold) ..Realm C type replica, 1960 xk150fhc
69 S2 2+2 (just sold) ..Realm C type replica, 1960 xk150fhc
| Link: | |
| BBcode: | |
| HTML: | |
| Hide post links |
#10 Re: Distributor and starting car
Very good point
Tom
1970 S2 FHC
1970 S2 FHC
| Link: | |
| BBcode: | |
| HTML: | |
| Hide post links |
#11 Re: Distributor and starting car
All
I added the pointer on the sump as the engine didn’t have one
I used the existing damper that was on the engine as it was in good order
The engine had great oil pressure and only sump and head were removed
Before removing Head all cams were aligned and fitted the same- would suggest if they were out they would clash
So I’m still unsure
Thanks
| Link: | |
| BBcode: | |
| HTML: | |
| Hide post links |
#12 Re: Distributor and starting car
So when u fitted the head were both 1&6 pistons up to the top...but you didnt check if they were exactly tdc or look at where the crank pulley was positioned.......and were both cams set with a setting tool......however you usually have to rotate the engine slightly to fit the cam flange bolts...then turn it back to tdc......if your sure you have done all this then u need to bring 6 up on its compression stroke....then measure when its at tdc with a dial guage down the spark plug hole.....then turn engine to 10deg btdc.....and have the distributor set to fire No6.....Steve
Steve
69 S2 2+2 (just sold) ..Realm C type replica, 1960 xk150fhc
69 S2 2+2 (just sold) ..Realm C type replica, 1960 xk150fhc
| Link: | |
| BBcode: | |
| HTML: | |
| Hide post links |
#13 Re: Distributor and starting car
Hi guys
Thanks for the reply’s
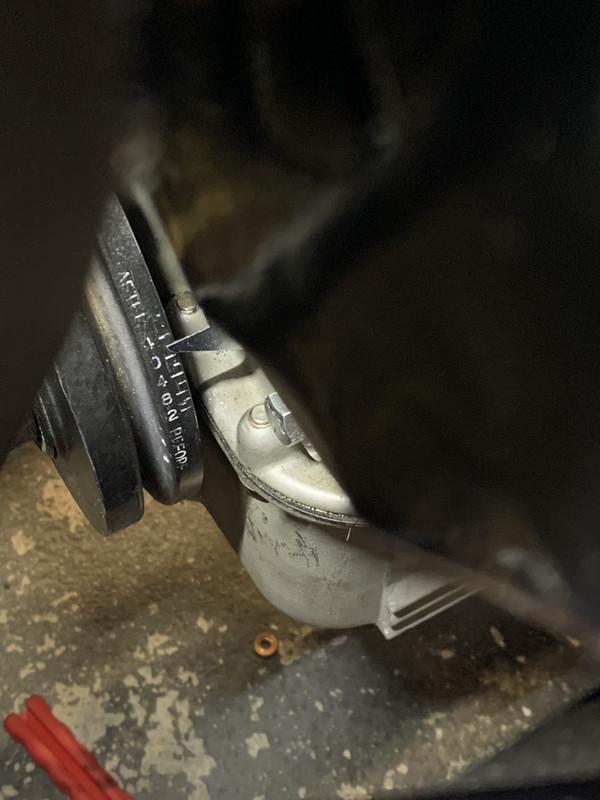
Received the new pointer damper was ok so fitted pointer
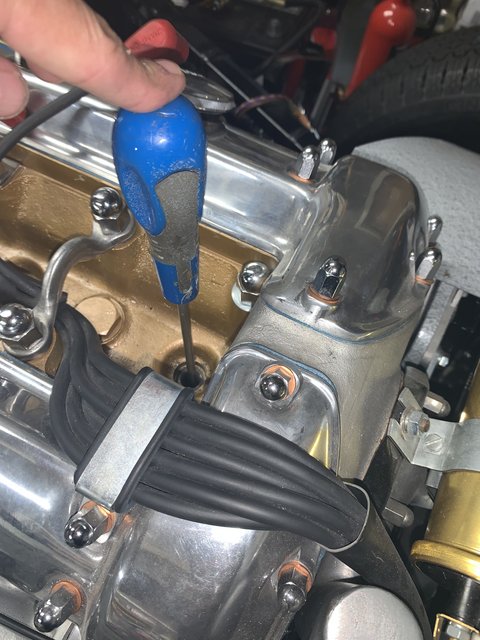
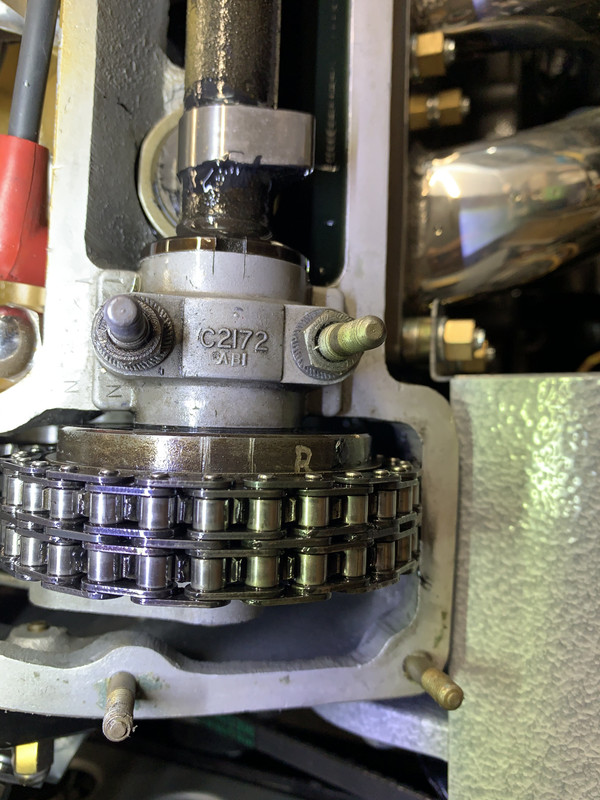
So took the cam covers off to check setting of cams
See pics
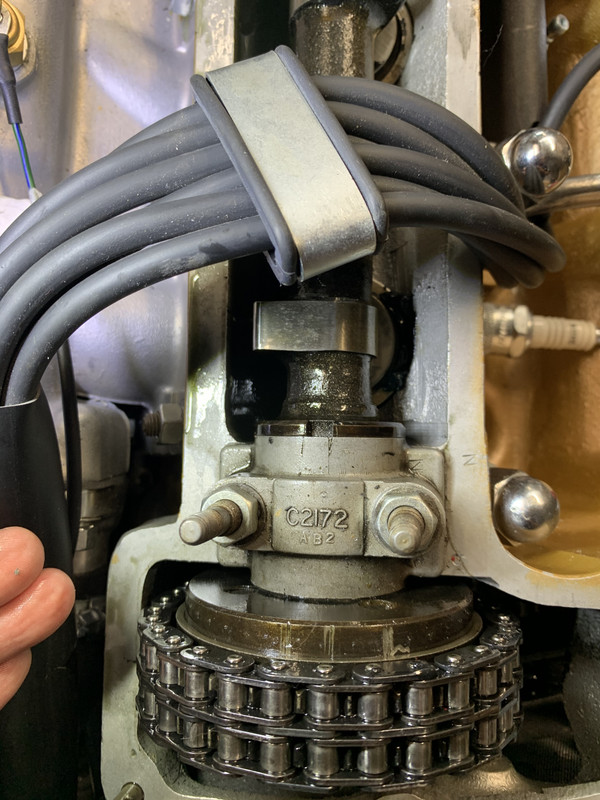
1 and 6 are at tdc
Cams align with marks and sectors
Pointer is at virtually 0 degrees
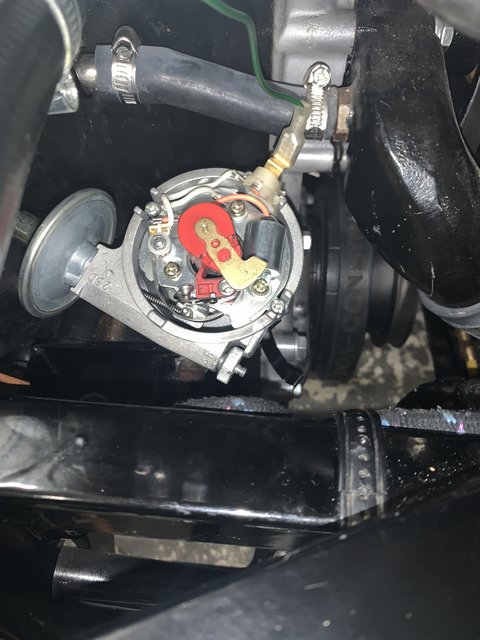
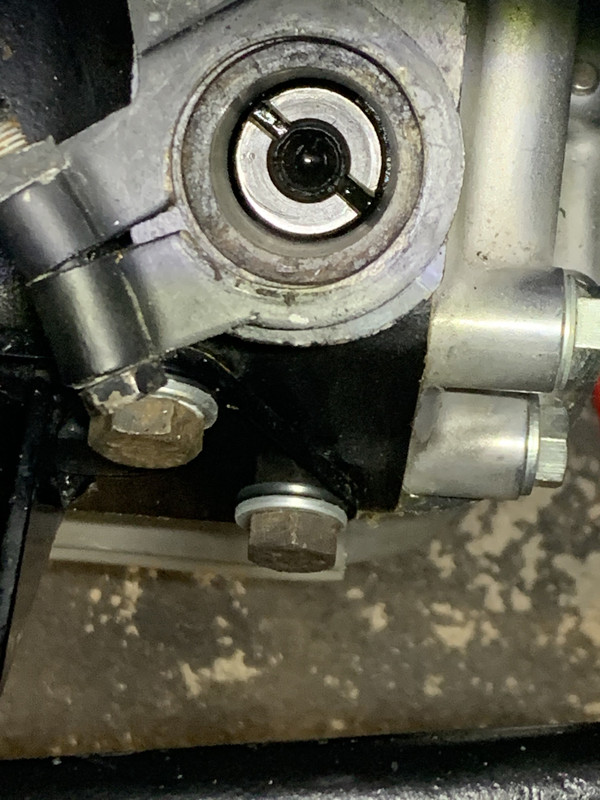
However the. Rotor arm is not pointing to number six
Is this simply switch around plug leads or can I rectify in any way?
If I turn the engine thro another stroke the rotor aligns at cylinder 6 and pointer align but the cams don’t align
Can you guide me please
Thanks
Phil
Thanks for the reply’s
Received the new pointer damper was ok so fitted pointer
So took the cam covers off to check setting of cams
See pics
1 and 6 are at tdc
Cams align with marks and sectors
Pointer is at virtually 0 degrees
However the. Rotor arm is not pointing to number six
Is this simply switch around plug leads or can I rectify in any way?
If I turn the engine thro another stroke the rotor aligns at cylinder 6 and pointer align but the cams don’t align
Can you guide me please
Thanks
Phil
| Link: | |
| BBcode: | |
| HTML: | |
| Hide post links |
#14 Re: Distributor and starting car updated
Hi Phil, looks like your distributor drive has been fitted 180 degrees out. The slot should have the larger side to the top. Easy solution, swap your plug leads individually to the other side of cap so the rotor arm is pointing to No 1 not No 6.
Derek
64 ser 1 fhc, 71 ser 3 2+2. Ser 3 now sold, looking for a new toy to keep Ser 1 company
64 ser 1 fhc, 71 ser 3 2+2. Ser 3 now sold, looking for a new toy to keep Ser 1 company
| Link: | |
| BBcode: | |
| HTML: | |
| Hide post links |
#15 Re: Distributor and starting car updated
Is your engine actually at TDC, measured with a dial gauge or similar? If it is, then adjust the pointer so it actually points toTDC. If it isn’t, then you need to establish exactly where TDC is, then adjust the pointer and cam timing to suit.
Tom
1970 S2 FHC
1970 S2 FHC
| Link: | |
| BBcode: | |
| HTML: | |
| Hide post links |
#16 Re: Distributor and starting car updated
Hi Phil...as above you dizzy is 180 deg out......the crank shaft turns twice for one turn of the cams or dizzy.....assumeing every thing was ok befor you started your rebuild it think you probably had the crank one complete turn out when you fitted the head and cams...so its a cam strip down or just swap the spark plugs around.....Steve
Steve
69 S2 2+2 (just sold) ..Realm C type replica, 1960 xk150fhc
69 S2 2+2 (just sold) ..Realm C type replica, 1960 xk150fhc
| Link: | |
| BBcode: | |
| HTML: | |
| Hide post links |
-
 Series1 Stu
- Posts: 1650
- Joined: Thu Feb 02, 2017 12:26 pm
- Location: Shropshire

#17 Re: Distributor and starting car updated
I might have missed something here but before your do anything serious can you confirm that you are aware that number 6 cylinder is at the front of the engine?
Apologies if you are already aware.
Regards
Apologies if you are already aware.
Regards
Stuart
If you can't make it work, make it complicated!
'62 FHC - Nearing completion
'69 Daimler 420 Sovereign
'78 Land Rover Series 3 109
If you can't make it work, make it complicated!
'62 FHC - Nearing completion
'69 Daimler 420 Sovereign
'78 Land Rover Series 3 109
| Link: | |
| BBcode: | |
| HTML: | |
| Hide post links |
#18 Re: Distributor and starting car updated
Hi Phil, did you try my suggestion and swap the leads from side to side? Let me know how you get on.
Derek
Derek
Derek
64 ser 1 fhc, 71 ser 3 2+2. Ser 3 now sold, looking for a new toy to keep Ser 1 company
64 ser 1 fhc, 71 ser 3 2+2. Ser 3 now sold, looking for a new toy to keep Ser 1 company
| Link: | |
| BBcode: | |
| HTML: | |
| Hide post links |