


Series 1 bonnet fitting


#21 Re: Series 1 bonnet fitting
I had the same problem. I've come to the conclusion that it's caused by the cantilever springs imperceptably bending the nose area down as it tries to lift the rear of the bonnet. Structurally the weakest point of the bonnet is a line across near the top of the wheel arch in line with the picture frame. The bonnet could bend/ flex accross that area, which would cause the wings to bulge out imperceptably at that point. I've observed that a lot of E's do in fact bulge out at that point, whereas the top of the wheel arch should be in line with the extended side line of the tub. Now I've spoilt it for everyone because once you see it you can't unsee it! 
Randall Botha
'64 3.8 fhc & '51 Mk 7
'64 3.8 fhc & '51 Mk 7
| Link: | |
| BBcode: | |
| HTML: | |
| Hide post links |
-
 bitsobrits
- Posts: 421
- Joined: Tue Dec 27, 2011 2:09 am
- Location: Omaha, NE area

#22 Re: Series 1 bonnet fitting
As Malcom Sayer designed it, the E type body tapers its entire length from front to rear, with the widest part near the front edge of the front wheel arch. From certain angles that can create the illusion that there is a bulge in the curve of the wheel arch. Due to the shaped metal, flanging, and bonded under panels, I don't believe there is any flexing going on.
Steve
'65 S1 4.2 FHC (early)
'65 S1 4.2 FHC (early)
| Link: | |
| BBcode: | |
| HTML: | |
| Hide post links |
#23 Re: Series 1 bonnet fitting
Don't want to get into a needless spat but the bonnet is a huge floppy thing. Nws the taper, on a lot of E's you can clearly see a bulge if you follow the reflection lines down the sides. The inner metal flanges are very narrow over the picture frame & imo can easily deflect there.
Randall Botha
'64 3.8 fhc & '51 Mk 7
'64 3.8 fhc & '51 Mk 7
| Link: | |
| BBcode: | |
| HTML: | |
| Hide post links |

#24 Re: Series 1 bonnet fitting
Hallo,
my Etype is bare metal at the moment. After the stripping the body had not really a straight line at the side, but now after several hours of bodywork it has starting at the rear wheel arch to the end of the A panel a straight line. The bonnet is new and has no good fit to the car. Curently i am modifying the curvation at the wing to meet the A panel curvation and in closed condition the point on the front wheel arch ist maybe 5mm out too fare on both sides. The information it should be in line was unclear for me, i have no reference, but in general the bonnet was a bit to wide also at the A panel. I will check if it changes in open condition and modify the wing that it lines up in closed condition. Also the length of the wing need to be modified to have a nice gap to the sill.
It is like with nearly every panel you can buy, must be fitted to the car.
Chris
| Link: | |
| BBcode: | |
| HTML: | |
| Hide post links |
#25 Re: Series 1 bonnet fitting
The sides sre straight but not parallel.
Randall Botha
'64 3.8 fhc & '51 Mk 7
'64 3.8 fhc & '51 Mk 7
| Link: | |
| BBcode: | |
| HTML: | |
| Hide post links |
-
Philippe-J.
- Posts: 42
- Joined: Mon Nov 27, 2023 12:14 pm
- Location: Occitanie

#26 Re: Series 1 bonnet fitting
My turn to manage a bonnet fitting.
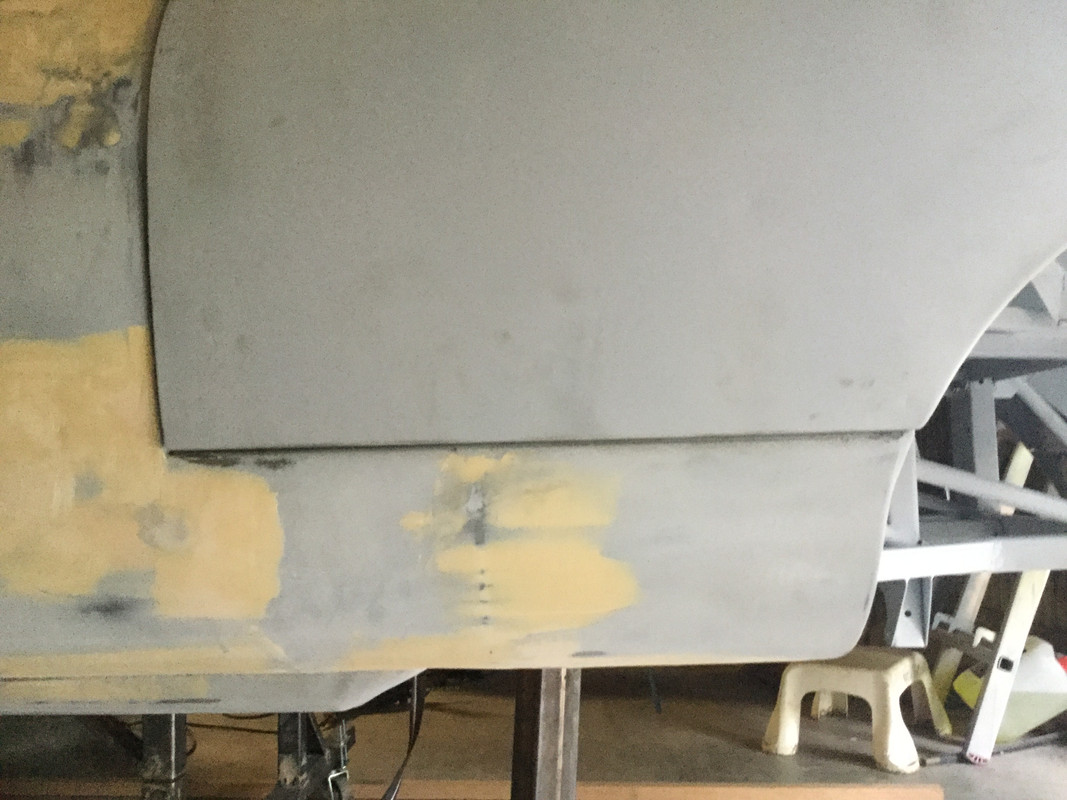
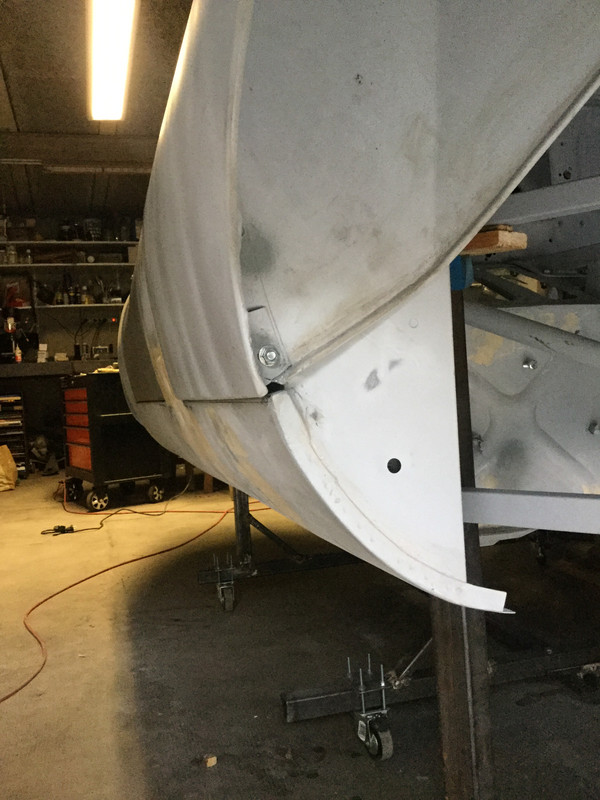
The process with the shims at the front is not complicated and I could manage it. However, it did not solve all the issues, specially those due to supposedly bonnet distortions. As a result I could align the central panel of the bonnet with the scuttle but the wings remained a concern. Particularly on the RH side. It looks as though the centre panel itself has its right edge rising up by few mm, with a wing departing from the vertical edge of the scuttle proportionally, as a consequence. See photo:
What would you advise to solve that:
- try and bend down the right end of the centre panel (how ?)
- lead loading of the scuttle horizontal surface to reach that of the bonnet, from the louvers down to the wheel arch?
Solution 1 seems difficult as the V strengthening channel at the rear of the bonnet centre panel is unlikely to be bent. Solution 2 would imply a hudge quantity of lead, wouldn't it?
Any advice welcome.
Philippe-J
1967 S1(.25) OTS (well, bits of, so far...)
1967 S1(.25) OTS (well, bits of, so far...)
| Link: | |
| BBcode: | |
| HTML: | |
| Hide post links |
-
 politeperson
- Posts: 1295
- Joined: Tue Jun 07, 2016 8:26 pm
- Location: Boston UK

#27 Re: Series 1 bonnet fitting
So your bonnet is high on the right hand side of the car.
How is the bonnet to sill gap in this position?
If your bonnet to sill gap is wide, the bonnet has to come down more.
If your bonnet is touching the sill, you need to think about rolling the wire edge of the bonnet up, to allow the bonnet to close a bit more.
How is the bonnet to sill gap in this position?
If your bonnet to sill gap is wide, the bonnet has to come down more.
If your bonnet is touching the sill, you need to think about rolling the wire edge of the bonnet up, to allow the bonnet to close a bit more.
Its true, but Enzo never said it
Too many E types
XK120 SUs
Too many E types
XK120 SUs
| Link: | |
| BBcode: | |
| HTML: | |
| Hide post links |
-
Philippe-J.
- Posts: 42
- Joined: Mon Nov 27, 2023 12:14 pm
- Location: Occitanie
#28 Re: Series 1 bonnet fitting
It's the second option I'm afraid. The bonnet wing is touching the sill all along, so you're right I will have to roll its wire edge.
But my concern is also that, the center panel being flush with the scuttle from its left edge up to half of its right half (at the external level of the louvers), then it rises too much by say quarter of an inch at its right end. So does the starting edge of the wing as a consequence.
Besides I anticipate that if I only roll the wire edge, the wing to center panel will be allowed to go down to the scuttle level, but then the middle of the center panel will be to low. So I have to minimize the slope at the right edge of the center panel.
However I guess that the first issue will be more a concern when I have solved the second one
Question: do you heat the wire edge prior to rolling it up?
Regards.
Philippe-J
1967 S1(.25) OTS (well, bits of, so far...)
1967 S1(.25) OTS (well, bits of, so far...)
| Link: | |
| BBcode: | |
| HTML: | |
| Hide post links |
-
politeperson
- Posts: 1295
- Joined: Tue Jun 07, 2016 8:26 pm
- Location: Boston UK
#29 Re: Series 1 bonnet fitting
No, you do not have to heat it. You clamp the wire into the desired position then use a hammer and dolly to beat the outer skin over.
It does sound more difficult than it is it is practice. Depends on your experience. However there is another way.
You can cut the whole bottom of the bonnet including the wire edge, remove a strip from the wheel to the wheel arch then re-weld it using a butt weld slowly. This allows you to set the bonnet sill gap easily once the top is flush.
Once the offending section is removed, you will be able to push the bonnet closed a bit further to see how things look.
All the catches should be removed for this of course.
The center panel is supposed to close evenly with the bulkhead. This is controlled by the shims. It is possible that by adding height shims on the left hand side at the front, the right hand side at the back will come down as the bonnet tilts.
I have had bonnets that will not close evenly. Usually second hand ones. I have found little bit of spring is ok, as once the catches are on, a few engine heat cycles can remove the twist in use. You do not notice the twist once the bonnet is clamped shut of course.
Until you deal with the height issue I guess you will not know where you are. If the bonnet is too tall for the car, you are going to have do do one or the other.
I assume you have already aligned the rear wheel arch sections (bonnet to sill?). That is your first datum really.
It is strange how difficult it can be sometimes and other times it can be easy.
2 weeks ago I positioned a brand new bonnet on a car with 5 thick shims on each hinge face.
This positioned the sill/wheelarch perfectly. I then did a rough cut to allow the bonnet to fully shut.
I then added a shim to make a parallel sill bonnet gap. The top of the bonnet lined up level with the scuttle. No cutting required.
I then did a fine cut to obtain an even gap to the bulkhead using a scribe, 2 inch tape and a 1mm cutting disc on a grinder.
I then bolted on the hardware and it just worked perfectly, took less than a day.
Other times I have been at it a week!
Its true, but Enzo never said it
Too many E types
XK120 SUs
Too many E types
XK120 SUs
| Link: | |
| BBcode: | |
| HTML: | |
| Hide post links |
-
Philippe-J.
- Posts: 42
- Joined: Mon Nov 27, 2023 12:14 pm
- Location: Occitanie
#30 Re: Series 1 bonnet fitting
Thank you so much for your answer and your experience.
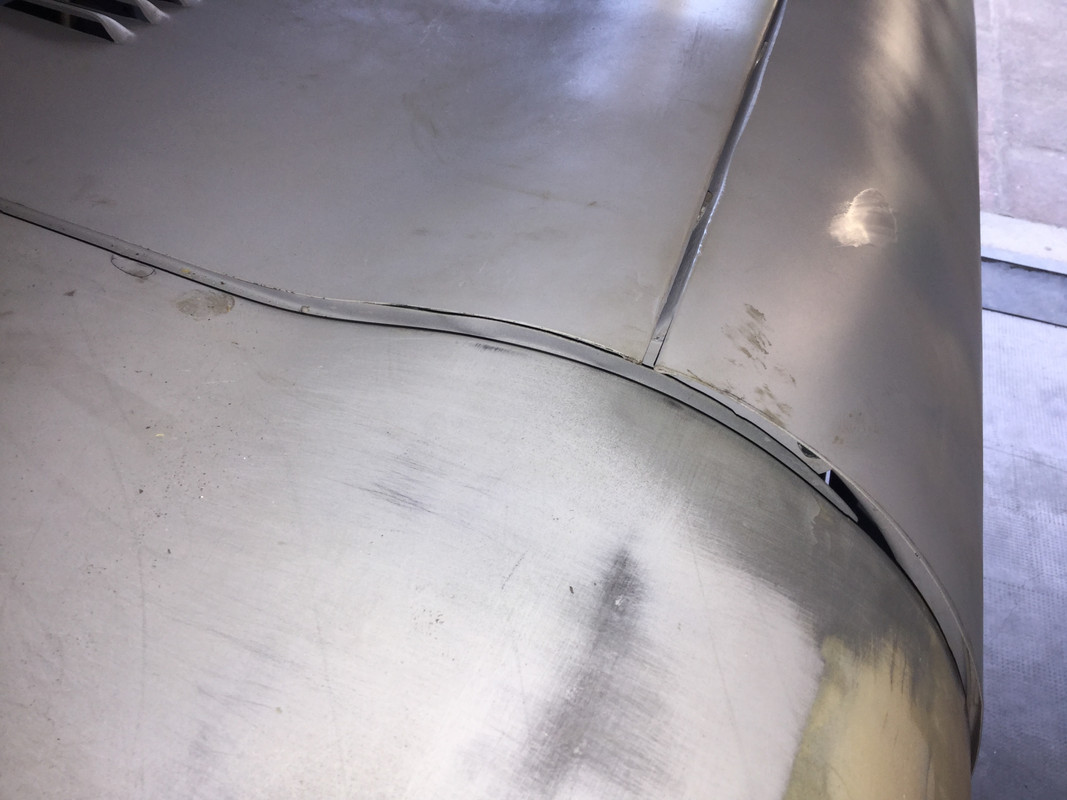
The image of your recent work is interesting as it confirms that I might have a problem with my sills. Obviously, the bottom of the door aperture should be in line with the sill where it meets the bonnet between the wheel arch and the scuttle. This is not the case with my car, the sill "horizontal"' edge rises up, by 5 mm at the wheel end, with regards to the extrapolation of the door bottom limit. So I guess that the sill itself is faulty, not so the bottom end of the bonnet.
So before I do the rolling up of the bonnet, I'll try and grind as much as possible the sill top edge, which is actually lead loaded. I hope that the lead thickness is enough.
Second issue is that the same bonnet bottom is slightly off the scuttle:
One possibility is that I did not tighten the internal air ducts and mudshields at the right positions wrt the screw plays when I reassembled it. I'll have to try this first.
Yesterday I was lucky enough to solve the problem of the convex shape of the center panel at its right end (that was too high by 5 mm wrt to the scuttle). I used a terrible set-up to vertically push it down (fainted hearts beware! ):
):
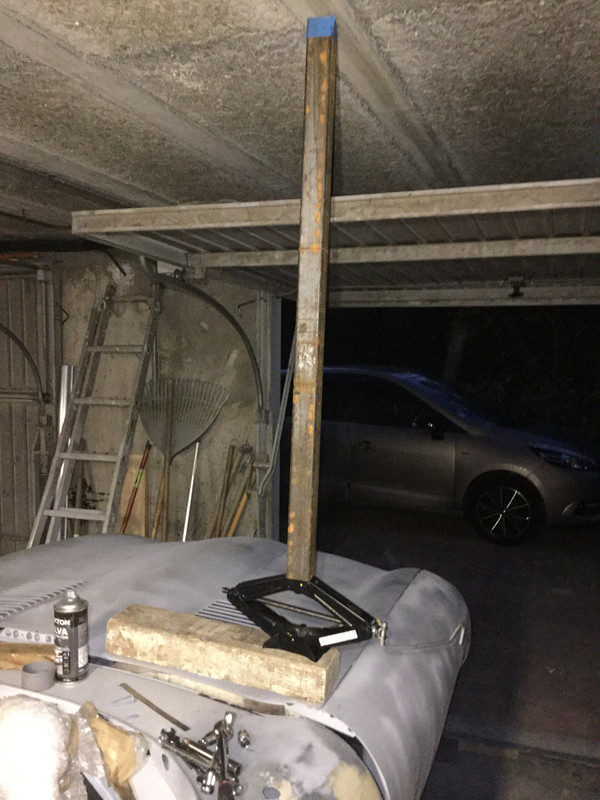
By heating with an air gun the area I reached the elastic domain and stabilized the shape correction.
Those who just have to adjust shims to have their bonnet fit are actually lucky people.
Regards,
The image of your recent work is interesting as it confirms that I might have a problem with my sills. Obviously, the bottom of the door aperture should be in line with the sill where it meets the bonnet between the wheel arch and the scuttle. This is not the case with my car, the sill "horizontal"' edge rises up, by 5 mm at the wheel end, with regards to the extrapolation of the door bottom limit. So I guess that the sill itself is faulty, not so the bottom end of the bonnet.
So before I do the rolling up of the bonnet, I'll try and grind as much as possible the sill top edge, which is actually lead loaded. I hope that the lead thickness is enough.
Second issue is that the same bonnet bottom is slightly off the scuttle:
One possibility is that I did not tighten the internal air ducts and mudshields at the right positions wrt the screw plays when I reassembled it. I'll have to try this first.
Yesterday I was lucky enough to solve the problem of the convex shape of the center panel at its right end (that was too high by 5 mm wrt to the scuttle). I used a terrible set-up to vertically push it down (fainted hearts beware!
By heating with an air gun the area I reached the elastic domain and stabilized the shape correction.
Those who just have to adjust shims to have their bonnet fit are actually lucky people.
Regards,
Philippe-J
1967 S1(.25) OTS (well, bits of, so far...)
1967 S1(.25) OTS (well, bits of, so far...)
| Link: | |
| BBcode: | |
| HTML: | |
| Hide post links |
-
Geoff Allam
- Posts: 201
- Joined: Sat Mar 31, 2018 12:55 am

#31 Re: Series 1 bonnet fitting
Politeperson. When you scribed and cut the back of the bonnet along the scuttle did you cut it to your chosen final gap? On other cars you have done have you experienced any change in the gap width once the drive train is installed and the car is back on its wheels.
Geoff Allam
67 series1 ots under restoration
67 series1 ots under restoration
| Link: | |
| BBcode: | |
| HTML: | |
| Hide post links |
-
politeperson
- Posts: 1295
- Joined: Tue Jun 07, 2016 8:26 pm
- Location: Boston UK
#32 Re: Series 1 bonnet fitting
Hello Geoff,
No I didn't find any change in the gap. Bare shell or with running gear,
Even with running gear in the car and lifting it off the ground by the bulkhead and the rear trailing arm mounts, with all 4 wheels off the ground, no change in the gap.
All the cars I have done this to have been strong with new floors and new frames.
I wouldn't do this to a coupe or roadster of unknown provenance!
The E type design is really, really strong.
The way the bottom tubes of the frames push a mounting flange against the whole inner sill makes the shell exceedingly resistant to bending, and the combined effect of the frames makes the front end very strong indeed.
In fact the rear section and boot floor is also exceeding strong, The fuel tank protection is amazing. I know! I have tested it to the limit.
They are not so strong when they are rusty though!
Blimey, that is an extreme amount of pressure on that center section. Looks like you are going to lift the garage roof off. You sure you haven't got another issue Philippe?
Looks like you might like to consider bringing the bonnet back by 5mm with shiIsland Bluems looking at the wheel arch/sill join?
I have a couple of jobs to to in France in June, so will be in Correze and then Carcassonne. I had better call in and give you a hand. Hope that twist has gone by then.
Its true, but Enzo never said it
Too many E types
XK120 SUs
Too many E types
XK120 SUs
| Link: | |
| BBcode: | |
| HTML: | |
| Hide post links |
-
Geoff Allam
- Posts: 201
- Joined: Sat Mar 31, 2018 12:55 am
#33 Re: Series 1 bonnet fitting
Thank you. I was asking because some have reported changes and others have not. I am getting close to the final trimming time for mine so I am a bit nervous about whether the gap has potential for changing.
Geoff Allam
67 series1 ots under restoration
67 series1 ots under restoration
| Link: | |
| BBcode: | |
| HTML: | |
| Hide post links |

#34 Re: Series 1 bonnet fitting
A few bags of sand or similar in the engine bay may revel whether the fit requires adjusting.
Danny
1962 S1 3.8 FHC (1012/1798)
2015 Range Rover Sport SVR
"Experience is something you don't get until just after you need it."
1962 S1 3.8 FHC (1012/1798)
2015 Range Rover Sport SVR
"Experience is something you don't get until just after you need it."
| Link: | |
| BBcode: | |
| HTML: | |
| Hide post links |
-
Philippe-J.
- Posts: 42
- Joined: Mon Nov 27, 2023 12:14 pm
- Location: Occitanie
#35 Re: Series 1 bonnet fitting
Good evening Politeperson,
I am taking advantage of the break during the Crunch to give you good news about my terrible set up. I did not break the garage ceiling nor the car. I even succeeded in correcting the distortion of the center panel edge.
I made some progress in the alignment of the bonnet on the LH side too. With some lead loading of the top sill edge, the gaps are ok. It's not the same story on the RH side, even if the wing is no more off the sill at the rear of the wheel arch. Indeed the wing sill gap is parallel but equal to ... zero. As the top of the wing and the center panel are flush with the scuttle, it is likely that I'll have to roll the wire edge up. Can I roll it around the wire and the panel, i. e. have the panel around the wire for one and an half turn?
The last problem is that on both sides is that the wings are slightly too "body built" wrt the scuttle (4 mm). I have to bomber the curve of the former. Should I use lead or filler?
As for your trip in June, PM me and I'll be pleased to meet you and get your advice, I am an hour drive from Carcassonne.
I am taking advantage of the break during the Crunch
I made some progress in the alignment of the bonnet on the LH side too. With some lead loading of the top sill edge, the gaps are ok. It's not the same story on the RH side, even if the wing is no more off the sill at the rear of the wheel arch. Indeed the wing sill gap is parallel but equal to ... zero. As the top of the wing and the center panel are flush with the scuttle, it is likely that I'll have to roll the wire edge up. Can I roll it around the wire and the panel, i. e. have the panel around the wire for one and an half turn?
The last problem is that on both sides is that the wings are slightly too "body built" wrt the scuttle (4 mm). I have to bomber the curve of the former. Should I use lead or filler?
As for your trip in June, PM me and I'll be pleased to meet you and get your advice, I am an hour drive from Carcassonne.
Philippe-J
1967 S1(.25) OTS (well, bits of, so far...)
1967 S1(.25) OTS (well, bits of, so far...)
| Link: | |
| BBcode: | |
| HTML: | |
| Hide post links |
-
Geoff Allam
- Posts: 201
- Joined: Sat Mar 31, 2018 12:55 am
#36 Re: Series 1 bonnet fitting
Danny. I had considered that but it is my understanding that the engine & transmission weigh approx 750 lbs. That would require 15 50 lb bags of sand. Not sure how I would do that.
Geoff Allam
67 series1 ots under restoration
67 series1 ots under restoration
| Link: | |
| BBcode: | |
| HTML: | |
| Hide post links |
#37 Re: Series 1 bonnet fitting
Yes I guess this is impractical if the engine and gearbox are out of the car, you can possibly fit it as you are now and providing enough leeway in adjustment for the final fit once the engine and gearbox are installed.
Danny
1962 S1 3.8 FHC (1012/1798)
2015 Range Rover Sport SVR
"Experience is something you don't get until just after you need it."
1962 S1 3.8 FHC (1012/1798)
2015 Range Rover Sport SVR
"Experience is something you don't get until just after you need it."
| Link: | |
| BBcode: | |
| HTML: | |
| Hide post links |
-
Philippe-J.
- Posts: 42
- Joined: Mon Nov 27, 2023 12:14 pm
- Location: Occitanie
#38 Re: Series 1 bonnet fitting
Geoff,
from my recent experience, at least confirm your adjustment with the spring balance links on. In my case I noticed a slight effect with the bonnet going backwards by few mm, but one side went down too.
from my recent experience, at least confirm your adjustment with the spring balance links on. In my case I noticed a slight effect with the bonnet going backwards by few mm, but one side went down too.
Philippe-J
1967 S1(.25) OTS (well, bits of, so far...)
1967 S1(.25) OTS (well, bits of, so far...)
| Link: | |
| BBcode: | |
| HTML: | |
| Hide post links |
-
Geoff Allam
- Posts: 201
- Joined: Sat Mar 31, 2018 12:55 am
#39 Re: Series 1 bonnet fitting
Yes, you are correct. I noticed an approximately1/8 inch difference with the balance links on. It is good to reinforce that the links need to be present during fitting. Fortunately that is constant and is easily present when doing final adjustments before trimming.
Geoff Allam
67 series1 ots under restoration
67 series1 ots under restoration
| Link: | |
| BBcode: | |
| HTML: | |
| Hide post links |
-
Philippe-J.
- Posts: 42
- Joined: Mon Nov 27, 2023 12:14 pm
- Location: Occitanie
#40 Re: Series 1 bonnet fitting
I am in the stage of preparing the shortening of the RH bonnet wing, by rolling up the bottom wire edge, at the back of the wheel. I'd like to have your opinion about the way I intend to do it, before making a mess of it.
This is the panel ready for operation on my bench:
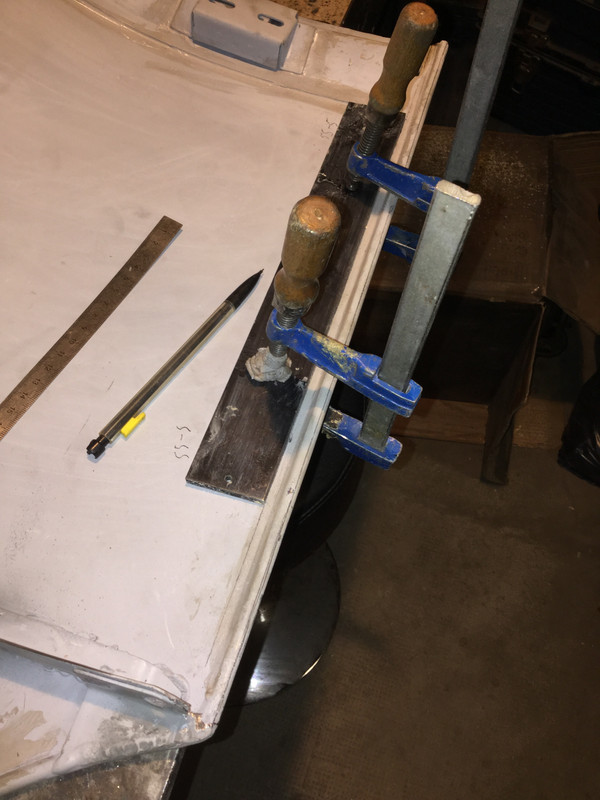
and the sketch of the way I see it (an image is better than words):
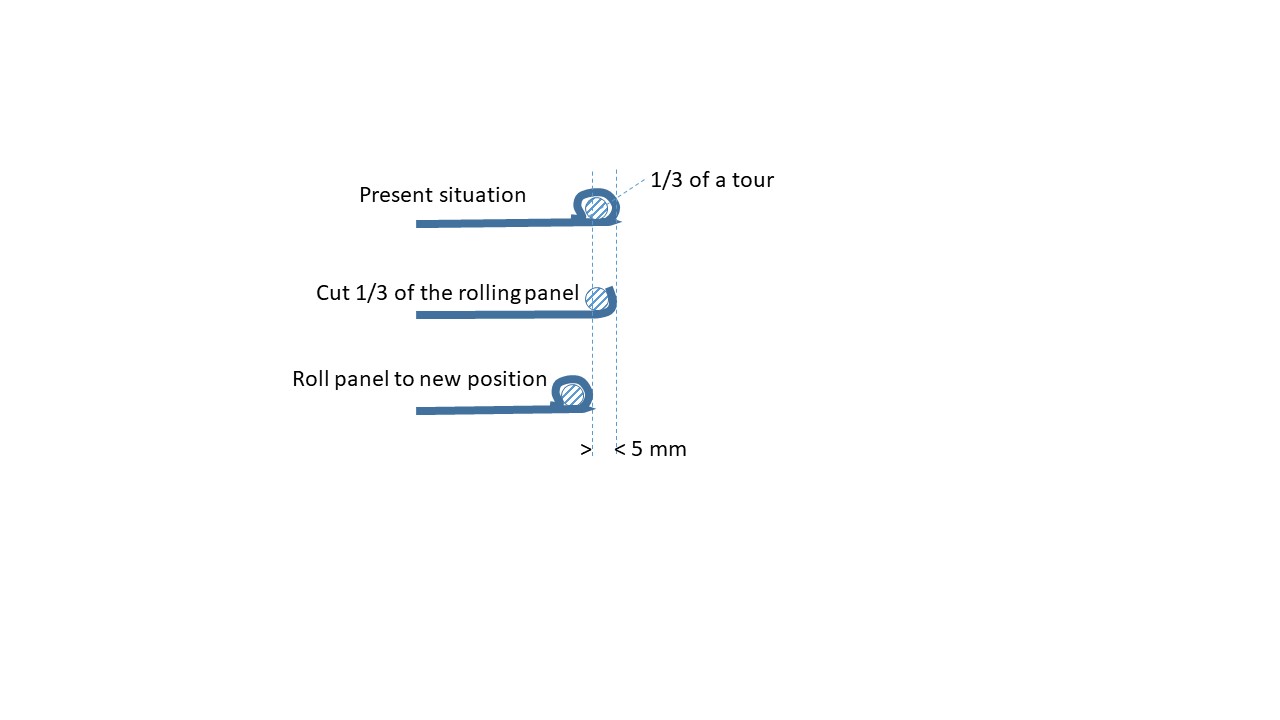
Any comment about that welcome.
Cheers.
This is the panel ready for operation on my bench:
and the sketch of the way I see it (an image is better than words):
Any comment about that welcome.
Cheers.
Philippe-J
1967 S1(.25) OTS (well, bits of, so far...)
1967 S1(.25) OTS (well, bits of, so far...)
| Link: | |
| BBcode: | |
| HTML: | |
| Hide post links |