


Evening All
I’ve read a post from last year about rebuilding the IRS. The main message was that a keen amateur can do it, just send off the diff to Alan Slawson. It’s been sat on a dolly for a month but the tub is back from the blasters now so I need to crack on and I’m up for having a go at it. I have removed the shocks, radius arms and wishbones (noting the shims as advised in the previous post). I have a couple of questions- as I am on to the hubs next do I need any special tools? Also as I progress are there any other key tips or is it all common sense? The Haynes manual gets very technical on the hub rebuilding so I may send them to Alan as well.
All advice appreciated as ever.
Thanks
Colin
IRS Rebuild
-
colinevans
Topic author - Posts: 178
- Joined: Thu Sep 24, 2015 6:54 am
- Location: Dorset, UK

#2 Re: IRS Rebuild
Hi Colin
Definitely use Alan....it’s a specialist item and by the time you have bought special tools it doesn’t make sense....even with man maths....!
Stripping is straight forward...take off everything to leave the bare case and nothing else bolted to it
All the best
Jonathan
Definitely use Alan....it’s a specialist item and by the time you have bought special tools it doesn’t make sense....even with man maths....!
Stripping is straight forward...take off everything to leave the bare case and nothing else bolted to it
All the best
Jonathan
1963 3.8 FHC ..now finished …………….
1974 2.7 Carrera now as an RS Touring
1974 2.7 Carrera now as an RS Touring
| Link: | |
| BBcode: | |
| HTML: | |
| Hide post links |
-
colinevans
Topic author - Posts: 178
- Joined: Thu Sep 24, 2015 6:54 am
- Location: Dorset, UK
#3 Re: IRS Rebuild
Cheers Jonathan, do I need anything special to get the hubs off once I have removed the split pin & castle nut?
Colin
Series 2 OTS, 280SL
Series 2 OTS, 280SL
| Link: | |
| BBcode: | |
| HTML: | |
| Hide post links |

#4 Re: IRS Rebuild
Hi Colin...everything other than the diff is straight forward.......the hubs are easy once you understand what you are doing. ....no special tools for the irs but you will need a dial guage......read the manual re the rear hubs untill it all makes sense....you will need to read it a few times........just continue this thread with any questions....Steve
Steve
69 S2 2+2 (just sold) ..Realm C type replica, 1960 xk150fhc
69 S2 2+2 (just sold) ..Realm C type replica, 1960 xk150fhc
| Link: | |
| BBcode: | |
| HTML: | |
| Hide post links |
-
colinevans
Topic author - Posts: 178
- Joined: Thu Sep 24, 2015 6:54 am
- Location: Dorset, UK
#5 Re: IRS Rebuild
Evening Steve
Thanks, will have a good read and post any questions if I get stuck!
Cheers, Colin
Thanks, will have a good read and post any questions if I get stuck!
Cheers, Colin
Colin
Series 2 OTS, 280SL
Series 2 OTS, 280SL
| Link: | |
| BBcode: | |
| HTML: | |
| Hide post links |
#6 Re: IRS Rebuild
Hi, I had my diff rebuilt by Alan and nothing short of excellent, for about £100 a side he rebuilds the hubs, with all the shims at hand it’s a no brainer, give it to him save the headache.

Previously...S1 OTS E type (sold)
S1 2+2 manual. (Sold)
S2 rhd OTS full resto finished 8/23
S1 3.8 coupe (full restoration yet to start!)
S1 2+2 manual. (Sold)
S2 rhd OTS full resto finished 8/23
S1 3.8 coupe (full restoration yet to start!)
| Link: | |
| BBcode: | |
| HTML: | |
| Hide post links |

#7 Re: IRS Rebuild
I did the same and used the workshop manual to guide me when I put it all back together again in the cage.
Richard
Previous owner and restorer of a S1 3.8 FHC Opalescent Golden Sand with Tan Trim 889504 (now sold and headed for Athens)


Previous owner and restorer of a S1 3.8 FHC Opalescent Golden Sand with Tan Trim 889504 (now sold and headed for Athens)
| Link: | |
| BBcode: | |
| HTML: | |
| Hide post links |

#8 Re: IRS Rebuild
Colin Wrote:
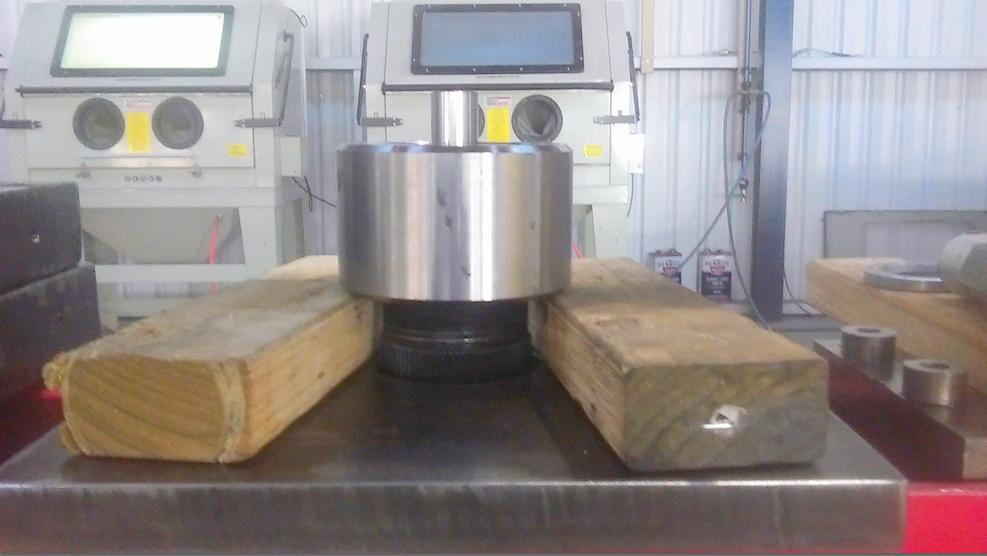
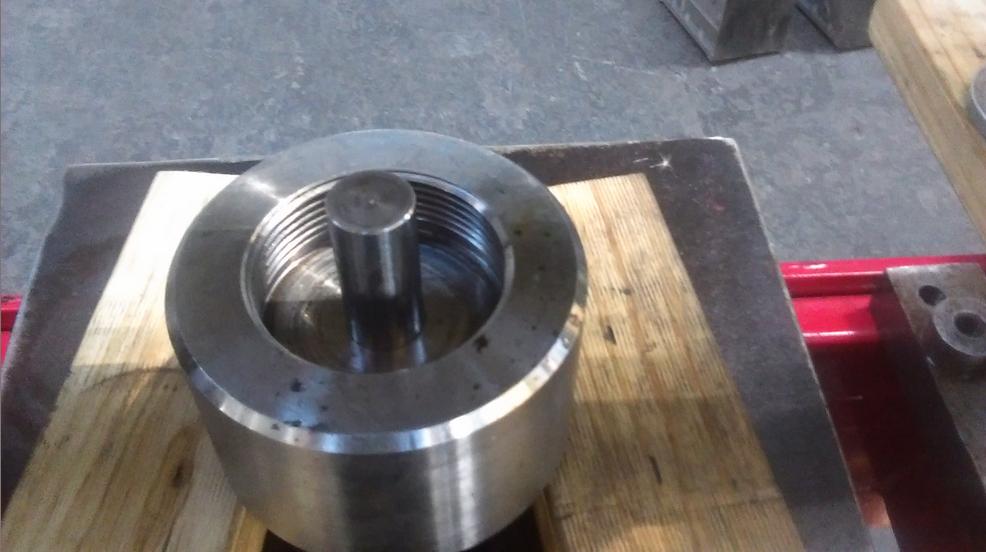
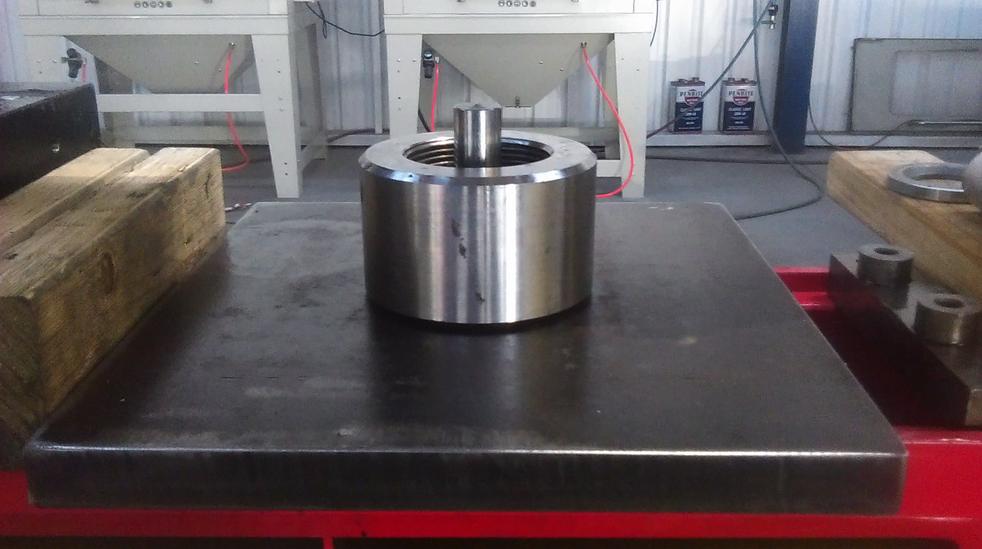
It does happen, but very rarely, that you can remove the split pin and nut, then simply withdraw the Hub and Hub Carrier from the spline of the Half Shaft. Normally a tool designated as JD7A (for wire wheel hubs) is required to pull the Hub assembly from the spline shaft.
The tool has a cap that screws onto the Hub, then via an internal thread at the centre of the cap, a threaded shaft is used to apply pressure to the end of the splined half shaft and in so doing, pulls the Hub assembly off the shaft.
Quite often, Loctite will have been used on the joint between the spined half shaft and the internal spline of the hub. in which case, separating the hub from the shaft can be very difficult.
The following pictures are of the set up I have in my shop. It works on the same basic principle as the JD7A tool, in that pressure is applied to the end of the splined half shaft, but with a hydraulic press and not a screw thread. I've had a few occasions where the Permanent Loctite had been used. in which case the Loctite has to be broken down with heat. Heating with a gas torch will not do the job, as there is too much air space insulating the area where the heat is required. What's needed is a soaking heat as obtained from an oven. For that purpose, I have a commercial, electric Pizza Oven into which the Half Shaft and Hub Assembly will comfortable fit.
The pictures showing the Threaded Cap sitting on timber is only to show the arrangement of the Hub coming up through the steel plate from beneath.
Regards,
Bill
Hello Colin,do I need anything special to get the hubs off once I have removed the split pin & castle nut?
It does happen, but very rarely, that you can remove the split pin and nut, then simply withdraw the Hub and Hub Carrier from the spline of the Half Shaft. Normally a tool designated as JD7A (for wire wheel hubs) is required to pull the Hub assembly from the spline shaft.
The tool has a cap that screws onto the Hub, then via an internal thread at the centre of the cap, a threaded shaft is used to apply pressure to the end of the splined half shaft and in so doing, pulls the Hub assembly off the shaft.
Quite often, Loctite will have been used on the joint between the spined half shaft and the internal spline of the hub. in which case, separating the hub from the shaft can be very difficult.
The following pictures are of the set up I have in my shop. It works on the same basic principle as the JD7A tool, in that pressure is applied to the end of the splined half shaft, but with a hydraulic press and not a screw thread. I've had a few occasions where the Permanent Loctite had been used. in which case the Loctite has to be broken down with heat. Heating with a gas torch will not do the job, as there is too much air space insulating the area where the heat is required. What's needed is a soaking heat as obtained from an oven. For that purpose, I have a commercial, electric Pizza Oven into which the Half Shaft and Hub Assembly will comfortable fit.
The pictures showing the Threaded Cap sitting on timber is only to show the arrangement of the Hub coming up through the steel plate from beneath.
Regards,
Bill
| Link: | |
| BBcode: | |
| HTML: | |
| Hide post links |
-
colinevans
Topic author - Posts: 178
- Joined: Thu Sep 24, 2015 6:54 am
- Location: Dorset, UK
#9 Re: IRS Rebuild
Thanks Bill, that’s very helpful. As it happens I didn’t have a large enough imperial socket to even try the castle nut- would you know what size it is so I can get one? A 30mm metric fitted on but I didn’t want to risk it. I’ll do it on the bench as I have now removed the first half shaft with the hub- after a bit of a battle with one rounded nut that needed filing flat!
Cheers, Colin
Cheers, Colin
Colin
Series 2 OTS, 280SL
Series 2 OTS, 280SL
| Link: | |
| BBcode: | |
| HTML: | |
| Hide post links |
#10 Re: IRS Rebuild
Hi Colin,
Plenty of advice on here once you get to the reassembly.
Just a few initial tips :-
1) If you haven’t already got a remote bleed assembly to bring the rear brake pipe bleed points down to an accessible point, now is the time to consider fitting one while the cage is out.
2) When refitting the rear coil and damper assemblies, make sure you put the top mounting bolts through from the inside of the cage so that the nuts are on the outside of the cage. It is not possible to withdraw the bolts externally should at a latter date you need to remove the coils and dampers once the cage is mounted back in the car.
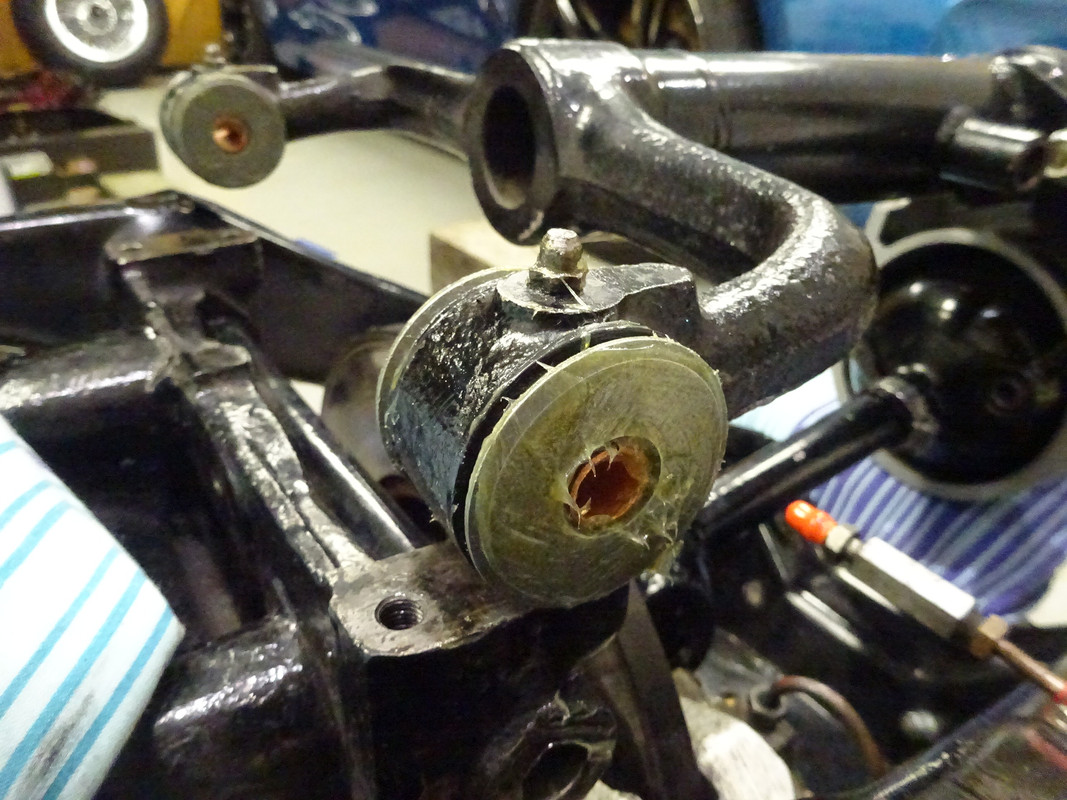
3) When removing the Wishbones, fully examine all the needle bearings, bearing tubes, sealing rings, sealing ring retainers and outer thrust washers. These are pretty exposed to the elements and you can buy a complete kit to replace all these items at a reasonable price. The Needle bearings easily drift out and can be gently pressed in with a normal G Cramp.
4) Another basic cheap reassembly “tool” is to get some 15mm copper pipe from your local plumbers merchant. When reassembling the various bearings, seals and thrust washers into the end of the wishbones, smother them in grease so they remain in place and pass through a 1 1/2” piece of the 15mm copper pipe at each side to retain these as you fit the wishbones back between the Inner Fulcrum mounting bracket and the cage. Once in place, push a long length of 15mm copper pipe through to push out the two 1 1/2” pieces to form a dummy shaft right through the whole assembly. When putting the Inner Fulcrum Shaft back into place, gently hold the dummy shaft in place to ensure all the components remain in place.
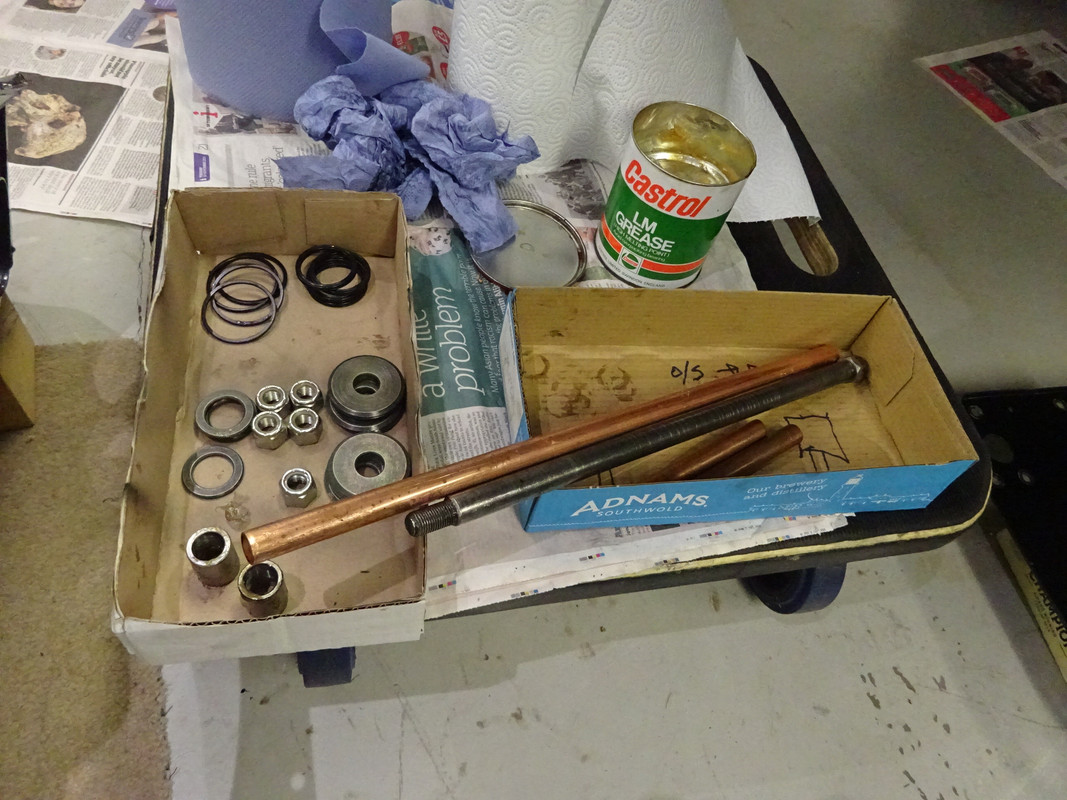
In mentioning the Inner Fulcrum Mounting brackets, if you choose to send the Differential away for someone else to work on - assuming it needed any work done - ensure you know where these are physically located, or make the point that you are supplying the Diff with these currently fitted as these are unique to the E Type and extremely expensive to source and will avoid any confusion at a later point !
Trust this helps,
Cheers,
Dave
Plenty of advice on here once you get to the reassembly.
Just a few initial tips :-
1) If you haven’t already got a remote bleed assembly to bring the rear brake pipe bleed points down to an accessible point, now is the time to consider fitting one while the cage is out.
2) When refitting the rear coil and damper assemblies, make sure you put the top mounting bolts through from the inside of the cage so that the nuts are on the outside of the cage. It is not possible to withdraw the bolts externally should at a latter date you need to remove the coils and dampers once the cage is mounted back in the car.
3) When removing the Wishbones, fully examine all the needle bearings, bearing tubes, sealing rings, sealing ring retainers and outer thrust washers. These are pretty exposed to the elements and you can buy a complete kit to replace all these items at a reasonable price. The Needle bearings easily drift out and can be gently pressed in with a normal G Cramp.
4) Another basic cheap reassembly “tool” is to get some 15mm copper pipe from your local plumbers merchant. When reassembling the various bearings, seals and thrust washers into the end of the wishbones, smother them in grease so they remain in place and pass through a 1 1/2” piece of the 15mm copper pipe at each side to retain these as you fit the wishbones back between the Inner Fulcrum mounting bracket and the cage. Once in place, push a long length of 15mm copper pipe through to push out the two 1 1/2” pieces to form a dummy shaft right through the whole assembly. When putting the Inner Fulcrum Shaft back into place, gently hold the dummy shaft in place to ensure all the components remain in place.
In mentioning the Inner Fulcrum Mounting brackets, if you choose to send the Differential away for someone else to work on - assuming it needed any work done - ensure you know where these are physically located, or make the point that you are supplying the Diff with these currently fitted as these are unique to the E Type and extremely expensive to source and will avoid any confusion at a later point !
Trust this helps,
Cheers,
Dave
Dave Rose
1967 Series 1 4.2 FHC
1967 Series 1 4.2 FHC
| Link: | |
| BBcode: | |
| HTML: | |
| Hide post links |
#11 Re: IRS Rebuild
Hi Colin.....metric is not used on an E type.....you need good AF tools....incorrect fitting sockets will just cause you problems as you have now found out.....invest in a decent set of sockets and spanner if you want to do a proper job...AF stands for across flat. ...so just measure your nut across the flats for the size.....Steve
Steve
69 S2 2+2 (just sold) ..Realm C type replica, 1960 xk150fhc
69 S2 2+2 (just sold) ..Realm C type replica, 1960 xk150fhc
| Link: | |
| BBcode: | |
| HTML: | |
| Hide post links |
-
colinevans
Topic author - Posts: 178
- Joined: Thu Sep 24, 2015 6:54 am
- Location: Dorset, UK
#12 Re: IRS Rebuild
Hi Steve
Sorry, I didn’t word that very well. Wouldn’t have used metric, just mentioned it to reference the nearest equivalent size. I’m at the stage where I have stripped everything out myself and the tub has just come back from the blasters, so all my imperials have been well used and I have a decent stock of UNF bolts and set screws at the ready! I just wondered if anyone knew what size the castle nut was so I could get the right imperial one, but I appreciate the advice anyway Steve. I’ll use my calipers!
Also thanks for the great tips Dave!
Cheers, Colin
Colin
Series 2 OTS, 280SL
Series 2 OTS, 280SL
| Link: | |
| BBcode: | |
| HTML: | |
| Hide post links |

#13 Re: IRS Rebuild
FWIW Colin, I offer some "lessons learned", which I posted during my own restoration a few years back:
--------
The next time I do this (which will be never I suspect) I may make a load of new mistakes, but I will get the following right:
- I won't even think about trying to fit the wishbones without turning the whole unit upside down;
- I won't hire a hoist at £60 per day plus transport when I can buy one of those Chinese red ones for £119 on ebay (and have a laugh reading the translated instructions as a bonus);
- I will clean the bores in the wishbone yokes and driveshaft yokes carefully before inserting the new bearings, so I won't damage the races on the burrs left by PO's whacking, and have to order more bearings;
- I will make sure I have cut an outer fulcrum dummy shaft short enough to fit between the yokes of the wishbone, rather than hoping all the shims and stuff stay in place for the final push with the real shaft (they didn't of course, so the shaft chewed up the shims and I had to start again, with insufficient replacements so more to be ordered);
- I will make sure the dummy shaft stays in contact with the real shaft all the way through;
- if it needs more than a moderate tap to get either of the fulcrum shafts in, I will stop and see what's wrong;
- I won't fit the hub carriers before the radius arms, so I'll be able to get the radius arm bolts in and won't have to take the hub carrier off again for the seventh time;
- I will be very careful with the dial gauge when I'm measuring end float and preload - swivelling the hub even one degree will mess up the reading as the gauge moves on the bumpy surface of the hub. That way I won't have to take the fulcrum shaft out for the nth time when I discover that, rather than having a thou of preload it seems to have about 10 thou of float;
- I will wear gloves when I'm doing the lock wiring.
------
Good luck with it all!
Jeremy
1967 S1 4.2 FHC
1967 S1 4.2 FHC
| Link: | |
| BBcode: | |
| HTML: | |
| Hide post links |
-
colinevans
Topic author - Posts: 178
- Joined: Thu Sep 24, 2015 6:54 am
- Location: Dorset, UK
#14 Re: IRS Rebuild
Thanks Jeremy- very good! All points duly noted.
Cheers, Colin
Cheers, Colin
Colin
Series 2 OTS, 280SL
Series 2 OTS, 280SL
| Link: | |
| BBcode: | |
| HTML: | |
| Hide post links |
-
 bitsobrits
- Posts: 423
- Joined: Tue Dec 27, 2011 2:09 am
- Location: Omaha, NE area

#15 Re: IRS Rebuild
Having just done my IRS, I would add I found it useful to leave the cage to diff bolts loose until the inner fulcrum shafts were installed. Note that I assembled my IRS right side up, which makes this possible.
Steve
'65 S1 4.2 FHC (early)
'65 S1 4.2 FHC (early)
| Link: | |
| BBcode: | |
| HTML: | |
| Hide post links |
-
Geoff Allam
- Posts: 201
- Joined: Sat Mar 31, 2018 12:55 am

#16 Re: IRS Rebuild
Bill, further to your description of using a pizza oven to loosen the grip of red loctite is there a necessity to press out the shaft immediately while it is still hot or does heat permanently destroy the bond allowing you to handle the parts when they are cool?
Geoff Allam
67 series1 ots under restoration
67 series1 ots under restoration
| Link: | |
| BBcode: | |
| HTML: | |
| Hide post links |
-
colinevans
Topic author - Posts: 178
- Joined: Thu Sep 24, 2015 6:54 am
- Location: Dorset, UK
#17 Re: IRS Rebuild
Hi All
The IRS is now dismantled and I am dropping the diff and hubs up to Alan tomorrow (he says thanks for the recommendations!). Whilst those bits are away I will tackle the rest. I presume the radius arms and wishbones should be painted rather than powder coated, or does it not matter?
Thanks
Colin
The IRS is now dismantled and I am dropping the diff and hubs up to Alan tomorrow (he says thanks for the recommendations!). Whilst those bits are away I will tackle the rest. I presume the radius arms and wishbones should be painted rather than powder coated, or does it not matter?
Thanks
Colin
Colin
Series 2 OTS, 280SL
Series 2 OTS, 280SL
| Link: | |
| BBcode: | |
| HTML: | |
| Hide post links |
-
bitsobrits
- Posts: 423
- Joined: Tue Dec 27, 2011 2:09 am
- Location: Omaha, NE area
#18 Re: IRS Rebuild
I would paint the lower control arms rather than powder coat, as in the event you need to adjust the rear toe in to get it in spec, pretty much the only way to do so is to use serious heat (as in via oxy-acetylene torch) on the lower control arms. Obviously both paint and powder would be locally ruined by this, but paint is easier to repair in situ.
Last edited by bitsobrits on Tue May 25, 2021 6:25 pm, edited 1 time in total.
Steve
'65 S1 4.2 FHC (early)
'65 S1 4.2 FHC (early)
| Link: | |
| BBcode: | |
| HTML: | |
| Hide post links |
-
colinevans
Topic author - Posts: 178
- Joined: Thu Sep 24, 2015 6:54 am
- Location: Dorset, UK
#19 Re: IRS Rebuild
Thanks and wow! - if it gets to that stage I'll be calling for backup.
On a serious note, are the aftermarket bushes for the radius arms and anti-roll bar links any good, as they are half the price of the jag equivalents? Don't want to skimp if they are inferior, but worth asking.
Cheers
Colin
On a serious note, are the aftermarket bushes for the radius arms and anti-roll bar links any good, as they are half the price of the jag equivalents? Don't want to skimp if they are inferior, but worth asking.
Cheers
Colin
Colin
Series 2 OTS, 280SL
Series 2 OTS, 280SL
| Link: | |
| BBcode: | |
| HTML: | |
| Hide post links |
#20 Re: IRS Rebuild
Hi Colin......some very poor quality by some sellers on ebay etc.....if you look at the more reputable larger suppliers you typically get the options...aftermarket.....OEM.......Jaguar......you need to check with the supplier but typically the OEM are the same as the Jaguar but the Jaguar are in Jag brand packaging......i would opt for oem or Jag.......dont think its worth useing the aftermarket.....usually there is also an "uprated" option....eg poly instead of rubber bushes.....but your choice............Steve
Steve
69 S2 2+2 (just sold) ..Realm C type replica, 1960 xk150fhc
69 S2 2+2 (just sold) ..Realm C type replica, 1960 xk150fhc
| Link: | |
| BBcode: | |
| HTML: | |
| Hide post links |