


Hi everyone,
I am in the phase of weldering in the outer sills to my new floors. My question is about their attachment to the front closing panels. I noted that on the RH side they are not secured to the closing panel but at the lowest point. When I drilled out this point, they went split apart with no effort. I did not see that on the LH side of the car, where they seem to be joint solid.
Can anyone tell me if they should be welded together, or glued, along the length of the closing panel flange? (see a drawing at the post by Simonpfhc » Sat Aug 02, 2014 10:44 am).
Advices most appreciated, thanks.
How to secure sill to sill closing panel?
-
Philippe-J.
Topic author - Posts: 42
- Joined: Mon Nov 27, 2023 12:14 pm
- Location: Occitanie

#1 How to secure sill to sill closing panel?
Philippe-J
1967 S1(.25) OTS (well, bits of, so far...)
1967 S1(.25) OTS (well, bits of, so far...)
| Link: | |
| BBcode: | |
| HTML: | |
| Hide post links |
-
Airborne62
- Posts: 39
- Joined: Wed Nov 27, 2013 1:31 am
- Location: Northern VA

#2 Re: How to secure sill to sill closing panel?
I found Chuck's blogs at Monocoque Metalworks invaluable when doing my sills and more
https://www.monocoque-metalworks.com/ma ... 01/hidden/
https://www.monocoque-metalworks.com/ma ... 01/hidden/
Airborne62
'62 FHC
'62 FHC
| Link: | |
| BBcode: | |
| HTML: | |
| Hide post links |
-
Philippe-J.
Topic author - Posts: 42
- Joined: Mon Nov 27, 2023 12:14 pm
- Location: Occitanie
#3 Re: How to secure sill to sill closing panel?
Thanks a lot, Airborne62, that perfectly answers my question.
Says Chuck: "By 1968, the factory was simply using seam sealer on the joint between the bulkhead closing panel and outer sill." and he claims that MM spot welds outersills to the closing panels to add strength to the structure.
(c) Monocoque Metalworks
So that's what I'll do, except plug-welding instead of spot-welding as the later is out of reach for me.
BTW I'll do that both sides. The LH side seam sealer might let me down like RH side, sooner or later.
Philippe-J
1967 S1(.25) OTS (well, bits of, so far...)
1967 S1(.25) OTS (well, bits of, so far...)
| Link: | |
| BBcode: | |
| HTML: | |
| Hide post links |
-
eddiecross
- Posts: 205
- Joined: Thu Sep 15, 2016 9:36 pm
- Location: Egham

#4 Re: How to secure sill to sill closing panel?
Hi Philippe,
Would you mind letting us know how this progresses? I need to add new sills to my 67 at some point.
Choices of panels- Martin Robey, Hudsons, MM?
My interest/Q's...
If non MM sills, what were they and how is the fit?
How is the sill fit to the bulkhead closing panel- make? Any distortion with plug welding.
Final sill to door and bonnet gaps any issues? (Great article from Chuck on sill fitting- 1/8" factory gap lead loaded!)
Great to have a link to progress.
Regards
Eddie
67 FHC
67 FHC
| Link: | |
| BBcode: | |
| HTML: | |
| Hide post links |
-
Philippe-J.
Topic author - Posts: 42
- Joined: Mon Nov 27, 2023 12:14 pm
- Location: Occitanie
#5 Re: How to secure sill to sill closing panel?
Eddie,
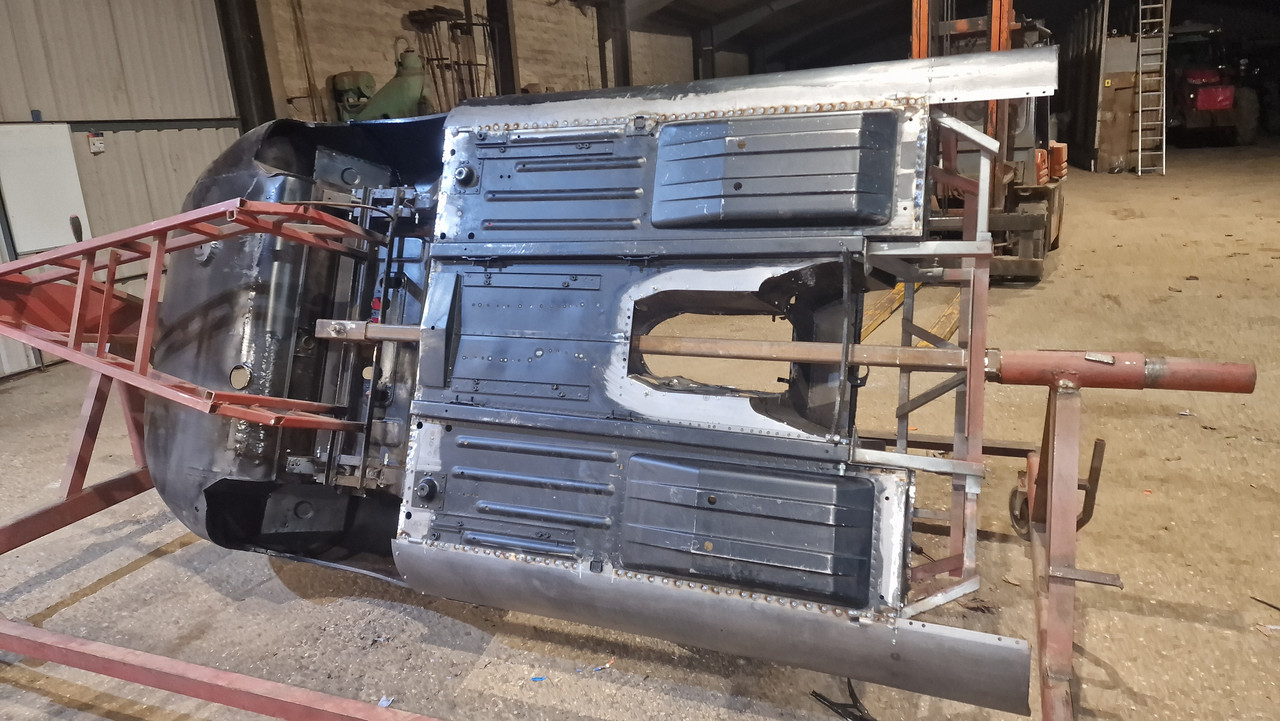
I'll get you informed with pleasure, but also with the limit of my own case where I could retain the original panels but the floors, including inner and outer sills, and sill closing panels.
I also hold the shell alignment with bars and X at the level of the doors and dashboard prior to cut the inner sills from the floors.
All in all I hope their fit will remain ok (as long as my MIG welding does not distort them all, that I will tell you at the end ).
).
I'll get you informed with pleasure, but also with the limit of my own case where I could retain the original panels but the floors, including inner and outer sills, and sill closing panels.
I also hold the shell alignment with bars and X at the level of the doors and dashboard prior to cut the inner sills from the floors.
All in all I hope their fit will remain ok (as long as my MIG welding does not distort them all, that I will tell you at the end
Philippe-J
1967 S1(.25) OTS (well, bits of, so far...)
1967 S1(.25) OTS (well, bits of, so far...)
| Link: | |
| BBcode: | |
| HTML: | |
| Hide post links |

#6 Re: How to secure sill to sill closing panel?
After reading this post I watched MM's take on aftermarket outer sills compared to his own, 100% MM if you want the correct profile.
Danny
1962 S1 3.8 FHC (1012/1798)
2015 Range Rover Sport SVR
"Experience is something you don't get until just after you need it."
1962 S1 3.8 FHC (1012/1798)
2015 Range Rover Sport SVR
"Experience is something you don't get until just after you need it."
| Link: | |
| BBcode: | |
| HTML: | |
| Hide post links |
-
Airborne62
- Posts: 39
- Joined: Wed Nov 27, 2013 1:31 am
- Location: Northern VA
#7 Re: How to secure sill to sill closing panel?
I will tell you I got in over my head on a 62 FHC. I ended up needing to replace the floor and inner/outer sills.
Chuck at MM is the man. His panels had the correct dimensions and curvature. He took the time to walk me through multiple issues and fabricated some custom patch panels for me. The car is almost finished...
Chuck at MM is the man. His panels had the correct dimensions and curvature. He took the time to walk me through multiple issues and fabricated some custom patch panels for me. The car is almost finished...
Airborne62
'62 FHC
'62 FHC
| Link: | |
| BBcode: | |
| HTML: | |
| Hide post links |
-
Philippe-J.
Topic author - Posts: 42
- Joined: Mon Nov 27, 2023 12:14 pm
- Location: Occitanie
#8 Re: How to secure sill to sill closing panel?
Maybe you all know this video by Charlie's Classic & Custom (
It's on a 2+2 but it is applicable to all E Types I guess.
where they show the issue of the outer sill profile, at 12'30", and the quite crude way around they have.
It's on a 2+2 but it is applicable to all E Types I guess.
Philippe-J
1967 S1(.25) OTS (well, bits of, so far...)
1967 S1(.25) OTS (well, bits of, so far...)
| Link: | |
| BBcode: | |
| HTML: | |
| Hide post links |
-
 politeperson
- Posts: 1300
- Joined: Tue Jun 07, 2016 8:26 pm
- Location: Boston UK
#9 Re: How to secure sill to sill closing panel?
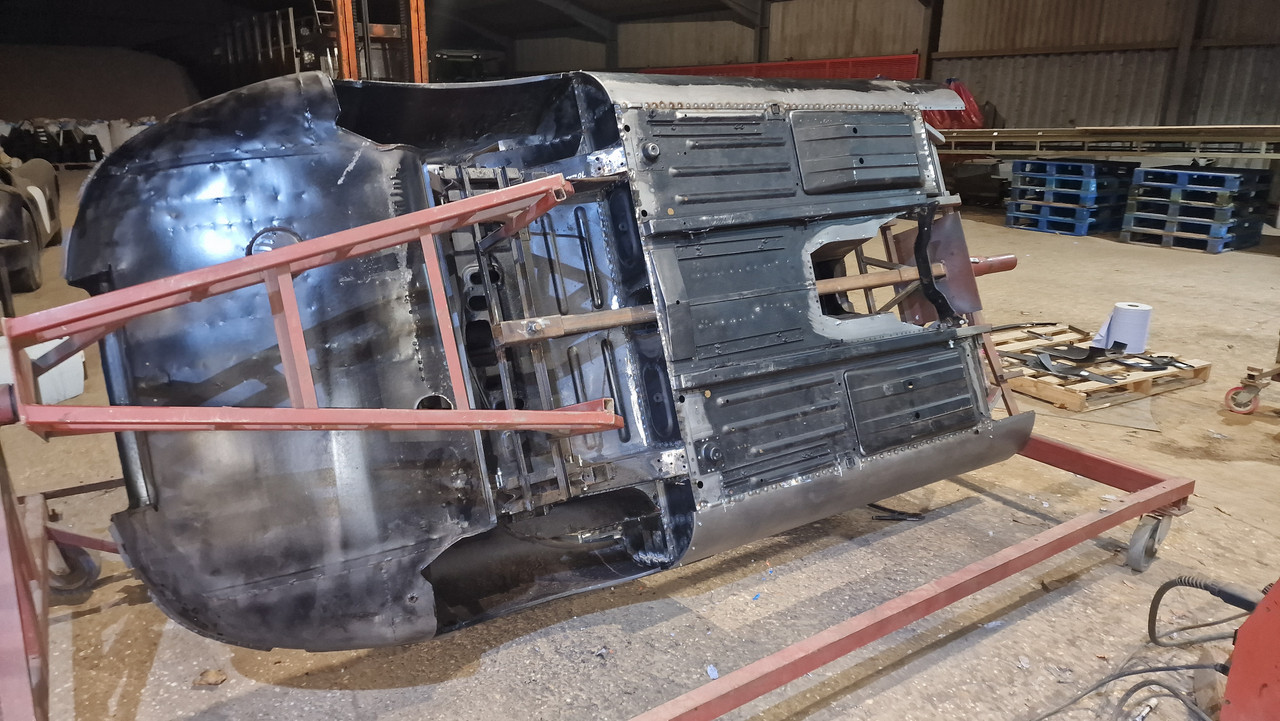
I fitted a pair of Mr Robeys outer sills this afternoon.
They have slightly less of a radius than the closing panels. This is on purpose I think. It allows you to pull them into the closing panel flanges to get rid of the gap for plug welding, using tek screws.
I finished about an hour ago, I will clean up the weld tomorrow.
They took longer to weld in than to fit, as the fit was perfect once they were pulled in, it took 15 minutes per side to fit them, much longer to clean them, punch/drill the holes and weld them in.
I was attaching them to Robey sill closing panels at both ends with a few tacks only.
I have fitted a few pairs of these and they have never given me any trouble.
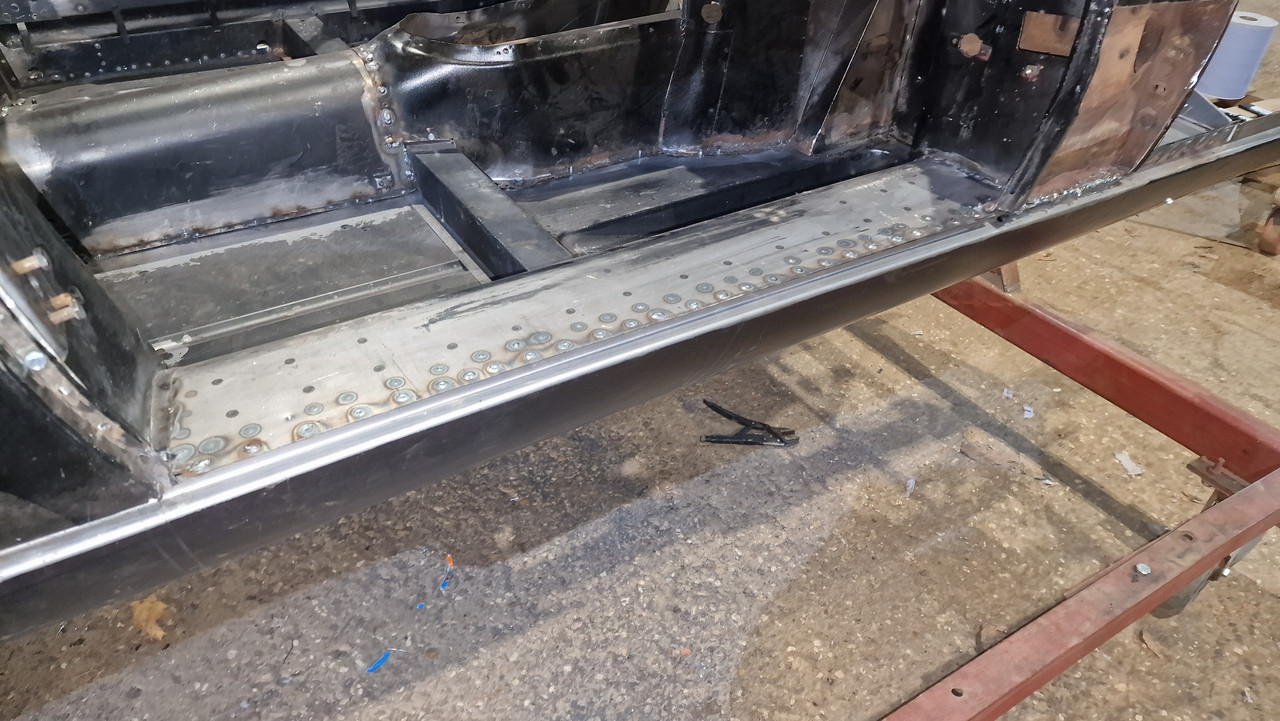
I wont go into the details on the main floor/sill bulkhead welds, however it requires a hole punch and quarter inch drill bit if plug welding. About 80 of them per side I would guess.
Drill the plug-weld holes in the closing panels first unless you are using a spot welder. Use thinner to remove the paint from the panels.
The rear outer sill panel has to be clamped onto the floor near the closing panel.
The center of the panel slides underneath the jacking point on the new floor and clamped to the inner sill where the door shuts.
The front needs to be clamped against the inner sill in front near the bulkhead.
To tighten the radius of the outer sill against the closing panels I would advise using 7mm head self tapping tek screws on a quarter in drive electric drill.
Screw through the pouter sill into the closing panel flange working from the top of the closing panel to the bottom, using three screws to bend the outer sill into the radius of the closing panel flanges.
You will find that the gap closes up perfectly.
I then tacked the closing panels along the sill using plug welds as they follow the profile perfectly.
They have slightly less of a radius than the closing panels. This is on purpose I think. It allows you to pull them into the closing panel flanges to get rid of the gap for plug welding, using tek screws.
I finished about an hour ago, I will clean up the weld tomorrow.
They took longer to weld in than to fit, as the fit was perfect once they were pulled in, it took 15 minutes per side to fit them, much longer to clean them, punch/drill the holes and weld them in.
I was attaching them to Robey sill closing panels at both ends with a few tacks only.
I have fitted a few pairs of these and they have never given me any trouble.
I wont go into the details on the main floor/sill bulkhead welds, however it requires a hole punch and quarter inch drill bit if plug welding. About 80 of them per side I would guess.
Drill the plug-weld holes in the closing panels first unless you are using a spot welder. Use thinner to remove the paint from the panels.
The rear outer sill panel has to be clamped onto the floor near the closing panel.
The center of the panel slides underneath the jacking point on the new floor and clamped to the inner sill where the door shuts.
The front needs to be clamped against the inner sill in front near the bulkhead.
To tighten the radius of the outer sill against the closing panels I would advise using 7mm head self tapping tek screws on a quarter in drive electric drill.
Screw through the pouter sill into the closing panel flange working from the top of the closing panel to the bottom, using three screws to bend the outer sill into the radius of the closing panel flanges.
You will find that the gap closes up perfectly.
I then tacked the closing panels along the sill using plug welds as they follow the profile perfectly.
Its true, but Enzo never said it
Too many E types
XK120 SUs
Too many E types
XK120 SUs
| Link: | |
| BBcode: | |
| HTML: | |
| Hide post links |
-
Philippe-J.
Topic author - Posts: 42
- Joined: Mon Nov 27, 2023 12:14 pm
- Location: Occitanie
#10 Re: How to secure sill to sill closing panel?
Thank you for your advice and photos. I am close to this stage with my floors, hopefully.
For the plug welding of the closing panels to the outer sills, I take note of the idea of the self taping screws installed from top to bottom as it will allow the former to gradually fit against the latter perfectly.
I take the opportunity to ask about additional welds on the floors. When I disassembled my original floors, I noticed that there were strengthening areas with (possibly) bronze welds. For instance around the jacking points or at the corners of the floor pannels. Did you have the same? Are they mandatory?
Philippe-J
1967 S1(.25) OTS (well, bits of, so far...)
1967 S1(.25) OTS (well, bits of, so far...)
| Link: | |
| BBcode: | |
| HTML: | |
| Hide post links |

#11 Re: How to secure sill to sill closing panel?
Hello Philippe,
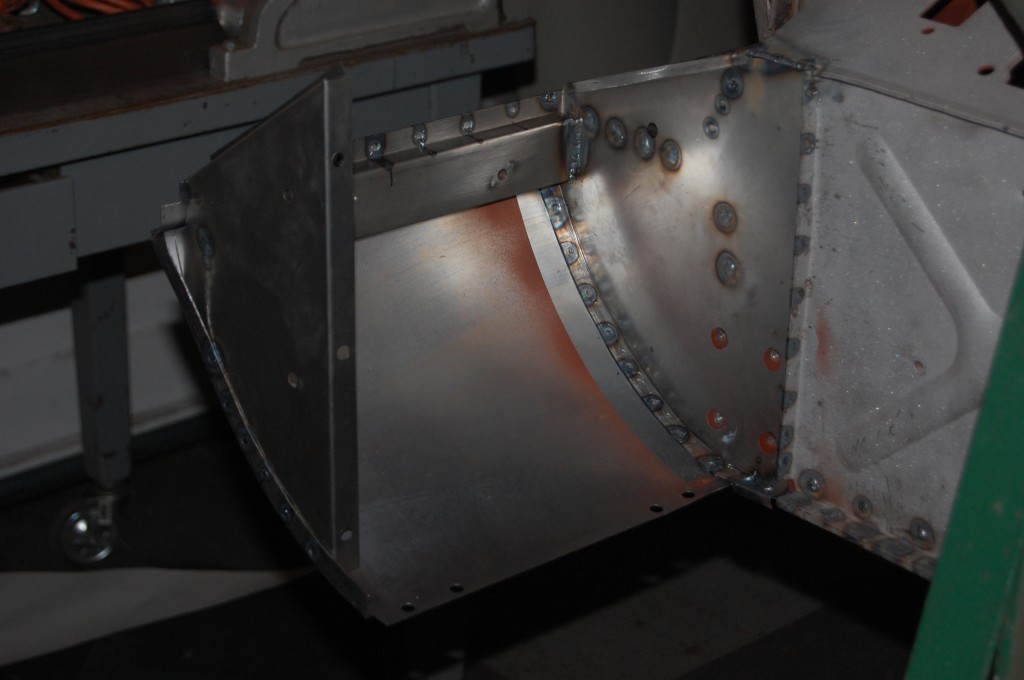
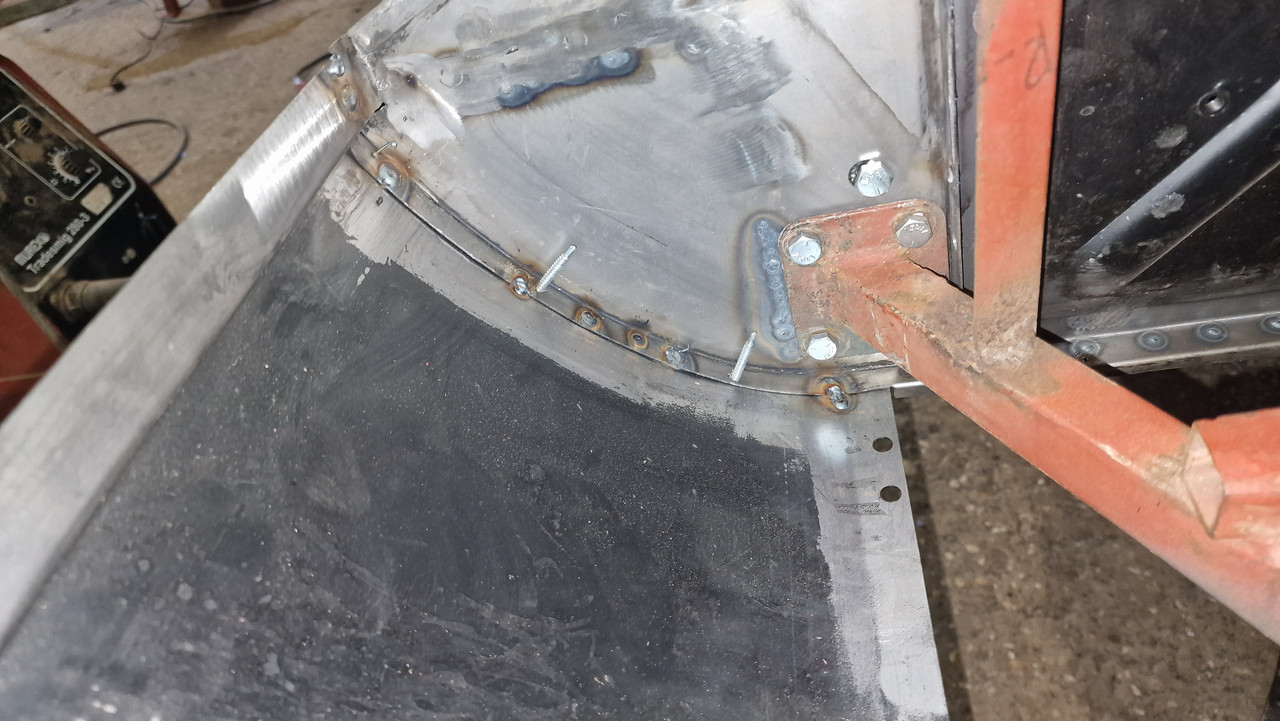
Although there is nothing stopping you from either Spot, or Plug welding the flange of the Sill Closing Panel to the Sill, it was never Stop Welded to the Sill in the factory. A Glue-like sealant, the same as used to glue the attachment strips to the under side of the bonnet, to which the bonnet air ducts were secured, was used.
The following picture, except for the feathered paint edge, is of an unmolested Sill Closing Panel, showing the sealant that has been squeezed out of the joint during original assembly. As far as being welded to the Sill, that only occurred at the horizontal support, in the area indicated by the Red Ellipse.
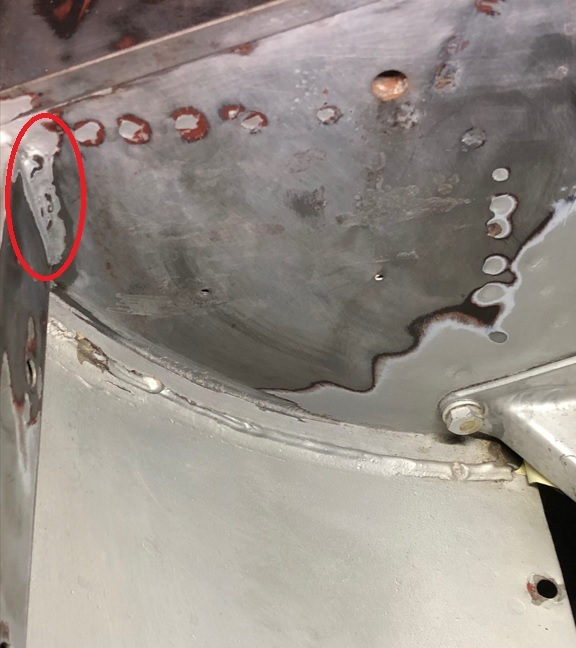
Whenever you have small, local areas of steel heated to the plastic state and beyond, shrinkage will occur, which translates into distortion that you have to deal with. Accordingly, welding the flange of the closing panel to the sill is not necessary, and bonding this area is the authentic method.
Regards,
Bill
Although there is nothing stopping you from either Spot, or Plug welding the flange of the Sill Closing Panel to the Sill, it was never Stop Welded to the Sill in the factory. A Glue-like sealant, the same as used to glue the attachment strips to the under side of the bonnet, to which the bonnet air ducts were secured, was used.
The following picture, except for the feathered paint edge, is of an unmolested Sill Closing Panel, showing the sealant that has been squeezed out of the joint during original assembly. As far as being welded to the Sill, that only occurred at the horizontal support, in the area indicated by the Red Ellipse.
Whenever you have small, local areas of steel heated to the plastic state and beyond, shrinkage will occur, which translates into distortion that you have to deal with. Accordingly, welding the flange of the closing panel to the sill is not necessary, and bonding this area is the authentic method.
Regards,
Bill
| Link: | |
| BBcode: | |
| HTML: | |
| Hide post links |
-
Philippe-J.
Topic author - Posts: 42
- Joined: Mon Nov 27, 2023 12:14 pm
- Location: Occitanie
#12 Re: How to secure sill to sill closing panel?
Dear Bill,
thank you so much for your interesting post. I did not find the information about this assembly with glue anywhere else. The completely complete E Type book is still to be written with all that kind of details.
Regards.
thank you so much for your interesting post. I did not find the information about this assembly with glue anywhere else. The completely complete E Type book is still to be written with all that kind of details.
Regards.
Philippe-J
1967 S1(.25) OTS (well, bits of, so far...)
1967 S1(.25) OTS (well, bits of, so far...)
| Link: | |
| BBcode: | |
| HTML: | |
| Hide post links |
-
Gfhug
- Posts: 3324
- Joined: Thu Jun 19, 2014 3:08 pm
- Location: Near Andover, Hampshire,in D.O. Blighty
#13 Re: How to secure sill to sill closing panel?
Philippe, Sika 4720 is an appropriate adhesive for those panels, you will need a compressed air sealant gun to properly apply it.
Geoff
Geoff
S2 FHC Light Blue
S2 OTS LHD - RHD full restoration
S2 OTS LHD - RHD full restoration
| Link: | |
| BBcode: | |
| HTML: | |
| Hide post links |
-
politeperson
- Posts: 1300
- Joined: Tue Jun 07, 2016 8:26 pm
- Location: Boston UK
#14 Re: How to secure sill to sill closing panel?
Phillippe,
I think the bronze welds were actually brazing.
In the factory they assembled the main body sections on jigs with brazing before they were fully welded together.
I would not worry about replicating that method now though, as you probably have a bit more time to assemble it than they did.
I think the bronze welds were actually brazing.
In the factory they assembled the main body sections on jigs with brazing before they were fully welded together.
I would not worry about replicating that method now though, as you probably have a bit more time to assemble it than they did.
Its true, but Enzo never said it
Too many E types
XK120 SUs
Too many E types
XK120 SUs
| Link: | |
| BBcode: | |
| HTML: | |
| Hide post links |
-
Philippe-J.
Topic author - Posts: 42
- Joined: Mon Nov 27, 2023 12:14 pm
- Location: Occitanie
#15 Re: How to secure sill to sill closing panel?
Today is the last of 2023, but it brings me tips I've been looking for for all that time!
Thank you for your posts, that, apart from guiding me in my next jobs, give interesting information about the making of the E Type at the factory.
Happy new year to you all!
Thank you for your posts, that, apart from guiding me in my next jobs, give interesting information about the making of the E Type at the factory.
Happy new year to you all!
Philippe-J
1967 S1(.25) OTS (well, bits of, so far...)
1967 S1(.25) OTS (well, bits of, so far...)
| Link: | |
| BBcode: | |
| HTML: | |
| Hide post links |
#16 Re: How to secure sill to sill closing panel?
Hi,
My understanding, is that early sills ( perhaps Series One) had closing panels spot welded to the sills, but Jaguar changed this later on to glued on, perhaps so that they didn’t have the extra expense of lead loading over the spot welds. (not sure of the date, perhaps for the Series Two).
Paul
My understanding, is that early sills ( perhaps Series One) had closing panels spot welded to the sills, but Jaguar changed this later on to glued on, perhaps so that they didn’t have the extra expense of lead loading over the spot welds. (not sure of the date, perhaps for the Series Two).
Paul
65 Series 1 FHC, 68 Jaguar 340
| Link: | |
| BBcode: | |
| HTML: | |
| Hide post links |