Handbrake help needed please!

Technical advice Q&A

Topic author
kgnich
Posts: 70
Joined: Thu Dec 31, 2009 8:09 am
Great Britain

#1 Handbrake help needed please!

Post by kgnich » Sun May 08, 2011 8:17 pm

10 steps forward and several back today....

Got the IRS fitted after a full rebuild but have two problems.

Image

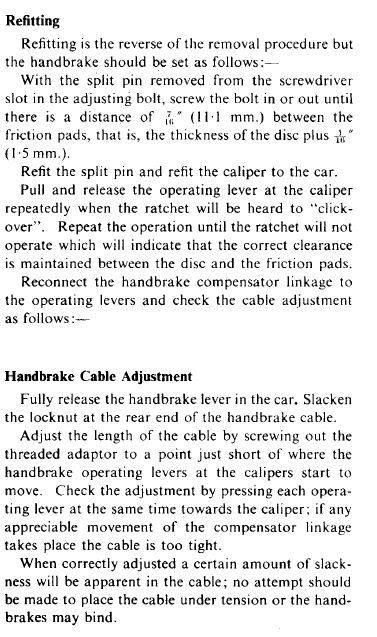
Firstly and most annoying is that one of the rear calipers is leaking badly - not at any of the connections but looks as though it is leaking at a seal. Bother. Do I have to take the whole unit out to reseal it? Series 2 , 1969 2+2. Caliper was rebuilt by a specialist in jaguar axles and they say they pressure test but this one clearly wasn't.

Second is the handbrake lever travel. I can't get it to go past 4 clicks. It just goes completely solid. It's obvious why when you see the photo's below. At the 4th click the handbrake is just about able to hold the car against the autobox but I know that is not right. Same specialist rebuilt the handbrake units but to be fair I had the same problem before I rebuilt it.
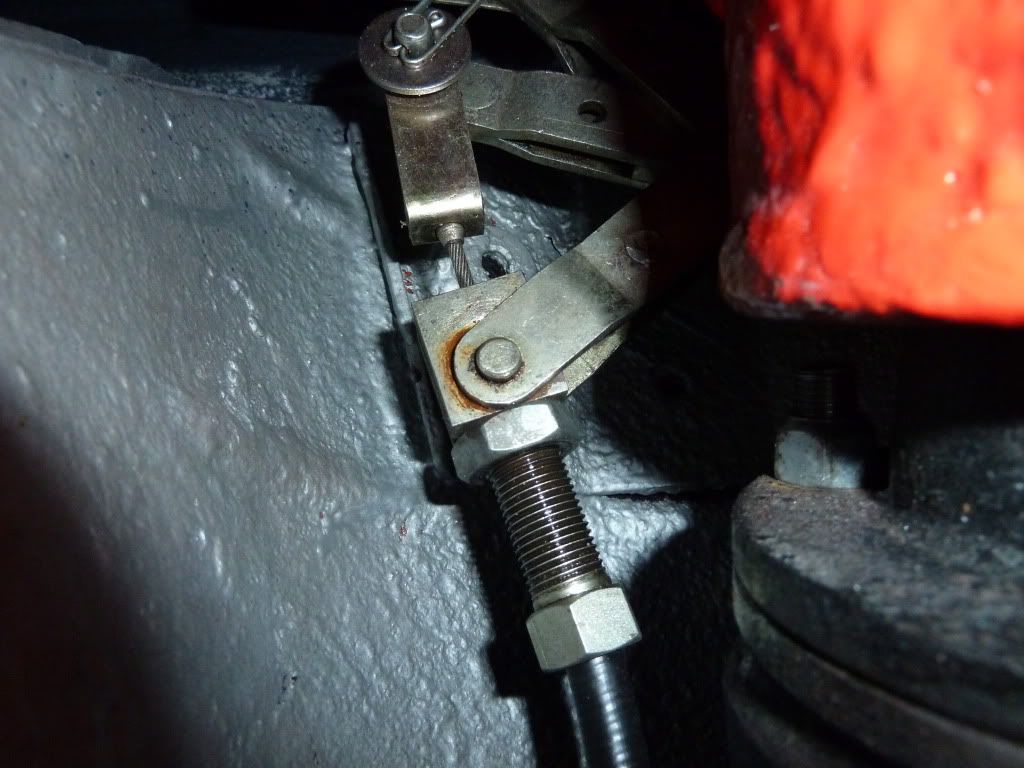
I suspect the handbrake cable is not right - or perhaps the compensator? I haven't replaced either on the rebuild as they appeared very new.

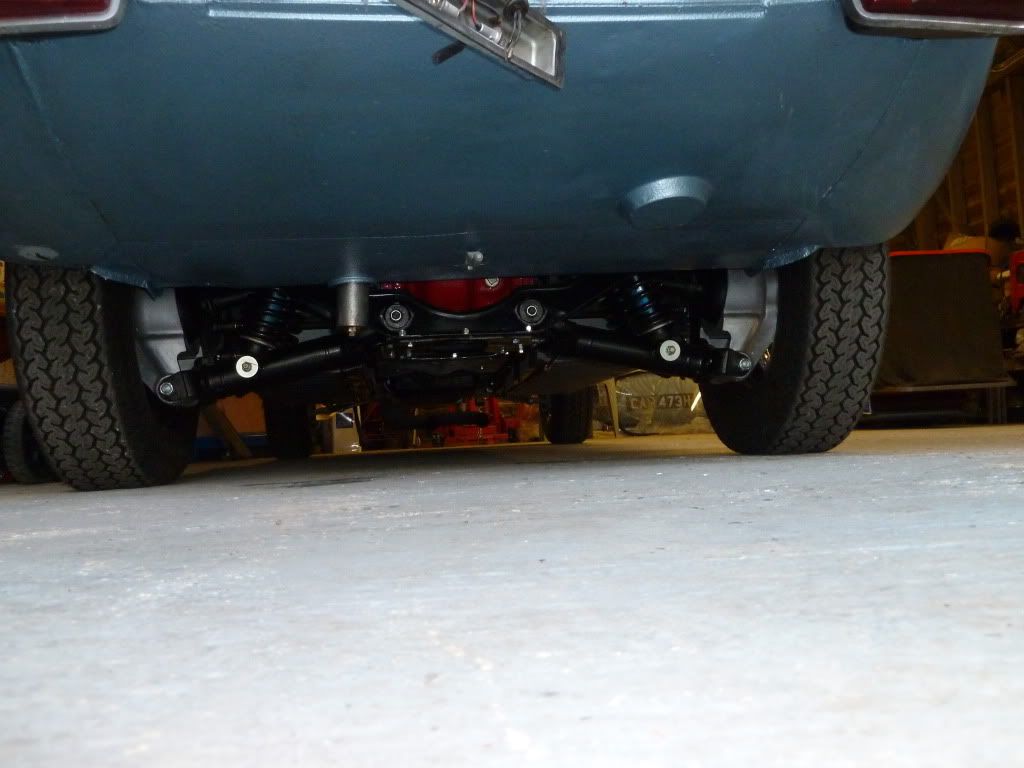
Here is a photo with the handbrake OFF

Image

..and here it is with 4 clicks

Image

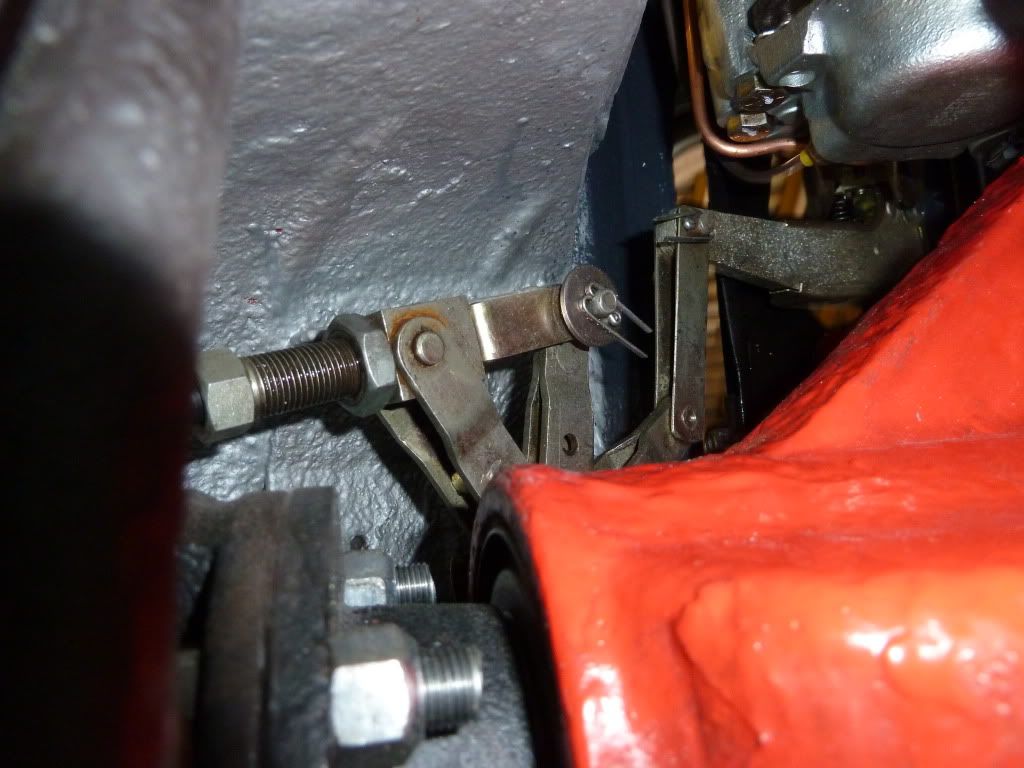
You can see that the clevis is hitting the block. Before I installed the IRS I chekced that the movement of the actuating arms on the calipers was relatively small before both sides clamped so I'm thinking there is something wrong with the cable perhaps? Has anyone had a similar problem. I'm sure if I could get 5 clicks the handbrake would be very good!!

Any help would be appreciated.

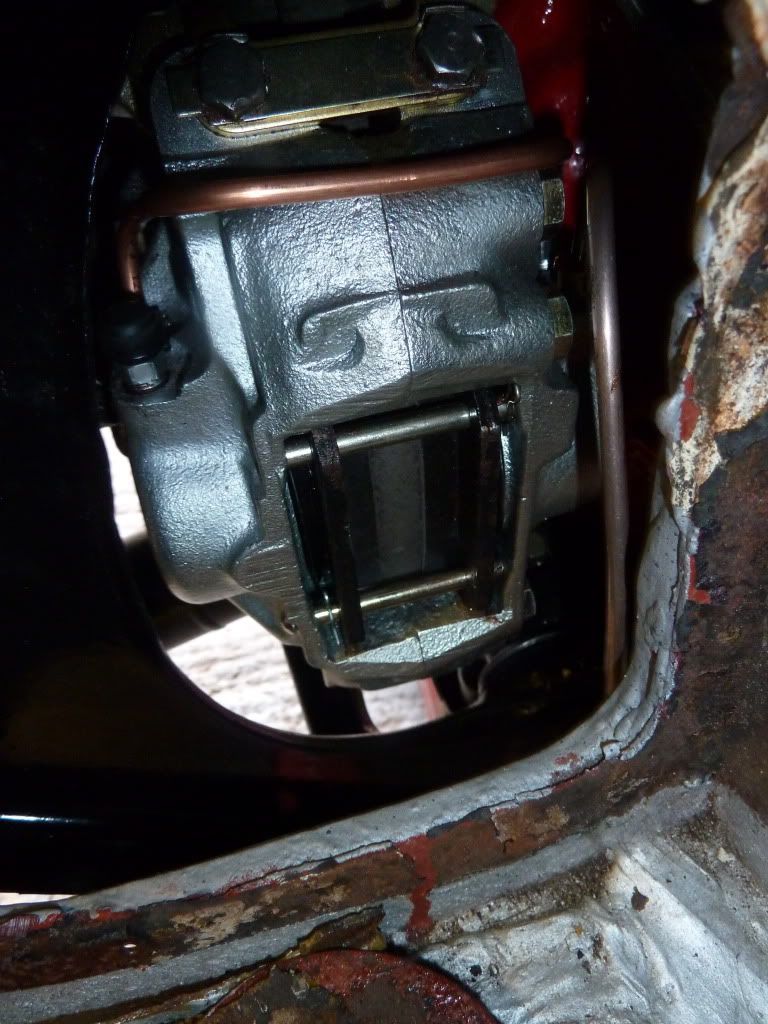
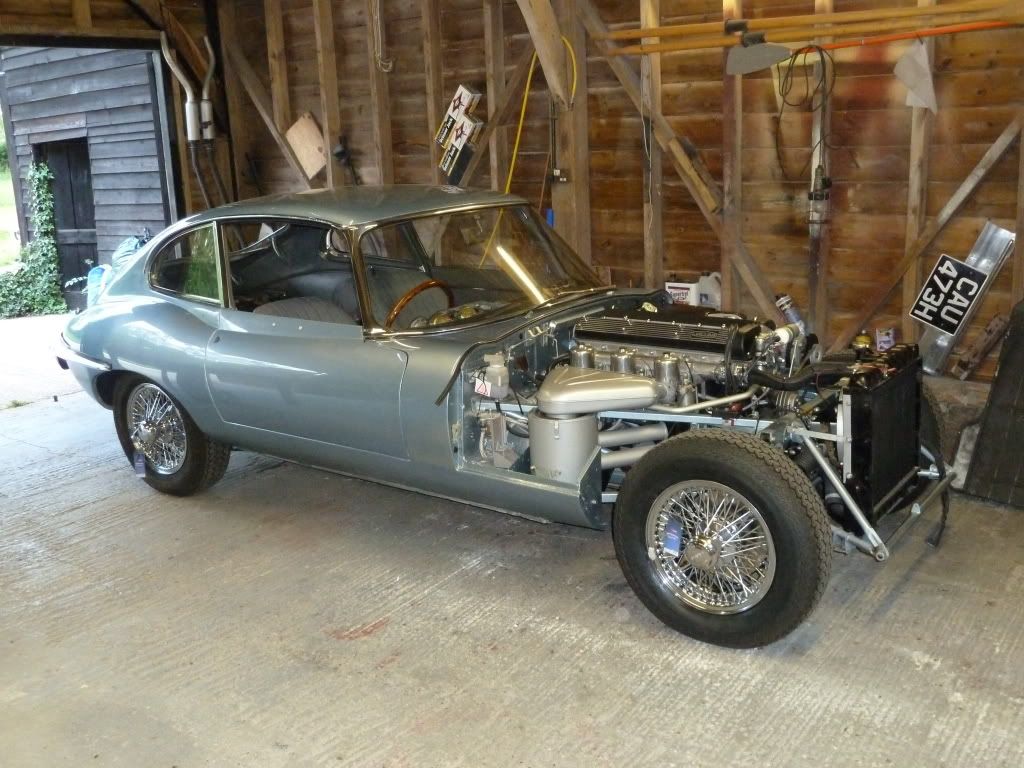
here is a photo showing current progress in case anyone is interested.

Image

Many thanks to anyone who can assist.

Cheers
Graham

It seems
1969 4.2 2+2

Link:
BBcode:
HTML:
Hide post links
Show post links

User avatar

Heuer
Administrator
Posts: 14790
Joined: Sat Mar 01, 2008 5:29 pm
Location: Nottinghamshire
Great Britain

#2

Post by Heuer » Sun May 08, 2011 8:56 pm

You might want to talk to Steve Hook (MGCJAG) as he has done a modification, courtesy of Dave Kerr, to the handbrake mechanism. No idea if this will help but worth a try!
David Jones
S1 OTS OSB; S1 FHC ODB
1997 Porsche 911 Guards Red

Add your E-Type to our World Map: http://forum.etypeuk.com/viewtopic.php?f=1&t=1810

Link:
BBcode:
HTML:
Hide post links
Show post links


1954Etype
Moderator
Posts: 2686
Joined: Sat Sep 27, 2008 12:32 pm
Contact:
Great Britain

#3

Post by 1954Etype » Sun May 08, 2011 9:10 pm

Heuer wrote:You might want to talk to Steve Hook (MGCJAG) as he has done a modification, courtesy of Dave Kerr, to the handbrake mechanism. No idea if this will help but worth a try!
No, Idon't believe it will David. I think the problem lies with the handbrake cable. The JEC, under Colin Ford, had a batch made that are correct as it was recognised that the only ones available were too long.

Link:
BBcode:
HTML:
Hide post links
Show post links

User avatar

mgcjag
Moderator
Posts: 8118
Joined: Fri Jul 09, 2010 6:15 pm
Location: Ludlow Shropshire
Great Britain

#4

Post by mgcjag » Sun May 08, 2011 9:28 pm

Hi Graham.......Just sent the details of the handbrake mod courtesy of Dave Kerr to your e mail....David (Heuer) havent done the mod myself as only recieved it from D Kerr after Id fitted the IRS.....Have you received the details I e-mailed you....(im having a bit of trouble with my sent mail)...Steve
Steve
69 S2 2+2 (just sold) ..Realm C type replica, 1960 xk150fhc

Link:
BBcode:
HTML:
Hide post links
Show post links

User avatar

mgcjag
Moderator
Posts: 8118
Joined: Fri Jul 09, 2010 6:15 pm
Location: Ludlow Shropshire
Great Britain

#5

Post by mgcjag » Sun May 08, 2011 9:39 pm

Hi Again Graham.....I wont say its impossible to remove the leaky caliper with the IRS in position because i havent tried.....But from memory i dont think so .....there is much less room to manouver on the 2+2 than the FHC. all the best Steve
Steve
69 S2 2+2 (just sold) ..Realm C type replica, 1960 xk150fhc

Link:
BBcode:
HTML:
Hide post links
Show post links


Topic author
kgnich
Posts: 70
Joined: Thu Dec 31, 2009 8:09 am
Great Britain

#6

Post by kgnich » Mon May 09, 2011 7:48 am

Thanks everyone.

I think I'll just have to take it all out again ... mainly to get to the leaking caliper and I'll see what I can do with the handbrake cable then. I think the clevis may be too long and I may be able to move the pin location in the cable to assist. I won't be able to get to it for a couple of weeks now though.

Does anyone know how the JEC cable differs from those sold by the usuals?

Thanks again.

Graham
1969 4.2 2+2

Link:
BBcode:
HTML:
Hide post links
Show post links

User avatar

Heuer
Administrator
Posts: 14790
Joined: Sat Mar 01, 2008 5:29 pm
Location: Nottinghamshire
Great Britain

#7

Post by Heuer » Mon May 09, 2011 8:43 am

Steve

Yes I got your email and attachments.
David Jones
S1 OTS OSB; S1 FHC ODB
1997 Porsche 911 Guards Red

Add your E-Type to our World Map: http://forum.etypeuk.com/viewtopic.php?f=1&t=1810

Link:
BBcode:
HTML:
Hide post links
Show post links

User avatar

PeterCrespin
Posts: 4561
Joined: Fri Mar 05, 2010 8:22 pm
Location: Gaithersburg, Maryland.
Contact:
United States of America

#8 Re: Handbrake help needed please!

Post by PeterCrespin » Mon May 09, 2011 10:06 am

kgnich wrote:10 steps forward and several back today....
Unless you are absolutely certain it is a seal (v. rare on new/refurbed calipers) it could be a union leaking and appearing to come from a piston, same as a cam feed leak can look like a crank seal etc. You can take the base plate off under the diff and rotate the caliper out from around the diff I think. I did this on an XJ but not sure if the caliper bolts are as accessible on the E-type LWB. Could be easier to drop the IRS as it's very clean and you've only just fitted it....

Your handbrake could be fixed pro-tem by disconnecting it, drilling a new clevis pivot hole much closer to the cable end and trimming off the excess.
1E75339 UberLynx D-Type; 1R27190 70 FHC; 1E78478; 2001 Vanden Plas

Link:
BBcode:
HTML:
Hide post links
Show post links


christopher storey
Posts: 5698
Joined: Sun Mar 09, 2008 3:07 pm
Location: cheshire , england
Great Britain

#9

Post by christopher storey » Mon May 09, 2011 12:32 pm

First the good news. The handbrake cable has been wrongly assembled. The eccentric block into which the adjuster screws should be facing forwards , ( or it could be termed outwards )with its longer section towards the cable outer , not inwards towards the compensator. It is that which is restricting the movement

The not so good news is that with the S2 Girling brakes it is very difficult to get the calipers out with the rear end in situ , and it is certainly much much easier to do if you drop the rear end . However, all may not be lost - with newly assembled calipers the pads and pistons should be removable , not easily but without too much trouble , so what I would do is identify which side of the caliper is leaking , and then remove that pad and piston , check that the seal is not twisted , and replace or reposition as necessary. It will not be easy because the pistons are a tight fit on new seals, but it should be possible

Link:
BBcode:
HTML:
Hide post links
Show post links


1954Etype
Moderator
Posts: 2686
Joined: Sat Sep 27, 2008 12:32 pm
Contact:
Great Britain

#10

Post by 1954Etype » Mon May 09, 2011 12:36 pm

christopher storey wrote:First the good news. The handbrake cable has been wrongly assembled. The eccentric block into which the adjuster screws should be facing forwards , ( or it could be termed outwards )with its longer section towards the cable outer , not inwards towards the compensator. It is that which is restricting the movement
Good spot Chris!

Link:
BBcode:
HTML:
Hide post links
Show post links


Topic author
kgnich
Posts: 70
Joined: Thu Dec 31, 2009 8:09 am
Great Britain

#11

Post by kgnich » Mon May 09, 2011 1:24 pm

Chris,

Thanks so much for that. I did try to assemble the block the other way around as I knew I wanted max clearance. However to get the cable through the slot in the block if it is turned around 180 degrees the clevis has to pass through the twin plates and it simply wouldn't ... hence the reason it is assembled as is. However perhaps a little more persuasion is needed! I look again.

As for the caliper seal I spoke to the supplier this morning and they thought perhaps that some copper swarf from the new brake pipes could have cut the seal - they have seen that before. He said the piston wouldn't come out with the disc in place. No harm in trying I suppose.

Again my thanks for your support and advice and encouragement - it is hugely appreciated.

Graham
1969 4.2 2+2

Link:
BBcode:
HTML:
Hide post links
Show post links

User avatar

PeterCrespin
Posts: 4561
Joined: Fri Mar 05, 2010 8:22 pm
Location: Gaithersburg, Maryland.
Contact:
United States of America

#12

Post by PeterCrespin » Mon May 09, 2011 4:38 pm

1954Etype wrote: Good spot Chris!
Indeed. Very well spotted!

Can't help thinking there should still be more 'wiggle room' though, because at four clicks and then binding solid, turning the trunnion around will get maybe another 2-3 clicks before binding. That's with the adjuster right out. The thing should operate reasonably and not come close to binding with the adjuster in the mid-way position for most well-designed mechanisms. That clevis is needlessly long and I wonder about handbrake pad adjustment and the threaded link to the caliper arm?

Pete
1E75339 UberLynx D-Type; 1R27190 70 FHC; 1E78478; 2001 Vanden Plas

Link:
BBcode:
HTML:
Hide post links
Show post links


Topic author
kgnich
Posts: 70
Joined: Thu Dec 31, 2009 8:09 am
Great Britain

#13

Post by kgnich » Mon May 09, 2011 10:13 pm

Well I've checked again tonight having taken the pads out and the caliper leak is definitely from the piston seal ... it's pouring out from the top of the piston when any hydraulic pressure is applied. Clearly a problem - could possibly be a torn seal but maybe just misplaced as it is a "dribble" rather than a "drip".

I'm resigned now to removing the IRS to get to the caliper and I'll see if I can get the compensator and brake cable assembled the other way around when it is out from under.

Any tips on how to adjust the small threaded link correctly?

Cheers
Graham
1969 4.2 2+2

Link:
BBcode:
HTML:
Hide post links
Show post links

User avatar

PeterCrespin
Posts: 4561
Joined: Fri Mar 05, 2010 8:22 pm
Location: Gaithersburg, Maryland.
Contact:
United States of America

#14

Post by PeterCrespin » Tue May 10, 2011 6:14 am

It takes a long time to write and a minute to do if you've got a good reference photo. There's bound to be info in the archives here I assume.

I have to be in front of it to remember for sure, but IIRC you start with your handbrake pads adjusted properly snug to the disc ,as per the book (5 thou? - check). Then adjust the threaded link (from memory) so that the clevis pin holes line up when the caliper arms are pulled onto the disc and the angles are around 90 degrees or just less. When leverage angles are significantly over 90 degrees the mechanical advantage falls off pretty rapidly.

That should mean when it springs back there is enough 'opening' on the jaws of the compensator arms that a properly-adjusted lever and cable operates the handbrakes powerfully and equally on each side and adjustment left in each direction on the threaded adjuster.

The XJ/XJS IRS uses supplementary return springs between the caliper arms and the cage, as they have no compensator, just a transverse cable. If the arms are already drilled it doesn't hurt to add these i guess if things are a little sticky.
1E75339 UberLynx D-Type; 1R27190 70 FHC; 1E78478; 2001 Vanden Plas

Link:
BBcode:
HTML:
Hide post links
Show post links


Topic author
kgnich
Posts: 70
Joined: Thu Dec 31, 2009 8:09 am
Great Britain

#15

Post by kgnich » Tue May 10, 2011 8:13 am

Thanks Pete

This is what my manual says about adjusting the handbrake ...

Image

It doesn't actually mention the threaded link. I couldn't find anything by searching this site unfortunately.

I'll see how it goes when I've got it all back out again.

Thanks for your help.

Cheers
Graham
1969 4.2 2+2

Link:
BBcode:
HTML:
Hide post links
Show post links

User avatar

PeterCrespin
Posts: 4561
Joined: Fri Mar 05, 2010 8:22 pm
Location: Gaithersburg, Maryland.
Contact:
United States of America

#16

Post by PeterCrespin » Tue May 10, 2011 9:38 pm

Those instructions are probably from the original 3.8 manual and that parts book doesn't show an adjustable link IIRC.

Just remember to work your way up the system from disc to handbrake lever and only move along when the part you're working on is totally sorted and to spec. That way you won't be using an adjustment at one point to 'compensate (doh) for a fault at another. It's a pretty good handbrake when set up right.

Pete
1E75339 UberLynx D-Type; 1R27190 70 FHC; 1E78478; 2001 Vanden Plas

Link:
BBcode:
HTML:
Hide post links
Show post links


Topic author
kgnich
Posts: 70
Joined: Thu Dec 31, 2009 8:09 am
Great Britain

#17

Post by kgnich » Tue May 10, 2011 9:50 pm

Thanks Pete. You are right about it being the 3.8 early manual instructions.
My 4.2 manual is silent on the handbrake adjustment. Point taken about working up from the disc. I'll see how it goes. I am determined to get the handbrake working efficiently!!
Graham
1969 4.2 2+2

Link:
BBcode:
HTML:
Hide post links
Show post links


Larry Wade
Posts: 86
Joined: Sun Dec 21, 2008 7:48 pm
Location: La Canada, California

#18 Handbrake help needed

Post by Larry Wade » Wed May 11, 2011 4:12 am

Hi Graham,

You can remove the brakes without taking out the disks. Here is how you do it:

Jack up the rear end.
Pull the back wheels off.
Remove the front shock absorber on either side.
Remove to two outer piston assemblies.
Remove the handbrake assembly and also take off all of the hydraulic lines.
Rotate the disk and you'll see the caliper mounting blots (one on top and one below). You can use a 3/8" driver with a long extension (mine was 12"). The short socket will fit on the nut. The thin extension will get you past the u-joint. Then you can take the two caliper assemblies out.
Remove the inner piston assemblies once you have the caliper frames out.

Assembly is the reverse sequence.

I works as I just finished doing this about a month ago.

Your seals should not be leaking. There isn't any acceptable excuse for that.

Best regards,
Larry

PS This assumes that you do not plan to lockwire the caliper assembly mounting bolts. Most people don't. If you do want to do that you probably will have no choice but to drop the IRS and pull the disks.
Larry Wade
62 OTS 877842
La Canada, California, USA

Link:
BBcode:
HTML:
Hide post links
Show post links


Topic author
kgnich
Posts: 70
Joined: Thu Dec 31, 2009 8:09 am
Great Britain

#19

Post by kgnich » Wed May 11, 2011 6:56 am

....
Last edited by kgnich on Wed May 11, 2011 7:03 am, edited 3 times in total.
1969 4.2 2+2

Link:
BBcode:
HTML:
Hide post links
Show post links


Topic author
kgnich
Posts: 70
Joined: Thu Dec 31, 2009 8:09 am
Great Britain

#20

Post by kgnich » Wed May 11, 2011 7:02 am

Thank you Larry for explaining that. I think you probably have the earlier Dunlop? calipers ... unfortunately mine are the later Girling ones where the mounting bolts are on the inside facing out. They can't be accessed through the disc and to get a spanner on them they I really need access to the front of the rear cage. It seems impossible to remove them insitu.

Here's a photo of one:

Image

I agree it is not at all acceptable to have a leaking seal especially as I sent them away to a specialist for a full rebuild. However I need to remove them and inspect before I know why the seal is leaking. My supplier has suggested that perhaps some copper swarf in the pipes has caused some damage. I suppose that is possible although I did use a pre-made kit. I have made many brake pipe flares myself in the past but decided to use the kit for this particular car.

I'll let everyone know what I find.

Thanks again

Graham
1969 4.2 2+2

Link:
BBcode:
HTML:
Hide post links
Show post links

Post Reply Previous topicNext topic