


Hello,
I need some advice.
My right door is twisted. Impossible to tune the door on the car. When you look at the side of the car, if the top left close to the handle and the front are ok , well aligned with the body of the car, then the bottom Left is out of the car. It yawns outward.
Nothing appears on the external panel. The curve looks, seems perfect..
Does anyone have any idea to rework the door?
Thanks for your opinion.
Issue on a door

#2
Sounds familiar as we just pulled the doors off. The drivers side was like yours - just "off". The passenger side came off easy but the driver's side was hung up. We finally wrestled it off and found what I think is the hinge pin coming out. I didn't spend any time really looking at it as we took the doors straight up to the home theater. They are small but heavy. So I'd check out the condition of the hinge. If you search the forum there are probably rebuild instructions.
Jim
Jim
70 E-type OTS
| Link: | |
| BBcode: | |
| HTML: | |
| Hide post links |
-
christopher storey
- Posts: 5698
- Joined: Sun Mar 09, 2008 3:07 pm
- Location: cheshire , england

#3
I'm not sure that I have followed the description of the fault. When you say nothing appears on the external panel, do you mean that the curve of that panel follows the body curvature , and that it is the inside part of the rear of the door which is sticking outwards ?
In any event, the first thing to look at is the hinges. These are moveable both where they meet the door, and where they meet the bulkhead, and getting the geometry of them right is not easy. If you are in real trouble, the best thing is to take the glass and frame out which makes the doors much lighter and easier to adjust
In any event, the first thing to look at is the hinges. These are moveable both where they meet the door, and where they meet the bulkhead, and getting the geometry of them right is not easy. If you are in real trouble, the best thing is to take the glass and frame out which makes the doors much lighter and easier to adjust
| Link: | |
| BBcode: | |
| HTML: | |
| Hide post links |

#4
I had a similar issue with the drivers my OTS and CMC fixed it. Can't remember all the details but it involved strapping a piece of wood to the door and using it to lever the door to fit. This was on a restored car but no idea exactly how they did it.
David Jones
S1 OTS OSB; S1 FHC ODB
1997 Porsche 911 Guards Red
Add your E-Type to our World Map: http://forum.etypeuk.com/viewtopic.php?f=1&t=1810
S1 OTS OSB; S1 FHC ODB
1997 Porsche 911 Guards Red
Add your E-Type to our World Map: http://forum.etypeuk.com/viewtopic.php?f=1&t=1810
| Link: | |
| BBcode: | |
| HTML: | |
| Hide post links |

#5
I stand to be corrected on this but my understanding is that in the factory when doors were first fitted to the car - the door skin was not yet permanently fixed to the door frame. The reason for this was (allegedly) so that the fitters could slightly twist the door to get the right fit. Once it was aligned it was then 'fixed' into position.
I don't know if this is an urban rumour but it is quite possibly true
I do know my new doors (from Robey) already had the skins 'fixed' into position so I could not twist them to get the best fit...
I have heard that restorers force the door into shape using a block of wood as Heuer mentioned - but until I know how they do it - im not going to try it. The end result is as you describe - the door is not perfectly flush with the bodywork on all sides
1964 FHC 4.2
Etype restoration blog http://connor.org.uk
Etype restoration blog http://connor.org.uk
| Link: | |
| BBcode: | |
| HTML: | |
| Hide post links |
#6
Here are some pictures from the problem:
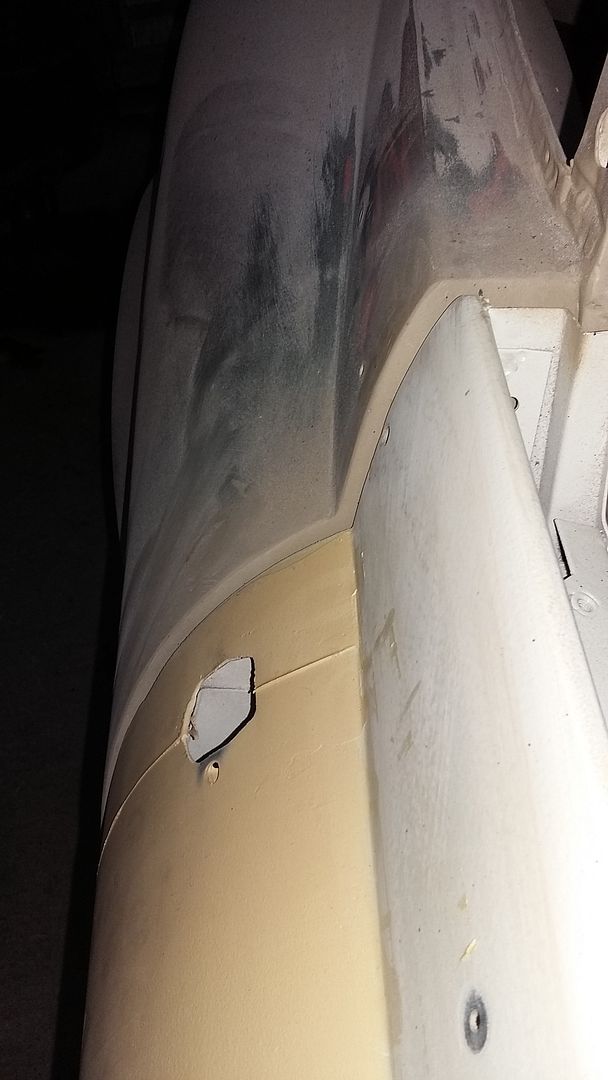

The defect is close to 7mm. Not a small one.


The defect is close to 7mm. Not a small one.
Le chemin sera long!...
| Link: | |
| BBcode: | |
| HTML: | |
| Hide post links |
#7
You cant tell from that picture , we need to see the whole door and gaps all around it. There is a rubber seal to go behind that back edge and if the front is the same then it may be adjustable from the hinges.
Even if its twisted, that amounted should be easily be able to be twisted back into shape. When doors are fitted you need to trial fit the rubbers at the same time to get them just right.
Even if its twisted, that amounted should be easily be able to be twisted back into shape. When doors are fitted you need to trial fit the rubbers at the same time to get them just right.
64 S1 4.2 OTS 1E10012 73 S3 2+2 manual 2013 V6 F type OTS
| Link: | |
| BBcode: | |
| HTML: | |
| Hide post links |
#8
Ok i will do some other pictures.
On the front side the door is aligned. This is the problem....
Either it is ok at the rear side and wrong at front or as it is on th picture.
On the front side the door is aligned. This is the problem....
Either it is ok at the rear side and wrong at front or as it is on th picture.
Le chemin sera long!...
| Link: | |
| BBcode: | |
| HTML: | |
| Hide post links |
-
 David Oslo
- Posts: 653
- Joined: Fri Sep 19, 2014 2:13 pm
- Location: Norway

#9
So the hinges are nicely aligned up / down / in / out such that the front edge of the door nicely follows the curvature of the scuttle panel / A-pillar, and then you have this 7mm inwards twist at the rear. Sure seems to be that the door needs an opposite twist with a piece of wood to sort it. Good that you're sorting this before you've primed and painted.
I've "adjusted" window frames on pressed steel doors by holding my knee at the bend point and giving a sharp pull on the top. I've also personally seen big Swedes and Germans "tweaking" doors on the assembly line, as recent as 10 years ago. So it's not uncommon, tolerance stack up and all that stuff.
In your case you will be needing to twist the "shoe box" construction of the lower door, which is inherantly stiff in torsion. I would suggest clamping a 1 meter piece of 2"x4" (48x98mm) wood to the inside flat surface of the door. Use multiple G-clamps, as many as you can manage, to spread the load. Ideally get the 2x4 wood to stick upwards through the glass frame, so that you have a accessible vertical lever. Then I would find a nice big hard foam pad, or rubber, and a same sized plywood pad (I'm thinking A4 size at least) and use that as a reaction point on the lower rear corner of the door. Then either with my own knee or foot, or a helper, hold the door shut using this load-spread pad, and pull outwards with the wooden lever. See if you can get the lower door to twist. Try gently first before proceeding towards the 7mm total.
These are just my thoughts as to how I would go about fixing it if it was on my car, don't shoot me if you get problems.....
David
S1 2+2 '67 MOD conversion (going)
S2 OTS '70 (arriving)
S1 2+2 '67 MOD conversion (going)
S2 OTS '70 (arriving)
| Link: | |
| BBcode: | |
| HTML: | |
| Hide post links |
-
christopher storey
- Posts: 5698
- Joined: Sun Mar 09, 2008 3:07 pm
- Location: cheshire , england
#10
Personally, I don't see that door as twisted. What I do see is that the panel gap at the rear end of the door is grossly insufficient with it pressed in as far as it is , and the door looks to me to be about 5mm too low at the very top which will radically affect the panel gap when that defect is cured ( although I am bound to say that it does not look too low at the chine , but that may just be the camera angle ) . It also looks to me as thought the top hinge is positioned inboard of the bottom hinge thus making the door slope in at the top . Also, it will look completely different if you position it in the way it should be when the door catch is engaged i.e. about 7 or 8mm further out . Also, Jaguar habitually used shims - certainly on the saloons - to adjust door position and panel gaps, and I do rather wonder if someone has put too many shims in at some position on the hinges. I always start with no shims at all, and then make up cardboard shims as a temporary measure which can be slid in and out with the hinge screws loosened , to see how this affects matters. It is a time consuming and fiddly job, but the more you play with it the more you will see how it works
| Link: | |
| BBcode: | |
| HTML: | |
| Hide post links |
-
 KingRichard
- Posts: 108
- Joined: Mon May 16, 2011 8:27 am
- Location: Netherlands
- Contact:

#11
Hi Christpher,
Do you mean shims behind the hinges. I don,t recall shims anywhere on my E. To adjust the hinge and door I used the 2x4 bolts in the hinges.
My doors are also not perfect and not in line with the body. Never knew the factory twisted the doors before fixing the skin. When I bought my car it had already new door skins welded. So I recognize the problem.
Richard
E-type series 2 2+2 RHD 1969
| Link: | |
| BBcode: | |
| HTML: | |
| Hide post links |

#12
I fitted a new door skin to one of my doors and "adjusted" the other.
The problem you have is very easily remedied so do not worry. As someone mentioned in a previous post it is a lot easier when the skin is not tacked or spot welded to the frame or carcass. Without the skin the door is actually very flexible.
Assuming the front of the door to the A post is ok, in your case I would cut a piece of 3"x2" timber that will fit diagonally from the top of the inside of the door across to the inner sill on the opposite side holding the door away from the B post by about 25mm so in effect the door is slightly open. I would put a wood screw into the end of the timber that meets the door and locate it in one of the trim clip holes to avoid it slipping. Now push firmly on the bottom of the door to twist it into shape. Keep trying it until it is aligned.
I would avoid using the edge of the door/skin for fear of creasing the skin. By bracing the edge of the frame of the door you can exert quite a lot of force.
Hope this helps.
Simon
| Link: | |
| BBcode: | |
| HTML: | |
| Hide post links |


#14
I was waiting for you to answer this thread as your perfect doors demonstrate, twisting them is easy if done carefully.
64 S1 4.2 OTS 1E10012 73 S3 2+2 manual 2013 V6 F type OTS
| Link: | |
| BBcode: | |
| HTML: | |
| Hide post links |
#15
Flattery will get you everywhere Ian!Alty Ian wrote:I was waiting for you to answer this thread as your perfect doors demonstrate, twisting them is easy if done carefully.
Simon
| Link: | |
| BBcode: | |
| HTML: | |
| Hide post links |
-
David Oslo
- Posts: 653
- Joined: Fri Sep 19, 2014 2:13 pm
- Location: Norway
#16
Good method explanation by Simon. To add a further suggestion to his method I would suggest using a ratchet strap to pull the door bottom inwards. Anchor it at suitable strong point on opposite side (e.g. seat belt anchor?) and then hook it to inside surface of door inner, thus entirely avoiding any direct pressure on the door skin. Ratchet straps also gives a controllable pull, one click at a time. In case explanation is confusing, you will have a wood strut (in compression) and a strap in tension, both in same direction across car, from door to strong points.288gto wrote:Assuming the front of the door to the A post is ok, in your case I would cut a piece of 3"x2" timber that will fit diagonally from the top of the inside of the door across to the inner sill on the opposite side holding the door away from the B post by about 25mm so in effect the door is slightly open. I would put a wood screw into the end of the timber that meets the door and locate it in one of the trim clip holes to avoid it slipping. Now push firmly on the bottom of the door to twist it into shape. Keep trying it until it is aligned.
David
S1 2+2 '67 MOD conversion (going)
S2 OTS '70 (arriving)
S1 2+2 '67 MOD conversion (going)
S2 OTS '70 (arriving)
| Link: | |
| BBcode: | |
| HTML: | |
| Hide post links |
#17
Thank you to all of you for your suggestions.
I'll keep you informed for the result.
Cheers
I'll keep you informed for the result.
Cheers
Le chemin sera long!...
| Link: | |
| BBcode: | |
| HTML: | |
| Hide post links |
#18
A guy from a French forum has proposed this as "an official" way to solve this kind of problem on the Mini :
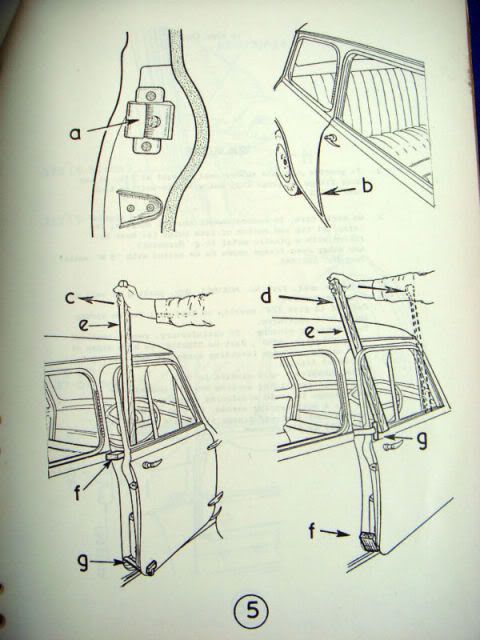
This is for a mini but it is at the same period than the E Type.
He completes in saying that this solution is still used on modern car. Why not.
Cheers

This is for a mini but it is at the same period than the E Type.
He completes in saying that this solution is still used on modern car. Why not.
Cheers
Le chemin sera long!...
| Link: | |
| BBcode: | |
| HTML: | |
| Hide post links |
-
David Oslo
- Posts: 653
- Joined: Fri Sep 19, 2014 2:13 pm
- Location: Norway
#19
Nicely drawn! In fact so well drawn that this is not amature, but likely to be either BL / Mini or a reputable repair company that has made the drawings and description. The tool / device used at arrow G looks to be a special tool, not just a block of wood.
Like I mentioned a few posts ago, I've seen manual 'power' adjusting of car doors on the final assembly line, at Saab in Trollhatten and Porsche in both Valmet and Zuffenhausen. So as you say, this is not uncommon.
Like I mentioned a few posts ago, I've seen manual 'power' adjusting of car doors on the final assembly line, at Saab in Trollhatten and Porsche in both Valmet and Zuffenhausen. So as you say, this is not uncommon.
David
S1 2+2 '67 MOD conversion (going)
S2 OTS '70 (arriving)
S1 2+2 '67 MOD conversion (going)
S2 OTS '70 (arriving)
| Link: | |
| BBcode: | |
| HTML: | |
| Hide post links |