Windscreen Changing, Tie-Rod Anchorage issues, Chrome Trim difficulties.

Technical advice Q&A
User avatar

Topic author
rfs1957
Posts: 1325
Joined: Sat Jan 15, 2011 2:52 pm
Location: Languedoc - France
France

#1 Windscreen Changing, Tie-Rod Anchorage issues, Chrome Trim difficulties.

Post by rfs1957 » Mon Jun 27, 2016 4:55 pm

No way like getting to know the PO than through the horrors he leaves you ! Went to change the windscreen and found this.

Image

Image

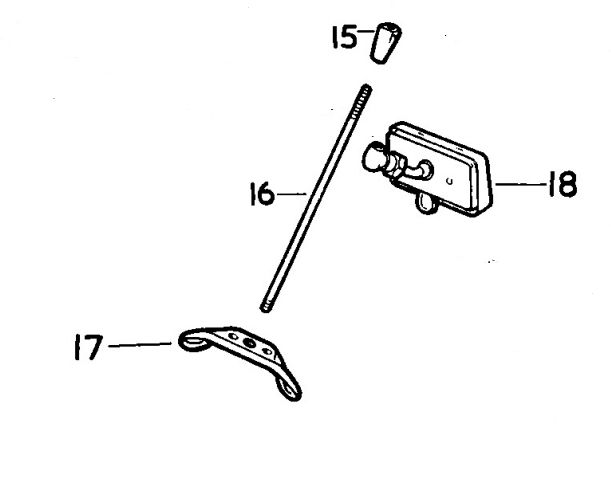
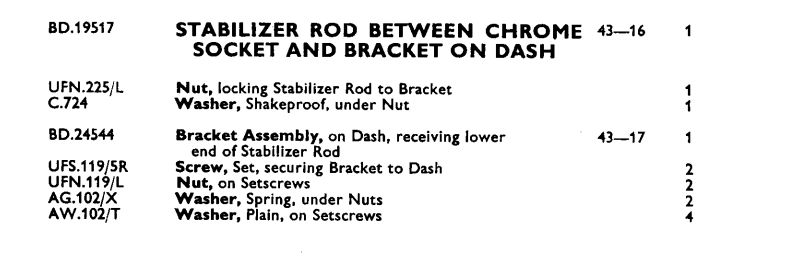
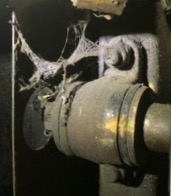
Can I take it that this bracket/plate at the foot of the rear-view mirror bar is an "addition" ? I think we were in the getting-divorced-gotta-finish-the-car-and-flog-it-mode at this point. Any suggestions about repairing this ? Some kind of bar from L to R secured in those holes near the corners ? And what is at the bottom of the threaded-bar normally - see the slot and some glued-on nut.

Image

Are the black trim triangles behind each door pillar secured just by glue at the lower ends ? Top they're held by the chrome caps ? Lower left is also sandwiched by the grab-handle ? But lower right is glue only ?

Image

The lower windscreen trim strip has holes at either end but no corresponding hole or even opportunity to screw into anything that I can see - is this strip just held in by the lower curve of the chrome side-plates ?

Image

I'm intending to change the complete front-of-doors rubber seals, are these sold as uppers and lowers (the upper being quite a complex shape) or are they joined together when you buy them ? And what is the best glue for this - the PO used Evostick and it's now horribly yellow.

Is now the time to change all the windscreen washer-jet piping, and if so how the ---- do you get your hand inside the box-section ?!

All and any advice / comments / jibes most welcome.
Last edited by rfs1957 on Wed Aug 10, 2016 9:27 pm, edited 1 time in total.
Rory
3.8 OTS S1 Opalescent Silver Grey - built May 28th 1962

Link:
BBcode:
HTML:
Hide post links
Show post links

User avatar

PeterCrespin
Posts: 4561
Joined: Fri Mar 05, 2010 8:22 pm
Location: Gaithersburg, Maryland.
Contact:
United States of America

#2 Windscreen Changing, Tie-Rod Anchorage issues, Chrome Trim difficulties.

Post by PeterCrespin » Mon Jun 27, 2016 6:23 pm

Last time I did OTS a-post seals they sold the same one-piece part for FHC and you just cut it off at the top of the screen pillar.

To get a big hand in a small space one of them needs to change. Since performing open and close surgey on an E-type bulkhead is expensive, you might want to hold your hand against an angle grinder for a few mins and get in and out quickly, before the copious red lubricant dries up. Jibes R Us.
1E75339 UberLynx D-Type; 1R27190 70 FHC; 1E78478; 2001 Vanden Plas

Link:
BBcode:
HTML:
Hide post links
Show post links

User avatar

Topic author
rfs1957
Posts: 1325
Joined: Sat Jan 15, 2011 2:52 pm
Location: Languedoc - France
France

#3 Windscreen Changing, Tie-Rod Anchorage issues, Chrome Trim difficulties.

Post by rfs1957 » Tue Jun 28, 2016 4:43 pm

Checked through the parts list and found BD.23138

http://www.sngbarratt.com/PartSearchRes ... no=BD23138

Guess there must have been something like this on my car, could anyone confirm ?

Image

The "replacement" seems to be trying to do the same thing, and pick up on the pair of holes to L and R of the wiper-access hole, but the intended interaction with the claw at the top isn't clear for me.

Image

How does BD23138 mate up with that upper anchorage just below the windscreen rubber please ? And is there just a nut screwed on the end, or should there be some kind of trunnion ? (note for Crespin : à la Triumph/BSA rear-brake ?)

Any pictures, please ?
Rory
3.8 OTS S1 Opalescent Silver Grey - built May 28th 1962

Link:
BBcode:
HTML:
Hide post links
Show post links

User avatar

Heuer
Administrator
Posts: 14776
Joined: Sat Mar 01, 2008 5:29 pm
Location: Nottinghamshire
Great Britain

#4 Windscreen Changing, Tie-Rod Anchorage issues, Chrome Trim difficulties.

Post by Heuer » Tue Jun 28, 2016 5:19 pm

Image
Image
David Jones
S1 OTS OSB; S1 FHC ODB
1997 Porsche 911 Guards Red

Add your E-Type to our World Map: http://forum.etypeuk.com/viewtopic.php?f=1&t=1810

Link:
BBcode:
HTML:
Hide post links
Show post links

User avatar

PeterCrespin
Posts: 4561
Joined: Fri Mar 05, 2010 8:22 pm
Location: Gaithersburg, Maryland.
Contact:
United States of America

#5 Re: Horrors around the front windscreen, Trim, Rubbers etc

Post by PeterCrespin » Tue Jun 28, 2016 9:51 pm

PS Rory - get some gaskets under those wiper bezels. They keep the water out and the paint on.
1E75339 UberLynx D-Type; 1R27190 70 FHC; 1E78478; 2001 Vanden Plas

Link:
BBcode:
HTML:
Hide post links
Show post links

User avatar

Topic author
rfs1957
Posts: 1325
Joined: Sat Jan 15, 2011 2:52 pm
Location: Languedoc - France
France

#6 Re: Horrors around the front windscreen, Trim, Rubbers etc

Post by rfs1957 » Wed Jun 29, 2016 12:29 pm

Thanks for that David, there appear to have been two versions of this.

BD.24544 like your drawing, which appears relatively flat, perhaps as if it were located on the upper edge of the diaphragm/bulkhead ?

which SNGB have too : http://www.sngbarratt.com/ProductDetail ... 05372d39f7

and BD.23138 which is much deeper and goes to find anchorages in shear lower down, perhaps rather than in bending higher up ?

Anyone know when the change came ? And which is "better" ?

My version of the J.30 book only shows the latter version BD.23138, and suggests there is a "nut" BD.19518 on the bottom end of the tie-rod BD.19517, but given the adjacent numbers this must have been more than just an ordinary 5/16UNF (like the UFN.225/L used with the BD.24544).

If my tie-rod is the correct part complete with screwdriver-slot (fitted to the bottom on mine), presumably this would go at the top and be used to drive the tie-rod into its bottom anchorage ?

Anyone with this visible on his shell care to advise how best to link between the weedy and rusty "fork" I've got at the top of the bulkhead and some better anchorages elsewhere ?
Rory
3.8 OTS S1 Opalescent Silver Grey - built May 28th 1962

Link:
BBcode:
HTML:
Hide post links
Show post links


Alty Ian
Posts: 829
Joined: Sat Sep 07, 2013 8:24 am
Location: Cheshire
Great Britain

#7 Windscreen Changing, Tie-Rod Anchorage issues, Chrome Trim difficulties.

Post by Alty Ian » Wed Jun 29, 2016 12:47 pm

Hi

The slotted end of the rod goes at the bottom.
Make sure you have plenty of threads into the top section its it has quite a lot of tension on it when the hood is clipped down.
Then screw the bottom into the bracket with it loose to the body.
The proper brackets are much easier to use as they are fixed by 10UNF bolts (suggest they are about 40mm long at least) through the two side holes leaving space to get at things (and dont forget the central demister) and allowing them to be tightened up after the dash is on to tension the rod to suit what you need.

Ian
64 S1 4.2 OTS 1E10012 73 S3 2+2 manual 2013 V6 F type OTS

Link:
BBcode:
HTML:
Hide post links
Show post links

User avatar

Topic author
rfs1957
Posts: 1325
Joined: Sat Jan 15, 2011 2:52 pm
Location: Languedoc - France
France

#8 Windscreen Changing, Tie-Rod Anchorage issues, Chrome Trim difficulties.

Post by rfs1957 » Wed Jun 29, 2016 3:13 pm

Not sure I get this Ian ; could you help with these specifics ?

1. Which/where are the 40mm bolts you refer to ? Are you suggesting that the tension in the tie-rod is produced by pulling the whole bracket downwards, such that the lower tie-rod footing is pulled down at the same time ? I had assumed you forced the top screen rail downwards by hand and wound the top chrome block down the tie-bar until the two horizontal screws on the top rail would go into the side holes.

2. Why in fact would the slot in the head be at the bottom ? I had assumed it was to enable it to be screwed down into the shell from above ?

3. Which of the two brackets does your car use, and which type would you use if you were trying to repair / reclaim this area ?

Image

The position of the fork was correct (in relation to the dashboard cover) but the tie-bar obviously needs fore-and-aft guidance too, and the fork is anyway way too weak to take any bant from above.

I had imagined that the bracket would fit something like this.

Image

Hence BD23138.

Image

Keep the ideas coming.

.
Rory
3.8 OTS S1 Opalescent Silver Grey - built May 28th 1962

Link:
BBcode:
HTML:
Hide post links
Show post links


Alty Ian
Posts: 829
Joined: Sat Sep 07, 2013 8:24 am
Location: Cheshire
Great Britain

#9 Windscreen Changing, Tie-Rod Anchorage issues, Chrome Trim difficulties.

Post by Alty Ian » Wed Jun 29, 2016 9:18 pm

Heuer wrote:Image
Image
Rory

I dont know when it changed but the photo below is what mine looks like which as you can see is what David has shown you from the parts manual above. This photo is taken with the demister plenum removed for you.

Image
I think this is a far better and more easily adjusted method then that plate you have.
Look at this and then read my description and I think you will see what I was saying.

Ian
64 S1 4.2 OTS 1E10012 73 S3 2+2 manual 2013 V6 F type OTS

Link:
BBcode:
HTML:
Hide post links
Show post links


1954Etype
Moderator
Posts: 2686
Joined: Sat Sep 27, 2008 12:32 pm
Contact:
Great Britain

#10 Re: Horrors around the front windscreen, Trim, Rubbers etc

Post by 1954Etype » Wed Jun 29, 2016 10:19 pm

Ian, is that bracket fitted the right way round?
Angus 67 FHC 1E33656
61 OTS 875047

Link:
BBcode:
HTML:
Hide post links
Show post links

User avatar

nefematic
Posts: 359
Joined: Sun Aug 12, 2012 4:18 pm
Location: Stuttgart, Germany
Germany

#11 Re: Horrors around the front windscreen, Trim, Rubbers etc

Post by nefematic » Thu Jun 30, 2016 5:49 am

Image

S2 OTS 1970
Last edited by nefematic on Thu Jun 30, 2016 12:52 pm, edited 1 time in total.
Martin Scherz
Late S2 1970 OTS US LHD

Link:
BBcode:
HTML:
Hide post links
Show post links

User avatar

nefematic
Posts: 359
Joined: Sun Aug 12, 2012 4:18 pm
Location: Stuttgart, Germany
Germany

#12 Re: Horrors around the front windscreen, Trim, Rubbers etc

Post by nefematic » Thu Jun 30, 2016 6:06 am

Image

The tie rod thread with slot goes downward. The top is closed, you couldn't access the slot from there.

Martin
Martin Scherz
Late S2 1970 OTS US LHD

Link:
BBcode:
HTML:
Hide post links
Show post links

User avatar

Topic author
rfs1957
Posts: 1325
Joined: Sat Jan 15, 2011 2:52 pm
Location: Languedoc - France
France

#13 Re: Horrors around the front windscreen, Trim, Rubbers etc

Post by rfs1957 » Thu Jun 30, 2016 9:00 am

Many thanks to both of you for your pictures, much appreciated - hope I've not opened a can of worms, because there's an upside-down one in there somewhere !

I'll order this type of bracket from SNGB since it looks like the required mounting holes are indeed still present on my car.

Rory
Rory
3.8 OTS S1 Opalescent Silver Grey - built May 28th 1962

Link:
BBcode:
HTML:
Hide post links
Show post links


Alty Ian
Posts: 829
Joined: Sat Sep 07, 2013 8:24 am
Location: Cheshire
Great Britain

#14 Re: Horrors around the front windscreen, Trim, Rubbers etc

Post by Alty Ian » Thu Jun 30, 2016 10:47 am

1954Etype wrote:Ian, is that bracket fitted the right way round?
Probably not Angus. It fitted my car slightly better this way round. I tried it the other way but it fouled the dash top but when I turned it over it fitted.
As long as its all tight does it really matter?
Ian
64 S1 4.2 OTS 1E10012 73 S3 2+2 manual 2013 V6 F type OTS

Link:
BBcode:
HTML:
Hide post links
Show post links

User avatar

ralphr1780
Posts: 1067
Joined: Wed Apr 11, 2012 4:29 pm
Belgium

#15 Re: Horrors around the front windscreen, Trim, Rubbers etc

Post by ralphr1780 » Thu Jun 30, 2016 1:39 pm

Rory, this is what I have on my S1 (built Oct 62), which I believe is what you need to have.
Image
The other bracket shown in Ian's pics is what I have on my S2.
Ralph
'69 OTS + '62 OTS - Belgium

Link:
BBcode:
HTML:
Hide post links
Show post links

User avatar

Topic author
rfs1957
Posts: 1325
Joined: Sat Jan 15, 2011 2:52 pm
Location: Languedoc - France
France

#16 Re: Horrors around the front windscreen, Trim, Rubbers etc

Post by rfs1957 » Thu Jun 30, 2016 4:27 pm

Yes Ralph, you may be right - in doubt, I've had to jump and actually just this afternoon ordered Ian's version BD.24544 from SNGB since I think it will fit, or can be made to fit if not, and might be considered to be a desirable improvement if it was changed for the S2 ; I reckon that if it appears preferable to use the lower holes like your one does, then there's nothing to stop me brazing a couple of straps below the BD.24544 to pick up on those too.

It's funny, the one in your picture uses all 4 holes and therefore must be something of a spider in shape, whereas the shots I have seen of the BD.23138 show it as using only the lower two ; could there even be three versions ?

Everyone's contributions much appreciated.

Now, could you all now read my wiper-parking post too, please !
Rory
3.8 OTS S1 Opalescent Silver Grey - built May 28th 1962

Link:
BBcode:
HTML:
Hide post links
Show post links

User avatar

ralphr1780
Posts: 1067
Joined: Wed Apr 11, 2012 4:29 pm
Belgium

#17 Re: Horrors around the front windscreen, Trim, Rubbers etc

Post by ralphr1780 » Thu Jun 30, 2016 5:01 pm

Rory, with respect to your wiper rack for sure it is not the original one, guess experts will comment soon.
Have a closer look at the pic I have posted, you can see the rack which has a copper contact for the rest position and this is missing on yours.
Ralph
'69 OTS + '62 OTS - Belgium

Link:
BBcode:
HTML:
Hide post links
Show post links


1954Etype
Moderator
Posts: 2686
Joined: Sat Sep 27, 2008 12:32 pm
Contact:
Great Britain

#18 Re: Horrors around the front windscreen, Trim, Rubbers etc

Post by 1954Etype » Thu Jun 30, 2016 7:32 pm

Ian, obviously not if it all fits and lines up ok. All the original S2 cars l have seen have it fitted the other way round to yours and l didn't like the fact that there wasn't a spacer fitted between the bulkhead and bracket. The way yours is fitted is the more logical.
Angus 67 FHC 1E33656
61 OTS 875047

Link:
BBcode:
HTML:
Hide post links
Show post links


Alty Ian
Posts: 829
Joined: Sat Sep 07, 2013 8:24 am
Location: Cheshire
Great Britain

#19 Re: Horrors around the front windscreen, Trim, Rubbers etc

Post by Alty Ian » Thu Jun 30, 2016 8:17 pm

1954Etype wrote:Ian, obviously not if it all fits and lines up ok. All the original S2 cars l have seen have it fitted the other way round to yours and l didn't like the fact that there wasn't a spacer fitted between the bulkhead and bracket. The way yours is fitted is the more logical.
Angus

If you recall ours is a transition car (first week of S1 4.2 production) and maybe when Jaguar first fitted it it was this way round (this was how it was originally fitted when I took the dash off) as the central demister plastic plenum fouls it when the other way up. Maybe that's why Jaguar changed the S2 dashtops and moved the demister vents either side of the rod to avoid the clash and in the process turned the bracket round as per martin's car.

Ian
64 S1 4.2 OTS 1E10012 73 S3 2+2 manual 2013 V6 F type OTS

Link:
BBcode:
HTML:
Hide post links
Show post links

User avatar

Topic author
rfs1957
Posts: 1325
Joined: Sat Jan 15, 2011 2:52 pm
Location: Languedoc - France
France

#20 Re: Horrors around the front windscreen, Trim, Rubbers etc

Post by rfs1957 » Thu Jun 30, 2016 9:07 pm

Rory, with respect to your wiper rack for sure it is not the original one, guess experts will comment soon.
Have a closer look at the pic I have posted, you can see the rack which has a copper contact for the rest position and this is missing on yours.
Yes, my understanding is that the early motor had no means of knowing where it was, and relied on the centre arm to hit an adjustable stop - and provide an earth, was that it ? - and the later motor has the position sensor integrated ; so I've got an early motor and a later rack ?
Rory
3.8 OTS S1 Opalescent Silver Grey - built May 28th 1962

Link:
BBcode:
HTML:
Hide post links
Show post links

Post Reply Previous topicNext topic