Talk about the E-Type Series 1
-
Topic author
Heuer
- Administrator
- Posts: 14766
- Joined: Sat Mar 01, 2008 5:29 pm
- Location: Nottinghamshire

Post
by Heuer » Tue Jun 11, 2013 6:33 pm
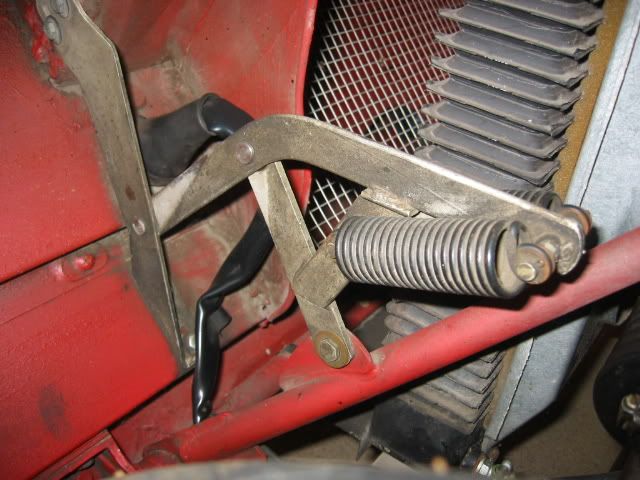
I have been looking at a replacement Bonnet Balance Link Assembly and as we know they were cadmium plated with black springs:
I rang SNG and found they were painted entirely black. They reckon customers prefer them that way so they can paint them silver themselves and, besides, that is how they arrive from the supplier. I then spoke to Andy Rayner at Hutsons and he tells me they do come in both black powder coat or bright zinc but he does not recommend the latter because the coating does not last more than 12 months unless you paint them. Not sure painting them is going to work though because of the movement of the linkage - getting paint everywhere and it then rubbing off during movement. Seems a shame as they are one of the first things you notice on opening the bonnet when they are silver. On the other hand Andy told me he thinks they look stunning in black a yellow car they are currently working on. Any thoughts, anyone tried painting them?
One other thing - anyone know where you can get the wiring support clip that attaches to the Balance Link as in the above picture? I can't seem to find anyone who lists it - C.18410 I believe.
-
kingzetts
- Posts: 745
- Joined: Thu May 15, 2008 9:33 am
- Location: Worcester UK
Post
by kingzetts » Tue Jun 11, 2013 8:37 pm
What about trying zinc plating with a clear powdercoat on top?
I've recently set myself up with a home powdercoating setup. A ?10 domestic oven off eBay and a coating gun from
http://www.electrostaticmagic.co.uk/ , plus a plywood spray booth cum powdercoat cabinet built from a sheet of plywood. So far I've done some seat brackets in silver, and a brake backplate and master cylinder (924 Turbo) in satin black. It is SO easy and the results are SO MUCH better than painting.
If you wanted, I could order some clearcoat and you could send me the brackets to paint.
John '62 S1 OTS (now sold)
-
Topic author
Heuer
- Administrator
- Posts: 14766
- Joined: Sat Mar 01, 2008 5:29 pm
- Location: Nottinghamshire
Post
by Heuer » Tue Jun 11, 2013 8:40 pm
Ooooh - new toy! I will investigate and let you know. It does beg the question "why on earth do SNG not powder coat their repro's in silver?"
-
Geoff Green
- Posts: 141
- Joined: Tue Apr 22, 2014 3:13 am

Post
by Geoff Green » Wed Dec 19, 2018 3:26 am
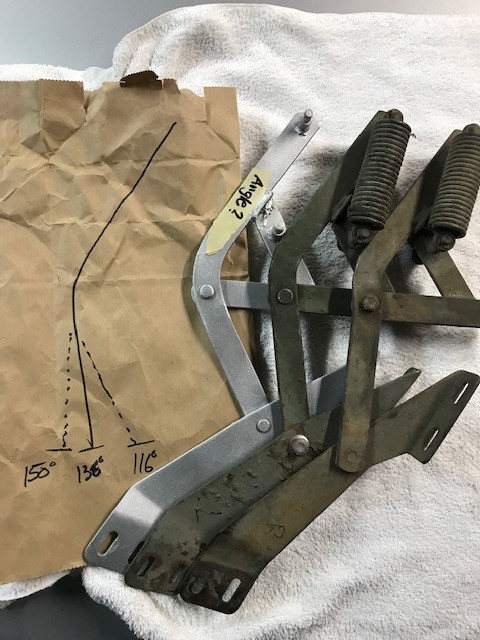
Beginning to sort out the different balance link assemblys. I have a collection and my friend found he had two (one each right and left) that have a different angle to the curve. I looked at mine and I found three different angles of about 115 deg, 136 deg and 150 deg. Recently one forum member posted his bumper would strike the ground. If the different angle links are installed the bonnet opens different amounts. The part numbers I have found so far are BD-20014, BD-20015 and BD-20016, BD-20017. There may be more as I have not looked through all the parts documents. The Martin Robey links have an angle of about 136degrees.
A photo of the bonnet link (either side and the year with model of your car) taken at 90 degrees will assist in figuring this out. I should be able to get close to the degree reading from the photo.
Thanks for your interest and assistance.
Geoff
Last edited by
Geoff Green on Thu Dec 20, 2018 12:45 am, edited 1 time in total.
-
paulsco
- Posts: 825
- Joined: Mon May 04, 2009 5:12 pm
- Location: Oxfordshire
Post
by paulsco » Wed Dec 19, 2018 1:44 pm
I have painted mine with Simonze Wheel Steel.
https://www.halfords.com/motoring/paint ... teel-500ml
It is a lot lighter colour than it would appear from the advert. I have used this on lots of parts and it seems very hard wearing. I have sprayed it on bolts and dried it with a hot air gun in a few seconds and put them into use.
I use it on blasted parts,it doesn't require a primer and can be over coated with clear coat if desired.
Paul
65 Series 1 FHC, 68 Jaguar 340
-
paulsco
- Posts: 825
- Joined: Mon May 04, 2009 5:12 pm
- Location: Oxfordshire
Post
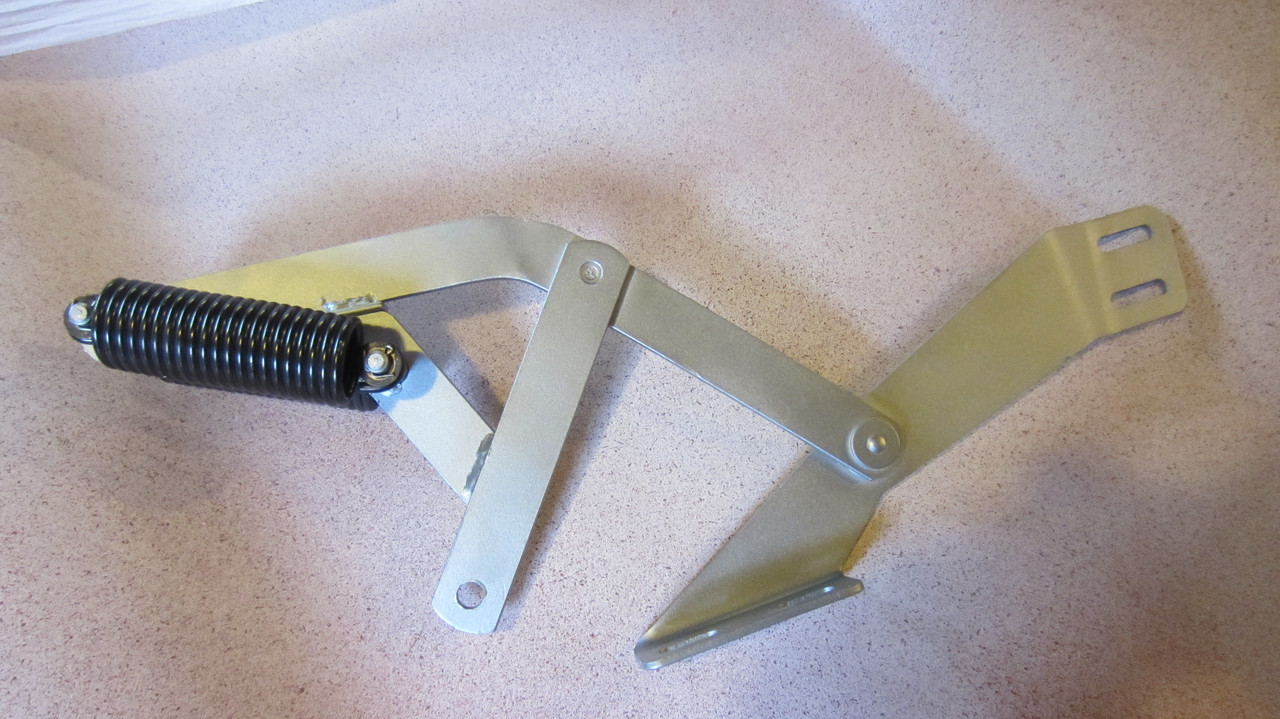
by paulsco » Wed Dec 19, 2018 4:26 pm
A picture:
Paul
65 Series 1 FHC, 68 Jaguar 340
-
neal herridge
- Posts: 171
- Joined: Wed Aug 13, 2014 4:20 pm
- Location: devon
Post
by neal herridge » Wed Dec 19, 2018 6:00 pm
David.
I zinc & clear pass mine , I dismantle them first then bead blast them ( you have to machine new pivot bolts to rivet over on re assembly ) then I get them plated.
The ones on my FHC were plated about 6 years ago & still look good .
I have just done the same on my DHC but very few miles yet.
They do get a wipe over with a bit of oil when I oil the pivots, but on the whole they are holding up well.
I also think the powder coating makes them look a bit thick & heavy.
As for the clip I make them up from St/steel strip, if you have a help full engineering firm near you they may have some off cuts of St/steel.
Hope this helps Neal.
-
Geoff Green
- Posts: 141
- Joined: Tue Apr 22, 2014 3:13 am
Post
by Geoff Green » Thu Dec 20, 2018 12:49 am
Thanks for the photo Paul.
Yours are aftermarket and about 136 degrees. This is the angle in the main, longest section where the gentle curve is.
Still researching and I read the post about fitting some a few years ago.
-
paulsco
- Posts: 825
- Joined: Mon May 04, 2009 5:12 pm
- Location: Oxfordshire
Post
by paulsco » Thu Dec 20, 2018 6:26 pm
Hi Geoff,
No they are not aftermarket, they are original, just blasted and painted.
Paul
65 Series 1 FHC, 68 Jaguar 340
-
Geoff Green
- Posts: 141
- Joined: Tue Apr 22, 2014 3:13 am
Post
by Geoff Green » Sat Dec 22, 2018 10:00 pm
Paul, meant to say yours are the same as aftermarket at 136 degrees. Most of the ones I have are also 136 degrees. As seen in the photo the long link with the bend is the angle I am measuring. Oddly two cars have had different angles with one 136 degree link which my friend noticed when he tried to install both and found one would not bolt up like the other after installing the bonnet. I compared the ones I have and found three different angles. Most are 136 degrees.
-
paulsco
- Posts: 825
- Joined: Mon May 04, 2009 5:12 pm
- Location: Oxfordshire
Post
by paulsco » Sat Dec 22, 2018 10:25 pm
Interesting; I was not aware there were different angled links.
However, blowing up your photo, it looks to me like the one on the far right is bent where the bolt is substituted for the rivet.
Paul
65 Series 1 FHC, 68 Jaguar 340
-
daverawle
- Posts: 245
- Joined: Thu May 08, 2008 7:14 pm
- Location: Cornwall, England
-
Contact:
Post
by daverawle » Sun Dec 23, 2018 2:06 pm
Even with new links & springs the bonnet still needed to be propped open on our steep drive. Fitting a gas strut fixed it plus the bonnet opens further or even fully by removing a single pin. Not for everyone perhaps but I feel it's one of the better mods.

Dave
1963 OTS


