Horn push assembly S1
#21
The badges were only glued in and are the same size as the horn push but missing the retaining ring. Also badge too flat... needs to be ground and polished to create the correct radius to match the original. I had an old pattern horn push so I removed the retaining ring and Epoxy resined to badge and fitted.
No crazing to badge, gold not as intense as some but I am pleased with the result.
Link: | |
BBcode: | |
HTML: | |
Hide post links |
-
- Posts: 4561
- Joined: Fri Mar 05, 2010 8:22 pm
- Location: Gaithersburg, Maryland.
- Contact:
#22
Yup, that's the ticket. It's not 'missing' the retaining ring, unless you think it's missing the black surround, brass plate and spring as well. it just isn't being used as a horn push hence you have to supply the horn push bits to complete the swap. Good catch on the curvature difference although they can be used as-is. I think the colour depends how long the hub caps were in the sun?
1E75339 UberLynx D-Type; 1R27190 70 FHC; 1E78478; 2001 Vanden Plas
Link: | |
BBcode: | |
HTML: | |
Hide post links |
#23
The retaining ring takes the brass contact, and the cut out locates the horn push to stop horn push spinning round. Also without retaining ring it would just fall out. The ring is the stop to locate it on the centre, because without it the hub cap badge is the same diameter as the hole.
Adam
Adam
Link: | |
BBcode: | |
HTML: | |
Hide post links |
-
- Posts: 4561
- Joined: Fri Mar 05, 2010 8:22 pm
- Location: Gaithersburg, Maryland.
- Contact:
#24
All true Adam, but the hub cap is not designed and does not function as a horn push, or vice versa so nothing is 'missing' in either incarnation
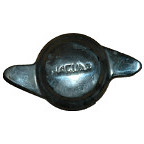
adam wrote:The retaining ring takes the brass contact, and the cut out locates the horn push to stop horn push spinning round. Also without retaining ring it would just fall out. The ring is the stop to locate it on the centre, because without it the hub cap badge is the same diameter as the hole.
Adam
It's just that the decorative emblem part, and that part alone, can be switched from the former to the latter with a bit of work. Most will be happy with the ready-made repro part, but for those who want an original golden Jag emblem and don't mind a bit of fettling, S3 hub caps are a source of the real McCoy.
1E75339 UberLynx D-Type; 1R27190 70 FHC; 1E78478; 2001 Vanden Plas
Link: | |
BBcode: | |
HTML: | |
Hide post links |
#26
Hi Folks
I purchased a small horn growler push cap for less than ?5 as a straight replacement for the leaping cat which I now have, It's cheap and cheerful but looks puny when compared to the original growler which I purchased for ?62 off eBay and is in good condition. I have decided to try to put things back as they should be, the PO left me the steering wheel but nothing else. I presume I will need an original steering wheel boss, outer circle for the horn push, bits in the attached photo?s and a few parts from the repair kit. Any advice would be welcome.
Thanks
John
1967 Series 1 2 + 2
Link: | |
BBcode: | |
HTML: | |
Hide post links |
#27
Hi John,
Yes, as you mention you will need the correct boss to connect steering wheel & the outer horn circle (you could buy repro & fit your nice growler - although I don't know if they're guaranteed to fit). I would just start with that initially as you may find that the other parts are already in place within the steering column (although it looks like the spring & plastic shroud may not be in place at the top of the brass plunger). Be warned that the replacement parts in the repair kit are often in poor quality 'soft' brass & it's hard to get them to remain in contact so it's best to keep originals if possible.
Regards,
Neil
1962 S1 OTS
1967 S1 FHC
1962 S1 OTS
1967 S1 FHC
Link: | |
BBcode: | |
HTML: | |
Hide post links |
#28
Hi Folks just thought I would follow up on this thread, having purchased an original Growler badge I was then faced with the problem that I could not purchase the other parts separately, so I purchased a replica growler unit so that I could use the other bits and a s/wheel boss, including the original growler, using my own original steering wheel total cast is about ?260 which I am happy with. Now fitted and working.
Thanks fort the advice.
John Series 1 2 + 2
Thanks fort the advice.
John Series 1 2 + 2
Link: | |
BBcode: | |
HTML: | |
Hide post links |
-
- Posts: 244
- Joined: Mon Feb 20, 2012 9:24 pm
- Location: Perthshire
#29 Re: Horn push assembly S1
adam,
I've PM'd you.
David
I've PM'd you.
David
1964 3.8 FHC
Link: | |
BBcode: | |
HTML: | |
Hide post links |
-
- Posts: 173
- Joined: Mon Jan 24, 2011 8:27 pm
- Location: The National Forest
#30 Re: Horn push assembly S1
Apologies for the thread revival; I've searched all of the horn push threads but can't find what I'm looking for. I am restoring 2 horn pushes. One I believe to be S1 ( chrome ring 54300576, brass contact ring on 54300754, copper plate 54300575) the other I believe to be S2 (black ring, no horn contacts). Does the S1 horn push have the foam disc fitted between the emblem badge and copper plate? Or, is the foam disc fitted only on the S2 instead of the copper plate?
Thanks,
Ross
Thanks,
Ross
'67 S1.5 FHC, manual, maroon with black interior. Originally exported to Arizona but 'repatriated' in '89. Since converted to RHD and triple SUs.
Link: | |
BBcode: | |
HTML: | |
Hide post links |
#31 Re: Horn push assembly S1
I have 3 S1 horn push assemblies two originals and one after market and haven't seen any foam discs in any of them while restoring.
Danny
1962 S1 3.8 FHC (1012/1798)
2015 Range Rover Sport SVR
"Experience is something you don't get until just after you need it."
1962 S1 3.8 FHC (1012/1798)
2015 Range Rover Sport SVR
"Experience is something you don't get until just after you need it."
Link: | |
BBcode: | |
HTML: | |
Hide post links |
-
- Posts: 3305
- Joined: Thu Jun 19, 2014 3:08 pm
- Location: Near Andover, Hampshire,in D.O. Blighty
#32 Re: Horn push assembly S1
Ross, I think the foam is there on the S2 to give a slight cushion feel to it. Whereas on the S1 it would be an insulator stopping the horn from working. Or get tangled up with the spring, contacts, etc. That’s what my thoughts are fwiw.
Geoff
Geoff
S2 FHC Light Blue
S2 OTS LHD - RHD full restoration
Link: | |
BBcode: | |
HTML: | |
Hide post links |