


Hi chaps,
I’ve raised this problem previously. I bought a new header tank from SNG some years back along with a new cap and upon installation the car immediately purged continuously when at operating temperature. It was evident the cap was not holding any pressure at all and upon measuring it was clear the cap’s seal was not reaching the inner flange where it seats. The depth of the new header tank flange is 20mm (just short of 13/16). SNG looked ito it and found there was indeed an issue with their 4lb caps. Once a new batch was available I was sent one but it made no difference. I gave up on this and continued using my old cap (came on the car) which seems to work fine (both with old and new header tanks). The problem is, this aftermarket cap has no markings on it so I don’t even know the pressure it holds and it’s also a 4-eared type so doesn’t look right. Perhaps someone would be kind enough to measure the flange depth on their header tank for me as a comparison.
Cheers,
Pete
4lb radiator cap
-
 peters3103
Topic author - Posts: 485
- Joined: Sun Aug 05, 2012 7:25 am
- Location: Canberra Australia

#1 4lb radiator cap
Pete
61 E-Type FHC Opalescent Golden Sand
69 XJ6 4.2 MOD Old English White - one previous owner
16 XE R Sport 25t Polaris White - shopping trolley
63 MGB Roadster Aintree Green - my dads from new
61 E-Type FHC Opalescent Golden Sand
69 XJ6 4.2 MOD Old English White - one previous owner
16 XE R Sport 25t Polaris White - shopping trolley
63 MGB Roadster Aintree Green - my dads from new
| Link: | |
| BBcode: | |
| HTML: | |
| Hide post links |
-
 PeterCrespin
- Posts: 4561
- Joined: Fri Mar 05, 2010 8:22 pm
- Location: Gaithersburg, Maryland.
- Contact:

#2 Re: 4lb radiator cap
I went into this about a year ago when Angus's silver FHC had the exact same problem in my custody. Steve will know where the thread is.
I've tried loading a pic but can't see it.
I've tried loading a pic but can't see it.
1E75339 UberLynx D-Type; 1R27190 70 FHC; 1E78478; 2001 Vanden Plas
| Link: | |
| BBcode: | |
| HTML: | |
| Hide post links |


#3 Re: 4lb radiator cap
Is this it Peter http://forum.etypeuk.com/viewtopic.php? ... cap#p71256
Steve
69 S2 2+2 (just sold) ..Realm C type replica, 1960 xk150fhc
69 S2 2+2 (just sold) ..Realm C type replica, 1960 xk150fhc
| Link: | |
| BBcode: | |
| HTML: | |
| Hide post links |
-
PeterCrespin
- Posts: 4561
- Joined: Fri Mar 05, 2010 8:22 pm
- Location: Gaithersburg, Maryland.
- Contact:
#4 Re: 4lb radiator cap
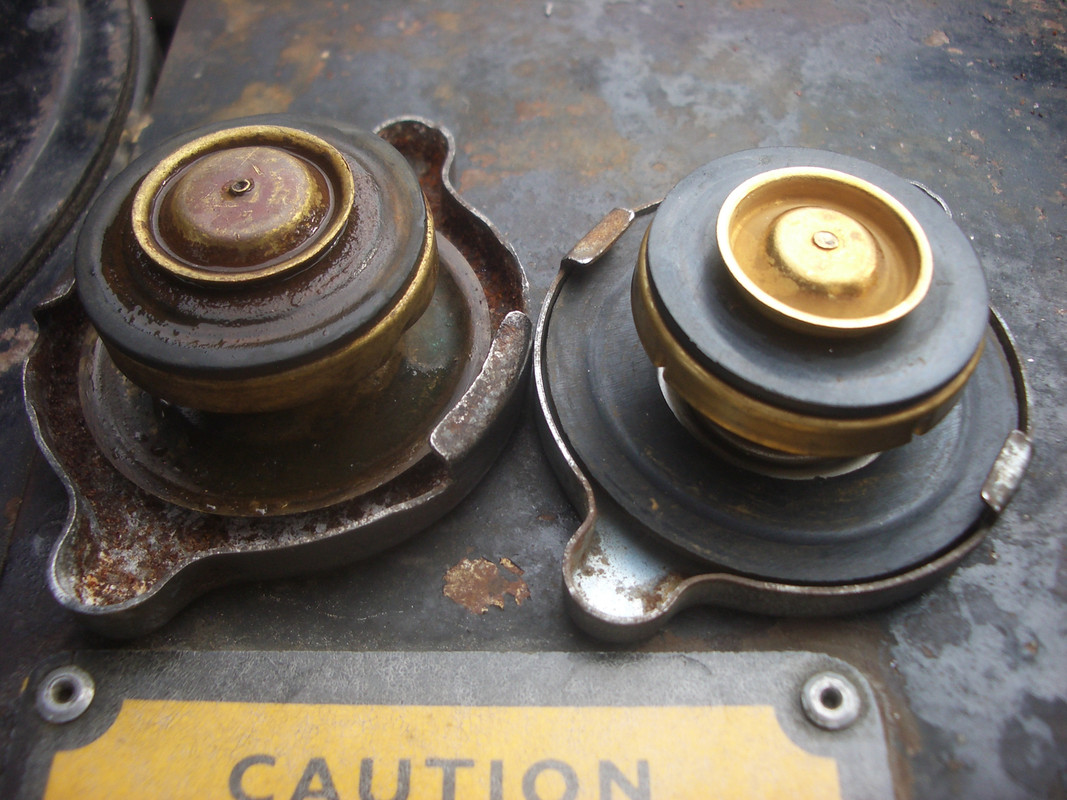
No, but thanks for trying. I managed to upload the short and long neck radiator cap image below. Short one on the right did not seal at base of neck (see no impression on sealing rubber).
You never stop learning in this game. I found out the other day there are two diameters of rad cap too. The early Ds used the larger one so I had to buy a MkVII cap
You never stop learning in this game. I found out the other day there are two diameters of rad cap too. The early Ds used the larger one so I had to buy a MkVII cap
1E75339 UberLynx D-Type; 1R27190 70 FHC; 1E78478; 2001 Vanden Plas
| Link: | |
| BBcode: | |
| HTML: | |
| Hide post links |
-
Geoff Green
- Posts: 141
- Joined: Tue Apr 22, 2014 3:13 am
#5 Re: 4lb radiator cap
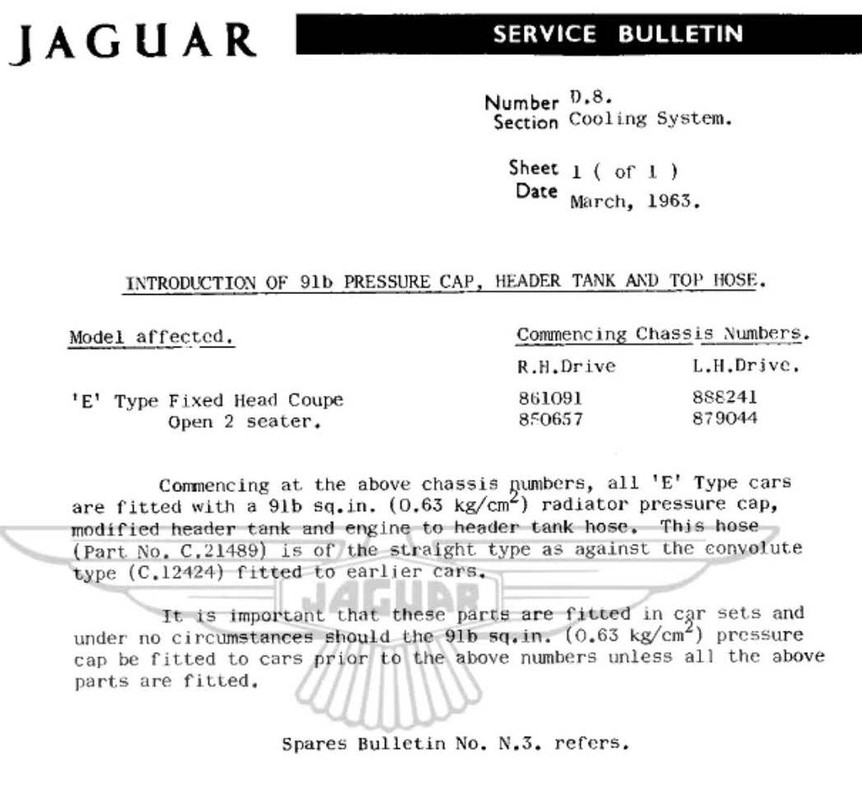
in perusing the Jaguar Spares Division Bulletins for Spare Parts Catalogues covering the late 1950s and early 1960s I came across this:
Bulletin No N.1 Date June.1961 Section Cooling System Subject Radiator Filler Cap
It discusses the change in the early deep cap and the later short cap (June 1961 is the change from early to late). While applying to the Mark 2 and XK 150 cars I can understand the error with supplying the incorrect cap as all were available in both 4 lbs and 9 lbs. So you could get a 4 or 9 lbs pressure cap in either long or short version.
Which brings us to today where someone finds a 4 lb cap of long version and makes coolant tanks to that depth then sells correct short caps which will not seal. Another surprise is the part number remained the same yet the pressure went from 4 lbs to 9 lbs.
Early depth 1" C12672, C12922
Later depth 3/4" C18900, C19373
| Link: | |
| BBcode: | |
| HTML: | |
| Hide post links |
-
peters3103
Topic author - Posts: 485
- Joined: Sun Aug 05, 2012 7:25 am
- Location: Canberra Australia
#6 Re: 4lb radiator cap
Gents,
I’ve found a 4lb cap which is marginally longer in reach than my other 2. When seated in the filler neck, you can push down on it approximately 1/32 - 1/16” against the spring tension. I’ve driven the car about 20 miles with this cap on in 30deg temp. running at just under 70deg on the gauge - a little cooler now with the Radtec radiator. When I pulled up in the garage and switched off, there was no sign of coolant overflow even when the temp on the gauge increased to around 80deg. When cool I checked the level in the header and it is just over the baffle where I normally fill it to. It appears it’s working well now but I have a Coolcat fan arriving in the coming days for peace of mind on very hot days in city driving.
Thanks as usual for your input.
Regards
Pete
Pete
61 E-Type FHC Opalescent Golden Sand
69 XJ6 4.2 MOD Old English White - one previous owner
16 XE R Sport 25t Polaris White - shopping trolley
63 MGB Roadster Aintree Green - my dads from new
61 E-Type FHC Opalescent Golden Sand
69 XJ6 4.2 MOD Old English White - one previous owner
16 XE R Sport 25t Polaris White - shopping trolley
63 MGB Roadster Aintree Green - my dads from new
| Link: | |
| BBcode: | |
| HTML: | |
| Hide post links |

#7 Re: 4lb radiator cap
As has been said, one learns every day. Over 30 years I have never been able to stop the car from venting when hot, and I don't mean boiling hot either, and it would seem that I will need to find one of the 9 lb caps above. I gave up on 4 lb caps donkey's years back. Looking at mine the flanges are of the smaller type so this begs the question - where can I get a longer neck cap?
| Link: | |
| BBcode: | |
| HTML: | |
| Hide post links |

#8 Re: 4lb radiator cap
SPC J30 shows:Geoff Green wrote: ↑Sun Mar 03, 2019 2:37 amAnother surprise is the part number remained the same yet the pressure went from 4 lbs to 9 lbs.
Early depth 1" C12672, C12922
Later depth 3/4" C18900, C19373
C18460 = 4lbs
C18485 = 9lbs
SPC J37 shows:
C18484 = 7lbs (4.2 cars)
"The header tank is modified to suit the new cap"

David Jones
S1 OTS OSB; S1 FHC ODB
1997 Porsche 911 Guards Red
Add your E-Type to our World Map: http://forum.etypeuk.com/viewtopic.php?f=1&t=1810
S1 OTS OSB; S1 FHC ODB
1997 Porsche 911 Guards Red
Add your E-Type to our World Map: http://forum.etypeuk.com/viewtopic.php?f=1&t=1810
| Link: | |
| BBcode: | |
| HTML: | |
| Hide post links |
-
Geoff Green
- Posts: 141
- Joined: Tue Apr 22, 2014 3:13 am
#9 Re: 4lb radiator cap
Thanks Dave! 
I measured my new early header tank (reproduction) and the depth is 13/16 which means a 3/4 inch cap will not work. And the 1 inch will require pressing down a bit to get it to twist on depth. Please add your header tank filler neck depth. And to keep all the info in one place, from the parts book:
First design
C.16998 Radiator Header Tank Assembly - hose connection on corner of tank
C.18460 Filler Cap 4 lbs
Depth 13/16 inch
C.12424 Hose, Connecting Header Tank to Outlet Elbow - straight hose with multiple convoluted ribs not to be used with 9 lbs cap
850001 to 850656
875001 to 879043
860001 to 861090
885001 to 888240
Second design
C.21512 Radiator Header Tank Assembly - hose connection on side of tank
C.18485 Filler Cap 9 lbs
Depth ? inch
850657 and subs
879044 and subs
861091 and subs
888241 and subs
C.21489 Hose, Connecting Header Tank to Outlet Elbow - smooth hose with curve
| Link: | |
| BBcode: | |
| HTML: | |
| Hide post links |
#10 Re: 4lb radiator cap
I had to buy a replacement cap from SNG and found that I was loosing more coolant than with the old cap. SNG checked the depth of the cap & said it was correct. I noted that the new cap was also stiffer to turn on the header tank. I eventually sussed that the cap only required one rubber gasket - the one on the sprung valve. I removed the upper rubber washer which isn't required. Removing the upper washer allows the washer on the sprung valve to form a seal with the header tank. Removal of the washer also makes the cap easier to turn.
The earlier photo of the two caps side by side shows that there is only one washer on the old cap.
Nick
The earlier photo of the two caps side by side shows that there is only one washer on the old cap.
Nick
1E20498 1965 S1 FHC
| Link: | |
| BBcode: | |
| HTML: | |
| Hide post links |
-
PeterCrespin
- Posts: 4561
- Joined: Fri Mar 05, 2010 8:22 pm
- Location: Gaithersburg, Maryland.
- Contact:
#11 Re: 4lb radiator cap
Yes and no Nick.
The cap on the right was the one on Angus’s car when I took it. The one on the left was given to me by a guy (also called Nick!), who lives next door to my daughter in Cheltenham and has just finished restoring his 2+2. As part of my testing I swapped various bits around and the seal on the short cap started on the long and may even be fitted over the remains of the same seal on the short judging by it being flush with the cap edge. The purpose at that stage was to confirm that puking was not related to adequacy or otherwise of that upper outer seal.
However, that top seal is needed to ensure all expelled coolant goes down the tube not leakng over the header tank and - on many cars - to ensure it is sucked back into the system on cooling if an atmospheric catch tank is used. It’s true that the average S1 doesn’t absolutely need it and especially true that everyone with issues needs to check their own cap and at a pinch taking the top rubber out could make a non-touching lower seal abut the header tank neck and keep the show on the road until a correct can be found/ fitted.
1E75339 UberLynx D-Type; 1R27190 70 FHC; 1E78478; 2001 Vanden Plas
| Link: | |
| BBcode: | |
| HTML: | |
| Hide post links |
-
Geoff Green
- Posts: 141
- Joined: Tue Apr 22, 2014 3:13 am
#12 Re: 4lb radiator cap
For a 3/4 inch depth neck the caps vary in length (in inches) 0.96, 1, 1.2, 1.4, 2.3, 2.8.
Here are instructions on how to choose;
See; https://www.northernfactory.com/knowledge/radiatorcaps
Here are instructions on how to choose;
See; https://www.northernfactory.com/knowledge/radiatorcaps
| Link: | |
| BBcode: | |
| HTML: | |
| Hide post links |
-
PeterCrespin
- Posts: 4561
- Joined: Fri Mar 05, 2010 8:22 pm
- Location: Gaithersburg, Maryland.
- Contact:
#13 Re: 4lb radiator cap
Thank you Geoff for reminding me that the more I learn the less it appears I know! “Where has this chart been all my life?” No, wait, “Now I know why I spent forty years playing with air-cooled engines.”
1E75339 UberLynx D-Type; 1R27190 70 FHC; 1E78478; 2001 Vanden Plas
| Link: | |
| BBcode: | |
| HTML: | |
| Hide post links |
#14 Re: 4lb radiator cap
Gents,
Was this the previous thread?http://forum.etypeuk.com/viewtopic.php?t=11088
I have been trying to solve excessive coolant loss since I lost my previous cap (don't ask) & fitted a replacement. The distance from top seating surface to bottom seating surface is 20mm on my replacement header tank (presumably a C24570 but fitted by PO & supplier not known). The seal to seal distance on my SNG supplied C18484 7lb cap is also 20mm. So there is effectively no 'nip' on the lower seal in my case.
A Presco radiator cap catalogue http://www.presco-radiator-caps.com/catalogue.pdf says the correct cap for 4.2 E-type should be SR7-05-02 - which translates as short reach (1") with 7/16" wide lugs and a neoprene washer in the top cap (you were correct Peter). The 1" distance in the catalogue is from the outer face of the cap (with the writing on) to the sprung seal - it isn't the seal to seal distance.
The SNGB supplied cap matches the Presco catalogue dimensions, so I can't fault them. I did wonder how much 'nip' there should be on the seal. The area of the lower seal is 1.1 sq.in, and it takes about 8lbs (using the kitchen scales) to get the spring to move, i.e. it pretty much needs 7psi to move the spring without any nip. So this approximate test suggests that going to a long reach (1.25") 7psi cap will pressurise to over 7psi - it's only 7psi with the correct preload. I might ask Presco if a 4psi long reach cap would be worth trying, depending on the spring rate.
Nick
1E20498 1965 S1 FHC
| Link: | |
| BBcode: | |
| HTML: | |
| Hide post links |