


Excellent description, I will remember this is on the Forum for future reference, but hope that I never need to read this again!
Just thinking aloud, instead of the needle nose pliers I wonder if a bit of wood (say a paint mixing stick) taped in same manner to the washer hose would be better. Easier to get it to the right length, and could actually just remain in the dash / cowl area, sort of sacrificial. Holding the pliers in the tips of your fingers sounds a real nightmare of a job.
How do you tighten washer jets?
-
 David Oslo
- Posts: 653
- Joined: Fri Sep 19, 2014 2:13 pm
- Location: Norway

#21
David
S1 2+2 '67 MOD conversion (going)
S2 OTS '70 (arriving)
S1 2+2 '67 MOD conversion (going)
S2 OTS '70 (arriving)
| Link: | |
| BBcode: | |
| HTML: | |
| Hide post links |

#22
I am sure there a number of implements that you could hold the washer pipe with, but bear in mind the aperture is very small that you are working within, but also if you have your hands too close you then cannot see what you are doing. I placed a bright workshop light in the centre aperture which back lit the whole proceedings without getting in the way. I was working from the floor outside the car, kneeling down and with one hand through the steering wheel. I guess a pair of mole grips would do but I worried that getting them off may brake the nylon tail on the jet or indeed they may drop into the no mans land between the bulkheads. where the wipers are parked is critical to the access so switch on the wipers and turn the ignition off where you want them to stop or they will self park. Also, as a precaution then disconnect the battery incase you accidentally switch ignition on or the wiper moves which could trap your hand fingers etc. I think that trying to replace the whole washer jet will require removing the wiper spindle on the end you are working on and maybe the centre one as well. I reckoned this may have produced enough flex in the wiper rack to allow a small hand to enter through the smaller of the two apertures. That small hand struggled to access the bag of tricks through the centre aperture as the centre demise vent was in the way. If you removed the dash top........and so on!
| Link: | |
| BBcode: | |
| HTML: | |
| Hide post links |
#23
Is your little friend small enough to clean chimneys. You could hire him outandrewh wrote:well for the benefit of others , it is possible just. So bear in mind I had to tighten the wing nut under the washer jet and then put the pipe back on the jet. The pipe was pretty hard and unpliable and I reckon blew off because the jet was blocked. Note to self, clean the jets before trying the washers on laid up or older restoration cars, would have saved a lot of trouble.
I was able to hook out the the washer pipe into the centre of the dash area. Here I joined with a straight barbed joiner a piece of new flexible washer pipe. Then i taped some wire to the pipe and fed the wire through the centre section behind the wiper rack and back through the aperture behind the rev counter ( which I had removed). Once the pipe was excited through this aperture, and here comes the clever bit, I got some long nosed pliers set them firmly on the plastic pipe about 15 mm below the end and taped them under pressure, closed with duck tape. this enabled me to feed the pipe onto the washer jet by holding the pliers by one handle and in the tip of my fingers.
I had the advantage of having an old washer jet to hand so fed the new plastic pipe into the old jet to open the pipe up to the required sizing. Having congratulated myself on a job well done, I then tried the pump and promptly blew off the pipe again as the jet was blocked. The only good news is that it was easier second time around. Whilst I would have preferred to fit the new pipe directly from the jet to the T piece in the centre of the dash, that would have been an unnecessary fiddle. I would agree with previous comments that this is one of the worst, and most difficult jobs to do on a series one, and would not have been possible without the small hands of my mates son to tighten up the wing nut under the washer. I sent him back with a rather red pressure dent/scratch across his wrist so best stay out of sight of his mother for a few days!

Tony (E typed)
1962 E Type Series 1 Roadster (OTS)
Tony
1962 E Type Series 1 Roadster (OTS)
Tony
| Link: | |
| BBcode: | |
| HTML: | |
| Hide post links |
-
Tferrer@gmail.com
- Posts: 9
- Joined: Thu Jan 01, 2015 9:31 am
- Location: San Francisco
#24 The 18 easy steps to new windshield sprayers!
If you are at the point where you are trying to put the hose back on, then you should probably bite the bullet and REPLACE the sprayers AND hoses and the associated "T". I did this about 6 months ago on my LHD 65 coupe. It is doable without removing the dash or god forbid, windshield. Here are the steps.
1: Remove the center console
2: Drop the gauge panel (you'll see the fuse panel at this point)
3: Take some kite string (5 ft or so) and tie it around the main wiper arm.
4: Remove the wiper arm and get it out of the way (the string runs back into the cabin)
5: get a small magnetic LED lite and position it in the front cavity to shine in the direction you will be working. Passenger or driver side makes no matter
6: This is the hard part and requires the recruitment and dedication of a slender 10-13 yo relative, neighbor etc. with small hands and wrist. (If you can't find one, you can just forget it. I tried with my girlfriend (she's a real sport) and though she could get he hand close it just wouldn't work.)
7: A 20 dollar bill (for said relative)
8: Some pillows
9:Explain in detail that they will be among the few people in the world capable of doing this operation. They will also get kudos at any Jag event worldwide.
10: Arrange the pillows so your helper is comfortable while able to reach their arm (almost entirely) into the front cavity of the car and to simply follow the sprayer hose up to the base of the sprayer. Note: The cowl has metal tags that hold the hose to the firewall. Simply bend them down with a long screwdriver prior to this operation.
11: Have them firmly hold the wing nut (that's what it is) that holds the sprayer in position while you turn it from outside the car JUST to loosen it. Have them back off the wing nut entirely and slide the nut down the hose while they bring their hand out. You want to prevent that nut falling down and rattling around. You can tape it to the hose once you get your hands on it.
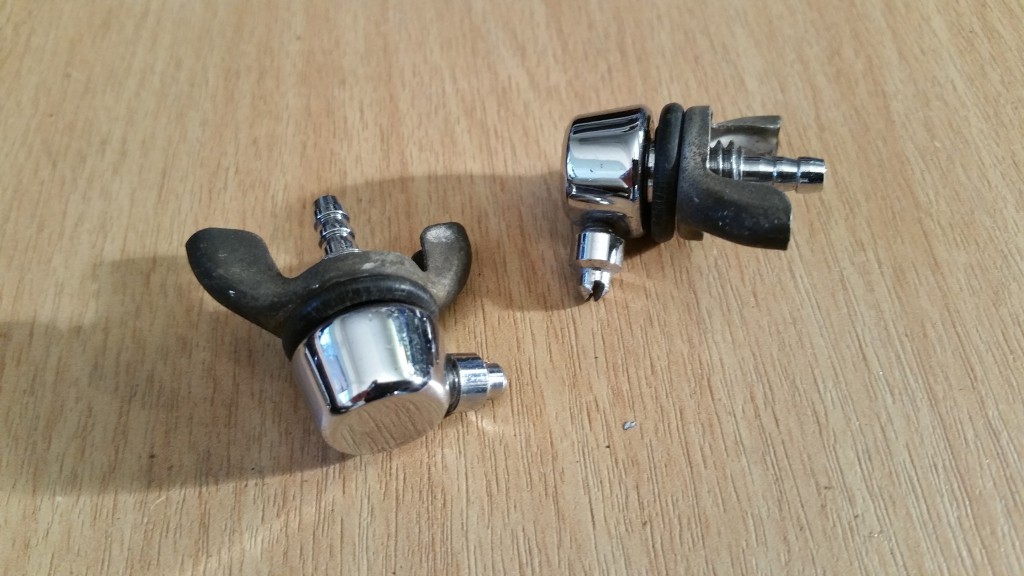
12: Once the nut is off, you can pull the sprayer "up" and remove the hose. The sprayers are very cheaply made of plastic. The replacement ones from SNG are entirely metal and of a much higher quality. They already have the small washer underneath as well. Be sure your helper practices with the new sprayer so they understand what they are trying to accomplish and what it should feel like. I did this for a few minutes with their eyes closed! They love the challenge.
13: Get your new hose (buy about 10 ft) and place the new wing nut on the hose and have your assistant grab the hose and nut and begin the positioning of the hose to get it through the cowl of the car so you can grab the end of it and push it on the new sprayer. I heated the hose end with a hair dryer so I could push it on as far as possible.
14: Place the sprayer back into the cowl hole so your helper can put the nut back on. THIS IS THE TOUGH PART.
15: Your helper is in a very tough spot with no real space and must use quite a bit of finger dexterity to tighten the wing nut back on tightly. This is very difficult so you'll have to be patient. It may take a couple tries. It's easy to cross thread it and get stuck so make sure they get it on correctly. They are most likely going to scrape themselves up a bit. No blood, but it's not comfortable. This is about the time you remind them of the 20 bucks awaiting them....
15: Have them snug up the wing nut as much as they can. Then ask them to hold it as firmly as they can while you tighten it up from the outside.
16: Once that sprayer is attached you can cut the hose to give you plenty of extra. You'll trim it up later when you attach the plastic "T" and get closer to the completion.
17: Replicate the same process from the other side (this side also has the added difficulty of the wiper motor being present. Once this side is done you are 95% of the way home.
18: Run some new hose from the engine compartment through the single firewall grommet for the sprayers. The "T" will go on this on the other side of the firewall. Measure and cut out as much of the slack hose as possible. It's pretty basic at this stage. Try to secure the hose on firewall again with the metal tabs you previously bent open.
Shazaam, you should be done!
At this point, you'll start noticing how many otherwise very nice cars have ratty sprayers. Smile to yourself and know you accomplished one of the small but larger PITA jobs on an e-type!
1: Remove the center console
2: Drop the gauge panel (you'll see the fuse panel at this point)
3: Take some kite string (5 ft or so) and tie it around the main wiper arm.
4: Remove the wiper arm and get it out of the way (the string runs back into the cabin)
5: get a small magnetic LED lite and position it in the front cavity to shine in the direction you will be working. Passenger or driver side makes no matter
6: This is the hard part and requires the recruitment and dedication of a slender 10-13 yo relative, neighbor etc. with small hands and wrist. (If you can't find one, you can just forget it. I tried with my girlfriend (she's a real sport) and though she could get he hand close it just wouldn't work.)
7: A 20 dollar bill (for said relative)
8: Some pillows
9:Explain in detail that they will be among the few people in the world capable of doing this operation. They will also get kudos at any Jag event worldwide.
10: Arrange the pillows so your helper is comfortable while able to reach their arm (almost entirely) into the front cavity of the car and to simply follow the sprayer hose up to the base of the sprayer. Note: The cowl has metal tags that hold the hose to the firewall. Simply bend them down with a long screwdriver prior to this operation.
11: Have them firmly hold the wing nut (that's what it is) that holds the sprayer in position while you turn it from outside the car JUST to loosen it. Have them back off the wing nut entirely and slide the nut down the hose while they bring their hand out. You want to prevent that nut falling down and rattling around. You can tape it to the hose once you get your hands on it.
12: Once the nut is off, you can pull the sprayer "up" and remove the hose. The sprayers are very cheaply made of plastic. The replacement ones from SNG are entirely metal and of a much higher quality. They already have the small washer underneath as well. Be sure your helper practices with the new sprayer so they understand what they are trying to accomplish and what it should feel like. I did this for a few minutes with their eyes closed! They love the challenge.
13: Get your new hose (buy about 10 ft) and place the new wing nut on the hose and have your assistant grab the hose and nut and begin the positioning of the hose to get it through the cowl of the car so you can grab the end of it and push it on the new sprayer. I heated the hose end with a hair dryer so I could push it on as far as possible.
14: Place the sprayer back into the cowl hole so your helper can put the nut back on. THIS IS THE TOUGH PART.
15: Your helper is in a very tough spot with no real space and must use quite a bit of finger dexterity to tighten the wing nut back on tightly. This is very difficult so you'll have to be patient. It may take a couple tries. It's easy to cross thread it and get stuck so make sure they get it on correctly. They are most likely going to scrape themselves up a bit. No blood, but it's not comfortable. This is about the time you remind them of the 20 bucks awaiting them....
15: Have them snug up the wing nut as much as they can. Then ask them to hold it as firmly as they can while you tighten it up from the outside.
16: Once that sprayer is attached you can cut the hose to give you plenty of extra. You'll trim it up later when you attach the plastic "T" and get closer to the completion.
17: Replicate the same process from the other side (this side also has the added difficulty of the wiper motor being present. Once this side is done you are 95% of the way home.
18: Run some new hose from the engine compartment through the single firewall grommet for the sprayers. The "T" will go on this on the other side of the firewall. Measure and cut out as much of the slack hose as possible. It's pretty basic at this stage. Try to secure the hose on firewall again with the metal tabs you previously bent open.
Shazaam, you should be done!
At this point, you'll start noticing how many otherwise very nice cars have ratty sprayers. Smile to yourself and know you accomplished one of the small but larger PITA jobs on an e-type!
| Link: | |
| BBcode: | |
| HTML: | |
| Hide post links |
#25
Great description, but we were talking about doing this without removing the whole wiper rack, which is the difficult bit . This is the bit that you didn't explain in detail!! if the wiper rack is removed then its really pretty much the same as fitting them from a bare steel or tub. Removing the wiper rack with the dash panels in and the windscreen in is a major undertaking and to be honest, if you are going to remove it imho you may as well just strip the dash completely. You only need to remove the windscreen if you have no helper to turn the washer jet whilst you place the nuts on the jets. I did this on my full rebuild as most others have and it was hard work with nothing in the way! when I fitted them from the bare shell I manage to find a mate with extremely small hands and long arms! Next time you go to the pub chaps, start eyeing up future helpers.
| Link: | |
| BBcode: | |
| HTML: | |
| Hide post links |
-
Tferrer@gmail.com
- Posts: 9
- Joined: Thu Jan 01, 2015 9:31 am
- Location: San Francisco
#26
There's no need to remove the rack. It's just the single wiper arm. It takes about 30 seconds to pop off and drop out of the way.....with the string attached so you can pull it back up and reattach when your completed....
| Link: | |
| BBcode: | |
| HTML: | |
| Hide post links |
#27
ah right, I misunderstood your terminology, my mistake. I also popped off the operating arm but since it sits down on the inner bulkhead it was quite accessible to reach to re attach. This enabled me to operates the wipers to get the best access . The biggest barrier to getting in on a 4.2 was the centre dash vent. which sticks down in the way.
| Link: | |
| BBcode: | |
| HTML: | |
| Hide post links |
-
Tferrer@gmail.com
- Posts: 9
- Joined: Thu Jan 01, 2015 9:31 am
- Location: San Francisco
#28
Yes, but that's relatively straightforward. I did forget to mention that though. Thanks for the reminder! Hopefully your are done with your job. The toughest part is finding the helper...
| Link: | |
| BBcode: | |
| HTML: | |
| Hide post links |


#29 windscreen jet nozzles
Hello,
I am just reassembling my freshly restored body.
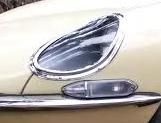
Coming across the jet nozzles I was wondering on which side the rubber ring goes. From reading here it should be on the outside. Have seen pics with the rubber ring between body and nozzle and some pics without rubber ring.
What is your state of knowledge?
Thanks
Maikel
I am just reassembling my freshly restored body.
Coming across the jet nozzles I was wondering on which side the rubber ring goes. From reading here it should be on the outside. Have seen pics with the rubber ring between body and nozzle and some pics without rubber ring.
What is your state of knowledge?
Thanks
Maikel
| Link: | |
| BBcode: | |
| HTML: | |
| Hide post links |

#30
Maikel
I have an unrestored S2 OTS, There is definitely no rubber on the outside so it must be underneath the body
John
I have an unrestored S2 OTS, There is definitely no rubber on the outside so it must be underneath the body
John
1969 S2 OTS
| Link: | |
| BBcode: | |
| HTML: | |
| Hide post links |

#31
Agreed, it is under the wingnut. You may see cars with the O rings on the top but this is a quick fix if the jets become loose. It is a lot easier to put O rings over the jets than wrestle with the wing nuts from underneath.
David Jones
S1 OTS OSB; S1 FHC ODB
1997 Porsche 911 Guards Red
Add your E-Type to our World Map: http://forum.etypeuk.com/viewtopic.php?f=1&t=1810
S1 OTS OSB; S1 FHC ODB
1997 Porsche 911 Guards Red
Add your E-Type to our World Map: http://forum.etypeuk.com/viewtopic.php?f=1&t=1810
| Link: | |
| BBcode: | |
| HTML: | |
| Hide post links |
#32
Don't agree. Just checked my 66 and it has rubbers between chrome jet and bulkhead. Makes sense as you need to seal it and protect the paintwork.
Angus 67 FHC 1E33656
61 OTS 875047
61 OTS 875047
| Link: | |
| BBcode: | |
| HTML: | |
| Hide post links |
#33
Does it have rubber washers under the wing nuts as well?
Edit: just answered my own question - only one washer:
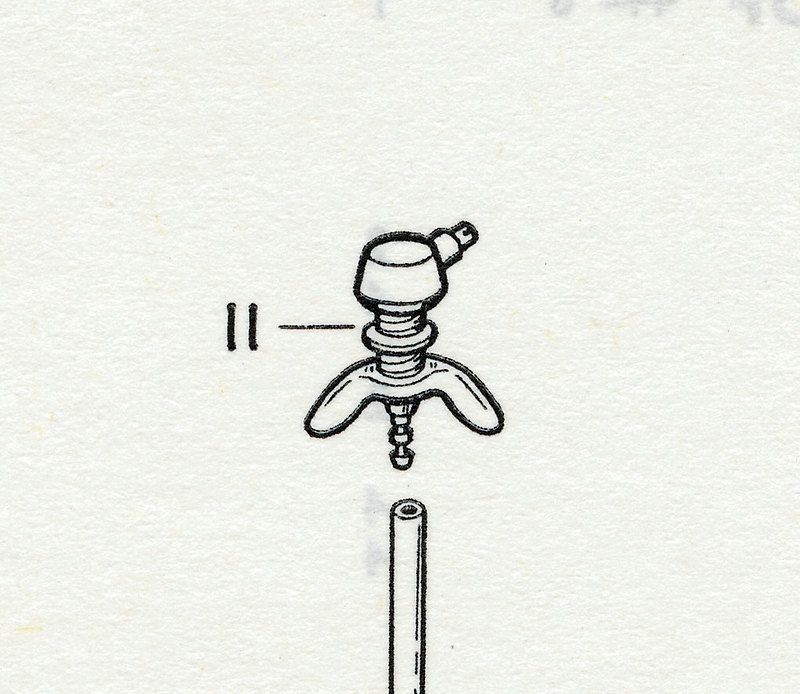
Edit: just answered my own question - only one washer:
David Jones
S1 OTS OSB; S1 FHC ODB
1997 Porsche 911 Guards Red
Add your E-Type to our World Map: http://forum.etypeuk.com/viewtopic.php?f=1&t=1810
S1 OTS OSB; S1 FHC ODB
1997 Porsche 911 Guards Red
Add your E-Type to our World Map: http://forum.etypeuk.com/viewtopic.php?f=1&t=1810
| Link: | |
| BBcode: | |
| HTML: | |
| Hide post links |


#34 Re: How do you tighten washer jets?
I was just cleaning up my wingnuts from the washer jets from my Series2 and noticed one of them was stamped dotloc. Just another minor detail to add to the list. It isn't listed as a separate part, only as part of the jet assembly.

-Mark
1969 Series 2 OTS, Regency Red
'Life's to short to drive a boring car'
1969 Series 2 OTS, Regency Red
'Life's to short to drive a boring car'
| Link: | |
| BBcode: | |
| HTML: | |
| Hide post links |

#35 Re: How do you tighten washer jets?
Many years ago I used to work in a British Leyland dealership. One day I was given the job of fitting new washer jets to a Marina - the originals were missing. It was the Devils own job - pretty much along the line of what is described here. I asked how or why the owner had gone to all the trouble of taking the old ones out - apparently he had gone to Windsor Safari Park and the Baboons had plucked them out!
When I get to that stage on my E Type, I'm sorely tempted to fit push-in washer jets, so I can get them out again the same way. Or just take a ride to Windsor perhaps?
When I get to that stage on my E Type, I'm sorely tempted to fit push-in washer jets, so I can get them out again the same way. Or just take a ride to Windsor perhaps?
Hugo Miller - rebuilding an imported Series II OTS & converting to RHD
| Link: | |
| BBcode: | |
| HTML: | |
| Hide post links |