


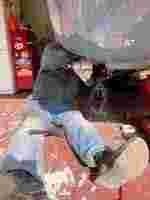
In one last attempt to thwart me taking her engine out my S3 has decided not to let go of the transmission/propeller shaft. Nuts & bolts are holding fast to the point where I'm in danger of rounding the heads. Looking at the torque settings they shouldn't be that tight, just 28-32lb.ft., but my car hasn't read the book.
Anybody learnt any clever tips that might help me win this battle of wills?
Cheers!
Nigel
"...remove bolts securing propeller shaft..."
-
 panamacarrera
Topic author - Posts: 94
- Joined: Sun Jul 09, 2017 4:36 pm
- Location: Southport, UK


#2 Re: "...remove bolts securing propeller shaft..."
Mine were stuck fast too Nigel. I take it you've drenched them with Plusgas? Best penetrating oil I've found. Anyway I had to grind the nuts off with a dremel. Horrible job. The grinding damaged the bolts and you can't get them out unless you're going to do surgery on the gearbox...
Jeremy
1967 S1 4.2 FHC
1967 S1 4.2 FHC
| Link: | |
| BBcode: | |
| HTML: | |
| Hide post links |

#3 Re: "...remove bolts securing propeller shaft..."
Get some heat on the nuts....a hand held propane torch can work wonders... Steve
Steve
69 S2 2+2 (just sold) ..Realm C type replica, 1960 xk150fhc
69 S2 2+2 (just sold) ..Realm C type replica, 1960 xk150fhc
| Link: | |
| BBcode: | |
| HTML: | |
| Hide post links |

#4 Re: "...remove bolts securing propeller shaft..."
If these are the gearbox end of the prop shaft I’d not use a flame, not with trim and oil and under seal. If the nuts/bolts are rounding I wouldn’t try to save them, they are toast. I’d grind them off and buy new replacements.
Chris '67 S1 2+2
| Link: | |
| BBcode: | |
| HTML: | |
| Hide post links |
#5 Re: "...remove bolts securing propeller shaft..."
If it’s of any use I’ve just refitted my prop and had similar issues at the gearbox end.
The locking nuts had been reused and were showing signs of being rounded and were very tight. Aware of any potential issues I didn’t want to risk destroying the nuts completely so spent a while selecting the closest fitting ring spanner I had and making sure it was fitted very snugly onto the nut. This entailed tapping it into place with a short thin drift until it was right up against the end of the prop all round..
Heart in mouth and constant heavy pulling did the trick.
If you damage the bolts then it’s no option but to take off the pinion fitting which you want to avoid.
Series 1 FHC purchased 40 years ago. Courted my wife in it.
Series 1 2+2 when the kids were small now sold.
Series 1.5 OTS in opalescent maroon, Californian car. My retirement present.
Series 1 2+2 when the kids were small now sold.
Series 1.5 OTS in opalescent maroon, Californian car. My retirement present.
| Link: | |
| BBcode: | |
| HTML: | |
| Hide post links |

#6 Re: "...remove bolts securing propeller shaft..."
All things can be removed ! LOL Yup...some heat, any good penetrating oil, and eventually they will come out. Replace with new bolts anyway. Remember to take a few inches off the shaft, install a new collapsible section, and re-balance, before you put back in. In the future, in all long wheel base cars, such as Series 3 cars, it will be a very easy job to pull transmission. Clutch changing , addressing a flywheel issue, etc, will be an afternoon's job. No need to pull engine. Keep drenching those bad boys.....you'll get them out !
John
John
| Link: | |
| BBcode: | |
| HTML: | |
| Hide post links |
#7 Re: "...remove bolts securing propeller shaft..."
Dear Nigel,
Why don't you just see if you can not take them off till after the engine is out?
The propshaft is in two pieces, joined in the middle by a splined shaft which is hidden under a rubber gaiter. If you can simply pull the joint apart then it'll come apart, subject to the other half of the propshaft being able to move.
kind regards
Marek
| Link: | |
| BBcode: | |
| HTML: | |
| Hide post links |
-
 Series1 Stu
- Posts: 1650
- Joined: Thu Feb 02, 2017 12:26 pm
- Location: Shropshire
#8 Re: "...remove bolts securing propeller shaft..."
When your replace the bolts, make sure they are T rated. Anything less could see your prop shaft digging into the tarmac.
Regards
Regards
Stuart
If you can't make it work, make it complicated!
'62 FHC - Nearing completion
'69 Daimler 420 Sovereign
'78 Land Rover Series 3 109
If you can't make it work, make it complicated!
'62 FHC - Nearing completion
'69 Daimler 420 Sovereign
'78 Land Rover Series 3 109
| Link: | |
| BBcode: | |
| HTML: | |
| Hide post links |


#9 Re: "...remove bolts securing propeller shaft..."
I have this ahead of me so very keen to learn if this would work, can’t see why not?
Tim is saying “If you damage the bolts then it’s no option but to take off the pinion fitting which you want to avoid.” By pinion fitting, do u mean the propshaft yolk? Why should this be avoided, if u match-mark 1st so can be reinstated to the same balance? Presumable, as part of the engine out, the prop-shaft will also be removed/checked/refurbished?
Only experience I can add, I found PO had cut the floor pan so the top of the tunnel over the gearbox end uni-joints could be folded back, I decided to repair by brazing (with just the gearbox access cover removed). With the underbody seal well soaked with oil from leaking rear end seal I was concerned about fires so had s&h standing by with an extinguisher. Wasn’t required, everything very reluctant to burn.
Is the job is being done by the book, with the engine lowered a bit to give proper access to the bolts?
Regards,
ColinL
'72 OTS manual V12
ColinL
'72 OTS manual V12
| Link: | |
| BBcode: | |
| HTML: | |
| Hide post links |
#10 Re: "...remove bolts securing propeller shaft..."
Colin Wrote:
The Prop Shaft does indeed have a splined coupling, but at one end and nowhere near the centre. The splined coupling end is originally affixed to the gearbox companion flange, although I've seen a few that have the Prop Shaft mounted back to front with the splined coupling attached to the pinion companion flange.
If you can't get the bolts securing the Prop Shaft to the gearbox undone, the splined coupling (female component) will slide free of the Prop Shaft as the Engine and Gearbox are moved forward. There is a rubber gaiter protecting the spine from the ingress of contaminants. Its a firm sliding fit on the plane journal just before where the male spline starts and secured at its other end with a metal collar. Either the splined shaft will slide through the gaiter, or the gaiter will come away from the coupling (normally the former) when the Engine and Gearbox are moved forward. This method will work if the Prop Shaft has been attached between the Gearbox and Differential correctly with the splined coupling towards the front. If the splined coupling is attached to the Pinion Companion Flange, I suspect that the Prop Shaft will inhibit lifting the engine.
Colin Wrote:
I normally remove the engine with practically no lifting (modified motor cycle jack placed under the sump) and wheeling it forward. However, this method requires the carburetors and picture frame to be removed first, but would allow the Prop Shaft to come out as a whole, or separate from the splined coupling if its attached to the Pinion Companion Flange. The same forward movement with the picture frame in place and relatively little vertical movement of the engine is possible using an engine hoist, or crane.
Regards,
Bill
Hello Colin,I have this ahead of me so very keen to learn if this would work, can’t see why not?
The Prop Shaft does indeed have a splined coupling, but at one end and nowhere near the centre. The splined coupling end is originally affixed to the gearbox companion flange, although I've seen a few that have the Prop Shaft mounted back to front with the splined coupling attached to the pinion companion flange.
If you can't get the bolts securing the Prop Shaft to the gearbox undone, the splined coupling (female component) will slide free of the Prop Shaft as the Engine and Gearbox are moved forward. There is a rubber gaiter protecting the spine from the ingress of contaminants. Its a firm sliding fit on the plane journal just before where the male spline starts and secured at its other end with a metal collar. Either the splined shaft will slide through the gaiter, or the gaiter will come away from the coupling (normally the former) when the Engine and Gearbox are moved forward. This method will work if the Prop Shaft has been attached between the Gearbox and Differential correctly with the splined coupling towards the front. If the splined coupling is attached to the Pinion Companion Flange, I suspect that the Prop Shaft will inhibit lifting the engine.
Colin Wrote:
There is no issue with dismantling the Prop Shaft from the Pinion Companion Flange, except with regards to my comments above and the Prop Shaft inhibiting lifting the Engine/Gearbox.Tim is saying “If you damage the bolts then it’s no option but to take off the pinion fitting which you want to avoid.” By pinion fitting, do u mean the propshaft yolk? Why should this be avoided, if u match-mark 1st so can be reinstated to the same balance? Presumable, as part of the engine out, the prop-shaft will also be removed/checked/refurbished?
I normally remove the engine with practically no lifting (modified motor cycle jack placed under the sump) and wheeling it forward. However, this method requires the carburetors and picture frame to be removed first, but would allow the Prop Shaft to come out as a whole, or separate from the splined coupling if its attached to the Pinion Companion Flange. The same forward movement with the picture frame in place and relatively little vertical movement of the engine is possible using an engine hoist, or crane.
Regards,
Bill
| Link: | |
| BBcode: | |
| HTML: | |
| Hide post links |
#11 Re: "...remove bolts securing propeller shaft..."
By pinion fitting I mean the flange on the end of the gearbox.
The comment by Marek about splitting the prop sounds a good thought
Tim
The comment by Marek about splitting the prop sounds a good thought
Tim
Series 1 FHC purchased 40 years ago. Courted my wife in it.
Series 1 2+2 when the kids were small now sold.
Series 1.5 OTS in opalescent maroon, Californian car. My retirement present.
Series 1 2+2 when the kids were small now sold.
Series 1.5 OTS in opalescent maroon, Californian car. My retirement present.
| Link: | |
| BBcode: | |
| HTML: | |
| Hide post links |
#12 Re: "...remove bolts securing propeller shaft..."
It's only a suggestion:- if it is assembled as per oem then there should only be a very short stub of propshaft at the front end and it may the case that this can be lifted out together with the gearbox and engine if it can be pulled forward as it lifts. If it comes down to the last inch, then the rear end may be disconnected at the rear flange and moved to the side in its tunnel to pull it back against the differential. This may give you enough freedom to simply disconnect.
I am surprised that the nuts or bolts are rounded - I thought you only have space for a ring spanner on the front yoke anyway.
kind regards
Marek
I am surprised that the nuts or bolts are rounded - I thought you only have space for a ring spanner on the front yoke anyway.
kind regards
Marek
| Link: | |
| BBcode: | |
| HTML: | |
| Hide post links |
-
 Ole-xke1974
- Posts: 181
- Joined: Sat Nov 08, 2014 9:52 am
- Location: Holmfirth, West Yorkshire
#13 Re: "...remove bolts securing propeller shaft..."
1974 SIII E-Type w. XJ S2 4sp w. O/D
| Link: | |
| BBcode: | |
| HTML: | |
| Hide post links |
-
panamacarrera
Topic author - Posts: 94
- Joined: Sun Jul 09, 2017 4:36 pm
- Location: Southport, UK
#14 Re: "...remove bolts securing propeller shaft..."
Sorted!
Thanks for all your suggestions folks.
I went with Marek's suggestion and it worked just fine. Much easier to remove the propshaft bolts with the thing outside the car and liberal use of propane heat. I still have one more to get out - I'm taking the transmission to a mate who has oxyacetylene tomorrow for the final sod!
Thanks again.
Cheers!
Nigel
'71 S3 OTS
| Link: | |
| BBcode: | |
| HTML: | |
| Hide post links |
#15 Re: "...remove bolts securing propeller shaft..."
I’m sure others will comment but it looks to me that your bolts are in the wrong way round. I thought that the bolts should be fitted so that the nuts came on from the rear (axle ) end with the bolts fitted through the gearbox flange.
Tim
Tim
Series 1 FHC purchased 40 years ago. Courted my wife in it.
Series 1 2+2 when the kids were small now sold.
Series 1.5 OTS in opalescent maroon, Californian car. My retirement present.
Series 1 2+2 when the kids were small now sold.
Series 1.5 OTS in opalescent maroon, Californian car. My retirement present.
| Link: | |
| BBcode: | |
| HTML: | |
| Hide post links |
#16 Re: "...remove bolts securing propeller shaft..."
Tim Wrote"
Quite correct. Originally and normally, the bolts are assembled through the holes in the gearbox companion flange so that the head of the bolt is towards the front of the car. These should be put in place before tapping the flange home on the spline, as its not possible to fit them in this orientation afterwards.
Regards,
Bill
Hello Tim,I thought that the bolts should be fitted so that the nuts came on from the rear (axle ) end with the bolts fitted through the gearbox flange.
Quite correct. Originally and normally, the bolts are assembled through the holes in the gearbox companion flange so that the head of the bolt is towards the front of the car. These should be put in place before tapping the flange home on the spline, as its not possible to fit them in this orientation afterwards.
Regards,
Bill
| Link: | |
| BBcode: | |
| HTML: | |
| Hide post links |


#17 Re: "...remove bolts securing propeller shaft..."
Why? This way it is so much more of an issue to replace a damaged bolt. Is there an engineering reason why the bolt head should face towards the front?
Best Regards
Philip
Jag: 72 S3 XKE, 74 S3 XKE OTS, 80 XJS (Megasquirt + 5sp manual O/D)
Jensen: 74 Interceptor (EFI by Megasquirt + O/D 4sp auto)
Chev: 59 Apache std, 70 C10 (350V8, 700R4)
Philip
Jag: 72 S3 XKE, 74 S3 XKE OTS, 80 XJS (Megasquirt + 5sp manual O/D)
Jensen: 74 Interceptor (EFI by Megasquirt + O/D 4sp auto)
Chev: 59 Apache std, 70 C10 (350V8, 700R4)
| Link: | |
| BBcode: | |
| HTML: | |
| Hide post links |
#18 Re: "...remove bolts securing propeller shaft..."
Philip Wrote:
In terms of securing the flanged joint, no advantage one way, or the other. I can only think that in the unlikely event that if three of the four nuts should come undone with the fourth loose, the bolts can't fall out and the tail-shaft will be roughly retained in position. In this situation you would be aware of a problem, but the tail-shaft wouldn't be thrashing around in its tunnel. The Jaguar workshop manual specifies assembly in this manner. Notwithstanding being loose, the fact that the bolts are still retained in position, they would still take considerable shear load.
Colin Wrote:
A business, specializing in E Type restoration. All metal finish - no filler other than lead.
Following are a few pictures inside the shop.
Regards,
Bill


Hello Philip,Why? This way it is so much more of an issue to replace a damaged bolt. Is there an engineering reason why the bolt head should face towards the front?
In terms of securing the flanged joint, no advantage one way, or the other. I can only think that in the unlikely event that if three of the four nuts should come undone with the fourth loose, the bolts can't fall out and the tail-shaft will be roughly retained in position. In this situation you would be aware of a problem, but the tail-shaft wouldn't be thrashing around in its tunnel. The Jaguar workshop manual specifies assembly in this manner. Notwithstanding being loose, the fact that the bolts are still retained in position, they would still take considerable shear load.
Colin Wrote:
Hello Colin,Bill. with your evident expertise, r u a business or private person?
A business, specializing in E Type restoration. All metal finish - no filler other than lead.
Following are a few pictures inside the shop.
Regards,
Bill
Last edited by angelw on Tue Feb 27, 2018 8:22 am, edited 1 time in total.
| Link: | |
| BBcode: | |
| HTML: | |
| Hide post links |

#19 Re: "...remove bolts securing propeller shaft..."
I can think of two more reasons to install the bolts with the heads forward:angelw wrote: ↑Tue Feb 27, 2018 8:09 amBill wrote:
In terms of securing the flanged joint, no advantage one way, or the other. I can only think that in the unlikely event that if three of the four nuts should come undone with the fourth loose, the bolts can't fall out and the tail-shaft will be roughly retained in position. In this situation you would be aware of a problem, but the tail-shaft wouldn't be thrashing around in its tunnel. The Jaguar workshop manual specifies assembly in this manner. Notwithstanding being loose, the fact that the bolts are still retained in position, they would still take considerable shear load.
1) Having the exposed threads to the rear means that they are less likely to be damaged by debris picked up by the front wheels.
2) Having the nuts at the rear means that if you do have to put heat on them then the flange is between your flame and the rear seal on the tailshaft.
| Link: | |
| BBcode: | |
| HTML: | |
| Hide post links |
#20 Re: "...remove bolts securing propeller shaft..."
Just thought i would look up this bolt orientation.....both my S1,2, & 3 service manuals say nothing about it in the removal or refitting section for prop shaft.....however on page G4. (S1.2 manual) there is an exploded view of the prop...at both ends it shows the bolts go in from the prop side

Steve
69 S2 2+2 (just sold) ..Realm C type replica, 1960 xk150fhc
69 S2 2+2 (just sold) ..Realm C type replica, 1960 xk150fhc
| Link: | |
| BBcode: | |
| HTML: | |
| Hide post links |