master cylinder assembly diagram

Talk about the E-Type Series 3

Topic author
42south
Posts: 213
Joined: Sat Aug 18, 2012 9:07 pm
Location: Ohope beach, New Zealand
New Zealand

#1 master cylinder assembly diagram

Post by 42south » Mon Jan 20, 2020 4:14 am

Hi Guys
Has any one fitted a repair kit to a S3 master brake cylinder? I have the seal kit from SNG which comes with a diagram like this

Image

However when looking in the repair manual there are several differences in the order of parts on the piston. the area of difference is the arrowed area.

Any help on which one is correct appreciated.

Many thanks
Mark
Mark Brown
1971 S3 Etype, now sold, sadly.

Link:
BBcode:
HTML:
Hide post links
Show post links


Topic author
42south
Posts: 213
Joined: Sat Aug 18, 2012 9:07 pm
Location: Ohope beach, New Zealand
New Zealand

#2 Re: master cylinder assembly diagram

Post by 42south » Mon Jan 20, 2020 7:02 pm

Further to my previous post I found an excellent video on YouTube


This vid covers all important aspects of the disassembly and overhaul.
It has the piston seals in the same order as the S3 repair manual, which is at odds with the diagram above. However the diagram is a generic one for many cars, so I’m going with the video and the Jag manual.

Cheers
Mark Brown
1971 S3 Etype, now sold, sadly.

Link:
BBcode:
HTML:
Hide post links
Show post links


Sdinse
Posts: 25
Joined: Wed Dec 13, 2017 2:04 am
United States of America

#3 Re: master cylinder assembly diagram

Post by Sdinse » Tue Jan 21, 2020 12:22 am

Have you seen the "S III ROM & Parts Manual Errata" doc that Rich Mozetta(on Jag-Lovers) put together. It explains a lot and I believe the brake Master cylinder is the first thing listed. Quote: 1 - RTC9015 p31.48 ''Master Cylinder - Reaction Valve'' Exploded view of internals(bottom of page) wrong. Also shown wrong in ROM rebuild section. The 10878 ''plastic seal retainer cup'' and ''NSS'' seal are shown incorrectly. The open lip of the seal and cup must face inwards to maintain fluid pressure. I will add a diagram in the document. I will also add a diagram of the reaction valve internals as none exist. Assembly is not obvious and can be assembled backwards.

HTH,
Steve
Steve
1971 SIII E Type 2+2

Link:
BBcode:
HTML:
Hide post links
Show post links

User avatar

abowie
Posts: 3886
Joined: Wed Sep 07, 2011 9:15 pm
Location: Australia
Contact:
Australia

#4 Re: master cylinder assembly diagram

Post by abowie » Tue Jan 21, 2020 1:18 am

Sdinse wrote:
Tue Jan 21, 2020 12:22 am
Have you seen the "S III ROM & Parts Manual Errata" doc
Can you post a copy here please or send it to Heuer for the KB.

Ta
Andrew.
881824, 1E21538. 889457. 1961 4.3l Mk2. 1975 XJS. 1962 MGB
http://www.projectetype.com/index.php/the-blog.html
Adelaide, Australia

Link:
BBcode:
HTML:
Hide post links
Show post links


Topic author
42south
Posts: 213
Joined: Sat Aug 18, 2012 9:07 pm
Location: Ohope beach, New Zealand
New Zealand

#5 Re: master cylinder assembly diagram

Post by 42south » Tue Jan 21, 2020 7:22 am

here's a link to the errata document.
https://forums.jag-lovers.com/t/e-type- ... st-1/70219

cheers
Mark Brown
1971 S3 Etype, now sold, sadly.

Link:
BBcode:
HTML:
Hide post links
Show post links

User avatar

Ole-xke1974
Posts: 181
Joined: Sat Nov 08, 2014 9:52 am
Location: Holmfirth, West Yorkshire
Great Britain

#6 Re: master cylinder assembly diagram

Post by Ole-xke1974 » Sun Jan 26, 2020 12:42 pm

After an MC repair, many have experienced sticking brakes.
I found it to be down to the small metal “plate” to the very left on the drawing. It’s stamped out and have a round edge side and a sharp edge side.
I believe the sharp edge side have to face the reaction valve to avoid getting stuck when you release the brakes.
I basically took a file to the sharp edges and now it doesn’t matter which way it’s fitted.
If I was doing a refurbish, I’d round the edges to be on the safe side.
Cheers ... Ole
1974 SIII E-Type w. XJ S2 4sp w. O/D

Link:
BBcode:
HTML:
Hide post links
Show post links


Topic author
42south
Posts: 213
Joined: Sat Aug 18, 2012 9:07 pm
Location: Ohope beach, New Zealand
New Zealand

#7 Re: master cylinder assembly diagram

Post by 42south » Thu Jan 30, 2020 2:04 am

Hi Guys
I took your advice Ole and did a bit of rounding of that plate. I also used heaps of red rubber grease during assembly. The final step was to install a stronger spring in the Reaction valve.
One problem that I encountered during assembly was with the large bearing at the front of the piston, the one with the rubber O ring on it. It was very tight on the piston shaft and almost made shaft movement impossible. So I just used another old bearing that I had, and it allowed freer movement.
One interesting thing was that this unit had been purchased new a few years ago and on disassembly it had the seals in the same orientation as the diagram above, as did another old unit that I had. So I went with this orientation.
Haven't tested it yet but have high hopes.
Cheers
Mark Brown
1971 S3 Etype, now sold, sadly.

Link:
BBcode:
HTML:
Hide post links
Show post links


eddiecross
Posts: 200
Joined: Thu Sep 15, 2016 9:36 pm
Location: Egham
Great Britain

#8 Re: master cylinder assembly diagram

Post by eddiecross » Mon Jan 25, 2021 10:38 pm

Main piston removal...
Followed the excellent you tube video above. Confirmed the correct bearing and seal order (instructions with the SNG rebuild kit showed it incorrectly)

I used an M6 rawlbolt as suggested in the you tube clip. This failed as it kept slipping out. Failed moving it with an air gun too. Was on absolutely solid.

Trick is to keep the body of the rawl bolt sticking out enough to clamp with molegrips and then you can wind in the eye of the bolt to really grip the inside of the body. Then clamp the eye bolt end in a vice and tap the housing off the piston with a hide mallet. Rawlbolt was £1.50 on ebay. Doubt I could have shifted it any other way.

Good news was that the cast body had been re-lined and the bore was unmarked.

Regards
Eddie
67 FHC

Link:
BBcode:
HTML:
Hide post links
Show post links


angelw
Posts: 634
Joined: Sat Feb 16, 2013 8:27 pm
Location: Ballarat, Vic, Australia
Australia

#9 Re: master cylinder assembly diagram

Post by angelw » Tue Jan 26, 2021 10:01 am

Eddie Wrote:
Doubt I could have shifted it any other way.
Hello Eddie,
I refurbish the parts of your focus and many others on a regular basis. I use a 10,000psi grease gun (not all that special) on anything that doesn't want to come apart easily. Simply attach the grease gun via a threaded connector, block those ports that need to be and then pump the parts out with the grease gun. I find it much better than compressed air, as its far more controllable (low velocity movement). Nil chance of damage with grease.

Regards,

Bill

Link:
BBcode:
HTML:
Hide post links
Show post links


eddiecross
Posts: 200
Joined: Thu Sep 15, 2016 9:36 pm
Location: Egham
Great Britain

#10 Re: master cylinder assembly diagram

Post by eddiecross » Wed Jan 27, 2021 6:47 am

Hi Bill,
You are right.
I just never seem to have the right threaded connectors lying around to do this. But yes, ideal way to do it with no chance of damage. I saw someone on a video use an old master cylinder bolted to a bench pumping it out which is also neat if you need to do a few of these.

On another topic that i can't figure out....the instructions that came with the rebuild kit and the Chris Rooke book show the bearing and 2ndary seal in the reverse order to the clip above.

My Haynes manual showed it as per above clip, My S1 master cylinder that I stripped has it in the same order, also an old S2 master cylinder has it in the same order...so I'm going with the flow on that one!

Cheers
Eddie
67 FHC

Link:
BBcode:
HTML:
Hide post links
Show post links

User avatar

vee12eman
Posts: 806
Joined: Mon Nov 26, 2007 7:14 pm
Kiribati

#11 Re: master cylinder assembly diagram

Post by vee12eman » Wed Jan 27, 2021 8:02 pm

Hi,
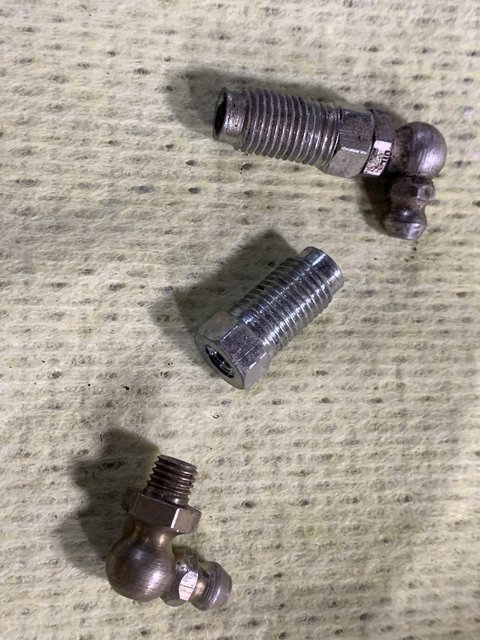
A really quick and easy grease gun/hydraulic adapter can be made with a brake line fitting nut and a grease nipple. I can’t remember the tap size but it might vary depending on the nipple anyway, normal brake line is 3/16”. However, it was just one from a normal grease point on the car, combined with the normal brake line fitting. I did not have to drill out, the existing hole took the tap and whilst it might not be a structurally sound job, it easily holds the pressure and I have dismantled some very old and cruddy hydraulic cylinders.

It’s not just a fluke of size, because I lost my first one, so made another which works just as well. Use a decent handheld grease gun and make sure the end is firmly and correctly fitted to the grease nipple.

All from my spares boxes, photo shows the two components plus one I made earlier.

Regards,

Simon.

Image
Regards,

Simon
Series III FHC

Link:
BBcode:
HTML:
Hide post links
Show post links


eddiecross
Posts: 200
Joined: Thu Sep 15, 2016 9:36 pm
Location: Egham
Great Britain

#12 Re: master cylinder assembly diagram

Post by eddiecross » Thu Jan 28, 2021 6:56 pm

Thanks all. Still interested to know why the brgs in the m/c are shown in two different orders.

Eddie
67 FHC

Link:
BBcode:
HTML:
Hide post links
Show post links

Post Reply Previous topicNext topic