


I am renovating the seats - the leather needs recolouring and the headrests needed replacement foam (the original foam had crumbled to the consistency of sand..).
I have managed to replace the headrest foam without removing the headrests, but can't get the staples in to finish the job as I can't get the headrests out of the seat. I've tried brute force (no joy) and sliding large zip ties down the side of the post to release the catch as the headrest is raised (still no luck).
It looks as if I am going to have to go in from the bottom of the seat back, but now that I have the seat out (easier than I thought) I can see the back and front of the seat are fastened to the other side by a row of panel pins.
Has anyone done this before? I am not sure whether it will be better to try and get the panel pins out and put it back together, or free enough of the back by cutting the back away from the pins and then stapling it back again once I have got the headrests out.
Any help would be appreciated.
Steve
Removing headrests
-
Gfhug
- Posts: 3305
- Joined: Thu Jun 19, 2014 3:08 pm
- Location: Near Andover, Hampshire,in D.O. Blighty

#2
Hi Steve, I have had the fun of removing headrests from my S2 seats. If you search you may see other enquiries.
However, I had to open up the bottom of the seat back, unpick a few inches of stiching to get access to the stem from underneath. Then with hammer, long drifts etc. to lump it with managed to drive out the headrest.
Re-stitching the bottom of the seat where unpicked was pretty easy with proper curved leather/upholstery needles. Then hammer back in the tacks.
Not difficult to do.
What I then worked out is that by squeeing the thickness and/or width of the stem you can get it to slide freely up and down. Gently squeezing in a vice. Can't remember which way I had to do it, but that is the principle.
Geoff
S2 FHC Light Blue
S2 OTS LHD - RHD full restoration
S2 OTS LHD - RHD full restoration
| Link: | |
| BBcode: | |
| HTML: | |
| Hide post links |
#3
Thanks Geoff
I think the S2 seats may be slightly different in construction. It looks like the cover was made like a pillowcase, pulled over the padding and frame and then tacked at the bottom by overlapping the front leather and rear vinyl. There is no obvious stitching to unpick.
I'll take a photo to show what I am working with.
Steve
Steve
1973 S3 v12 2+2 1S52113BW
1973 S3 v12 2+2 1S52113BW
| Link: | |
| BBcode: | |
| HTML: | |
| Hide post links |
-
Gfhug
- Posts: 3305
- Joined: Thu Jun 19, 2014 3:08 pm
- Location: Near Andover, Hampshire,in D.O. Blighty
#4
Tacked at the bottom, but I had to undo a little of the stitching at the bottom of the side sections to get enough freedom to move the cover and get access to the headrest stem.
S2 FHC Light Blue
S2 OTS LHD - RHD full restoration
S2 OTS LHD - RHD full restoration
| Link: | |
| BBcode: | |
| HTML: | |
| Hide post links |
#5
I was told that there is a small tab on the headrest stem that you need to push in in order to get the headrest out. You didn't need to take the seat apart to do it.
could be part number BD36715
could be part number BD36715
Richard
____________
1972 S3 2+2 - Black with Red leather, 4 Speed and Wires
1966 S Type 3.8 MOD - ex South Africa
1994 XJS V12 coupe - 59,000 miles
____________
1972 S3 2+2 - Black with Red leather, 4 Speed and Wires
1966 S Type 3.8 MOD - ex South Africa
1994 XJS V12 coupe - 59,000 miles
| Link: | |
| BBcode: | |
| HTML: | |
| Hide post links |


#6
Mine were hard to remove, but finally with a simple lever actuated between the headrest and the seat, it came out
2+2 1970
| Link: | |
| BBcode: | |
| HTML: | |
| Hide post links |
#7
I can't find any release mechanism on my headrests. It would be lovely if there was one. Any ideas where it magistrate be located.
Rolando - leverage may work - did you protect the seat and headrest by levering between something like two pieces of wood? How much force did you need to apply?
Steve
Rolando - leverage may work - did you protect the seat and headrest by levering between something like two pieces of wood? How much force did you need to apply?
Steve
Steve
1973 S3 v12 2+2 1S52113BW
1973 S3 v12 2+2 1S52113BW
| Link: | |
| BBcode: | |
| HTML: | |
| Hide post links |
#8
I now have one of my headrests removed. This is how I did it:
1) removed seat from car - only needs 4 bolts to be undone.
2) with seat upside down and folded forwards, I unfastened the bottom of the seat - it is held in place with a line of short nails, which can be prized out with a screwdriver and needle nose pliers.
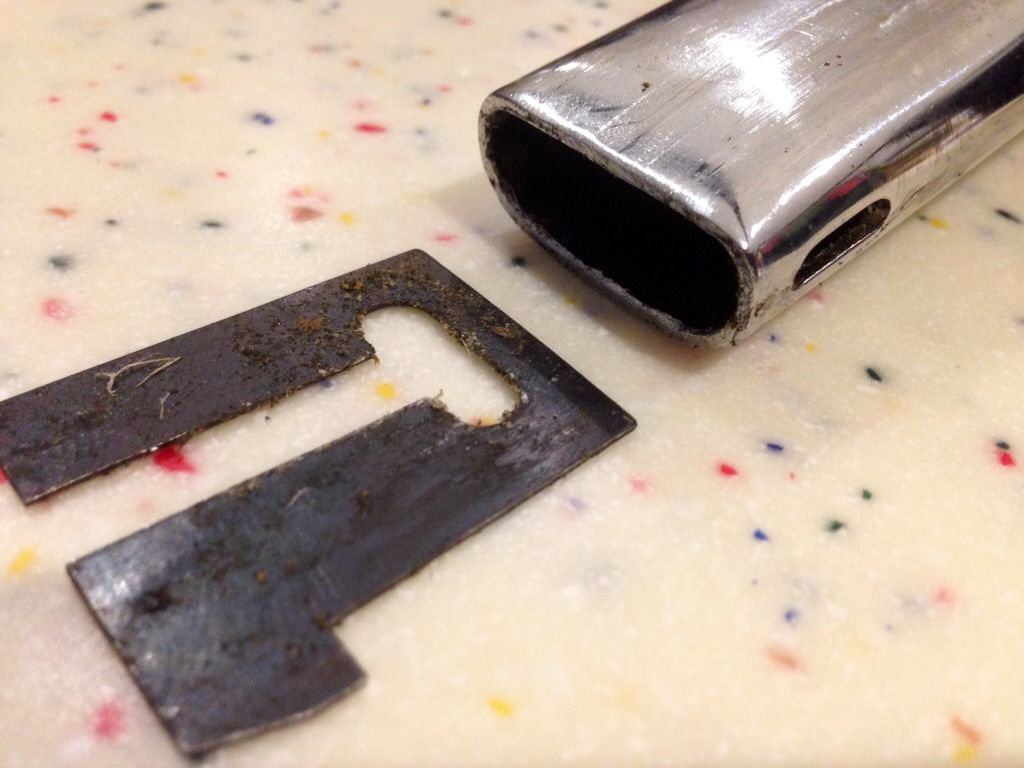
3) with all the nails out there is enough room to see the bottom of the headrest using a torch, but there is not enough room to get your hand and arm in. However all you need to do is to knock the piece on f Spring steel that is inside the bottom of the headrest column further inside the column. The headrest then just lifts straight out. I used a persuader (actually a pair of tree loppers) the fits inside the column, rested it against the spring steel and gave it a solid hit with a hammer. Job done!
I'll upload a photo of what the inside looks like so you know what you are dealing with! The clip exits the RHS of the column as you look at the seat from the front. The shape of the catch shows why these are so hard to move without opening the seat up.
Including putting the pins back in it only took me 30 mins.
1) removed seat from car - only needs 4 bolts to be undone.
2) with seat upside down and folded forwards, I unfastened the bottom of the seat - it is held in place with a line of short nails, which can be prized out with a screwdriver and needle nose pliers.
3) with all the nails out there is enough room to see the bottom of the headrest using a torch, but there is not enough room to get your hand and arm in. However all you need to do is to knock the piece on f Spring steel that is inside the bottom of the headrest column further inside the column. The headrest then just lifts straight out. I used a persuader (actually a pair of tree loppers) the fits inside the column, rested it against the spring steel and gave it a solid hit with a hammer. Job done!
I'll upload a photo of what the inside looks like so you know what you are dealing with! The clip exits the RHS of the column as you look at the seat from the front. The shape of the catch shows why these are so hard to move without opening the seat up.
Including putting the pins back in it only took me 30 mins.
Steve
1973 S3 v12 2+2 1S52113BW
1973 S3 v12 2+2 1S52113BW
| Link: | |
| BBcode: | |
| HTML: | |
| Hide post links |
#9
Next question - does anyone know where I can get the tensioner springs that stop the headrest falling down? The part number is BD37599 but everybody seems to have no stock.
It must have been a common part for many headrests st the time, so is there an alternative?
It must have been a common part for many headrests st the time, so is there an alternative?
Steve
1973 S3 v12 2+2 1S52113BW
1973 S3 v12 2+2 1S52113BW
| Link: | |
| BBcode: | |
| HTML: | |
| Hide post links |
#10
I have found some of the springs at Norman Motors http://www.normanmotorsltd.com. They have 3 left.
Steve
Steve
Steve
1973 S3 v12 2+2 1S52113BW
1973 S3 v12 2+2 1S52113BW
| Link: | |
| BBcode: | |
| HTML: | |
| Hide post links |
-
 Gravygraham
- Posts: 121
- Joined: Mon Dec 01, 2014 11:11 am
- Location: In the wilds of Kent, UK
#11
Interesting thread - I've recently replaced the foam and diaphragm in my drivers seat and the headrest now barely reaches The top of my shoulder! I'd like to get it to stay up but keeps sliding into the seat back.
'72 Series 3 manual coupe, pale primrose/black, cww
'61 Land Rover Series 2 petrol 88" in marine blue
'15 Defender 90 Heritage Edition
'15 Defender 90 Station Wagon
‘19 E-Pace HSE (Mrs Gravygraham’s runabout)
'61 Land Rover Series 2 petrol 88" in marine blue
'15 Defender 90 Heritage Edition
'15 Defender 90 Station Wagon
‘19 E-Pace HSE (Mrs Gravygraham’s runabout)
| Link: | |
| BBcode: | |
| HTML: | |
| Hide post links |
#12
The spring as are easy to fit - I used a piece of cotton wrapped round the middle just in case it fell down into the back of the seat.
They cost ?5 each, plus vat and p&p, but there are only 3 left...
Steve
They cost ?5 each, plus vat and p&p, but there are only 3 left...
Steve
Steve
1973 S3 v12 2+2 1S52113BW
1973 S3 v12 2+2 1S52113BW
| Link: | |
| BBcode: | |
| HTML: | |
| Hide post links |
#13
Just reached this stage in my restoration and have been unable to source the springs as well
I used a length of 3 core pvc flex which is the same diameter as the springs @ 6.8mm od and it works a treat.
I used a length of 3 core pvc flex which is the same diameter as the springs @ 6.8mm od and it works a treat.
| Link: | |
| BBcode: | |
| HTML: | |
| Hide post links |

#14 Re: Removing headrests
I know this is an old post but I'd thought I'd post my solution to the problem that came as a eureka moment.
One of my headrests was stuck in and all the force in the world wouldn't remove it. I got it to go up about 100 mm and then that was it. I figured that the clip was blocking it. I took the seats out as I was having the seat squab restuffed . The seat was dismantled. I carefully removed some of the nails holding in the upholstery at lower back. I was then able to insert a long length of flat bar up into the seat and locate it into the inside of the headrest oval tubular,keyhole surgery. I then whacked it with a hammer and this pushed the clip in. The headrest then came out. I have since removed the clips and stored them. There is a barb at the seat opening that is sufficient to hold the headrest in place
One of my headrests was stuck in and all the force in the world wouldn't remove it. I got it to go up about 100 mm and then that was it. I figured that the clip was blocking it. I took the seats out as I was having the seat squab restuffed . The seat was dismantled. I carefully removed some of the nails holding in the upholstery at lower back. I was then able to insert a long length of flat bar up into the seat and locate it into the inside of the headrest oval tubular,keyhole surgery. I then whacked it with a hammer and this pushed the clip in. The headrest then came out. I have since removed the clips and stored them. There is a barb at the seat opening that is sufficient to hold the headrest in place
Adam
S3 V12 E Type FHC Manual 1972-owned since 1978
1957 XK150 since 1976
S3 V12 E Type FHC Manual 1972-owned since 1978
1957 XK150 since 1976
| Link: | |
| BBcode: | |
| HTML: | |
| Hide post links |


#15 Re: Removing headrests
Likewise, I needed to remove the headrest on my series 2 OTS to replace the ratty covers. Wouldn't budge. Removed the staples from the base of the rear as others have described, opening it enough to get a look see with my trusty "torch". No spring steel clip was observed. The thing is apparently simply held tight in via friction.
A block of wood and a hammer, a few good whacks (more, actually then I thought would be necessary) and stem was at the base of keeper. Placed the seat upright, grabbed the headrest and it was out with a few good yanks.
50 year old staples were bent up and rusty, so simply used my Swingline stapler to refasten.
1970 baby blue Series II OTS
| Link: | |
| BBcode: | |
| HTML: | |
| Hide post links |
#16 Re: Removing headrests
Just for anyones info looking to replace headrest foams and, like me, not relishing the idea of removing the seats and getting fancy with needlework. I have just managed to replace both headrest foams on my S3 2+2 without removing the headrests.
Pull the headrests up, undo the 2 screws holding the plastic cover plate to the headrest, unpick the staples, replace the foams, staple the leather back - easier said than done, but simple.
You need a good strong upholstery stapler, not more than 80mm tall or so at the head, a stubby philips screwdriver or a 90deg drill driver attachment. I replaced the existing screws with larger threads to hold better.
I dont have a garage, everything done street side. My car is also a daily driver.
Seems the only thing that's not an engine out job on these things is emptying the ashtray
Joe
1972 S3 2+2 V12 Manual, FHC, British Rusting Green
1972 S3 2+2 V12 Manual, FHC, British Rusting Green
| Link: | |
| BBcode: | |
| HTML: | |
| Hide post links |