


I want to remove a reaction tie plate but leave the torsion bars in situ.
I'm sure I've seen the method described in the manual but I don't seem able to find it.
Can someone tell me where in the manual I should be looking?
Reaction plate removal
#1 Reaction plate removal
Andrew.
881824, 1E21538. 889457. 1961 4.3l Mk2. 1975 XJS. 1962 MGB
http://www.projectetype.com/index.php/the-blog.html
Adelaide, Australia
881824, 1E21538. 889457. 1961 4.3l Mk2. 1975 XJS. 1962 MGB
http://www.projectetype.com/index.php/the-blog.html
Adelaide, Australia
| Link: | |
| BBcode: | |
| HTML: | |
| Hide post links |
-
christopher storey
- Posts: 5698
- Joined: Sun Mar 09, 2008 3:07 pm
- Location: cheshire , england

#2 Re: Reaction plate removal
Right hand column of page B 19 about half way down
| Link: | |
| BBcode: | |
| HTML: | |
| Hide post links |

#3 Re: Reaction plate removal
Hi Andrew as Christopher mentions above......but much easier and safer and less chance of stripped threads if you first remove the tension from the torsion bars by disconnecting either top or bottom of the front hubs........im sure you know how to do this so wont go into detail
Steve
69 S2 2+2 (just sold) ..Realm C type replica, 1960 xk150fhc
69 S2 2+2 (just sold) ..Realm C type replica, 1960 xk150fhc
| Link: | |
| BBcode: | |
| HTML: | |
| Hide post links |
#4 Re: Reaction plate removal
Thanks!
Andrew.
881824, 1E21538. 889457. 1961 4.3l Mk2. 1975 XJS. 1962 MGB
http://www.projectetype.com/index.php/the-blog.html
Adelaide, Australia
881824, 1E21538. 889457. 1961 4.3l Mk2. 1975 XJS. 1962 MGB
http://www.projectetype.com/index.php/the-blog.html
Adelaide, Australia
| Link: | |
| BBcode: | |
| HTML: | |
| Hide post links |
#5 Re: Reaction plate removal
I had a look through this.
I seem to recall a method using hardened 3/8" pins to replace the 4 bolts on the teardrops which allows you to leave the TBs in and under tension.
I think I can work out what to do but I wanted to read it through in the manual and see if there are measurements for making the pins before I go reinventing the wheel.
Andrew.
881824, 1E21538. 889457. 1961 4.3l Mk2. 1975 XJS. 1962 MGB
http://www.projectetype.com/index.php/the-blog.html
Adelaide, Australia
881824, 1E21538. 889457. 1961 4.3l Mk2. 1975 XJS. 1962 MGB
http://www.projectetype.com/index.php/the-blog.html
Adelaide, Australia
| Link: | |
| BBcode: | |
| HTML: | |
| Hide post links |
#6 Re: Reaction plate removal
Hi Andrew...yes page B67..Reaction plate removal and diagram fig 67.....Steve
Steve
69 S2 2+2 (just sold) ..Realm C type replica, 1960 xk150fhc
69 S2 2+2 (just sold) ..Realm C type replica, 1960 xk150fhc
| Link: | |
| BBcode: | |
| HTML: | |
| Hide post links |
-
 politeperson
- Posts: 1295
- Joined: Tue Jun 07, 2016 8:26 pm
- Location: Boston UK
#7 Re: Reaction plate removal
Andrew,
Dont tap the bolts out all the way.
Just tap them past the reaction plate thickness, Then remove the plate, then tap them back through and put the nuts back on afterwards. You will not lose the setting.
You can leave the reaction plate out until you put the engine and gearbox back in.
What took me a while to figure out is the the rear torsion bar splines interlocks with the torsion bar bracket, nothing else. The torsion bar splines do not interlock with the reaction plate. The twisting force is transferred to the bracket first, then the bracket is bolted to the reaction plate through 2 chassis brackets.
You will not be interfering with the torsion bar bracket, so dont worry.
Of course all this assumes you have managed to get rid of all the twist in the torsion bars after you have, disconnected the steering arm, shock absorber, brake lines or caliper, anti roll bar split the upper ball joint and swung the lower arm down as far as it will go.
I have had situations where the torsion bar has still had a little bit of twist left in it, even with the lower arm swung down, resulting in the 4 torsion bar to chassis and reaction plate bolts not wanting to come out without a bit of drifting. This happens because the bars age.
When the car was assembled,the front suspension was set at a certain lower wishbone droop with the shock absorber removed. At this exact front wishbone position, the rear TB bracket bolt holes have to line up exactly with the 2 holes inn the chassis bracket otherwise the threads on the bolts could be damaged when they were clouted through the bracket, chassis and reaction plate.
There are always minor differences between torsion bars so the factory solution was very clever in the way it allowed exact adjustment of the torsion bar without using force.
The front of the torsion bar has 24 splines, the rear has 25 splines. The torsion bar is fitted in the front fist with the TB bracket loose, swinging in the middle of the torsion bar- off the splines. The operative then slid the bracket back to the rear to see if the holes line up. If the didn't, they would pull the TB out of the front and go onto the next spline and see if the bracket lined up.
24 splines at the front give a possible error of 15 degrees for each spline rotation. That is far too inaccurate to be able to line up the bolts on the bracket at the rear with the chassis holes. However, when you factor in the additional 25 increments you have on the rear splines, you can get the bolt holes to line up within .6 of a degree. Very clever.
Its true, but Enzo never said it
Too many E types
XK120 SUs
Too many E types
XK120 SUs
| Link: | |
| BBcode: | |
| HTML: | |
| Hide post links |
#8 Re: Reaction plate removal
Hi James.....if you just knock back the bolts or use the steel rods in place then you dont need to disconnect the front hubs....however disconnecting them does take away a bit of concern that there is a lot of tension there..Steve
Steve
69 S2 2+2 (just sold) ..Realm C type replica, 1960 xk150fhc
69 S2 2+2 (just sold) ..Realm C type replica, 1960 xk150fhc
| Link: | |
| BBcode: | |
| HTML: | |
| Hide post links |
#9 Re: Reaction plate removal
Yes I was wondering whether I could just do it like this.politeperson wrote: ↑Fri Feb 08, 2019 6:01 pmAndrew,
Dont tap the bolts out all the way.
Just tap them past the reaction plate thickness,
Andrew.
881824, 1E21538. 889457. 1961 4.3l Mk2. 1975 XJS. 1962 MGB
http://www.projectetype.com/index.php/the-blog.html
Adelaide, Australia
881824, 1E21538. 889457. 1961 4.3l Mk2. 1975 XJS. 1962 MGB
http://www.projectetype.com/index.php/the-blog.html
Adelaide, Australia
| Link: | |
| BBcode: | |
| HTML: | |
| Hide post links |
-
politeperson
- Posts: 1295
- Joined: Tue Jun 07, 2016 8:26 pm
- Location: Boston UK
#10 Re: Reaction plate removal
Hello Steve,
I would not like to knock back the bolts without releasing the front lower wishbone.
Surely the torsion bar, torsion bar bracket and the bolts would still be trying to twist?
James
I would not like to knock back the bolts without releasing the front lower wishbone.
Surely the torsion bar, torsion bar bracket and the bolts would still be trying to twist?
James
Its true, but Enzo never said it
Too many E types
XK120 SUs
Too many E types
XK120 SUs
| Link: | |
| BBcode: | |
| HTML: | |
| Hide post links |
#11 Re: Reaction plate removal
Hi James...yes all the tension is still there...its in the manual how to do it useing a pry bar on the bolt heads to release tension whilst you tap bolt back...however not something i fancy any i would release the hubs....
Andrew...if you dont use the rods and just knock the bolt back the pressure will be on the thread and could damage it....if you release the hubs then no tension so no chance of damaging the threads....Steve
Andrew...if you dont use the rods and just knock the bolt back the pressure will be on the thread and could damage it....if you release the hubs then no tension so no chance of damaging the threads....Steve
Steve
69 S2 2+2 (just sold) ..Realm C type replica, 1960 xk150fhc
69 S2 2+2 (just sold) ..Realm C type replica, 1960 xk150fhc
| Link: | |
| BBcode: | |
| HTML: | |
| Hide post links |
-
 PeterCrespin
- Posts: 4561
- Joined: Fri Mar 05, 2010 8:22 pm
- Location: Gaithersburg, Maryland.
- Contact:

#12 Re: Reaction plate removal
Just leave the car on its wheels if the purpose is engine/gearbox removal. The wishbone is under tension but is quite safe.
Tap bolts flush as described, remove plate and lift car over dropped power train. I made pins but didn’t bother using them more than once. Any slight thread damage on the bolts is not really an issue as the critical loading is mainly shear on the plain shank. The nut is primarily just to hold it firmly in place, not really join any components.
Tap bolts flush as described, remove plate and lift car over dropped power train. I made pins but didn’t bother using them more than once. Any slight thread damage on the bolts is not really an issue as the critical loading is mainly shear on the plain shank. The nut is primarily just to hold it firmly in place, not really join any components.
1E75339 UberLynx D-Type; 1R27190 70 FHC; 1E78478; 2001 Vanden Plas
| Link: | |
| BBcode: | |
| HTML: | |
| Hide post links |


#13 Re: Reaction plate removal
I had two rods made as per manual; I was lucky when using them first time (some time ago). Last autumn I did it again, but I found that the rods were not locating the torsion bar brackets exactly requiring to force the bolts back in which I did not want to do. In the end I went for the "undo the wishbone" route. There is definitely room for improvement on the tb bracket setting construction, which I shall do next time touching them.
Mark
1963 OTS 880436
1963 OTS 880436
| Link: | |
| BBcode: | |
| HTML: | |
| Hide post links |
#14 Re: Reaction plate removal
Not as easy as per manual. No surprises there. But doable.
I got the plate out easily. I have the steering rack disconnected but the other 2 ball joints are connected.
Installed the engine with no trouble. For future reference if you have the engine exactly 12"/ 30cm off the ground on your trolley you have plenty of room to drop the car down on a lift. I did this myself and it was an absolute piece of piss for one person. Why anyone would try to take the engine out the top or bolt the frames to the engine first is beyond me.
But on trying to refit the plate the I ran into trouble with clearance with the clutch housing support bracket C19207. I ended up having to use an angle grinder to cut this back about 1cm and up 3cm before I could get the plate to fit.
I have also mashed the threads on both of the top 3/8" bolts holding the teardrops. I reckon I can fix them with a die nut. Tomorrow's job.
Bottom line. Entirely doable. Didn't use pins. Will be doing it this way in the future.
Last edited by abowie on Sun Feb 10, 2019 10:03 pm, edited 1 time in total.
Andrew.
881824, 1E21538. 889457. 1961 4.3l Mk2. 1975 XJS. 1962 MGB
http://www.projectetype.com/index.php/the-blog.html
Adelaide, Australia
881824, 1E21538. 889457. 1961 4.3l Mk2. 1975 XJS. 1962 MGB
http://www.projectetype.com/index.php/the-blog.html
Adelaide, Australia
| Link: | |
| BBcode: | |
| HTML: | |
| Hide post links |
#15 Re: Reaction plate removal
Hi Andrew..why did you have the steering rack disconnected....... what did you have to cut the support brackets or reaction plate...if it was fitting before what was the problem....engine too far back/forward....cant see how the wishbone threads got damaged......Steve
Steve
69 S2 2+2 (just sold) ..Realm C type replica, 1960 xk150fhc
69 S2 2+2 (just sold) ..Realm C type replica, 1960 xk150fhc
| Link: | |
| BBcode: | |
| HTML: | |
| Hide post links |
#16 Re: Reaction plate removal
I haven't yet connected the tie rod ends because the car is on a hoist with the front suspension hanging down at maximum droop and I didn't want to put too much strain on them.mgcjag wrote: ↑Sun Feb 10, 2019 8:53 amHi Andrew..why did you have the steering rack disconnected....... what did you have to cut the support brackets or reaction plate...if it was fitting before what was the problem....engine too far back/forward....cant see how the wishbone threads got damaged......Steve
Complete groundup resto on a "stalled project" disassembled car so I suspect that the bracket might not have fitted anyway. A lot of the stuff that I got with the car doesn't fit or is wrong. To get the plate in with the teardrops in place you need to angle it forward and this was where I needed the extra space. I could have tapped the teardrops forward and out of the hole in the frame but I was leery of doing this in case I damaged the tab on the frame.
Meant "teardrop" not "wishbone"; edited and corrected.
Andrew.
881824, 1E21538. 889457. 1961 4.3l Mk2. 1975 XJS. 1962 MGB
http://www.projectetype.com/index.php/the-blog.html
Adelaide, Australia
881824, 1E21538. 889457. 1961 4.3l Mk2. 1975 XJS. 1962 MGB
http://www.projectetype.com/index.php/the-blog.html
Adelaide, Australia
| Link: | |
| BBcode: | |
| HTML: | |
| Hide post links |
#17 Re: Reaction plate removal
Hi Andrew...think this shows that the best way to go is disconnect the front hubs to remove all tension from the torsion bars.....you wouldnt have had to cut your reaction plate to make it fit and also not stripped the threads on the bolts.....Steve
Steve
69 S2 2+2 (just sold) ..Realm C type replica, 1960 xk150fhc
69 S2 2+2 (just sold) ..Realm C type replica, 1960 xk150fhc
| Link: | |
| BBcode: | |
| HTML: | |
| Hide post links |
#18 Re: Reaction plate removal
I agree that it would make it easier but it sort of defeats the purpose as if you are going to do that removing the TB completely only takes about another minute.
Andrew.
881824, 1E21538. 889457. 1961 4.3l Mk2. 1975 XJS. 1962 MGB
http://www.projectetype.com/index.php/the-blog.html
Adelaide, Australia
881824, 1E21538. 889457. 1961 4.3l Mk2. 1975 XJS. 1962 MGB
http://www.projectetype.com/index.php/the-blog.html
Adelaide, Australia
| Link: | |
| BBcode: | |
| HTML: | |
| Hide post links |

#19 Re: Reaction plate removal
Hello,
To dismantle the "reaction plate", I found an interesting video on youtube:
But in the end, I followed the procedure in the B67 manual, which is a bit different, but requires making 2 bars : 10 inch length, 3/8 diameter, rounded end.
But, after putting these 2 bars in the bottom holes of the reaction plate, I also found that there was still a lot of pressure in the torsion bars. To relieve the pressure I separated the 2 upper wishbones from the stub axle carriers. In my case this was sufficient, but perhaps for you, it will be necessary for you to dismantle one of the ends of the 2 shock absorbers.
The only difficulty encountered is getting the flat reaction out of the car. I had to use a tool to pry the gearbox housing, being very careful not to damage it. To put the reaction flat, it was a little easier using a hammer and a piece of wood to avoid damaging it.
Then, to put it back in place, you have to be able to replace the top bolts, acting on the 2 bars so that the top holes are aligned. Normally, the bolts should retract by hand without tapping with a hammer. Finally, by tightening the top nuts, the flat reaction will return to its initial position and you can then remove the 2 bars and put the remaining 4 bolts.
Allow about 45 minutes to dismantle the reaction plate and 45 minutes to put it back.
Good DIY.
- Attachments
-
- test.jpg (160.85 KiB) Viewed 5025 times
Jacques
E-type serie 1 OTS 1966.
E-type serie 1 OTS 1966.
| Link: | |
| BBcode: | |
| HTML: | |
| Hide post links |
#20 Re: Reaction plate removal
I have ended up needing to remove the sump from a 3.8.
Although I obviously did this 2 years ago, memory fades...
Armed with this thread I was able to do this by dropping the tie plate down with the exhaust still in place.
I made some nice long pins out of 1/2" 4140 steel with the ends turned down to a .370" section around an inch long with a nice blunt taper, as per the manual.
While you can do it without the pins, just using bolts, the long pins allow you to manipulate the tip into the hole in the tie plate more easily as the torque on the TB does tend to twist the bolt off line and out of alignment with the TP hole. This should make refitting the TP easier.
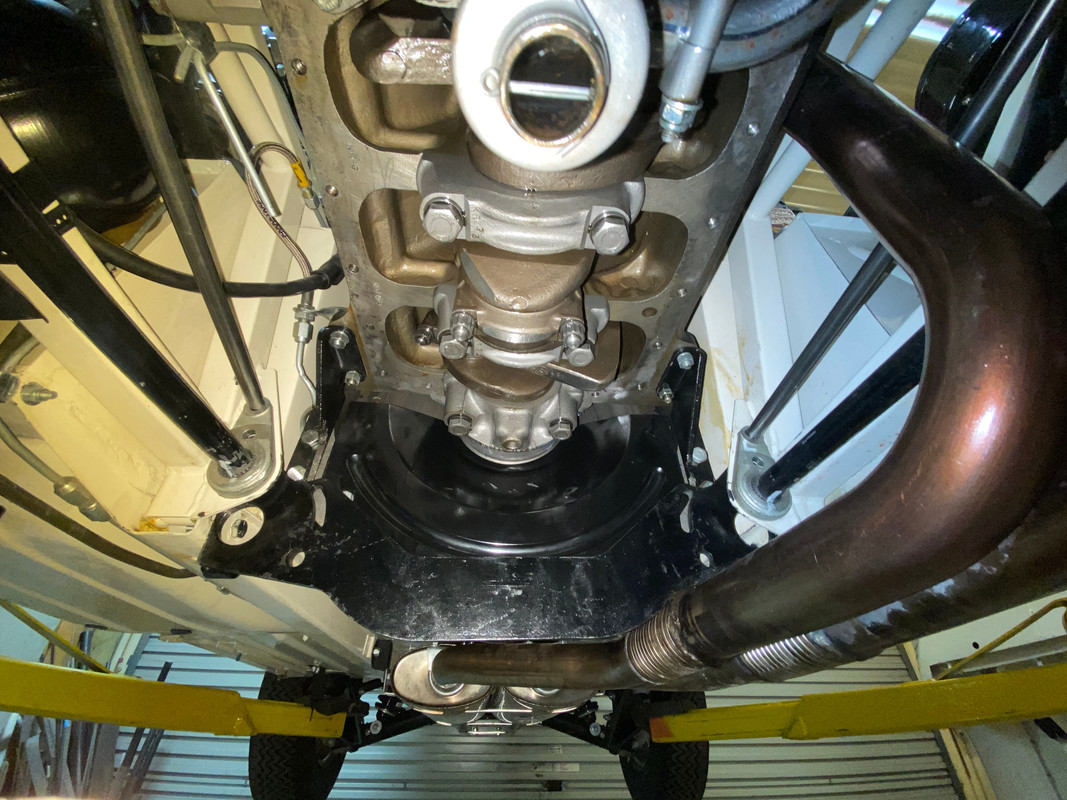
Here's a photo for posterity showing the crank position for clearance and the pins in situ.
Interestingly the main problem with clearance seemed to be the rear main bearing cap more than the crank web although you can't actually see into the sump to be sure until you have enough clearance to get it to drop down.
With the TP pushed down and back there is ample clearance to get the sump down and around the obstruction. And yes this is an adjustable plate but the critical dimensions are the same as the standard one.
I do however remember what a chore removing the gasket from the bottom of the block was. Took me an hour.
Although I obviously did this 2 years ago, memory fades...
Armed with this thread I was able to do this by dropping the tie plate down with the exhaust still in place.
I made some nice long pins out of 1/2" 4140 steel with the ends turned down to a .370" section around an inch long with a nice blunt taper, as per the manual.
While you can do it without the pins, just using bolts, the long pins allow you to manipulate the tip into the hole in the tie plate more easily as the torque on the TB does tend to twist the bolt off line and out of alignment with the TP hole. This should make refitting the TP easier.
Here's a photo for posterity showing the crank position for clearance and the pins in situ.
Interestingly the main problem with clearance seemed to be the rear main bearing cap more than the crank web although you can't actually see into the sump to be sure until you have enough clearance to get it to drop down.
With the TP pushed down and back there is ample clearance to get the sump down and around the obstruction. And yes this is an adjustable plate but the critical dimensions are the same as the standard one.
I do however remember what a chore removing the gasket from the bottom of the block was. Took me an hour.
Andrew.
881824, 1E21538. 889457. 1961 4.3l Mk2. 1975 XJS. 1962 MGB
http://www.projectetype.com/index.php/the-blog.html
Adelaide, Australia
881824, 1E21538. 889457. 1961 4.3l Mk2. 1975 XJS. 1962 MGB
http://www.projectetype.com/index.php/the-blog.html
Adelaide, Australia
| Link: | |
| BBcode: | |
| HTML: | |
| Hide post links |