Building an Engine Test Bed

Technical advice Q&A
User avatar

Topic author
rfs1957
Posts: 1324
Joined: Sat Jan 15, 2011 2:52 pm
Location: Languedoc - France
France

#1 Building an Engine Test Bed

Post by rfs1957 » Wed Jul 01, 2020 8:57 pm

I know others have done this but I've not seen any detailed account about designing/making one so have set off from scratch.

I know Mich did it, and this guy makes nice noises, but didn't bother with the cooling system.

viewtopic.php?f=2&t=5467&p=38597&hilit=test+bed#p38597

Here's where I'm up to, and maybe others (Michel ?) can chip in with pitfalls and advice.
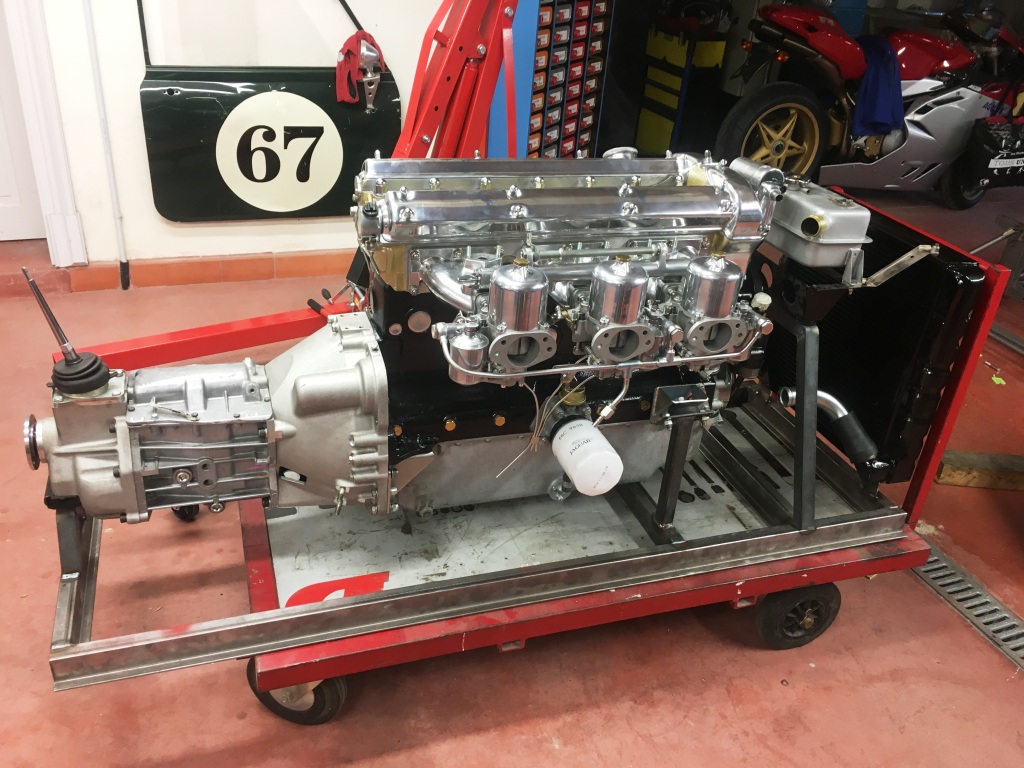
Image

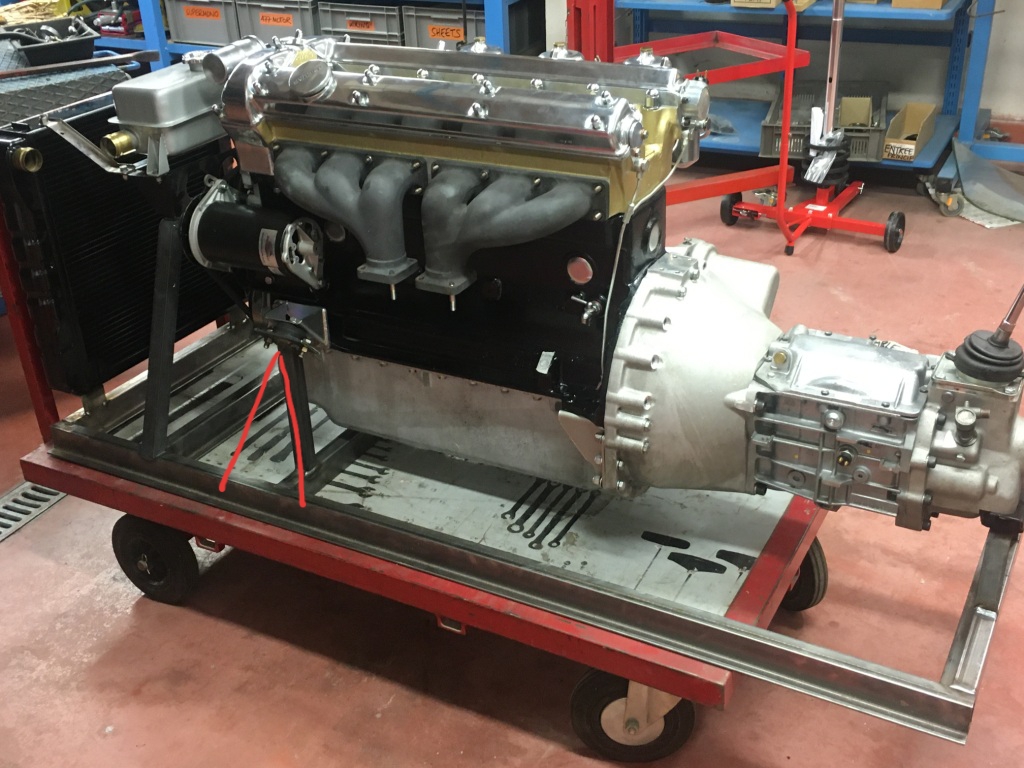
My goal is to be able to run the engine for about an hour in all, be able to set up the carbs, the timing, check for leaks, fit and test the Megajolt system, and generally make the most of having everything so accessible.
Image

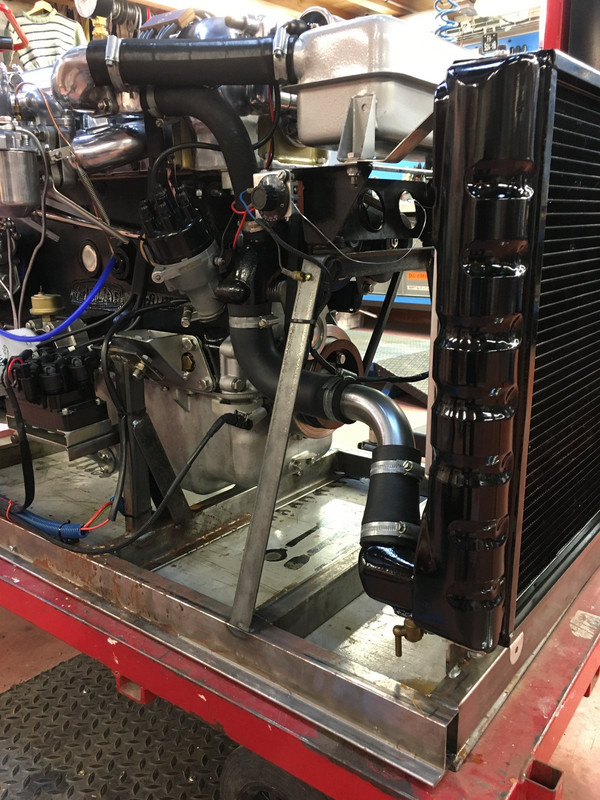
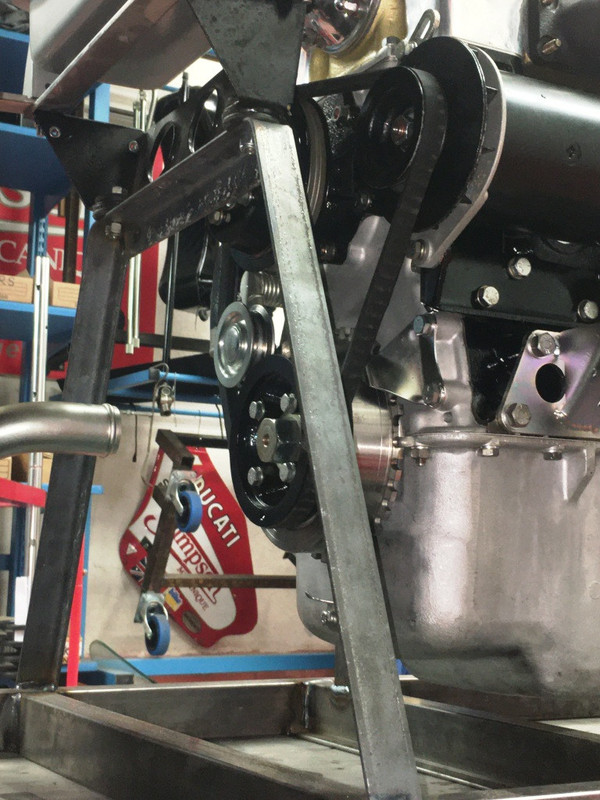
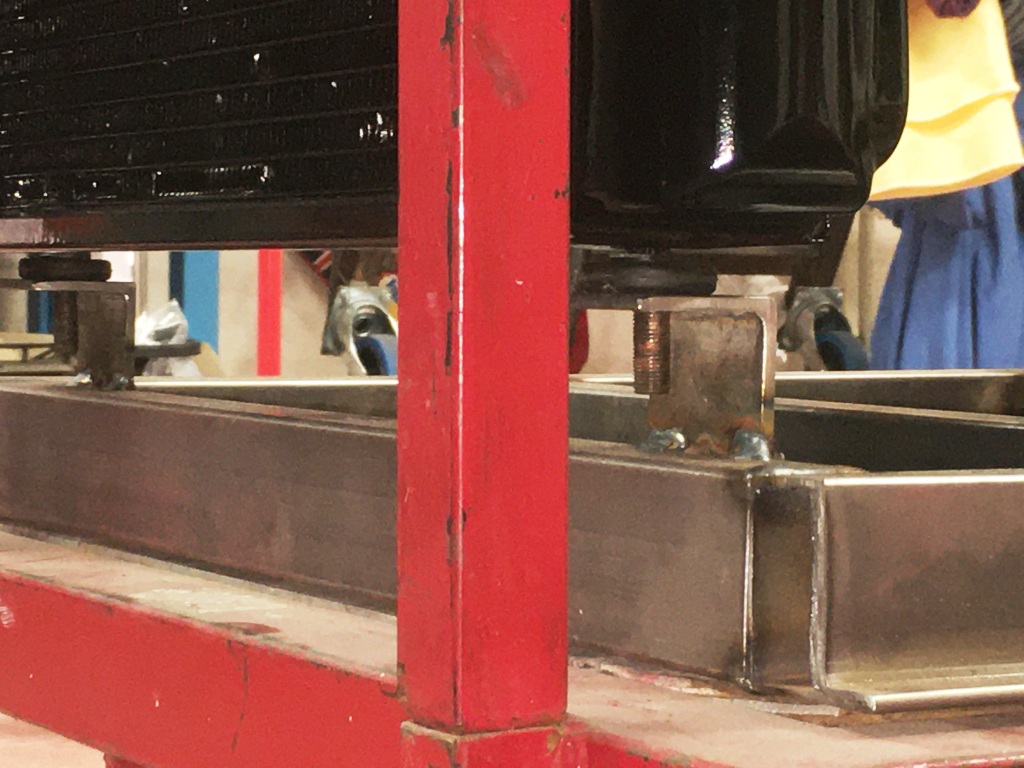
So a proper and almost complete (no heater circuit) cooling system, with the electric fan, is included.
Image

I'm using the general-purpose workshop donkey-trolley as a base, which conditions slightly some of the decisions.

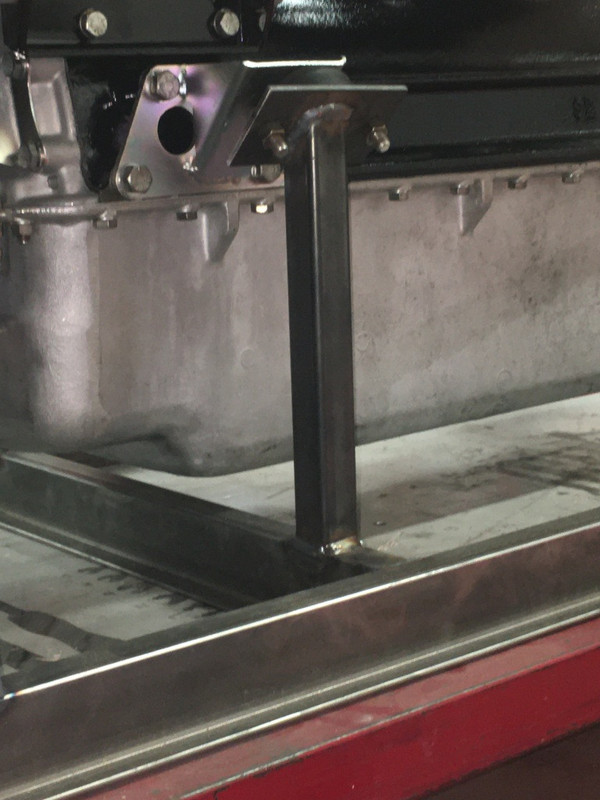
The engine suports are 30 x 30mm tube, I'll be adding a triangulation somewhere as they're a bit weedy at the root, to the eye anyway.
Image

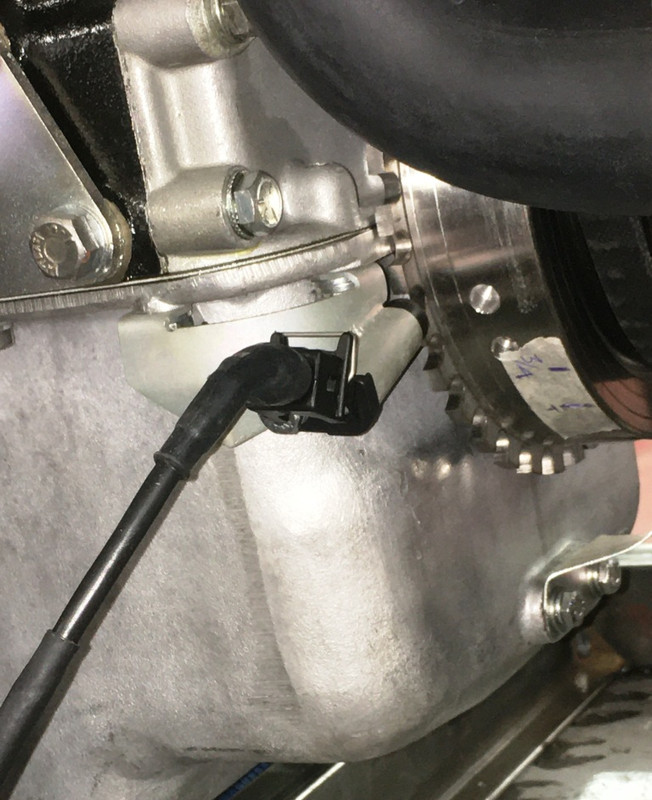
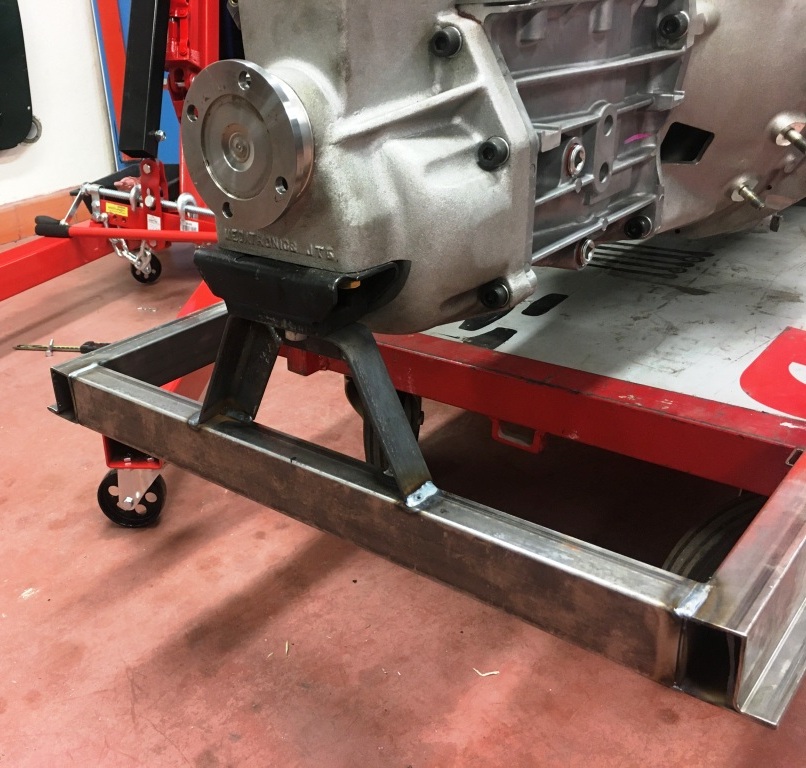
I determined the overall length from radiator mountings back to gearbox tail-support, and dropped heights down from the front chassis tube assemblies including the picture-frame and the bonnet/radiator support frame to give me the requisite mounting heights for the radiator, header tank, engine-mountings, and gearbox tail support.
Image

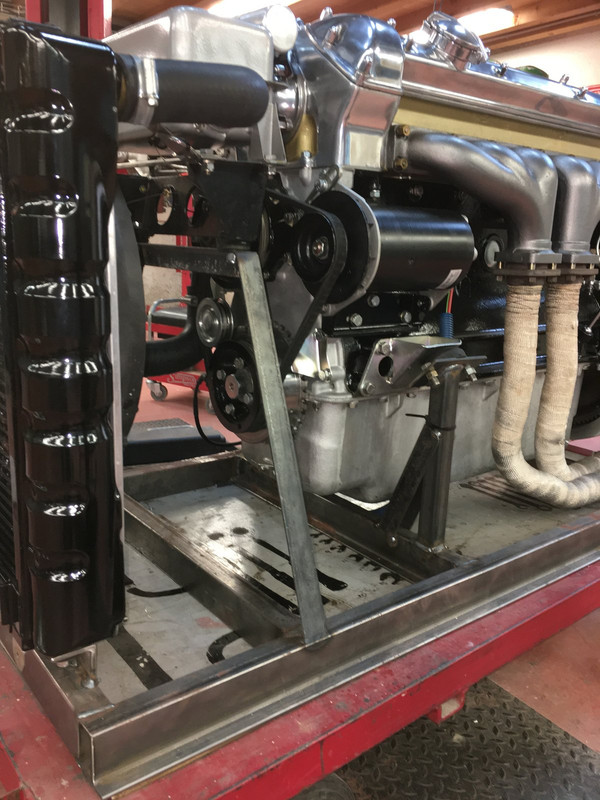
The tubing is 50 x 30 door-frame stuff, simply because I had fair bits left over from other projects, so it was essentially free.
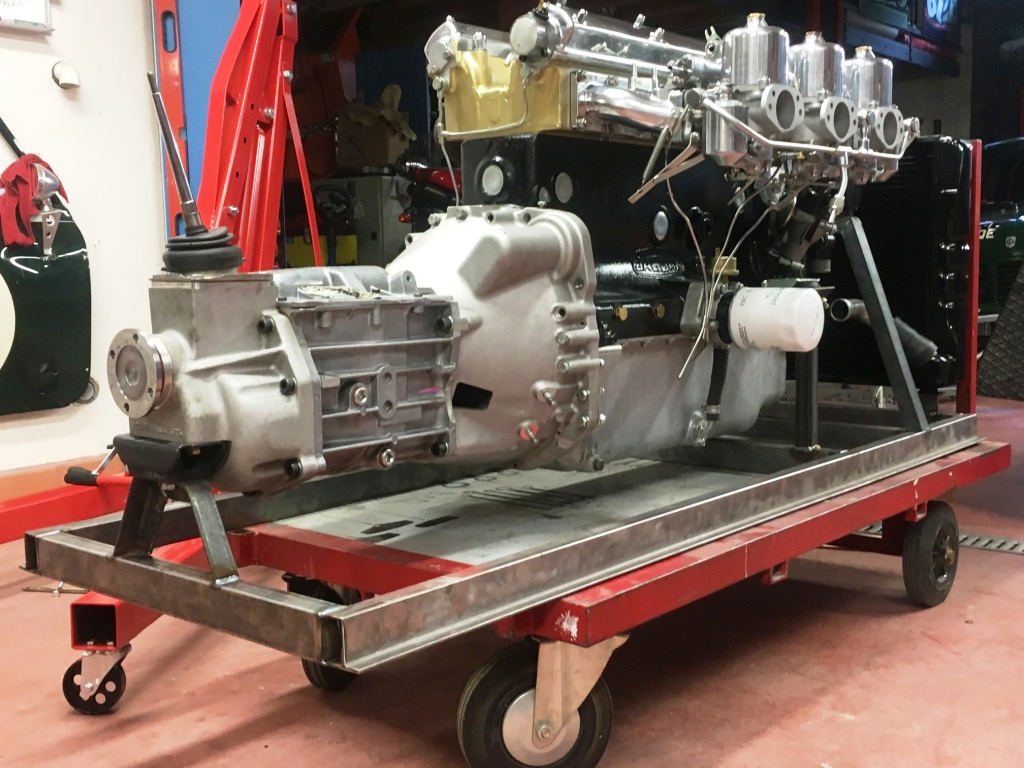
Image

I think my first cock-up is that I hadn't focussed on how low the exhaust headers went as they make their first bend (I intend to run this with a complete exhaust system), but first measurements suggest that at worst I'll just have to raise the base rails about 50mm to get the pipes to clear the trolley - the major length of the exhaust system will be carried independantly, suspended from trestles.
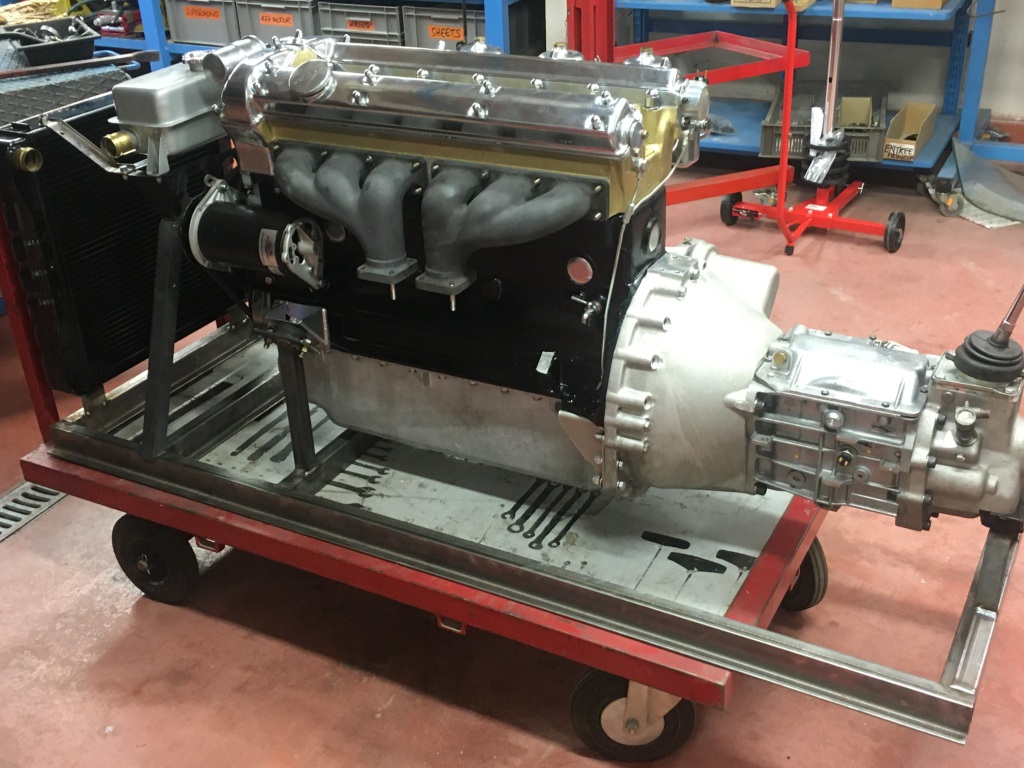
Image

I'll keep updating this as it goes along, and might put the dimensions and heights into a drawing as these were tricky to calculate and I'd have enjoyed having someone else's work to compare with my own conclusions regarding position/separation etc.
Rory
3.8 OTS S1 Opalescent Silver Grey - built May 28th 1962

Link:
BBcode:
HTML:
Hide post links
Show post links


288gto
Posts: 1417
Joined: Wed Nov 14, 2012 8:59 pm
Location: United Kingdom
Russia

#2 Re: Building an Engine Test Bed

Post by 288gto » Wed Jul 01, 2020 9:45 pm

When I read the title, I knew it was probably you Rory. Great idea, It was definitely reassuring to know Guy had run my complete engine and gearbox on his test bed before I fitted it into the car.

Back to your question, the only thing I can see is maybe add a bit of triangulation to the front engine mounts.
Now stating the obvious, and even the best of us can overlook things :yellow:

Music stand style control panel for guages water temp, oil, revs. starter button, battery isolator, fuses, diagnostic ports, etc?
If a laptop is to be used, provisions for this?
Mini loom and its routing / attachment to the frame?
Battery tray and clamp?
Fans, sender and override?
Fuel tank, pump, filter and cut off?

Suitable go pro mount for video of first fire up. :bigrin: :bouncyyellow:

Image
Last edited by 288gto on Thu Jul 02, 2020 1:37 pm, edited 1 time in total.
Simon
1969 S2 OTS

Link:
BBcode:
HTML:
Hide post links
Show post links


Gfhug
Posts: 3308
Joined: Thu Jun 19, 2014 3:08 pm
Location: Near Andover, Hampshire,in D.O. Blighty
Great Britain

#3 Re: Building an Engine Test Bed

Post by Gfhug » Thu Jul 02, 2020 7:09 am

And where will you balance the thruppeny bit to show how smooth your engine is? :bigrin:
S2 FHC Light Blue
S2 OTS LHD - RHD full restoration

Link:
BBcode:
HTML:
Hide post links
Show post links


1954Etype
Moderator
Posts: 2686
Joined: Sat Sep 27, 2008 12:32 pm
Contact:
Great Britain

#4 Re: Building an Engine Test Bed

Post by 1954Etype » Thu Jul 02, 2020 7:21 am

Bearing in mind the recent concerns regarding clutches, might be worth plumbing it in?
Angus 67 FHC 1E33656
61 OTS 875047

Link:
BBcode:
HTML:
Hide post links
Show post links

User avatar

ralphr1780
Posts: 1067
Joined: Wed Apr 11, 2012 4:29 pm
Belgium

#5 Re: Building an Engine Test Bed

Post by ralphr1780 » Thu Jul 02, 2020 8:18 am

Although I am always impressed by your work Rory, can't refrain from asking: wouldn't it have taken the same (or less) time and efforts to fit it directly on the car? :shrug: :scratchheadyellow:
Ralph
'69 OTS + '62 OTS - Belgium

Link:
BBcode:
HTML:
Hide post links
Show post links


288gto
Posts: 1417
Joined: Wed Nov 14, 2012 8:59 pm
Location: United Kingdom
Russia

#6 Re: Building an Engine Test Bed

Post by 288gto » Thu Jul 02, 2020 9:31 am

ralphr1780 wrote:
Thu Jul 02, 2020 8:18 am
Although I am always impressed by your work Rory, can't refrain from asking: wouldn't it have taken the same (or less) time and efforts to fit it directly on the car? :shrug: :scratchheadyellow:
Probably Ralph, but in the hopefully unlikely event that let's say as Angus mentions above you have a problem with the clutch, a gearbox noise or some other problem that normally involves removing the whole unit from the car to fix it, you might might be glad you tested it out of the car. Guy Broad ran my newly built engine complete with gearbox through all the gears and kindly provided a video. For me, and I'm not saying everyone is the same, it was a really useful exercise. The carbs and ignition were set up to a point where they only need fine tuning so that all I had to do was connect everything up and turn the key. The last thing I wanted to be doing with a freshly painted shell and frames was having to pull the the damn thing out again because a poor quality (perish the thought) component had failed after 30 seconds.

I bet this is something Angus would be interested in if he hasn't already got access to such facilities.

@Rory, definitely clutch hydraulics , if not a large lever.

Looking forward to more,

Simon
Simon
1969 S2 OTS

Link:
BBcode:
HTML:
Hide post links
Show post links

User avatar

Mich7920
Posts: 756
Joined: Sun Mar 15, 2015 4:43 pm
Location: France
France

#7 Re: Building an Engine Test Bed

Post by Mich7920 » Thu Jul 02, 2020 12:53 pm

Hi Rory
For the two engine supports I did them removable and adjustable for the width of the engine. Also I did the head seperate with an axle so that I would necessarily have the right angle when I put the engine on its supports.
The tube was 40x40, 30x30 is a bit thin.
I also buit an arch to use the third point of the engine. I used this arch to fix the choke in line with the SUs.
I used an E Type center dash with the gauges oil and temp. So I had the key, the starter swich and a switch for the fan and the fuel pump. I wanted to be abble to stop the pump if there were a problem.
I Bought a simple tachometer on coil to have the RPM.
The engine had it's clutch and gearbox . I used the original gearbox support with it's spring. I made a part for easily manipulate the clutch and check all the gears.
The last think is the exhaust of course and just a sheet metal cover to make safe the rear of the gearbox. My hands or my cloths can't be "eating" by the four screw witch turn at the back of the gearbox.
It was fun to do and to used.
Mich
Michel
1965 E Type FHC - On the road / 1963 E Type OTS - on the road after Angus Restoration

Link:
BBcode:
HTML:
Hide post links
Show post links

User avatar

Topic author
rfs1957
Posts: 1324
Joined: Sat Jan 15, 2011 2:52 pm
Location: Languedoc - France
France

#8 Re: Building an Engine Test Bed

Post by rfs1957 » Thu Jul 02, 2020 2:13 pm

Great suggestions, thanks.

The car is way off being ready to have an engine fitted to it, Ralph, and this will keep me busy whilst I wait.
Rory
3.8 OTS S1 Opalescent Silver Grey - built May 28th 1962

Link:
BBcode:
HTML:
Hide post links
Show post links

User avatar

ralphr1780
Posts: 1067
Joined: Wed Apr 11, 2012 4:29 pm
Belgium

#9 Re: Building an Engine Test Bed

Post by ralphr1780 » Thu Jul 02, 2020 2:43 pm

rfs1957 wrote:
Thu Jul 02, 2020 2:13 pm
Great suggestions, thanks.

The car is way off being ready to have an engine fitted to it, Ralph, and this will keep me busy whilst I wait.
Well, I thought you were almost there Rory. Bon courage!
Ralph
'69 OTS + '62 OTS - Belgium

Link:
BBcode:
HTML:
Hide post links
Show post links

User avatar

AshM
Posts: 455
Joined: Wed Dec 14, 2016 4:59 pm
Location: Edinburgh, Scotland
Great Britain

#10 Re: Building an Engine Test Bed

Post by AshM » Thu Jul 02, 2020 8:52 pm

Brilliant work Rory - your projects do make me smile.

How long before there is an 'engine running frame kit' available from SNGB! :bigrin:

Keep us informed of progress.

Best
Ash
Series 2 FHC 1970
1R 20607

Link:
BBcode:
HTML:
Hide post links
Show post links


SimonBroberts
Posts: 15
Joined: Fri Mar 20, 2020 10:36 am
Location: Harrogate
Great Britain

#11 Re: Building an Engine Test Bed

Post by SimonBroberts » Thu Jul 09, 2020 3:28 pm

Hello there

Looks neat and you're welding looks good!

It's not easy to see on the photo but the rear mount at the back of the gearbox is rubber too, like the front?

Just thinking they all need to be either solid or flexible, but not a mixture.

👍

Simon

Link:
BBcode:
HTML:
Hide post links
Show post links


1954Etype
Moderator
Posts: 2686
Joined: Sat Sep 27, 2008 12:32 pm
Contact:
Great Britain

#12 Re: Building an Engine Test Bed

Post by 1954Etype » Thu Jul 09, 2020 4:59 pm

Rory, I want first refusal on that when you’ve finished with it. I’ll come over and collect.
Angus 67 FHC 1E33656
61 OTS 875047

Link:
BBcode:
HTML:
Hide post links
Show post links

User avatar

Topic author
rfs1957
Posts: 1324
Joined: Sat Jan 15, 2011 2:52 pm
Location: Languedoc - France
France

#13 Re: Building an Engine Test Bed

Post by rfs1957 » Thu Jul 09, 2020 5:05 pm

Rear is rubber block on the Tremec 5 speed.
Easy to over engineer this thing, as there’s no torque reaction bar inertial reactions of the block to changes in crankshaft speed.
Currently waiting for Calyx manifold dope, so I can finish the exhaust side, but no stock at Frost UK even tho I’m in Manchester right now, with an awaiting Ryanair suitcase for dodgy-product hold luggage !
But mates sending other stuff from Connecticut so managed to get Eastwood to send Calyx there to join the parcel ....... tangled webs, weaving etc
Rory
3.8 OTS S1 Opalescent Silver Grey - built May 28th 1962

Link:
BBcode:
HTML:
Hide post links
Show post links

User avatar

Topic author
rfs1957
Posts: 1324
Joined: Sat Jan 15, 2011 2:52 pm
Location: Languedoc - France
France

#14 Re: Building an Engine Test Bed

Post by rfs1957 » Thu Jul 09, 2020 5:19 pm

The very least I owe you, Angus.
Bring a skip, there’s all sorts of other useful crap you might want.
Looks like I’ll have to buy those finishing touches like plastic bungs for the tubing after all.
Now a professional is going to look close up .....
Rory
3.8 OTS S1 Opalescent Silver Grey - built May 28th 1962

Link:
BBcode:
HTML:
Hide post links
Show post links


1954Etype
Moderator
Posts: 2686
Joined: Sat Sep 27, 2008 12:32 pm
Contact:
Great Britain

#15 Re: Building an Engine Test Bed

Post by 1954Etype » Thu Jul 09, 2020 6:17 pm

Just say the word mate and I’ll be over with a crate of decent red...
Angus 67 FHC 1E33656
61 OTS 875047

Link:
BBcode:
HTML:
Hide post links
Show post links

User avatar

Topic author
rfs1957
Posts: 1324
Joined: Sat Jan 15, 2011 2:52 pm
Location: Languedoc - France
France

#16 Re: Building an Engine Test Bed

Post by rfs1957 » Sun Jan 24, 2021 10:21 am

Tests now completed - it's ready for your white-van-man to collect, Angus.

I took these pictures before I dismantled it all, hoping they may help others make a similar thing, and avoid some of the pitfalls.

My main motivation was to see whether my MegaJolt installation (which is very different) worked, and to get to grips with the programming.

Image

I was also able to check that the clutch-release fork behaved correctly following my tweaks.

It was never my intention to set up the original dashboard, or make a "cockpit".

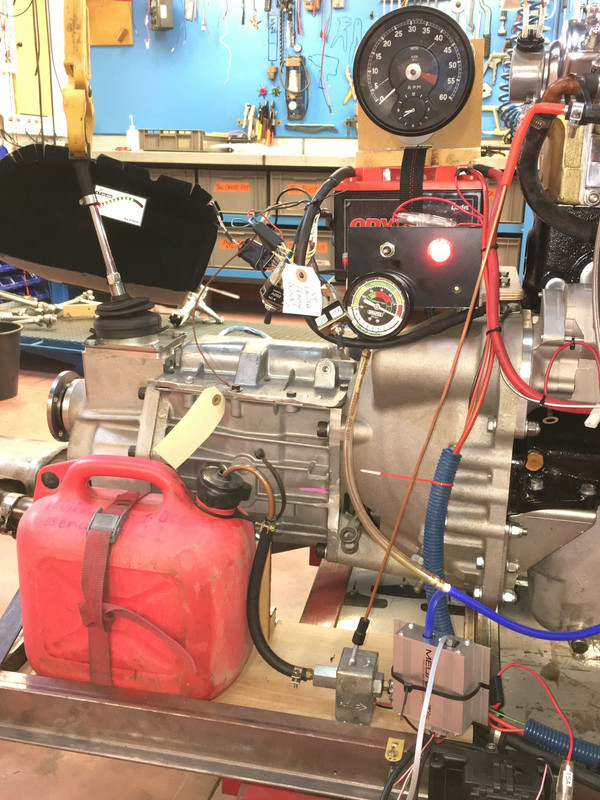
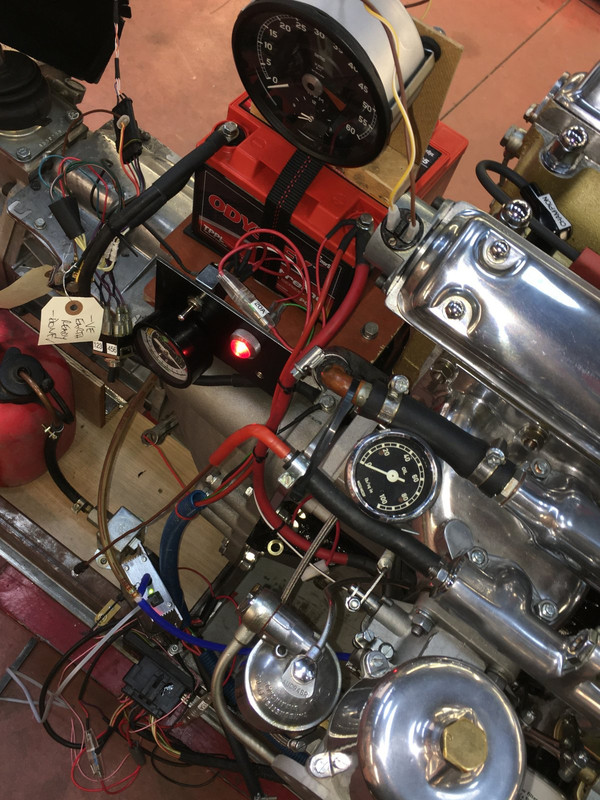
I used a mechanical oil guage plumbed into the lower oil rail to give me pressure, a pressure guage on the temperature-sender fitting to enable me to check tank-cap functions, the rev-counter to compare the digital MegaJolt screen with the original readings, and a vacuum guage to try to understand ported vs manifold suck.

I should have wired up the Jag-Club oil pressure guage to see a) whether polarity matters (am moving to -ve earth) and b) compare the readings, obviously, and now regret it.

Image

Image

Image

I only just put the engine high enough to enable the exhaust headers to clear the frame, and this is definitely one of the key parameters you should incorporate very early on in your design.

Image

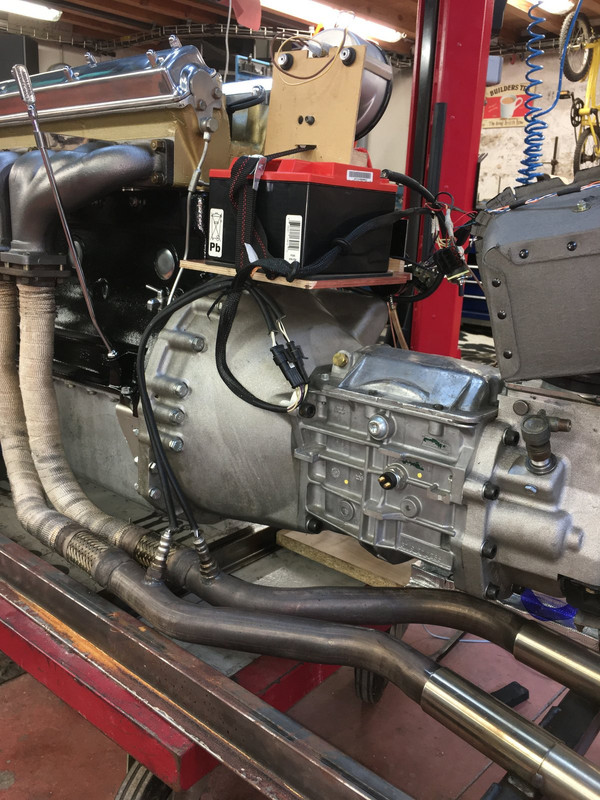
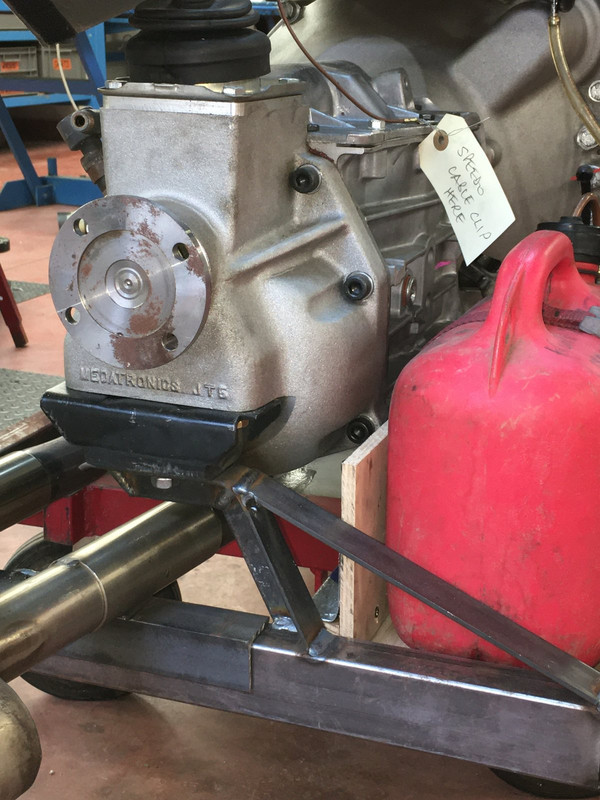
I had also completely ignored where the exhaust lay in relation to the gearbox rear mounting, so had to modify the very elegant original bracket with a flying truss / botch, which worked perfectly but could have been improved on if were to do it again.

Image

(Note to David - note the 1-2 MJ map switch on the lower frame !)

I used the twin-Lambda readouts that are hidden (because hinged) in the LH cubby-hole, to reassure me about what was happening in the carburettor department.

Of course, you could do all this and ignore the gearbox, in which case it would be easy to make rear supports that pick up near the triangulations at the bell-housing / block interface ; but despite the smooth-running I think it would be a good idea to use a pair of big Silentbloc-type rubbers somewhere.

Image

Image

Mounting the exhausts is a potential pain, as it's vital to get them outside which can mean umpteen disconnects.

Image

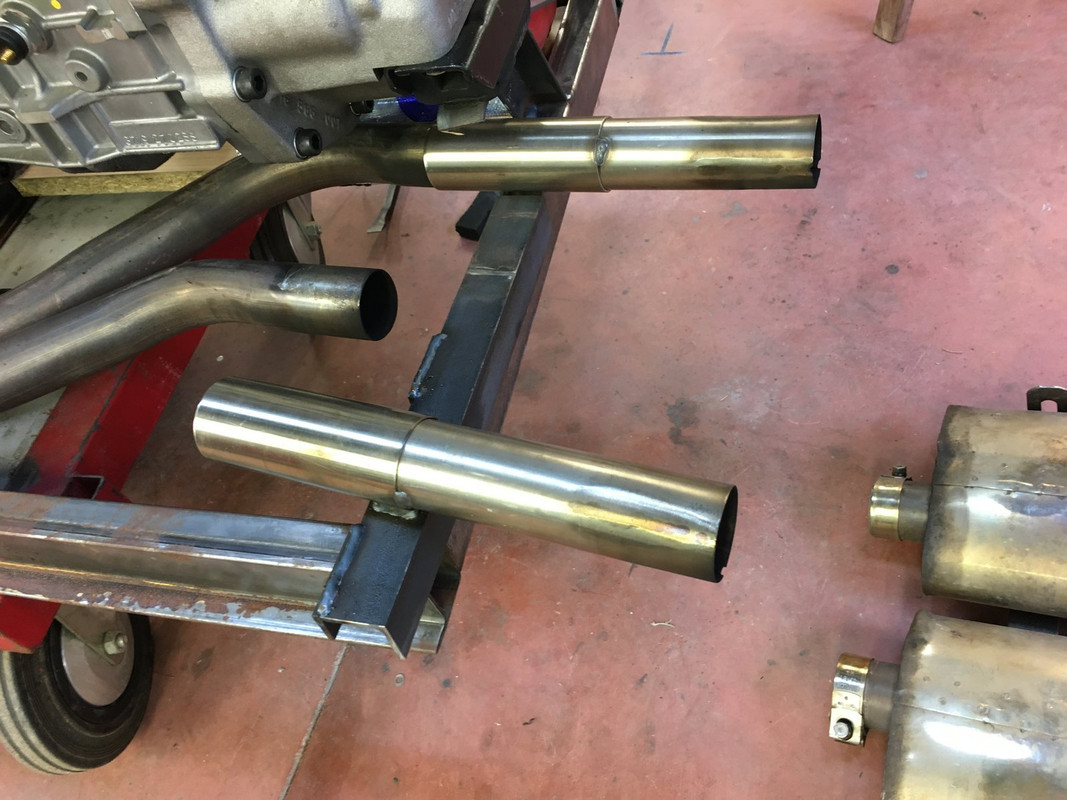
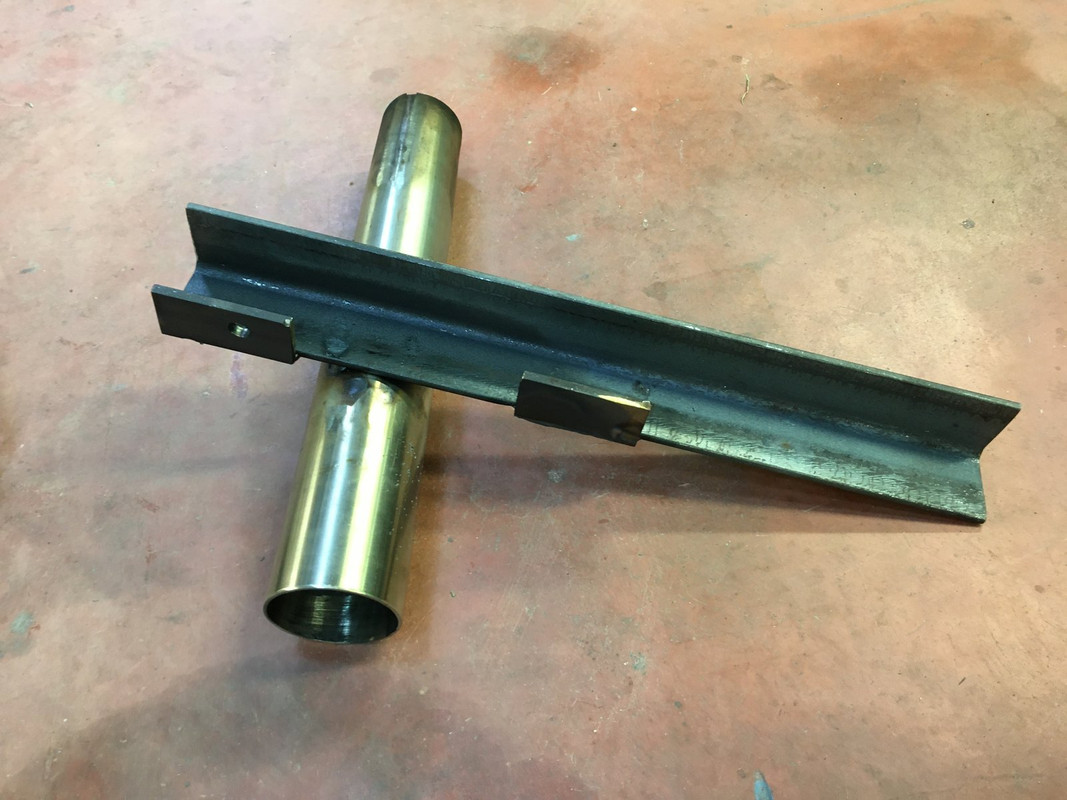
I supported them simply hung off a trestle at the rear, but made a pair of intermediate tubes, slightly conical to facilitate connection.

One is mounted to a piece of angle that simply slotted, loose and QD, over the rear frame, the other free-floating, just resting on the first, and this made hook-up much less tricky, less orientation-critical - and also got the silencer boxes further back ; I again hadn't focussed enough on where the exhaust would lie in relation to the test-bed.

Image

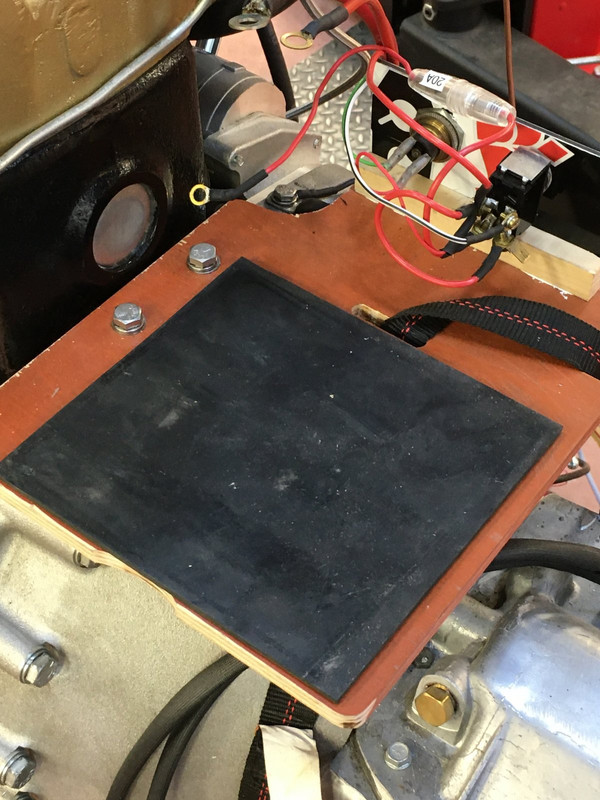
Using the bell-housing to carry the battery freed-up the space in the lower frame, of which there wasn't a lot in my design, and I should have considered the petrol-tank earlier in the design - but got away with it, just.

Image

Yes, it took quite a bit of time to knock this up and tweak it, but having run it for a total of a couple of hours in all, and been able to address leaks, check all manner of potential engine-out issues, and - for example - test and judge that the cams I had been sold were crap for road-use, and switch them back to standard, overall I think it's been a most useful intermediate step.
Rory
3.8 OTS S1 Opalescent Silver Grey - built May 28th 1962

Link:
BBcode:
HTML:
Hide post links
Show post links


Gfhug
Posts: 3308
Joined: Thu Jun 19, 2014 3:08 pm
Location: Near Andover, Hampshire,in D.O. Blighty
Great Britain

#17 Re: Building an Engine Test Bed

Post by Gfhug » Sun Jan 24, 2021 11:01 am

Admirable work, Rory. :salute:
How many cases of red will we mere mortals have to offer white-van-man to borrow it?
It’d be well worth it for anyone rebuilding their own engine :yellow:

Geoff
S2 FHC Light Blue
S2 OTS LHD - RHD full restoration

Link:
BBcode:
HTML:
Hide post links
Show post links


288gto
Posts: 1417
Joined: Wed Nov 14, 2012 8:59 pm
Location: United Kingdom
Russia

#18 Re: Building an Engine Test Bed

Post by 288gto » Sun Jan 24, 2021 11:10 am

With new components having a high propensity to failure within the first 3 minutes of use , well worth all your efforts in my opinion Rory. :thumbsup:
Simon
1969 S2 OTS

Link:
BBcode:
HTML:
Hide post links
Show post links


1954Etype
Moderator
Posts: 2686
Joined: Sat Sep 27, 2008 12:32 pm
Contact:
Great Britain

#19 Re: Building an Engine Test Bed

Post by 1954Etype » Sun Jan 24, 2021 4:23 pm

Looks great Rory. When we can travel, I’ll be over to collect it personally!
Angus 67 FHC 1E33656
61 OTS 875047

Link:
BBcode:
HTML:
Hide post links
Show post links

Post Reply Previous topicNext topic