


New Paint

#21 Re: New Paint
Its a forum...lots of different views and ideas......Steve
Steve
69 S2 2+2 (just sold) ..Realm C type replica, 1960 xk150fhc
69 S2 2+2 (just sold) ..Realm C type replica, 1960 xk150fhc
| Link: | |
| BBcode: | |
| HTML: | |
| Hide post links |
#22 Re: New Paint
Many thanks to all, I'm now reassured and I hopefully won't be quite so paranoid about spoiling the finish on my car. Thanks again.
Derek
64 ser 1 fhc, 71 ser 3 2+2. Ser 3 now sold, looking for a new toy to keep Ser 1 company
64 ser 1 fhc, 71 ser 3 2+2. Ser 3 now sold, looking for a new toy to keep Ser 1 company
| Link: | |
| BBcode: | |
| HTML: | |
| Hide post links |
-
Gfhug
- Posts: 3308
- Joined: Thu Jun 19, 2014 3:08 pm
- Location: Near Andover, Hampshire,in D.O. Blighty

#23 Re: New Paint
May I now refer you to your post #14 above?
S2 FHC Light Blue
S2 OTS LHD - RHD full restoration
S2 OTS LHD - RHD full restoration
| Link: | |
| BBcode: | |
| HTML: | |
| Hide post links |

#24 Re: New Paint
Derek Wrote:
As stated in my previous Post, a great finish can be obtained Off the Gun. However, to get that perfect, totally flat as glass, show stopping finish, its common to block the finished paint surface back with 2000 grade, or finer abrasive paper and cut with varying grades of cutting compound to remove the fine abrasive paper scratches. Following is an example finished not long ago:
Therefore, any minor marks that may occur in your paintwork can normally be rubbed out using fine cutting compound and in extreme cases, the marks cut back using fine abrasive paper and then cut with cutting compound and polished. With regards to the scenario where cutting with abrasive paper is concerned, its better left to someone that is experienced in carrying out such work, as its not difficult to cut through to the Base Coat, if its a Clear over Base system, or through to the primer with either the Clear and Base, or Direct Gloss Systems.
When selecting a final polish to use, try and avoid those that contain Silicon Wax. Although you intend not to damage your car, if it should require any paint work in the future, Silicon is the bane of spray painting. Unless its completely removed prior to paint application, a colloquial condition called "Fish Eyes" will occur. With years of Silicon Wax application, it's sometimes hard to remove. Ironically, to counter the "Fish Eyes" condition when it occurs, Silicon Drops are added to the paint.
Regards,
Bill
Hello Derek,I'm now reassured and I hopefully won't be quite so paranoid about spoiling the finish on my car.
As stated in my previous Post, a great finish can be obtained Off the Gun. However, to get that perfect, totally flat as glass, show stopping finish, its common to block the finished paint surface back with 2000 grade, or finer abrasive paper and cut with varying grades of cutting compound to remove the fine abrasive paper scratches. Following is an example finished not long ago:
Therefore, any minor marks that may occur in your paintwork can normally be rubbed out using fine cutting compound and in extreme cases, the marks cut back using fine abrasive paper and then cut with cutting compound and polished. With regards to the scenario where cutting with abrasive paper is concerned, its better left to someone that is experienced in carrying out such work, as its not difficult to cut through to the Base Coat, if its a Clear over Base system, or through to the primer with either the Clear and Base, or Direct Gloss Systems.
When selecting a final polish to use, try and avoid those that contain Silicon Wax. Although you intend not to damage your car, if it should require any paint work in the future, Silicon is the bane of spray painting. Unless its completely removed prior to paint application, a colloquial condition called "Fish Eyes" will occur. With years of Silicon Wax application, it's sometimes hard to remove. Ironically, to counter the "Fish Eyes" condition when it occurs, Silicon Drops are added to the paint.
Regards,
Bill
Last edited by angelw on Sun Aug 16, 2020 11:13 am, edited 1 time in total.
| Link: | |
| BBcode: | |
| HTML: | |
| Hide post links |
#25 Re: New Paint
Hello Bill,
Thanks for the great advice. My concerns started because when I got the car back from the paint shop it looked superb and with reassembly it was difficult not to cause minor scratches etc. Added to this was the fact that my other E which was painted 12 years ago has a finish like glass and just as hard. Comparing the two did make me concerned at how fragile the finish is. If I clean both cars I can rub my finger over the old paintwork with no marks made, if I do that on the newer paint it leaves micro scratches that cause dull areas. I feel sure now that I have re-examined the car that the paint is getting harder so I will get the paint shop to re buff the finish and polish with silicone free. Thanks again.
Thanks for the great advice. My concerns started because when I got the car back from the paint shop it looked superb and with reassembly it was difficult not to cause minor scratches etc. Added to this was the fact that my other E which was painted 12 years ago has a finish like glass and just as hard. Comparing the two did make me concerned at how fragile the finish is. If I clean both cars I can rub my finger over the old paintwork with no marks made, if I do that on the newer paint it leaves micro scratches that cause dull areas. I feel sure now that I have re-examined the car that the paint is getting harder so I will get the paint shop to re buff the finish and polish with silicone free. Thanks again.
Derek
64 ser 1 fhc, 71 ser 3 2+2. Ser 3 now sold, looking for a new toy to keep Ser 1 company
64 ser 1 fhc, 71 ser 3 2+2. Ser 3 now sold, looking for a new toy to keep Ser 1 company
| Link: | |
| BBcode: | |
| HTML: | |
| Hide post links |


#26 Re: New Paint
Thanks, Bill, for putting us at rest as regards the identification of "Total Rubbish".
Whilst irrelevant to the basic argument that had started here, and to which Bill has anyway masterfully, and irrevocably, put an end, the key to his opening paragraph - that some of us might miss, and if I might - is that word block.
In this way there is much less tendancy to attack the areas that surround the imperfections than when a simple hand-supported abrasive is used (like a piece of wet-and-dry paper).
It obviously can't be used everywhere.
Painters often use a contrasting rattle-can (usually black, on a light-coloured base-coat) to cloud, repeatedly, the surfaces they are rubbing down so they can see exactly where they've been, or not.
Here's one I made earlier, please enjoy a block-sanded Mini Van.
Okay, Okay, it's not perfect but it is flat
Whilst irrelevant to the basic argument that had started here, and to which Bill has anyway masterfully, and irrevocably, put an end, the key to his opening paragraph - that some of us might miss, and if I might - is that word block.
This means that any initial cutting processes are only ever carried out - whenever the shape allows it - using a flat and hard backing support, so that, paradoxically, maximum cutting occurs only on the highest or proudest points.angelw wrote: ↑Sun Aug 16, 2020 12:58 amHowever, to get that perfect, totally flat as glass, show stopping finish, its common to block the finished paint surface back with 2000 grade, or finer abrasive paper and cut with varying grades of cutting compound to remove the fine abrasive paper scratches.
In this way there is much less tendancy to attack the areas that surround the imperfections than when a simple hand-supported abrasive is used (like a piece of wet-and-dry paper).
It obviously can't be used everywhere.
Painters often use a contrasting rattle-can (usually black, on a light-coloured base-coat) to cloud, repeatedly, the surfaces they are rubbing down so they can see exactly where they've been, or not.
Here's one I made earlier, please enjoy a block-sanded Mini Van.
Okay, Okay, it's not perfect but it is flat
Rory
3.8 OTS S1 Opalescent Silver Grey - built May 28th 1962
3.8 OTS S1 Opalescent Silver Grey - built May 28th 1962
| Link: | |
| BBcode: | |
| HTML: | |
| Hide post links |
#27 Re: New Paint
Rory Wrote:
It can be a fine line between that glassy smooth finish "Off the Gun" and a run. Should a run result, a method that most experienced spray painters are familiar with, but perhaps not the DIY at home practitioner, is as follows:
1. When the paint has cured, a very thin wipe of plastic filler is applied in the area of the run; and I do mean thin. It should be applied so that the high area of the run is clearly visible, but the sounding area, say 2" - 3" around the run is thinly coated.
2. Fine grade abrasive paper, staring with circa 1000 grit and finishing with 2000 or finer is used with a rubber backing block to sand the whole area covered with plastic filler. The purpose of the plastic filler is to prevent the abrasive paper from, as Rory put it, attacking the area surrounding the imperfection. In this way, the high area of the run and the plastic filler are abraded uniformly until the actual run has been cut to the surface of the surrounding paint. When you can just start to see the colour of the paint through the plastic filler that still remains, swap to the finer 2000 grade paper to finish the cleanup of the plastic filler to the paint surface surrounding where the run was.
3. Finish with various grades of cutting compound to remove the fine abrasive marks of the 2000 grit abrasive paper.
Regards,
Bill
Still under the topic of Blocking the painted surface to produce that perfect surface but for different reason. In the event of a run, it can be difficult to abrade only the run and not the surrounding area.In this way there is much less tendancy to attack the areas that surround the imperfections than when a simple hand-supported abrasive is used (like a piece of wet-and-dry paper).
It can be a fine line between that glassy smooth finish "Off the Gun" and a run. Should a run result, a method that most experienced spray painters are familiar with, but perhaps not the DIY at home practitioner, is as follows:
1. When the paint has cured, a very thin wipe of plastic filler is applied in the area of the run; and I do mean thin. It should be applied so that the high area of the run is clearly visible, but the sounding area, say 2" - 3" around the run is thinly coated.
2. Fine grade abrasive paper, staring with circa 1000 grit and finishing with 2000 or finer is used with a rubber backing block to sand the whole area covered with plastic filler. The purpose of the plastic filler is to prevent the abrasive paper from, as Rory put it, attacking the area surrounding the imperfection. In this way, the high area of the run and the plastic filler are abraded uniformly until the actual run has been cut to the surface of the surrounding paint. When you can just start to see the colour of the paint through the plastic filler that still remains, swap to the finer 2000 grade paper to finish the cleanup of the plastic filler to the paint surface surrounding where the run was.
3. Finish with various grades of cutting compound to remove the fine abrasive marks of the 2000 grit abrasive paper.
Regards,
Bill
| Link: | |
| BBcode: | |
| HTML: | |
| Hide post links |
-
Gfhug
- Posts: 3308
- Joined: Thu Jun 19, 2014 3:08 pm
- Location: Near Andover, Hampshire,in D.O. Blighty
#28 Re: New Paint
This has created a conundrum for me.... When I get my project to the stage of needing painting is how much will it cost to ship out and back to Bill in Australia.
Or, is the alternative to send it the shorter distance to Rory?
Whichever, it'll come back looking superb
Geoff
Or, is the alternative to send it the shorter distance to Rory?
Whichever, it'll come back looking superb
Geoff
S2 FHC Light Blue
S2 OTS LHD - RHD full restoration
S2 OTS LHD - RHD full restoration
| Link: | |
| BBcode: | |
| HTML: | |
| Hide post links |
#29 Re: New Paint
Hello Geoff,
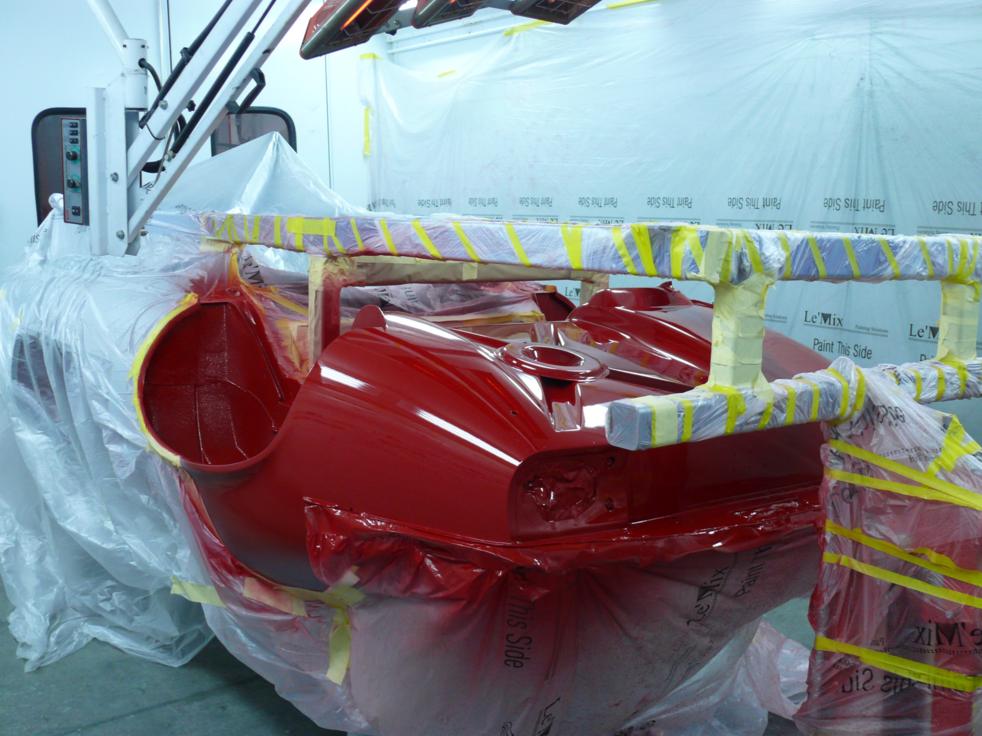
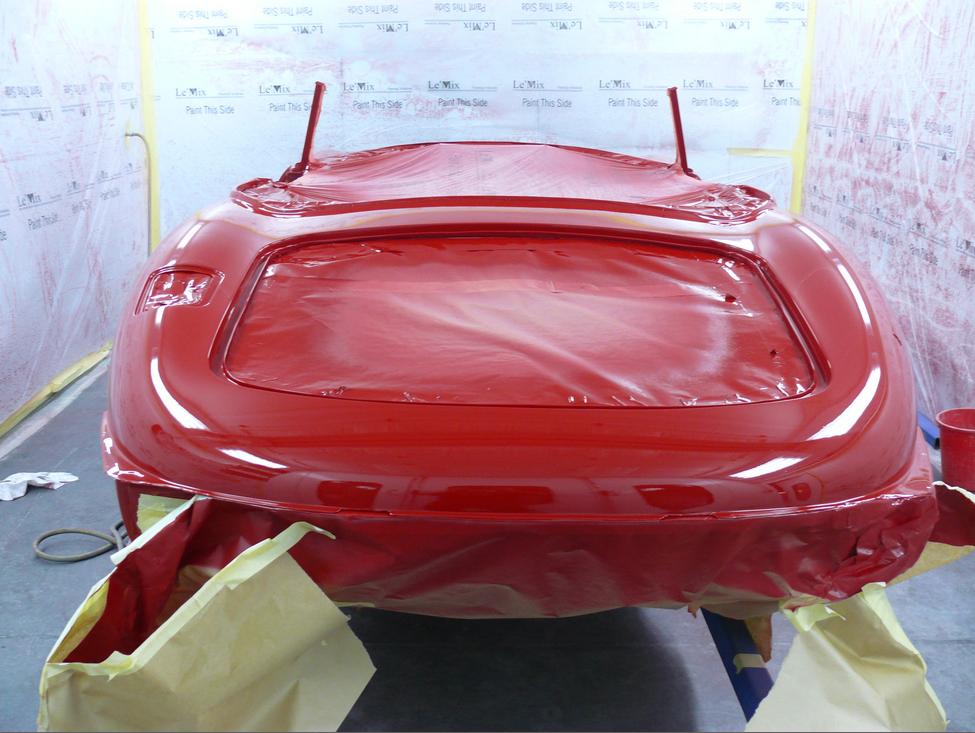
The following picture is of the Boot Floor and Lower Quarter Panels, shown just painted in my earlier Post, now just after cutting and polishing prior to setting the body right way up to prep for paint.
I paint E Types in this sequence, panels below the rear Bumper Bars, Cut and Polish whilst its upside down, then Right Side Up and paint the Top Surfaces, because we get a perfect finish on the underside of the Boot Floor that is equal to what you would expect for the Top Surfaces. When the top surfaces are painted, I do a very small blend where the Rear Wheel Arch and Rear B/Bar Tip almost meet and as the paint is all from the same mix, a perfect blend is achieved.
Regards,
Bill
| Link: | |
| BBcode: | |
| HTML: | |
| Hide post links |
-
Gfhug
- Posts: 3308
- Joined: Thu Jun 19, 2014 3:08 pm
- Location: Near Andover, Hampshire,in D.O. Blighty
#30 Re: New Paint
Hello Bill,
Now you've explained this I should imagine it gives you easier/better control of the work and finish than trying to do too large an area at a time.
It is always fascinating and informative to learn how the professionals tackle their work.
Another classic example of the friendly and helpful nature of this forum.

Regards
Geoff
Now you've explained this I should imagine it gives you easier/better control of the work and finish than trying to do too large an area at a time.
It is always fascinating and informative to learn how the professionals tackle their work.
Another classic example of the friendly and helpful nature of this forum.
Regards
Geoff
S2 FHC Light Blue
S2 OTS LHD - RHD full restoration
S2 OTS LHD - RHD full restoration
| Link: | |
| BBcode: | |
| HTML: | |
| Hide post links |
#31 Re: New Paint
Hello Geoff,
Large areas aren't the issue, it's that the paint finished surface of an E Type's Boot Floor reaches so far under the car that painting that and the Top Surfaces of the body with the car right way up is, in my opinion, is inconvenient and not conducive to a consistent, excellent finish. Cutting and polishing that area whilst its still upside down allows getting the body off of the rotisserie and onto the wheels of the dolly for the remainder of operations. Cutting and polishing the underside of the Boot Floor later on, with the body right way up is a real chore.
Regards,
Bill
| Link: | |
| BBcode: | |
| HTML: | |
| Hide post links |

#32 Re: New Paint
RORY - have you got any more pics of your Mini van? It looks abs gorgeous... (I learned to drive in one. 850cc, neck-snapping acceleration)
Jeremy
1967 S1 4.2 FHC
1967 S1 4.2 FHC
| Link: | |
| BBcode: | |
| HTML: | |
| Hide post links |
#33 Re: New Paint

Rory
3.8 OTS S1 Opalescent Silver Grey - built May 28th 1962
3.8 OTS S1 Opalescent Silver Grey - built May 28th 1962
| Link: | |
| BBcode: | |
| HTML: | |
| Hide post links |
-
 PeterCrespin
- Posts: 4561
- Joined: Fri Mar 05, 2010 8:22 pm
- Location: Gaithersburg, Maryland.
- Contact:

#34 Re: New Paint
Clearly, I am going to have to change my language. I often tell departing friends on two wheels or four to "Keep it shiny side up!" If they had one of Bill's E-types, that could be an invitation to roll it over into the nearest ditch...
1E75339 UberLynx D-Type; 1R27190 70 FHC; 1E78478; 2001 Vanden Plas
| Link: | |
| BBcode: | |
| HTML: | |
| Hide post links |
#35 Re: New Paint
Hello All,
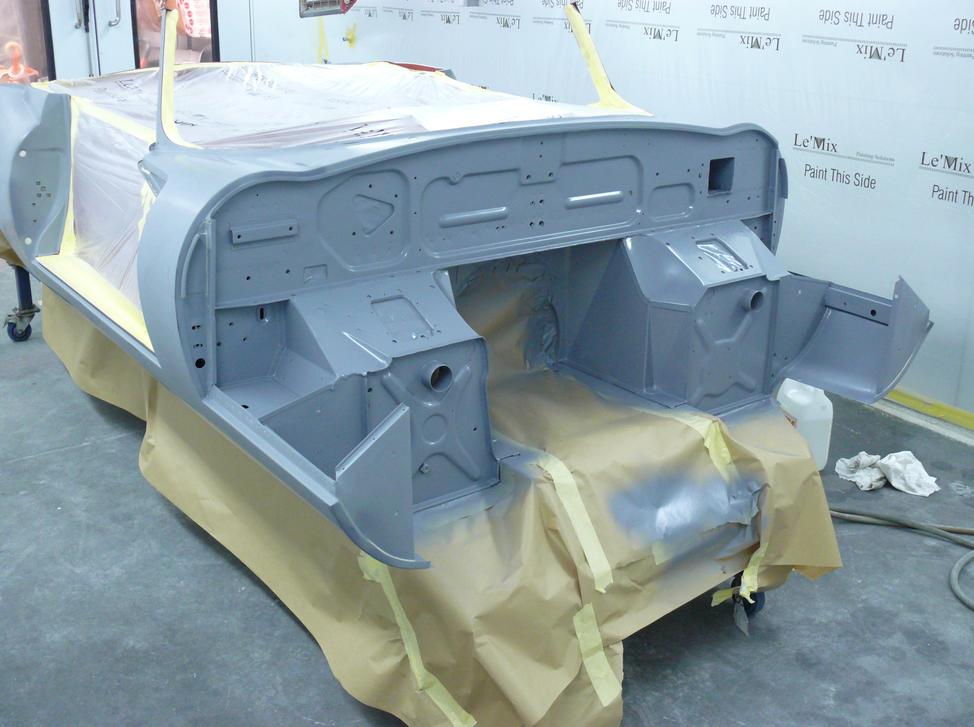
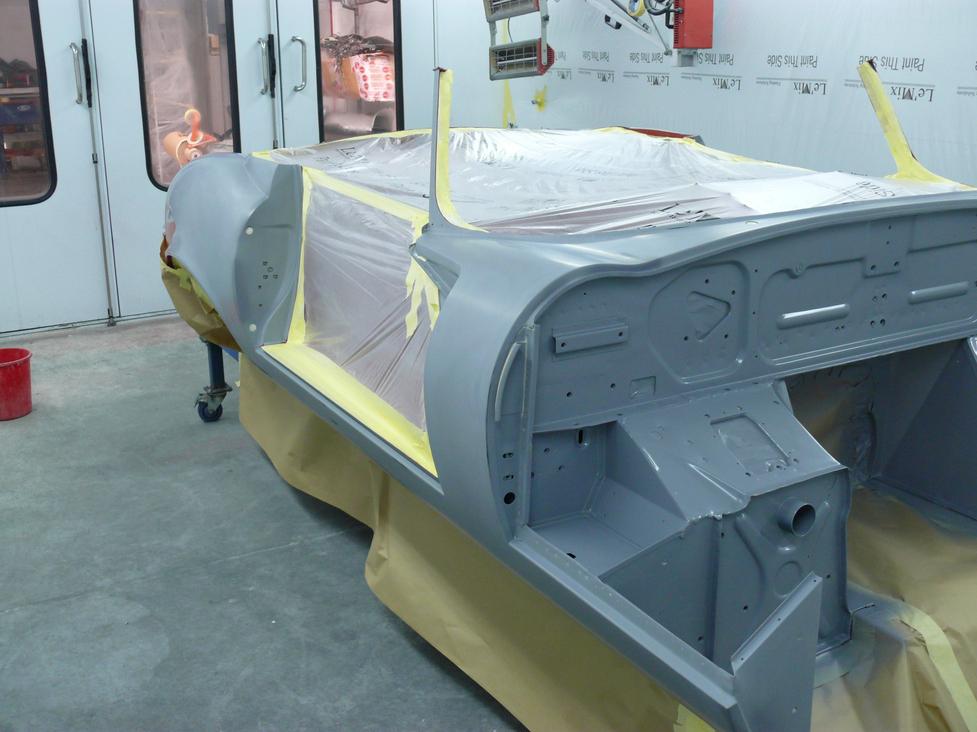
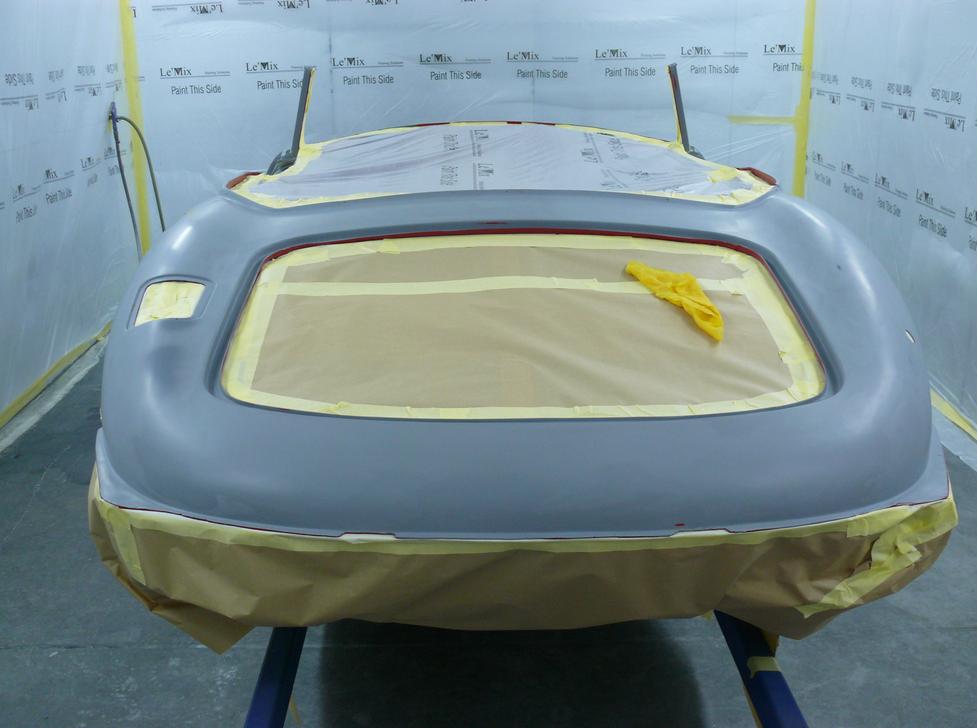
Here are pictures of the car featured in earlier Posts when the underside of the boot floor was painted.
A non-sanding, wet on wet primer was used on the bulkhead; you can see that it has quite a shine compared to normal sanding primer. The result of its use was excellent.
The masking pulled away at the rear of the tub is from when the small blend of the previously painted underside was carried out where the rear B/Bar comes close to the wheel arch.
Regards,
Bill
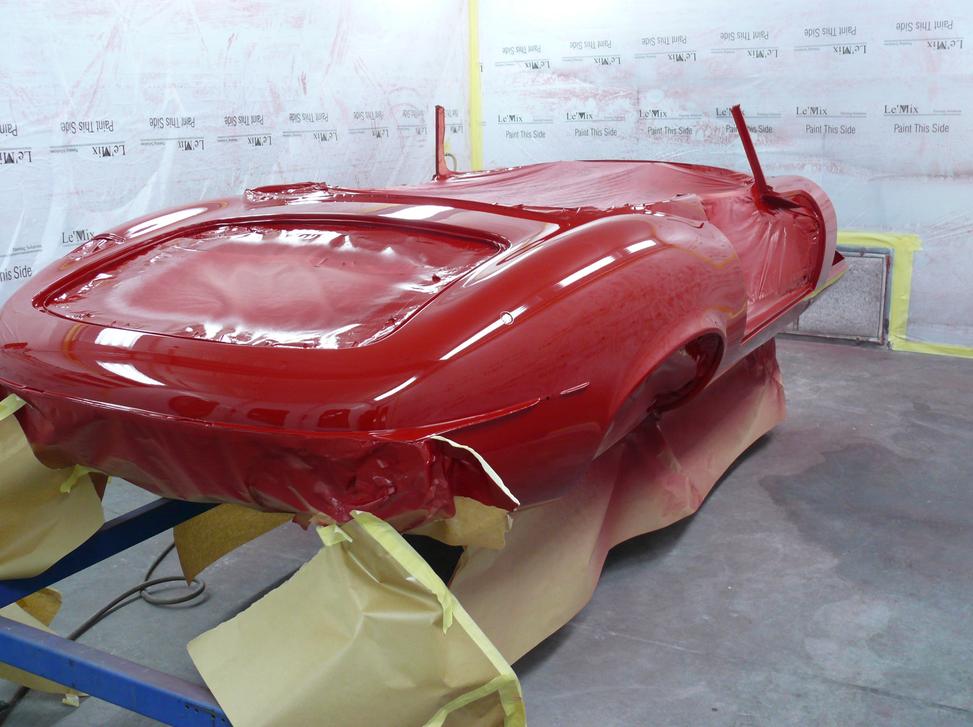
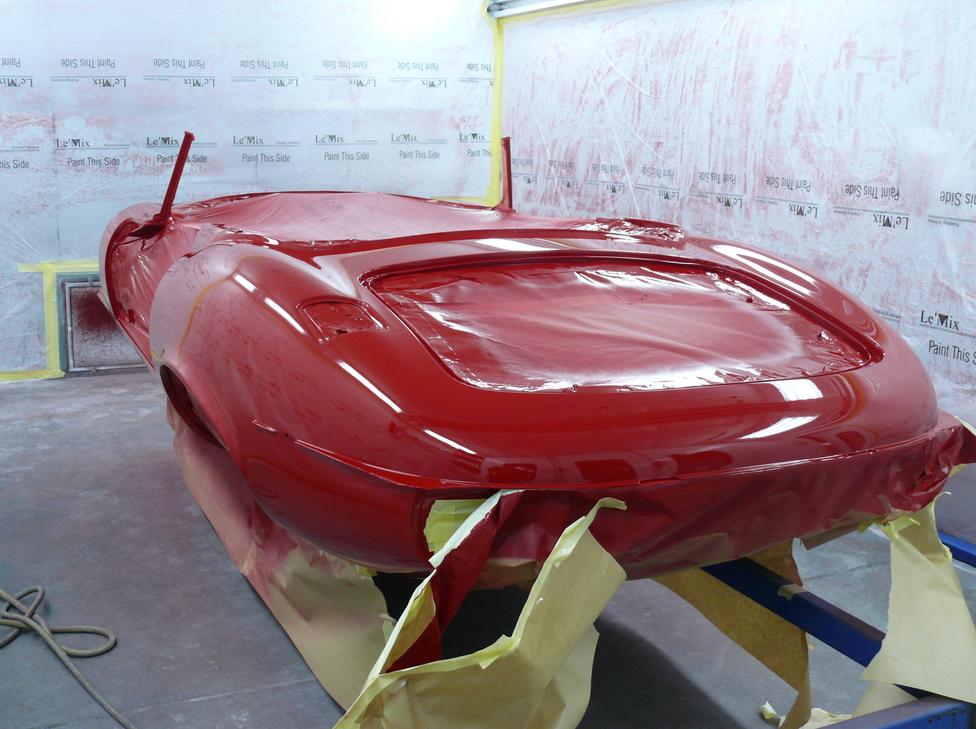
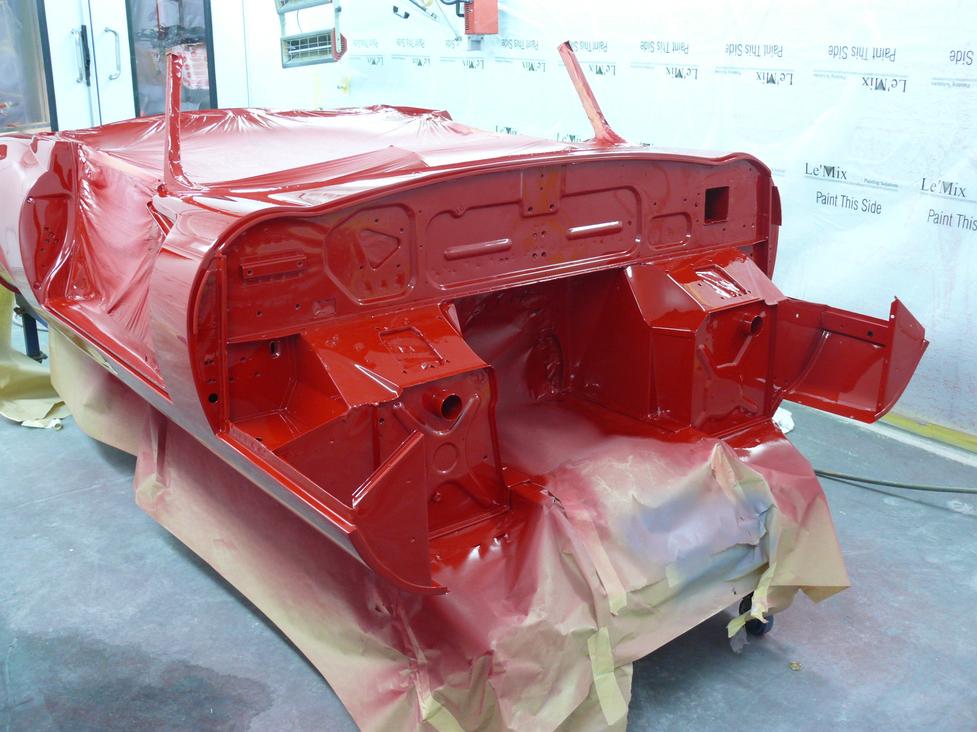
| Link: | |
| BBcode: | |
| HTML: | |
| Hide post links |
-
Gfhug
- Posts: 3308
- Joined: Thu Jun 19, 2014 3:08 pm
- Location: Near Andover, Hampshire,in D.O. Blighty
#36 Re: New Paint
Bill, can you explain a bit more about this wet on wet primer, please?
Why did you use it only on the bulkhead? As an experiment, and if so will you use it all over the next car? Do you apply it to bare metal or is there another primer underneath?
I’m finding your comments on paint very useful and will appreciate learning more from you.
Many thanks
Geoff
PS, my online search didn’t give a decent description of wet on wet, hence my questions
S2 FHC Light Blue
S2 OTS LHD - RHD full restoration
S2 OTS LHD - RHD full restoration
| Link: | |
| BBcode: | |
| HTML: | |
| Hide post links |
#37 Re: New Paint
Hello Geoff,
There are two ways to have subsequent paint systems adhere;
1. by chemical link
and
2. Keying the surface; what I call the Ploughed Field effect.
If you look at a painted surface under high magnification, after it’s been sanded, it looks like a ploughed field; generally, this is necessary to give a subsequent paint system something to grip onto.
When applying Top Coat, you’re actually using wet on wet technique. Subsequent coats are applied when the previous has flashed off, but long before it’s cured. In this way, a chemical link is achieved between the coats of paint. If for some reason you had to come back and apply further coats a week later, you would have to sand the paint surface to create the Ploughed Field affect.
The wet on wet primer I used was designed to speed up the repainting process in the general repair industry, where it can be applied directly to OEM e-Coated panels and then Top Coats applied without sanding the primer, resulting in a huge time saving.
This primer lays down flat and smooth, just like a well applied Top Coat and therefore, presents a good surface for subsequent Top Coats onto which to be applied. It’s allowed to flash off for 12 minutes, after which Top Coats can be applied to achieve a chemical link with the primer. A window of up to 48 hours exists where a Top Coat system can be applied without sanding and achieve the chemical link.
My motivation for using this primer was born out of a previous job where a Series 2 2+2, converted to a LWB Roadster, was finished in a slightly pearlescent paint. Notwithstanding that the substrate was properly prepared and final sanded with P800 grade abrasive, the visual affect was darkish streaks in the metallic that coincided with the sanding marks. My reasoning was to use a non sanding primer to provide a scratch free surface onto which to apply the pearlescent/metallic base coat. This worked out perfectly.
In the case of the car pictured in my previous Post, the bulkhead had been initially primed with a Black, epoxy primer and for uniformity of coverage; I wanted a consistent coloured substrate. I didn’t savor the prospect of having to sand the bulkhead again and so, on the back of the success with the slightly pearlescent paint exercise, decided to use the non sanding primer. One coat of the non sanding primer was applied, resulting in what you see in the pictures in the previous Post and a perfect surface, after it had flashed off, onto which to apply the Red Base Coat.
There is no necessity to use a non sanding primer over the whole of a car that has been primed and prepared correctly. The main reason is to cover varying colours of substrate to present a uniform coloured base. Some paint for repair work has a particular coloured primer specified. Therefore, on a solid colour, I don’t think I’d use it over the whole car, but on a metallic paint respray, I think yes.
The non sanding primer I used, De Beer 8-746, is not recommended on areas of metal exceeding 10 cm². Further, as only one coat should be applied, there is no scope for filling coarse file marks in metal after completing a repair.
Regards,
Bill
| Link: | |
| BBcode: | |
| HTML: | |
| Hide post links |
-
Gfhug
- Posts: 3308
- Joined: Thu Jun 19, 2014 3:08 pm
- Location: Near Andover, Hampshire,in D.O. Blighty
#38 Re: New Paint
Bill,
Thank you so much for your very comprehensive answer.
I’m a long way from having my project painted and for the moment a primer is being applied that protects the surface from any rusting as I clean up areas one by one. It is a protective coat that doesn’t need top coating soon afterwards. At the appropriate time it’ll all be sanded, sorry ploughed, to give a keying surface.
As always, Bill, you are generous in your time in explaining things.
Cheers and happy New Year.
Geoff
S2 FHC Light Blue
S2 OTS LHD - RHD full restoration
S2 OTS LHD - RHD full restoration
| Link: | |
| BBcode: | |
| HTML: | |
| Hide post links |