


I have mastered removal of the radio console so that I can open the central section of the console. What do I need to do to remove the Tacho/Speedo section on an S2?
Basically I just need to know how many screws there are and where to look for them.
Hoping to install my brand new(!?) S2 indicator switch over the weekend.
Thanks
Steve
Speedo/Tacho Console
-
Steve Marshall
Topic author - Posts: 180
- Joined: Sun Sep 29, 2013 10:35 am
- Location: London

#1 Speedo/Tacho Console
Nortonian mechanics Jan '69 S2 Roadster RHD Manual
| Link: | |
| BBcode: | |
| HTML: | |
| Hide post links |
-
christopher storey
- Posts: 5698
- Joined: Sun Mar 09, 2008 3:07 pm
- Location: cheshire , england
#2 Re: Speedo/Tacho Console
To remove the speedo/tacho housing is quite a complex job, requiring removal of the dashtop and then the instruments so as to gain access to the various fixings at the sides of the housing. What I do not understand is why you should need to do this so as to install a new indicator switch on an S2, which is secured by a bracket to the steering column, accessible once the clip on switch housing has been detached? To change it, if you are also changing the self-cancelling mechanism, I think it will be necessary to remove the steering wheel
| Link: | |
| BBcode: | |
| HTML: | |
| Hide post links |

#3 Re: Speedo/Tacho Console
Hi Steve....also confused re the indicator as above.....depending how agile you are it is possible to get your hand up under the dash and working blind undo the two knurked nuts holding in the speedo, and pull it out....then through the speedo hole get to the revcounter nuts and remove them...but dont drop the nuts.... you will need to remove the steeringwheel as said above.. Steve
Steve
69 S2 2+2 (just sold) ..Realm C type replica, 1960 xk150fhc
69 S2 2+2 (just sold) ..Realm C type replica, 1960 xk150fhc
| Link: | |
| BBcode: | |
| HTML: | |
| Hide post links |
-
 politeperson
- Posts: 1295
- Joined: Tue Jun 07, 2016 8:26 pm
- Location: Boston UK
#4 Re: Speedo/Tacho Console
Just got to add, the speedo only takes a minute to remove.
Once when I was driving my speedo started making so much noise I thought it was going to explode.
I pulled over at put my hand behind the dash from underneath. The nuts should only be hand tight and located at 180 degrees from each other. They hold standard clamps on the thread, that clamp the unit to the back of the dash.
Undo these and you can push the unit out of the dash enough to unscrew the speedo cable, tach and pull out the light bulbs.
It took literally a minute with no tools, admittedly I had no under dash panels at the time.
Its really easy.
Its true, but Enzo never said it
Too many E types
XK120 SUs
Too many E types
XK120 SUs
| Link: | |
| BBcode: | |
| HTML: | |
| Hide post links |
-
christopher storey
- Posts: 5698
- Joined: Sun Mar 09, 2008 3:07 pm
- Location: cheshire , england
#5 Re: Speedo/Tacho Console
Unfortunately , it's not the speedo he wishes to remove , but the housing for speedo and tacho
| Link: | |
| BBcode: | |
| HTML: | |
| Hide post links |

#6 Re: Speedo/Tacho Console
So do I, as I'm doing a LHD/RHD conversion - keep going!
Hugo Miller - rebuilding an imported Series II OTS & converting to RHD
| Link: | |
| BBcode: | |
| HTML: | |
| Hide post links |
-
politeperson
- Posts: 1295
- Joined: Tue Jun 07, 2016 8:26 pm
- Location: Boston UK
#7 Re: Speedo/Tacho Console
Oh yes, I see.
I swapped mine over last year. It must of explained itself as I went alon as I have no memory of doing it.
I definitely did it though!
I swapped mine over last year. It must of explained itself as I went alon as I have no memory of doing it.
I definitely did it though!
Its true, but Enzo never said it
Too many E types
XK120 SUs
Too many E types
XK120 SUs
| Link: | |
| BBcode: | |
| HTML: | |
| Hide post links |
#8 Re: Speedo/Tacho Console
I already have the screen out & the top of the dashboard off, so it was a doddle. A few 2BA screws & a couple of cables to unhook. Wiring loom is next :-(
Hugo Miller - rebuilding an imported Series II OTS & converting to RHD
| Link: | |
| BBcode: | |
| HTML: | |
| Hide post links |
-
politeperson
- Posts: 1295
- Joined: Tue Jun 07, 2016 8:26 pm
- Location: Boston UK
#9 Re: Speedo/Tacho Console
Yes, the wiring loom.
I had a genius solution on that conundrum.
After I removed the dash panels, the loom was exposed.
I phoned Anthony Fisher, a local mobile auto electrician (Boston).
Luckily my loom was in good condition so we could modify it. On a LHD car it runs from the right has side of the dash across anyway. Therefore LHD dash loom is relatively easy to modify to RHD spec. as it just needs shortening behind the dash.
Anthony spent 2 or three days in my garage shortening the dash loom from LHD to RHD spec and charged me a few hundred pounds. Job done. At the same time he rebuilt (checked out) the heater fan and the two cooling fans. He also did a few minor bits in the engine bay as a result of going to RHD.
It has all worked perfectly since.
Its true, but Enzo never said it
Too many E types
XK120 SUs
Too many E types
XK120 SUs
| Link: | |
| BBcode: | |
| HTML: | |
| Hide post links |
#10 Re: Speedo/Tacho Console
Yes, the wiring loom. Indeed! I have the same condundrum. I had read on here somewhere that it was probably easier to replace the loom rather than try to extend the relevant bits of it. I was lucky to find a 'new / second-hand' loom on eBay (Barrats, bought but not used by original purchaser).
So far I have managed to match up only two out of hundreds of wires. The rest doesn't seem to bear much if any resemblance to the original. I'm sure it will if I stare at it long enough, and I know from previous experience wth this kind of job that with each wire you find a home for, the remaining tangle gets a bit smaller. However, I am beginning to wonder whether it might be easier to modify the existing wiring after all?
The wiring on the car is in pretty good condition. One of the things that makes the re-wiring job harder is that many of the original wires seem to be a sort of bland magnolia in colour, making it difficult to match them to the new loom.
Hugo Miller - rebuilding an imported Series II OTS & converting to RHD
| Link: | |
| BBcode: | |
| HTML: | |
| Hide post links |


#11 Re: Speedo/Tacho Console
It's quite easy once you get the hang of it. I went through it methodically using the wiring diagrams and a labelling device. I then put labels on each of the wires (rather like a ring on a birds leg) and everything worked quite well. I'd definitely go with the replacement loom. The less joins in wiring the better.
-Mark
1969 Series 2 OTS, Regency Red
'Life's to short to drive a boring car'
1969 Series 2 OTS, Regency Red
'Life's to short to drive a boring car'
| Link: | |
| BBcode: | |
| HTML: | |
| Hide post links |
#12 Re: Speedo/Tacho Console
This is going to sound silly, but I haven't even worked out where the loom starts and ends! Does it go from behind the dash to cover the whole engine bay? Or are they two looms with a join somewhere? The only identifier I have found so far is a few warning lamps / panel lights, so at least I know where that bit goes!
Hugo Miller - rebuilding an imported Series II OTS & converting to RHD
| Link: | |
| BBcode: | |
| HTML: | |
| Hide post links |

#13 Re: Speedo/Tacho Console
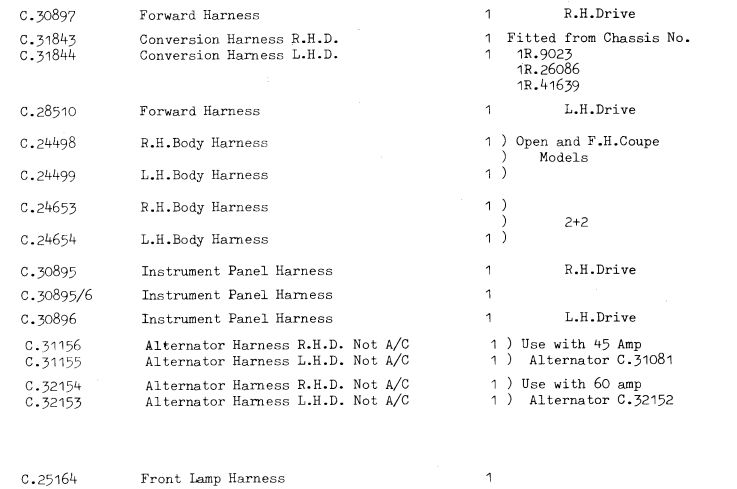
#
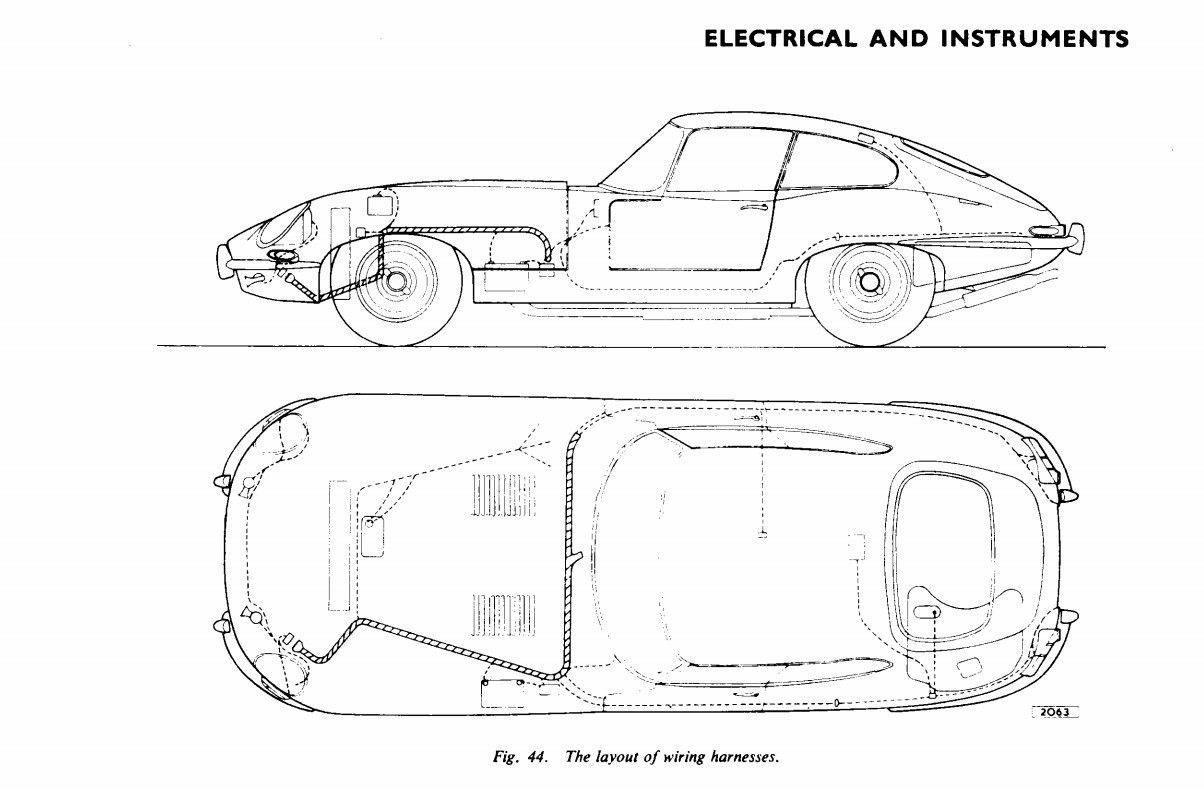
This is the S1 harness layout:
David Jones
S1 OTS OSB; S1 FHC ODB
1997 Porsche 911 Guards Red
Add your E-Type to our World Map: http://forum.etypeuk.com/viewtopic.php?f=1&t=1810
S1 OTS OSB; S1 FHC ODB
1997 Porsche 911 Guards Red
Add your E-Type to our World Map: http://forum.etypeuk.com/viewtopic.php?f=1&t=1810
| Link: | |
| BBcode: | |
| HTML: | |
| Hide post links |
#14 Re: Speedo/Tacho Console
The dash loom is pretty much that. Left to right across the front.
There is a main engine loom, that also comes into the cockpit, along with the alternator loom which also has a spur into the cockpit IIRC.
Basically, in the S2 without the Ballast you have
Front bonnet loom
!
! Cooling Fan loom
Main Engine loom
Alternator loom
Dash loom
LH Body loom RH Body loom
Very simplistically, the main engine loom and Alternator loom bring the power and signals from the under bonnet area to the ignition and fuse boxes. Dash loom distributes these across the front.
The main loom also connects to the dash loom and LH body loom to send signals to the rear lights and bring the fuel levels and warning to the front. The dash loom also carries the turn signals across the front to the RH body loom to send things like indicator signals and brake light signals to the back.
There are also some sundry cables needed. This pack contains things like the cable attached to the door switch, body loom to interior light and other minor bits and bobs.
-Mark
1969 Series 2 OTS, Regency Red
'Life's to short to drive a boring car'
1969 Series 2 OTS, Regency Red
'Life's to short to drive a boring car'
| Link: | |
| BBcode: | |
| HTML: | |
| Hide post links |
#15 Re: Speedo/Tacho Console
Well, I have the bulb holders for the waning lamps, so that's a clue. I couldn't see where it joined anything going through the left footwell and out into the engine bay by the battery however. Plus the fact that many of the wires seemed far too long to stay within the dash area. I didn't look at all thoroughly at all though - I just took one look and beat a hasty retreat. I'll check it out later when I get back to my car & see if I can make more sense of it. .
Hugo Miller - rebuilding an imported Series II OTS & converting to RHD
| Link: | |
| BBcode: | |
| HTML: | |
| Hide post links |
#16 Re: Speedo/Tacho Console
This is actually most helpful. In particular your observation that the dash loom only goes to one side of the fuses. I was looking for something going to both sides of the fuses. So now it's beginning to make a bit more sense, BUT... the problem I now have (if it is a problem) is that all the wires in the existing dash loom are in perfect condition. I can see no point in swapping over the whole loom, except as a mental challenge for masochists. I think I'd be better off just extending the instrument wires. It's the loom on the other side of the fuses that is not so good - no actually it is fine, but the colours are all very faded so I wouldn't want to try & colour-code that lot.mark10337 wrote:.....Very simplistically, the main engine loom and Alternator loom bring the power and signals from the under bonnet area to the ignition and fuse boxes. Dash loom distributes these across the front.
The main loom also connects to the dash loom and LH body loom to send signals to the rear lights and bring the fuel levels and warning to the front. The dash loom also carries the turn signals across the front to the RH body loom to send things like indicator signals and brake light signals to the back......
Also I keep finding flasher units. We're up to four so far; one in the middle of the dash at the top, two more tucked up under the left side of the dash, and a fourth down by the battery in the engine compartment.
What do they all do?
Hugo Miller - rebuilding an imported Series II OTS & converting to RHD
| Link: | |
| BBcode: | |
| HTML: | |
| Hide post links |
#17 Re: Speedo/Tacho Console
The flasher units are:
centre of the dash, between the fuse panels - hazard warning flasher
left hand side, under the dash. There should only be 1 - this is for the indicators
by the battery. This is not a flasher unit. This will be the 3AW unit for the ignition/alternator charging warning light.
centre of the dash, between the fuse panels - hazard warning flasher
left hand side, under the dash. There should only be 1 - this is for the indicators
by the battery. This is not a flasher unit. This will be the 3AW unit for the ignition/alternator charging warning light.
-Mark
1969 Series 2 OTS, Regency Red
'Life's to short to drive a boring car'
1969 Series 2 OTS, Regency Red
'Life's to short to drive a boring car'
| Link: | |
| BBcode: | |
| HTML: | |
| Hide post links |
#18 Re: Speedo/Tacho Console
Hah - I have two under the left side dash - I'll have another look tomorrow but I am guessing it must be one for each side - that's what Astons had. I had assumed the one in the middle was for the 'normal' indicators - thanks for putting me straight. I guess I can throw the alternator one away (along with the relay) when I upgrade the alternator to an integral type. But I need to re-fit the engine before I do that, and at the moment I'm still stripping it down - or trying to - right now I'm having a battle of wills with the head; I want it to come off but it wants to stay where it is!mark10337 wrote:The flasher units are:
centre of the dash, between the fuse panels - hazard warning flasher
left hand side, under the dash. There should only be 1 - this is for the indicators
by the battery. This is not a flasher unit. This will be the 3AW unit for the ignition/alternator charging warning light.
Hugo Miller - rebuilding an imported Series II OTS & converting to RHD
| Link: | |
| BBcode: | |
| HTML: | |
| Hide post links |
#19 Re: Speedo/Tacho Console
Hugo,
Once you've made a start and got some of the loom connected, rig yourself a series lamp at the battery.
Just a brake bulb will do - you install it in series at the battery, so that it is in circuit for the entire electrical circuit. Rig it so that it can sit up by the windscreen (i.e. duck tape it to the glass), and install all your fuses.
While you're inside the car cursing and pfaffling it will indicate various things without you having to use an ohmmeter or buzzbox or such:
- If you have a dead short somewhere, it will light up with normal intensity (But no fuse will blow, and no smoke will escape).
If you flip the switch for a load like the instrument panel illumination, both the series lamp and the panel will glow with reduced intensity.
If you flip a switch and nothing glows... that circuit isn't complete.
If you measure the reduced "battery voltage" past the series load, then you can use your voltmeter inside the car - anything that shows that reduced "battery voltage" has a good connection to the battery, anything less (but not zero) has some kind of a load between, and anything zero is either not connected, or switched off.
| Link: | |
| BBcode: | |
| HTML: | |
| Hide post links |
#20 Re: Speedo/Tacho Console
What a clever idea! Just one query though;
You say "If you measure the reduced "battery voltage" past the series load, then you can use your voltmeter inside the car - anything that shows that reduced "battery voltage" has a good connection to the battery, anything less (but not zero) has some kind of a load between, and anything zero is either not connected, or switched off."
If I connect a voltmeter after the "series load" (i.e.the bulb I have taped to the windscreen), I will still get a full 12+ volts, won't I? The current drawn by the voltmeter is far less than the current the bulb is capable of passing, so the bulb won't obstruct it. Isn't that correct? Or is it?
Hugo Miller - rebuilding an imported Series II OTS & converting to RHD
| Link: | |
| BBcode: | |
| HTML: | |
| Hide post links |