Gauge / Dial Restoration - Advice Sought

Talk about the E-Type Series 1
User avatar

Topic author
neil4444
Posts: 809
Joined: Fri Mar 06, 2009 10:46 pm
Location: East Sussex
Great Britain

#1 Gauge / Dial Restoration - Advice Sought

Post by neil4444 » Sat Nov 16, 2013 10:26 pm

Hi,

I decided to restore my dials/gauges myself however on removing them from the dash panesl and fully disassembling them I've found a few issues.

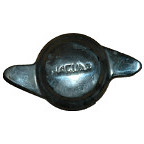
Firstly, on the back of the speedo case the odometer trip cable entry point has been lead soldered to the casing (see below). Is this normal or more likely to be an addition from the PO ? Furthermore, is this going to cause a problem when I come to have the cases plated ?

Image

Secondly, the front face plates of the Water & Fuel Gauges are peeling.
As the workings of the 2 gauges seem fine I'd ideally just like to find replacement faces. Were these Smiths gauges put into anything other than the S1 ?
Alternatively, has anyone tried painting these & had satisfactory results ?
If so what paint - satin black ?
Any advice gratefully received.

Image

Regards,

Neil
Neil
1962 S1 OTS
1967 S1 FHC

Link:
BBcode:
HTML:
Hide post links
Show post links

User avatar

PeterCrespin
Posts: 4561
Joined: Fri Mar 05, 2010 8:22 pm
Location: Gaithersburg, Maryland.
Contact:
United States of America

#2

Post by PeterCrespin » Sun Nov 17, 2013 1:57 am

No the solder is not normal and yes it will dissolve in the acidic stripping dips I think. The threaded boss is part of the mechanism which should come out of the casing intact. I've done a few gauges myself but to be crank I certainly didn't plate invisible parts. For the black I'd use satin black thinned to recolour the faded original. I have used a black felt pen to blacken spots and small areas. Once you clean the glass and touch up the face you'd need to be pretty picky to want better and pay full price for a professional gauge refurb.
1E75339 UberLynx D-Type; 1R27190 70 FHC; 1E78478; 2001 Vanden Plas

Link:
BBcode:
HTML:
Hide post links
Show post links


Durango2k
Posts: 1558
Joined: Fri Feb 11, 2011 11:59 pm
Location: Germany
Germany

#3

Post by Durango2k » Sun Nov 17, 2013 8:39 am

If you spray them how do you get the letters back like "FUEL" and "WATER" ???

Carsten

Link:
BBcode:
HTML:
Hide post links
Show post links


christopher storey
Posts: 5698
Joined: Sun Mar 09, 2008 3:07 pm
Location: cheshire , england
Great Britain

#4

Post by christopher storey » Sun Nov 17, 2013 8:44 am

You don't spray them : use a reasonable artists' brush and well thinned satin black

Link:
BBcode:
HTML:
Hide post links
Show post links


265bhp
Posts: 868
Joined: Wed Jan 26, 2011 10:29 pm
Location: surrey
Great Britain

#5

Post by 265bhp » Sun Nov 17, 2013 9:58 pm

Durango2k wrote:If you spray them how do you get the letters back like "FUEL" and "WATER" ???

Carsten
Carsten
I tried to find out if anyone made new or could supply new faces for the dials as mine were all too far gone also. I didn't want to just give them to a restorer, as I fancied doing them myself. In the end I decided to see if I could find someone to reprint them. Main problem was that the type face is not either a single font, nor is it an actual font that can be found, it's a combination of styles, which would originally have been drawn by hand by a sign writer, many times larger than final scale, then reduced photographically and screen printed. So I drew all the dials in CAD and found a printer who reproduced them via a pad print technique. I also did this as I am replacing the Amps gauge For a Volts one and wanted all the type face to be the same. Not original but looks more balanced. Send me a PM if you would like to know more. I'll post some pictures in a few days to show you what I mean. Hope that helps some

Regards
Jonathan
1963 3.8 FHC ..now finished …………….
1974 2.7 Carrera now as an RS Touring

Link:
BBcode:
HTML:
Hide post links
Show post links

User avatar

GSR 54D
Posts: 281
Joined: Wed Dec 03, 2008 1:17 pm
Location: Surrey
Great Britain

#6

Post by GSR 54D » Mon Nov 18, 2013 3:03 pm

Hi Neil

I've been down your route, a little, trying to restore bezels and gauges etc.
I ended up dropping a piece of glass and because of this I ended up using this company: www.thegaugeshop.com.
For 6 powder coated bezels, 12 "O" rings/seating seals, 1 new glass, I new black metal "Water" plate + postage = about ?70.
Initially I thought this was a lot however having a dashboard that looks right and has gauges that match is worth it.

John H.

Link:
BBcode:
HTML:
Hide post links
Show post links

User avatar

Topic author
neil4444
Posts: 809
Joined: Fri Mar 06, 2009 10:46 pm
Location: East Sussex
Great Britain

#7

Post by neil4444 » Mon Nov 18, 2013 5:11 pm

Job done. I painted them with thinned satin black. I found that dabbing/stippling rather than brushing gave the best result. However when the paint dried the newly painted patches were quite obvious so I clear lacquered them then very gently knocked the lacquer back to matt with a bit of P1200. The edges rubbed through very slightly when doing this but don't actually show once the bezel's in place.

Image

Image

Now to find a replacement speedo case.

Cheers,

Neil
Neil
1962 S1 OTS
1967 S1 FHC

Link:
BBcode:
HTML:
Hide post links
Show post links


christopher storey
Posts: 5698
Joined: Sun Mar 09, 2008 3:07 pm
Location: cheshire , england
Great Britain

#8

Post by christopher storey » Mon Nov 18, 2013 6:26 pm

Neil : I really wouldn't fret too much over that case . All the tube is there for is to secure the speedo cable and provided its dimensions are accurate ( in particular its distance from the stop to the back of the instrument it is probably just as good as a factory fresh one. You will have a hell of a job finding one without buying a complete instrument because IIRC the case is unique to the E with its 3 warning lights

Link:
BBcode:
HTML:
Hide post links
Show post links

User avatar

Topic author
neil4444
Posts: 809
Joined: Fri Mar 06, 2009 10:46 pm
Location: East Sussex
Great Britain

#9

Post by neil4444 » Mon Nov 18, 2013 6:52 pm

Thanks Chris, advice appreciated. I'll just have to get the platers to go easy around the leaded area.

Next question. Are the gauge needles painted with a luminous paint or just plain white ?
Neil
1962 S1 OTS
1967 S1 FHC

Link:
BBcode:
HTML:
Hide post links
Show post links

User avatar

Heuer
Administrator
Posts: 15173
Joined: Sat Mar 01, 2008 5:29 pm
Location: Nottinghamshire
Great Britain

#10

Post by Heuer » Mon Nov 18, 2013 11:26 pm

Plain white.
David Jones
S1 OTS OSB
1997 Porsche 911 Guards Red
2024 Lexus LBX

Add your E-Type to our World Map: http://forum.etypeuk.com/viewtopic.php?f=1&t=1810

Link:
BBcode:
HTML:
Hide post links
Show post links


265bhp
Posts: 868
Joined: Wed Jan 26, 2011 10:29 pm
Location: surrey
Great Britain

#11

Post by 265bhp » Sat Nov 23, 2013 9:01 pm

as promised this is how i did mine


dials as found in the car?.somewhat tired?.too much damage to the faces of the small gauges to repair?.and i wanted to replace the Amps gauge with a volts one?.I also had a mechanical oil pressure gauge fitted, but although a correct Smiths gauge, the font was a different style?.

the large dials needed a careful cleaning and replacement glass face, plus a replacement clock as the dials on mine were very yellow


Image

Image[/url]

individual cases?.


Image

Image

Image

Image

cases blast cleaned then plated and painted?

Image

Image

Image

Image

Image

and the new set of dials

they all now say Smiths, which I realise is incorrect?but now all the fonts are matching?.and importantly to me the volts graphics are all white, as opposed to the partial whiyte and red from the donor dial?..so it looks period correct even if slightly tweaked?.

Image


I'll take a photo and post an image of the artwork tomorrow, as all of this was drawn in CAD by me, then transferred to printers plates and pad printed on the dials?.the dials were all stripped, etch primed and gloss black sprayed, then once printed had a final satin coat to flatted


regards
Jonathan
1963 3.8 FHC ..now finished …………….
1974 2.7 Carrera now as an RS Touring

Link:
BBcode:
HTML:
Hide post links
Show post links


Durango2k
Posts: 1558
Joined: Fri Feb 11, 2011 11:59 pm
Location: Germany
Germany

#12

Post by Durango2k » Sat Nov 23, 2013 9:39 pm

What?s that Bremerhafen sign on top ?

Carsten

Link:
BBcode:
HTML:
Hide post links
Show post links


265bhp
Posts: 868
Joined: Wed Jan 26, 2011 10:29 pm
Location: surrey
Great Britain

#13

Post by 265bhp » Sat Nov 23, 2013 10:08 pm

Durango2k wrote:What?s that Bremerhafen sign on top ?

Carsten
Eagle eyes Carsten..!...the car came from the US...must have gone to Bremerhafen first, then on to Southampton

Jonathan
Last edited by 265bhp on Sat Nov 23, 2013 10:21 pm, edited 1 time in total.
1963 3.8 FHC ..now finished …………….
1974 2.7 Carrera now as an RS Touring

Link:
BBcode:
HTML:
Hide post links
Show post links


265bhp
Posts: 868
Joined: Wed Jan 26, 2011 10:29 pm
Location: surrey
Great Britain

#14

Post by 265bhp » Sat Nov 23, 2013 10:20 pm

and the last shot is the dials in the dash surrounds?.note they are now in the RHD format, with new fascias and vinyl from Hutsons which i covered myself, and the original textured aluminium fascia cleaned, including some markings, which adds a certain patina?.dont believe these rarer late 63/64 fascias are available new, but somehow i prefer the worn in look?.last thing i need to do is repair/replace the toggle switches as they are cracking though not visible in this picture

Image

Image


thanks for looking
Jonathan
1963 3.8 FHC ..now finished …………….
1974 2.7 Carrera now as an RS Touring

Link:
BBcode:
HTML:
Hide post links
Show post links


265bhp
Posts: 868
Joined: Wed Jan 26, 2011 10:29 pm
Location: surrey
Great Britain

#15

Post by 265bhp » Sun Nov 24, 2013 2:03 pm

just to complete this tale these 3 are images of the artwork

Once drawn in CAD and a pdf type file created, the image can be transferred to acetate, which using light sensitive technology creates the master plates which the ink is put onto

Using a printers pad the pad picks up the ink within the recessed shapes and transfers it to the painted metal gauge faces

Image

Image

Image

hope this helps

regards

Jonathan
1963 3.8 FHC ..now finished …………….
1974 2.7 Carrera now as an RS Touring

Link:
BBcode:
HTML:
Hide post links
Show post links


1954Etype
Moderator
Posts: 2739
Joined: Sat Sep 27, 2008 12:32 pm
Contact:
Great Britain

#16

Post by 1954Etype » Sun Nov 24, 2013 2:29 pm

Very impressive!
Angus 67 FHC 1E33656
61 OTS 875047

Link:
BBcode:
HTML:
Hide post links
Show post links

User avatar

Topic author
neil4444
Posts: 809
Joined: Fri Mar 06, 2009 10:46 pm
Location: East Sussex
Great Britain

#17

Post by neil4444 » Sun Nov 24, 2013 2:50 pm

Excellent. What finish did you use on the bezels ?
Neil
1962 S1 OTS
1967 S1 FHC

Link:
BBcode:
HTML:
Hide post links
Show post links


265bhp
Posts: 868
Joined: Wed Jan 26, 2011 10:29 pm
Location: surrey
Great Britain

#18

Post by 265bhp » Sun Nov 24, 2013 5:53 pm

neil4444 wrote:Excellent. What finish did you use on the bezels ?
Neil

I use 2K paint, satin in this case..because these are small items i used my modellers airbrush to get the right amount of paint thickness..used to use Halford paints but they are just not as durable as 2 pack

regards
Jonathan
1963 3.8 FHC ..now finished …………….
1974 2.7 Carrera now as an RS Touring

Link:
BBcode:
HTML:
Hide post links
Show post links

Post Reply Previous topicNext topic