Page 1 of 2
#1 Oily E-Type
Posted: Tue Sep 27, 2011 5:49 pm
by paulj
Hi
question do ALL E Types leak oil ????
I have several small irritating leaks which come to a small puddle
after several days

#2
Posted: Tue Sep 27, 2011 6:05 pm
by Heuer
Only the ones with oil still in them!
Worth checking the obvious areas and running a spanner/socket over the various bolts. Only one to really worry about is the rear crankshaft seal as that is an engine out job. You learn to live with the odd drops. Try using chalk dust or talcum powder (get one of those big squeezy puffer bottles from the baby counter at Boots) after wiping down as it will make the source of the leak more obvious.
#3 oily
Posted: Tue Sep 27, 2011 6:15 pm
by paulj
Hi David
I rebuilt this engine I have a small leak from the oil banjo's rear of head.
another from the front timing section bolt that goes to cylinder head from underneath, another that appears from head gasket exhaust side,one or two from the top covers again exhaust side and one from the gearbox plug
all very annoying as new gaskets used and sealant where appropriate

Paul
#4
Posted: Tue Sep 27, 2011 9:24 pm
by andy303
Paul:
Sorry to hear about your problem, it must be frustrating. But, not meaning to revel in a sense of schadenfreude, I feel a little better as my engine leaks in all those places too, but it has never been apart, as far as I know (53K miles). Better to surrender to an inevitability? Cardboard under the car in the garage works to catch the drips.
Andy
#5
Posted: Wed Sep 28, 2011 6:18 am
by vipergts
Its not a Jag unless it leaks oil.
Oily Rag = Jag
I thought it was part of Jaguars rust-proofing system

#6
Posted: Wed Oct 26, 2011 9:25 am
by johnmack
Heuer wrote:Only the ones with oil still in them!
Worth checking the obvious areas and running a spanner/socket over the various bolts. Only one to really worry about is the rear crankshaft seal as that is an engine out job. You learn to live with the odd drops. Try using chalk dust or talcum powder (get one of those big squeezy puffer bottles from the baby counter at Boots) after wiping down as it will make the source of the leak more obvious.
hello all whats the best way to check the rear crankshaft oil seal, I'm getting fumes from oil burning on my exhaust cross member and suspect rear seal i'm praying its something else but what else is there? johnmack
#7
Posted: Wed Oct 26, 2011 10:10 am
by Heuer
Check the rear camshaft oil pipe banjo's as a leak here will run down the block onto the exhaust. Try tightening them or replace the copper washers if it does not work.
#8
Posted: Wed Oct 26, 2011 5:15 pm
by christopher storey
Also, I found that the coarse thread screws which secure the exhaust camshaft blanking plate actually go through into an oil gallery . It's not under pressure - it drains the camshaft wells - but I found that PTFE tape on the screws eliminated what was quite a profuse leak which I had assumed came from the banjo
#9
Posted: Thu Oct 27, 2011 8:44 am
by PeterCrespin
paulj wrote:Hi David
I rebuilt this engine I have a small leak from the oil banjo's rear of head.
You don't say what car/engine you have, or its age. The former has a bearing on the issue and for the latter - it's at least a forty year-old car.
It is quite possible - likely even - someone has nicked the seating for the copper washers or the banjos themselves or has used un-annealed washers etc. etc. Maybe even the wrong length bolts or split banjo solder joint. You simply have to be methodical and restore all sealing faces / parts to good condition and use annealed washers and assemble carefully. If the parts are good and put together with care, there will be no leak. Ergo, if there is a leak one or other of the above does not apply - possibly both. There is no other possible explanation and it is not mysterious. Unlike one or two other areas, this joint is easy to get bone-dry with a modicum of care. I assume it's the banjos and not cam cover half-moons or rear fittings.
paulj wrote:another from the front timing section bolt that goes to cylinder head from underneath,.
There are no bolts into the cylinder head from underneath. There should be studs with nuts. The head block and timing cover faces obviously need to be checked true and flat at the time of head replacement, but now that you're past that stage you will need to clean the leaking area thoroughly and almost treat this like the banjo joints. If you have a 3.8 with a steel gasket you might want to investigate composite gasket options next time.
Ensure smooth flat faces on head/timing cover and fastener, annealed washers and sealant. I'd also put a drop of Loctite on the fastener and use a flat sealing washer rather than a locking washer that can seep oil. The oil ought not to be getting as far as the stud, but that can only be remedied next time the head is off. If you truly are using bolts a) take care not to strip the alloy thread and b) use sealant on the bolt as well as the washer. Use brake or carb cleaner or something squirted up inside the threads a few times to totally clean/dry the oil away first.
paulj wrote:another that appears from head gasket exhaust side,.
Oil should not leak from the head gasket. Assuming you don't mean the timing chest there is only one oil passage each side and that is the drain at the back. If you have an oil leak here it is a) very unusual and b) indicative of a bad gasket or poor technique. Unlikely to be the former although if you have a 3.8 it is easier to run into trouble than with a composite gasket 4.2 engine. My bet is the oil is leaking from somewhere else and running down or along the head, to the point that makes you think it is a head gasket. I assume you re-torqued after a few hundred miles?
paulj wrote:one or two from the top covers again exhaust side.
Check covers for flatness and reassemble correctly. A quick and easy check for bowing is to hold the covers face to face. Check the cover fits to the head with no gasket, i.e. the stud/cam cap areas are not interfering with the inside of the cover and holding it clear or only just touching the head. This can happen if people use too many washers or the wrong nuts or the covers have been built up with weld inside around cracked bosses. Tighten progressively from the centre outwards and don't overdo it. Again, all basic careful logical technique of checking everything during engine assembly. If the parts are all good (including the washers under the acorn nuts and the area of cover onto which they bear) and put together carefully, they will not leak. The reverse is also true.
paulj wrote:and one from the gearbox plug.
These parts are essentially bullet-proof. With a good washer I have trouble envisaging this being assembled such that it leaks, it is so simple. If yours does leak you need to revisit your work. PTFE tape is your friend, wrap it in the opposite direction to tightening, so that fitting tends to keep the tape on the thread rather than peeling it off.
paulj wrote: all very annoying as new gaskets used and sealant where appropriate
Paul
Turn your annoyance into determination to succeed and you will come out ahead. Being annoyed at Jaguar or your car is a waste of energy and misguided. As they say, the trouble with experience is you get the exam first and the lessons afterwards. Hopefully you have learned some lessons from your rebuild and if those are your only leak points you can look forward to a dry engine. Front and rear crank seals (at least original pattern) are a little trickier and you might have had to resign yourself to modest dripping, as I have. At least your stuff is very likely to be fixable for not much effort.
Pete
#10
Posted: Thu Oct 27, 2011 11:32 am
by Heuer
paulj and johnmack
Please can you add the Series and engine type of your cars into your signature much as Pete has done (you can do this from 'Profile' at the top of the Forum page). Asking a question without some qualification means other members could be wasting their time with advice or as least having to be generic rather than specific in their response.
#11 oil suspended
Posted: Mon Oct 31, 2011 8:28 pm
by paulj
thanks for all the replys, it seems that ptfe could cure quite a few leaks.
camshaft covers look to be the biggest contributer,
but at the moment she is in the paint shop with a major paint problem
so, just got to wait until this is sorted before I can try all your suggestions.
whilst i am on, I have just enjoyed an Aston track day at goodwood, it was an excellent day :D , safe,fast,very well organized. would love to enjoy E types doing the same thing
all the best Paul
#12
Posted: Mon Oct 31, 2011 10:55 pm
by PeterCrespin
Year and model of car please, preferably in your profile/signature so you don't have to keep typing and we don't have to keep asking.
Pete
#13
Posted: Wed Nov 02, 2011 11:19 am
by rfs1957
It's taken me far too long (3 years ?!) to realise that my 3.8 S1 oil-leaks are probably not from the rear crank seal after all ............ after just 7.000m on a VSE engine it did seem premature.
I could indeed never understand why the drips seemed to come from the starter-motor side rather than from the centre, why the front face of the flywheel was never in the slightest bit oily, nor why the weep appeared to carry on for a few drips-worth after the engine was stopped.
But the leak wasn't coming from the banjos on the cam drains, and my block doesn't appear to have the acess cover/casing to the rear that I've seen accused of leaks in the past.
(Maybe 4.2 ?)
I've now seen, using a contortionist's mirror, see pictures, that there is a plug+copper-washer, probably about 3/4" AF, to the RHS of the back of the cylinder block, below the starter motor as it were, and there's a good meniscus of oil around it.
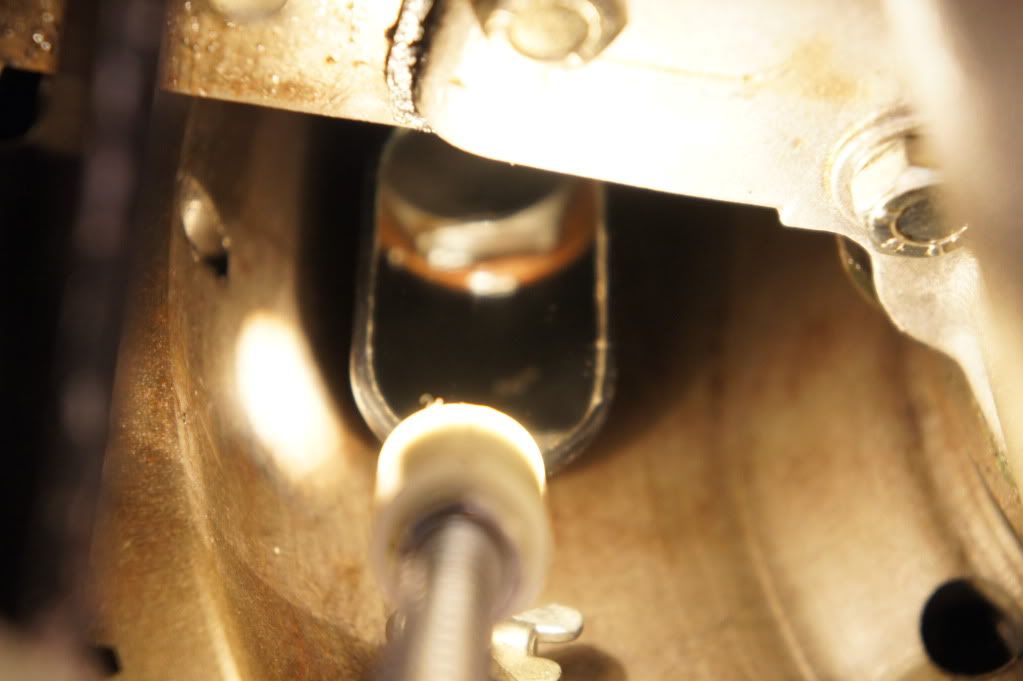
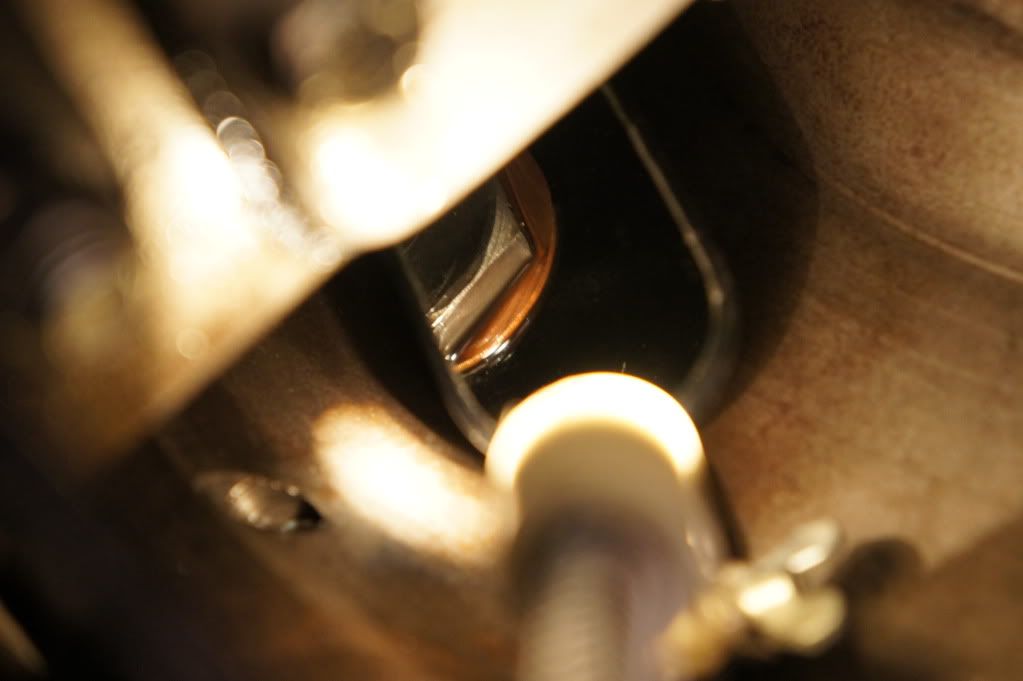
These shots are taken facing the rear of the car, and the surface behind the mirror is the flywheel.
Can someone confirm that this is indeed an oil-passage bung and that such a leak is plausible ? Or is there something else above it that could be responsible ?
It would appear virtually impossible to remove/seal this plug without removing the engine and the flywheel - has anyone ever managed ? I'll happily have a stab at making a tortuous 12-point-socket-based-cranked-flat spanner or w.h.y.
I am shortly going to change the gearbox so it's not a major drama - I'd just rather fix it and test it now rather than off the car.
#14
Posted: Wed Nov 02, 2011 11:50 am
by PeterCrespin
Yes it is the aorta of your engine - the main gallery- which has a blanking plug C2157 at the back and a threaded bung at the front. The front one is under the timing cover so even if it weeps out it would be 99% certain to go back in the sump rather than leak past the cover gasket, unlike the rear plug which dribbles as you realise. Good job you are taking the box off anyway...
#15
Posted: Wed Nov 02, 2011 12:02 pm
by rfs1957
Thanks Peter - can it be removed/sealed in situ then ?!?
#16
Posted: Wed Nov 02, 2011 1:41 pm
by rfs1957
Just had another look, does 1 1/8" AF look right for C2157 ?
#17
Posted: Wed Nov 02, 2011 6:57 pm
by PeterCrespin
No idea, sorry. Someone with a flywheel-free spare engine will need to check. From memory I think it is bigger than the side plugs for the same gallery.
It's one of those fasteners like the oil pipe fittings that you really need to get right first time when you are building the engine up from a bare block. Partly because of the oiling issues if anything is left loose or comes undone and partly because of the faffing required to sort any problems out .
Be interested to know if you manage to get a spanner up there with the engine and gearbox in place.
#18
Posted: Wed Nov 02, 2011 7:47 pm
by rfs1957
No chance of getting a 1 1/8" socket in Montpellier - they'd probably send customers to me - so I've settled for a 29mm 12-point socket and reckon we can knock up a workable tool from that.
Watch this space.
#19
Posted: Thu Nov 03, 2011 5:18 pm
by steve3.8
It is 11/8" AF,with 1/2" of thread into the block.If possible an open ended spanner would be best as there's only 5mm of useable flat.Both of the spare engines i have [ 3.8 and 4.2 ] have the same bung.
regards Steve3.8
#20
Posted: Thu Nov 03, 2011 9:23 pm
by rfs1957
There's no way you can get any kind of movement/arc with an o/e spanner in the available space.
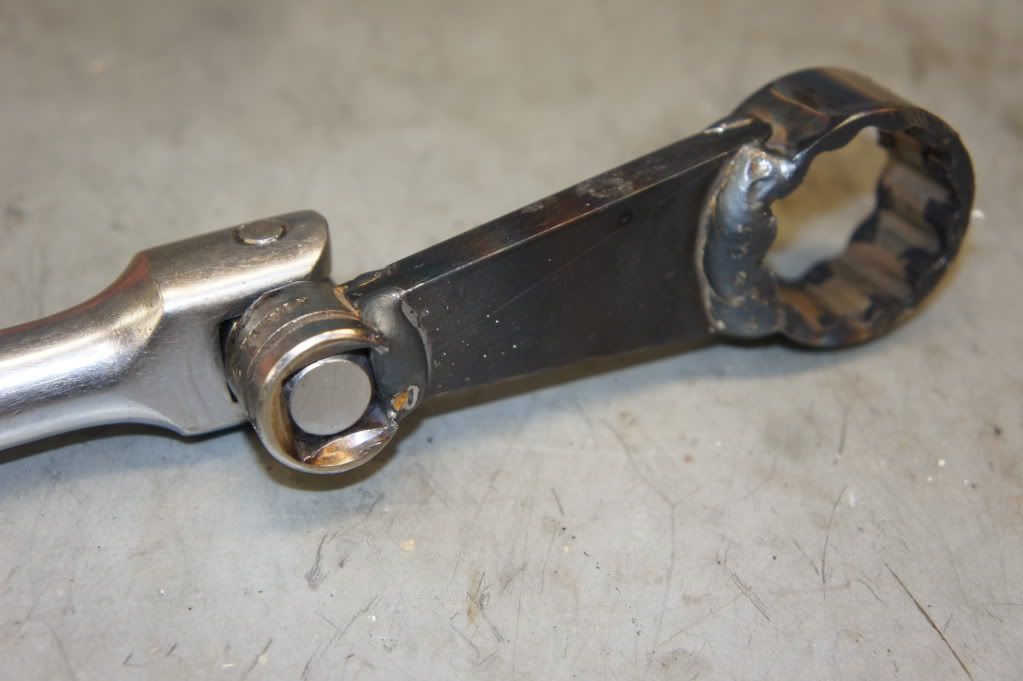
The 12-point ring (either 29mm or 1 1/8") cut from a socket was welded to a bit of 8mm plate, then a 1/2" drive stub welded to the other end. Centre-to-centre is 80mm and you have to make sure the tool can be used either way round, with the 12-point set up before welding so that turning it over gives you a 15? shift, otherwise there is insufficient mouvement.
I hope never to need it again, you can rent it for the price of the postage.
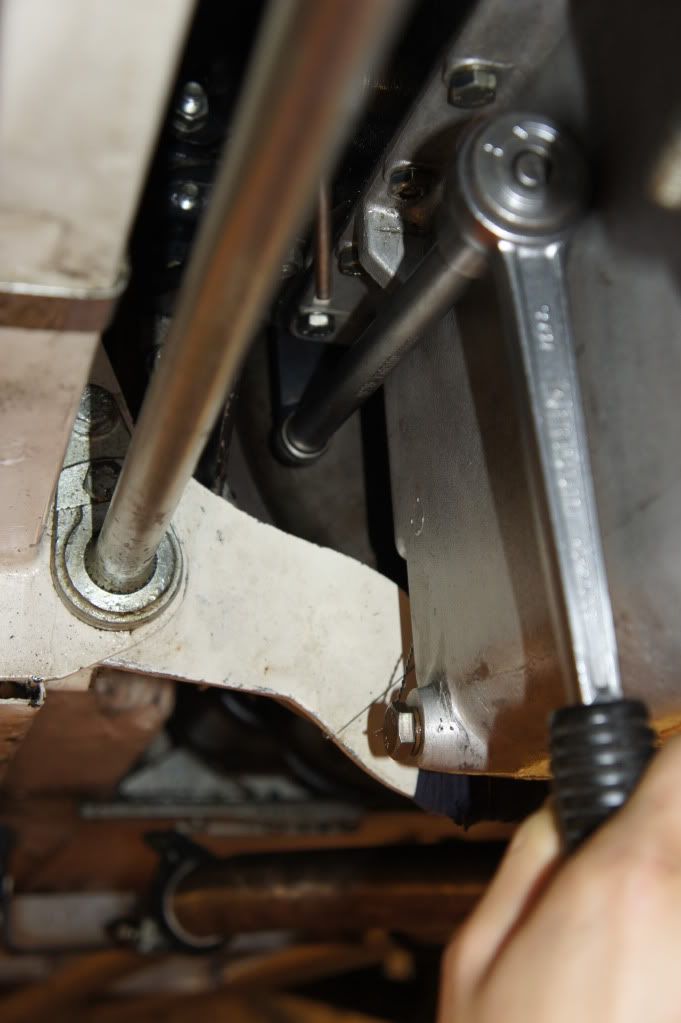

We ran the last few flats down with a long extension, and then for final tightening used a 90? head that gives excellent in-plane torque.

The copper washer had been used many times, despite the fact that the engine "had been rebuilt" by a specialist.
And then been interfered with by an idiot.
I can recommend Loctite 5910 as excellent stuff for this kind of application, smeared on threads or under fibre washers as well as more conventional uses.
One down, how many more to go.