


Is there anything on Monocoque Metalworks’ site about this? I seem to remember seeing something there but can’t find it straight off. Worth looking.
Geoff
Series 1 bonnet fitting
-
Gfhug
- Posts: 3856
- Joined: Thu Jun 19, 2014 3:08 pm
- Location: Near Andover, Hampshire,in D.O. Blighty

#41 Re: Series 1 bonnet fitting
S2 FHC Light Blue
S2 OTS LHD - RHD full restoration
S2 OTS LHD - RHD full restoration
| Link: | |
| BBcode: | |
| HTML: | |
| Hide post links |
-
Philippe-J.
- Posts: 272
- Joined: Mon Nov 27, 2023 12:14 pm
- Location: Occitanie

#42 Re: Series 1 bonnet fitting
Geoff,
MM I don't know, but there is something at 3'27'' of
Philippe
MM I don't know, but there is something at 3'27'' of
Philippe
| Link: | |
| BBcode: | |
| HTML: | |
| Hide post links |

#43 Re: Series 1 bonnet fitting
Not sure which of the myriad Fitting-A-Bonnet posts to choose, as there are so many on the Forum.
Big Bonnet = Big Number Of Postings.
My bonnet gaps were excellent when the bare shell came back from Hutsons, I can't remember exactly what measurement they were, but they were regular.
Now that the car is complete and loaded up with the engine etc, and the return springs, they've shifted slightly and I'm reassured to see that this is not an uncommon phenomenon.
Even if I see too that it is a contested one .........
But with so much new metal (sills, scuttle etc and all bonnet structures in perfect nick) in my shell I do not believe (Ed - want to believe) that it is a sign of an overly-weak structure, just a slightly springy one.
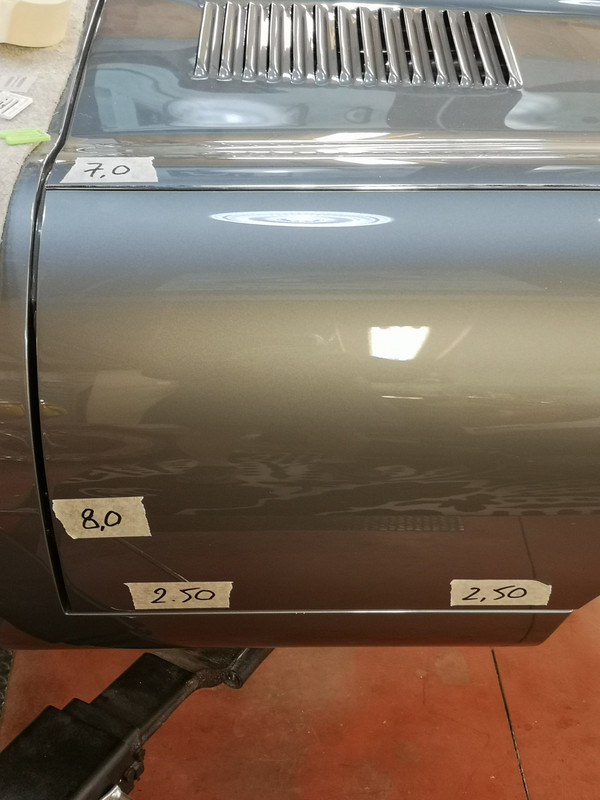
Those are my gaps as things stand.
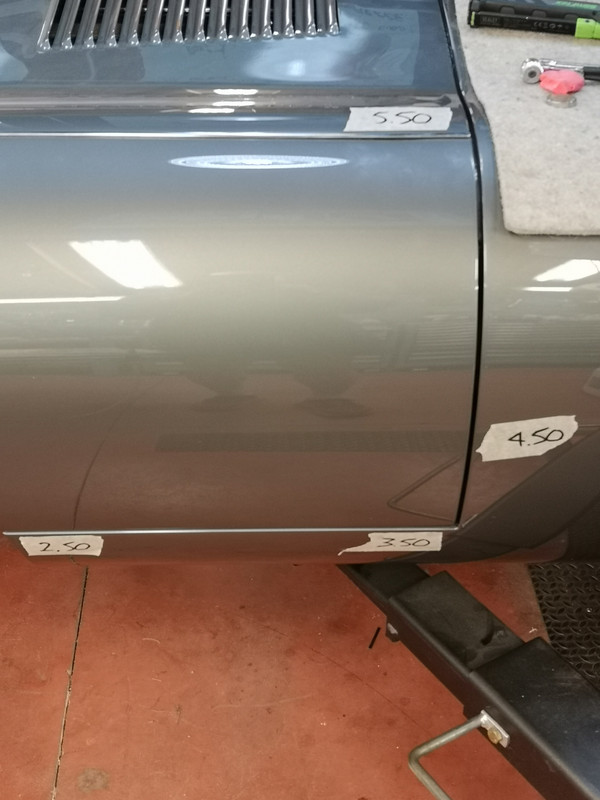
My questions are :
Is the adjustment with the shims a pretty "objective " exercise, as in - you change a thickness here, and it reduces/increases the gap there - predictably ?
On the face of it, if I "just" remove 2.50mm in front of the front RHS hinge, I ought to get the vertical gap on the RHS down to 5.50mm ; in practice, is this pie in the sky ?
I'm aware that this also has a crabbing effect on the opposite side of the bonnet.
Please hold my hand.
And as, in fact, I have zero shims in front of the RHS hinge, who is it that makes offset hinges for precisely that reason - I know I've seen them but I can't remember where ? Or is our fellow-contributor's Cut-And-TIG a better approach, seeing as how I've only got one to address ?
And lastly, how tight a gap do people aim for at the back of the bonnet ?
I was aiming for the same 4.50 - 5.50mm that I have on the LHS, or should I be aiming for tighter ?
Big Bonnet = Big Number Of Postings.
My bonnet gaps were excellent when the bare shell came back from Hutsons, I can't remember exactly what measurement they were, but they were regular.
Now that the car is complete and loaded up with the engine etc, and the return springs, they've shifted slightly and I'm reassured to see that this is not an uncommon phenomenon.
Even if I see too that it is a contested one .........
But with so much new metal (sills, scuttle etc and all bonnet structures in perfect nick) in my shell I do not believe (Ed - want to believe) that it is a sign of an overly-weak structure, just a slightly springy one.
Those are my gaps as things stand.
My questions are :
Is the adjustment with the shims a pretty "objective " exercise, as in - you change a thickness here, and it reduces/increases the gap there - predictably ?
On the face of it, if I "just" remove 2.50mm in front of the front RHS hinge, I ought to get the vertical gap on the RHS down to 5.50mm ; in practice, is this pie in the sky ?
I'm aware that this also has a crabbing effect on the opposite side of the bonnet.
Please hold my hand.
And as, in fact, I have zero shims in front of the RHS hinge, who is it that makes offset hinges for precisely that reason - I know I've seen them but I can't remember where ? Or is our fellow-contributor's Cut-And-TIG a better approach, seeing as how I've only got one to address ?
And lastly, how tight a gap do people aim for at the back of the bonnet ?
I was aiming for the same 4.50 - 5.50mm that I have on the LHS, or should I be aiming for tighter ?
Rory
3.8 OTS S1 Opalescent Silver Grey - built May 28th 1962
3.8 OTS S1 Opalescent Silver Grey - built May 28th 1962
| Link: | |
| BBcode: | |
| HTML: | |
| Hide post links |


#44 Re: Series 1 bonnet fitting
Here you go http://classicjaguar.com/parts-2/regula ... ion-parts/
I have used them on my 67 OTS, good quality and helped solved my miss alignment issues. As with most things E-Type it was an iterative process to get the spacing just right. I thought removing the same size spacer would result in an equal reduction in clearance, it didn't. Your results may vary. I found it necessary to loosen the return spring bolts while adjusting also. Your adjustment looks to fore and aft so it may be easier. You will need lots of spacers and careful measurement to maintain your up down positioning with the CJ hinges. It can be done !
Cheers !
I have used them on my 67 OTS, good quality and helped solved my miss alignment issues. As with most things E-Type it was an iterative process to get the spacing just right. I thought removing the same size spacer would result in an equal reduction in clearance, it didn't. Your results may vary. I found it necessary to loosen the return spring bolts while adjusting also. Your adjustment looks to fore and aft so it may be easier. You will need lots of spacers and careful measurement to maintain your up down positioning with the CJ hinges. It can be done !
Cheers !
1967 S1.25 OTS, 1952 MG TD
| Link: | |
| BBcode: | |
| HTML: | |
| Hide post links |
-
Gfhug
- Posts: 3856
- Joined: Thu Jun 19, 2014 3:08 pm
- Location: Near Andover, Hampshire,in D.O. Blighty
#45 Re: Series 1 bonnet fitting
Similar to Keith, I found it an iterative process to get the same gaps all round. Though that was for an S2 with the strut not the springs of the S1, but can't see why it shouldn't be the same. As for gaps. What do you have on the doors? Are you trying for the same gap? I've generally aimed for around 3-4 mm for both doors and bonnet.
Good luck
Geoff
Good luck
Geoff
S2 FHC Light Blue
S2 OTS LHD - RHD full restoration
S2 OTS LHD - RHD full restoration
| Link: | |
| BBcode: | |
| HTML: | |
| Hide post links |
#46 Re: Series 1 bonnet fitting
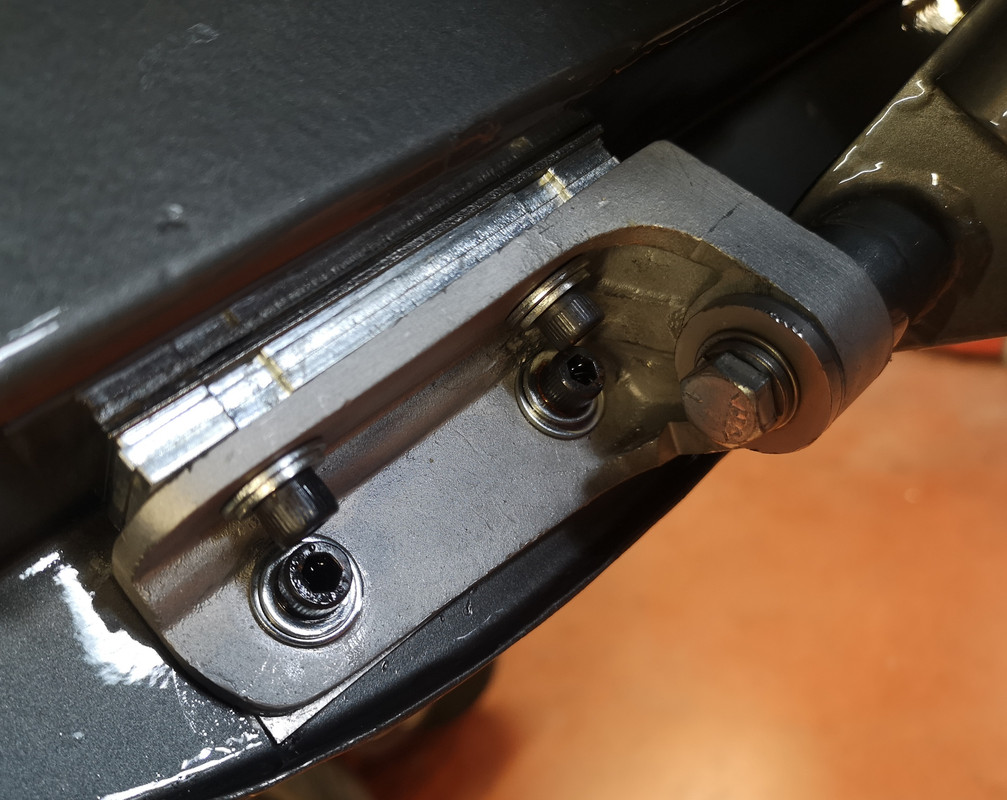
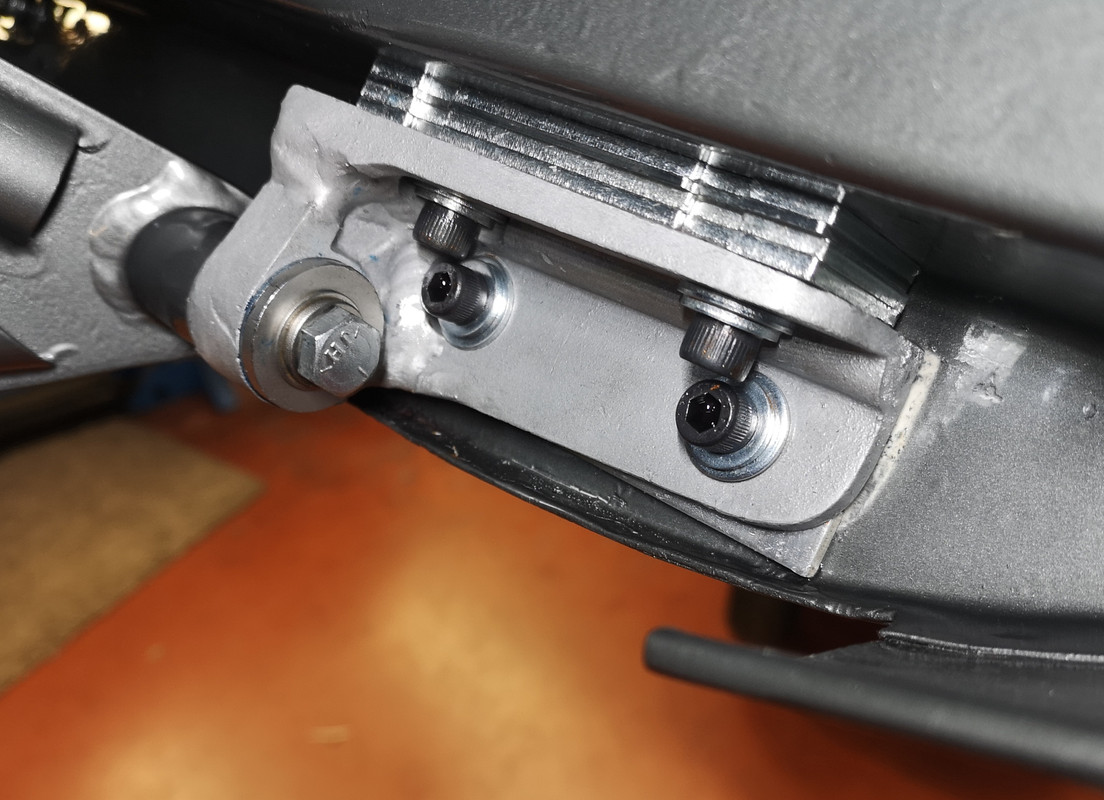
I thought I'd update with this and show what modifying an existing hinge entails, encouraged by member Keith Brown whose posts inspired me to go down that route.
As I actually only needed to move one hinge (the RHS) in one direction, having no shims to remove to get the bonnet backwards, I opted not to go for the "modified" hinges that I initially considered, as I would have ended up with some quite massive piles of shims in the vertical plane.
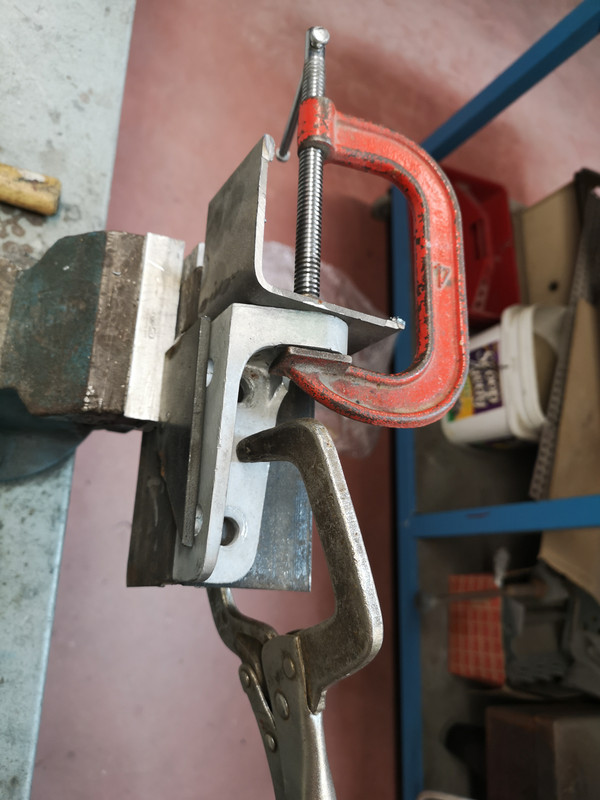
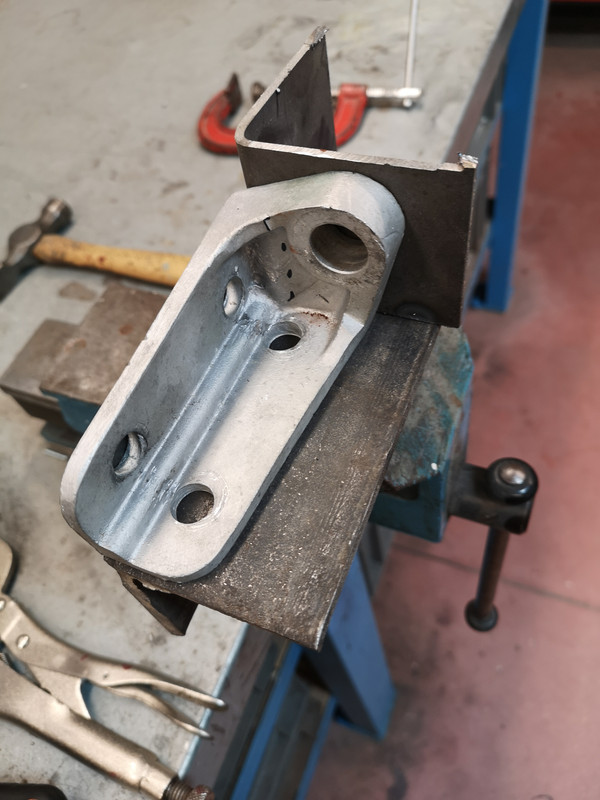
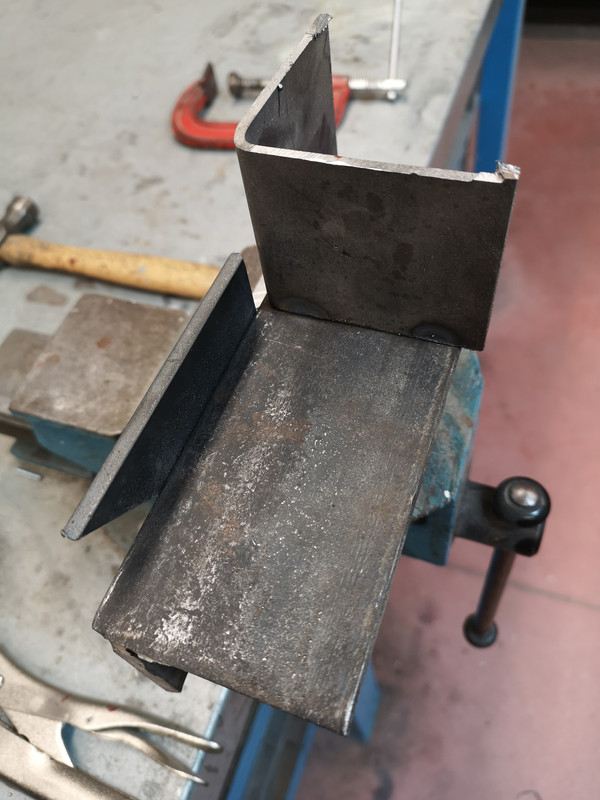
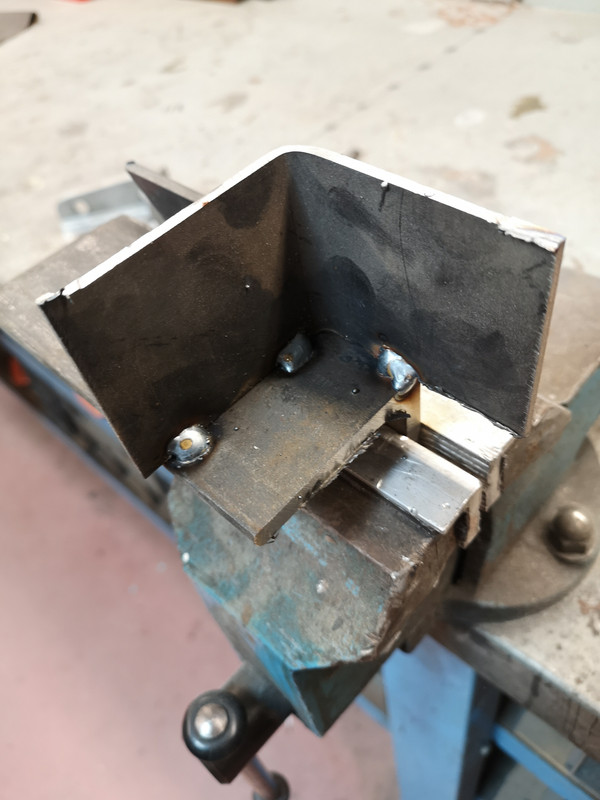
The first suggestion I would make would be to mark the hinge with a felt pen ON THE CAR what modification is called for, as it would be very easy to lose your bearings doing what follows - and find you'd done it in the wrong place.
The pictures show a rudimentary jug knocked up from scrap, with a couple of M6 bolts in the critical areas so that the parts can be reassembled square and true.
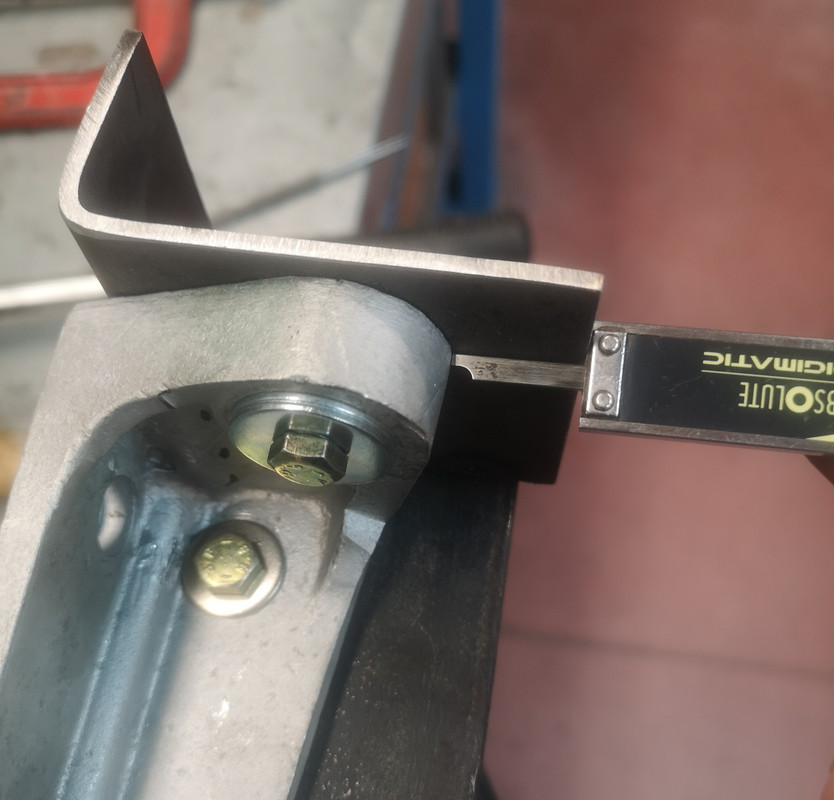
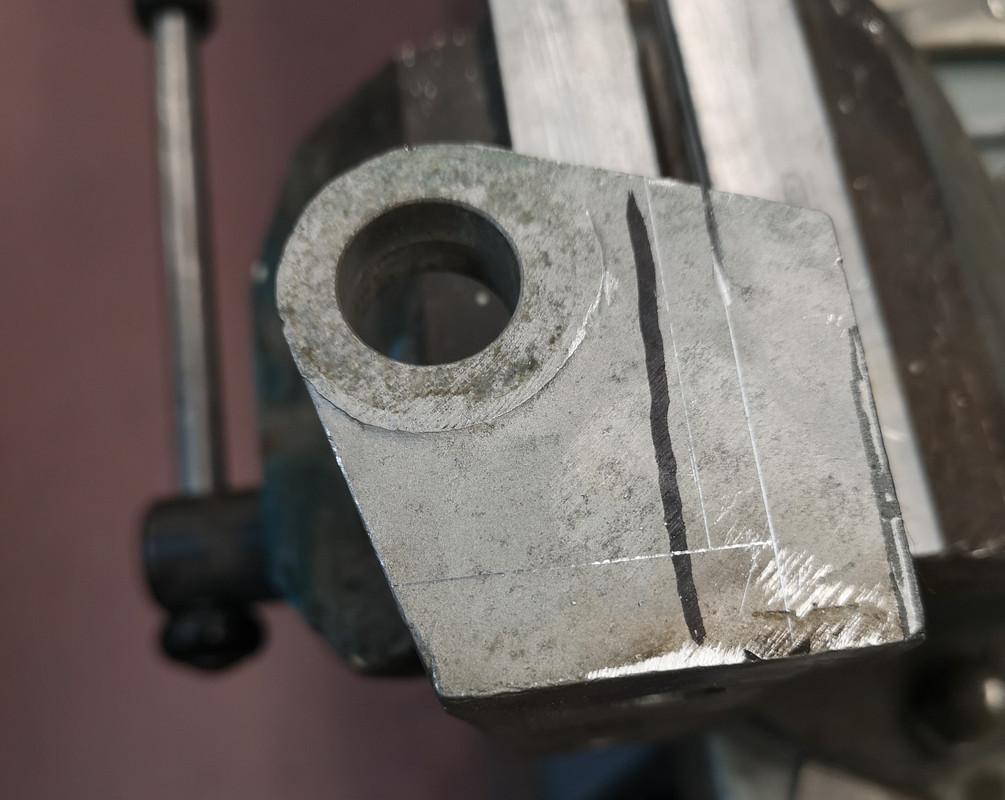
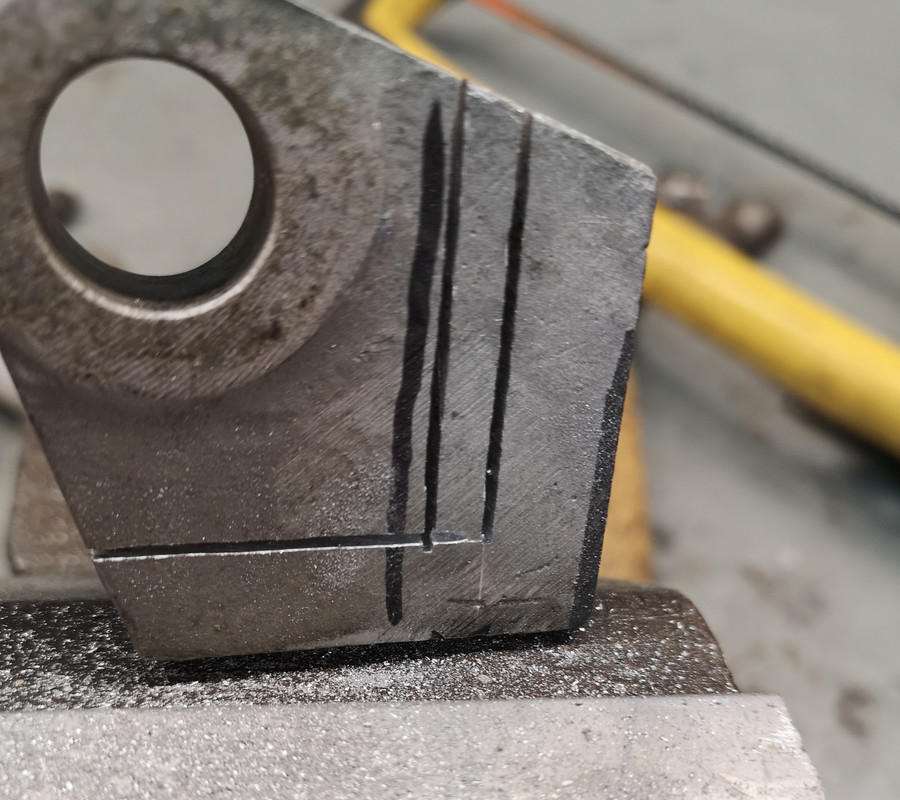
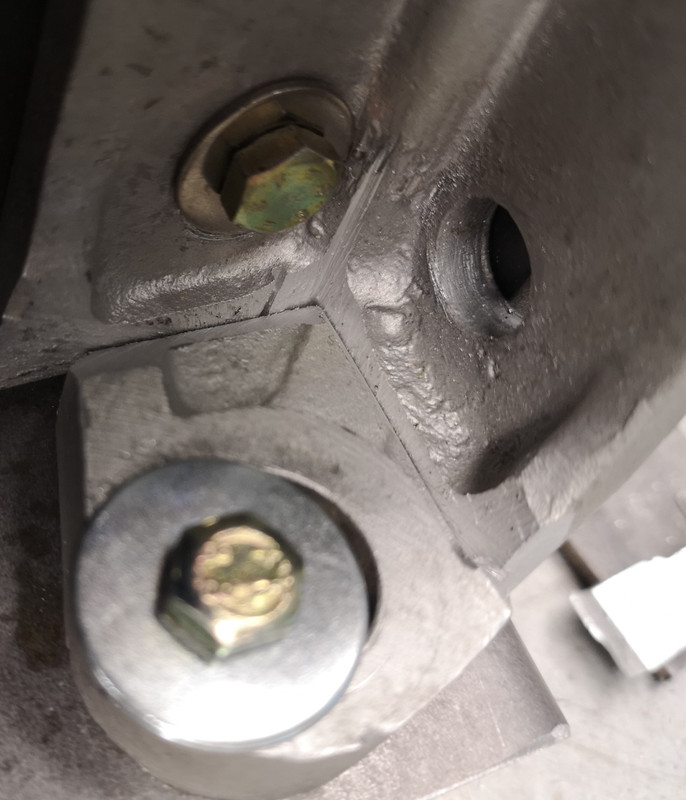
I needed to move about 4.50mm so cut out about 7.00mm so that I would still have a shim to play with.
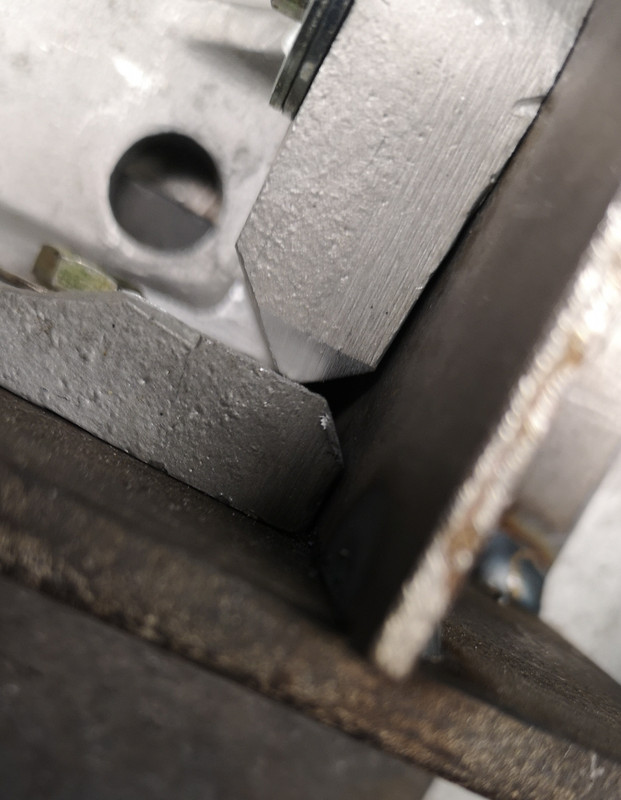
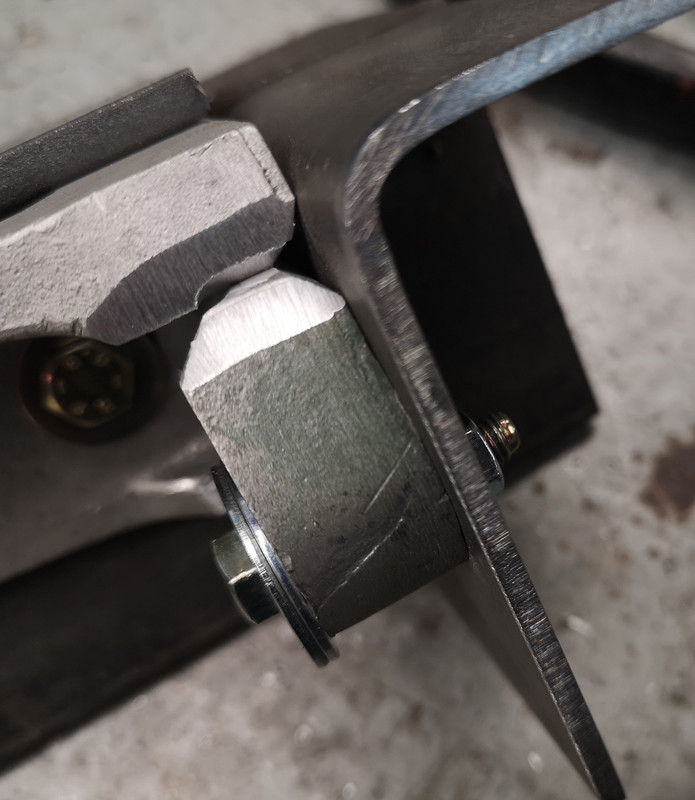
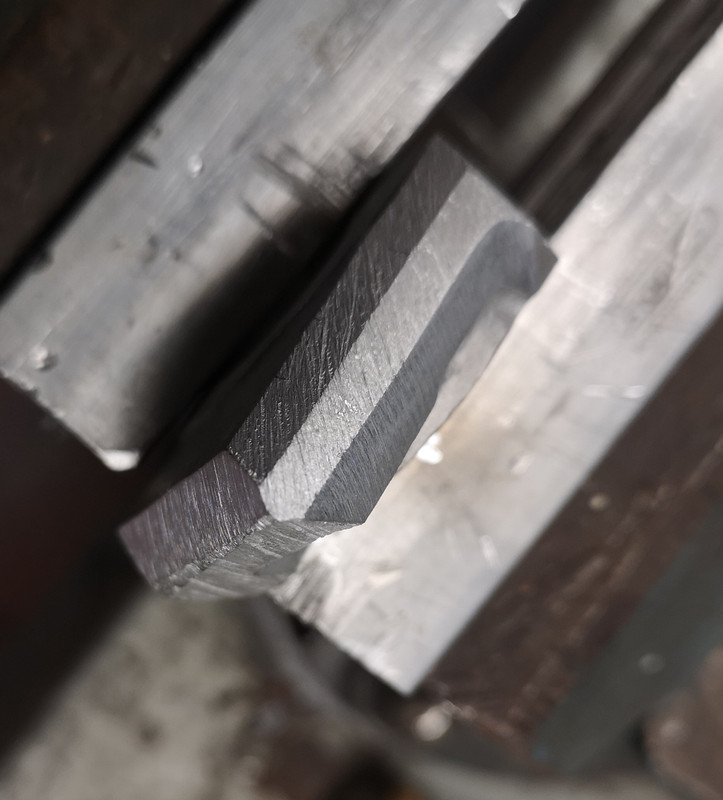
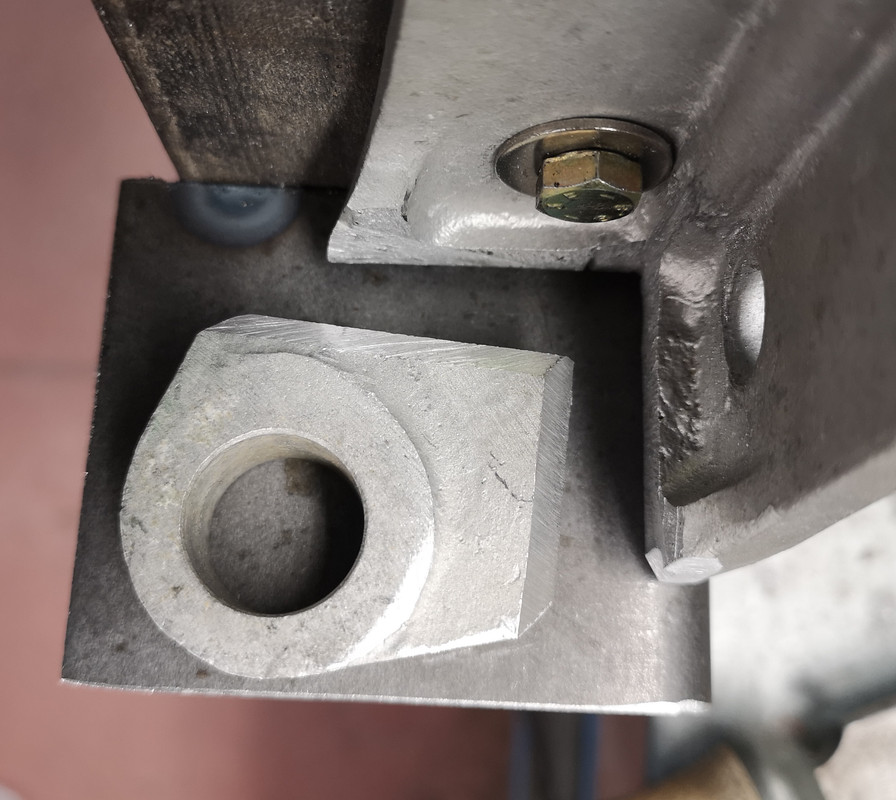
The penetrative requirements for the weld led me to make quite severe bevels on all the welding seams, and Yvan the welder was very pleased as the finished seams needed no dressing, just a quick bead-blast to clean everything up.
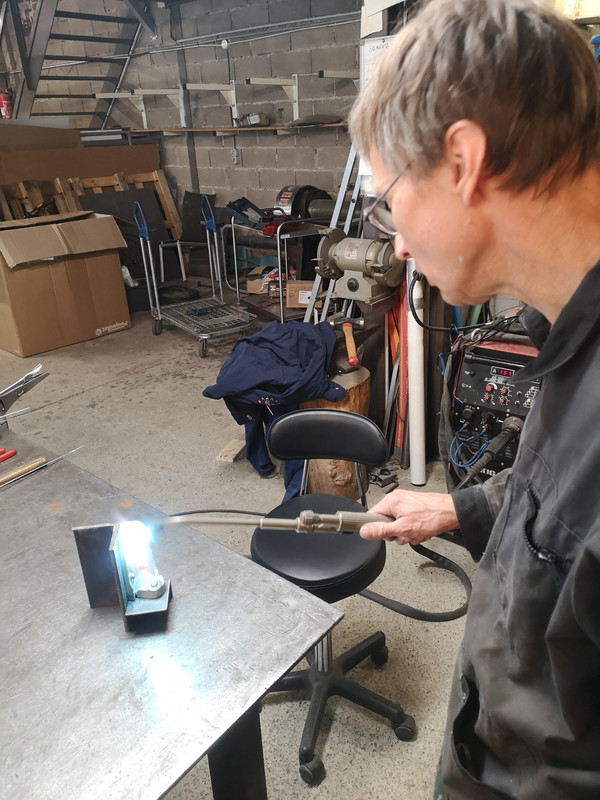
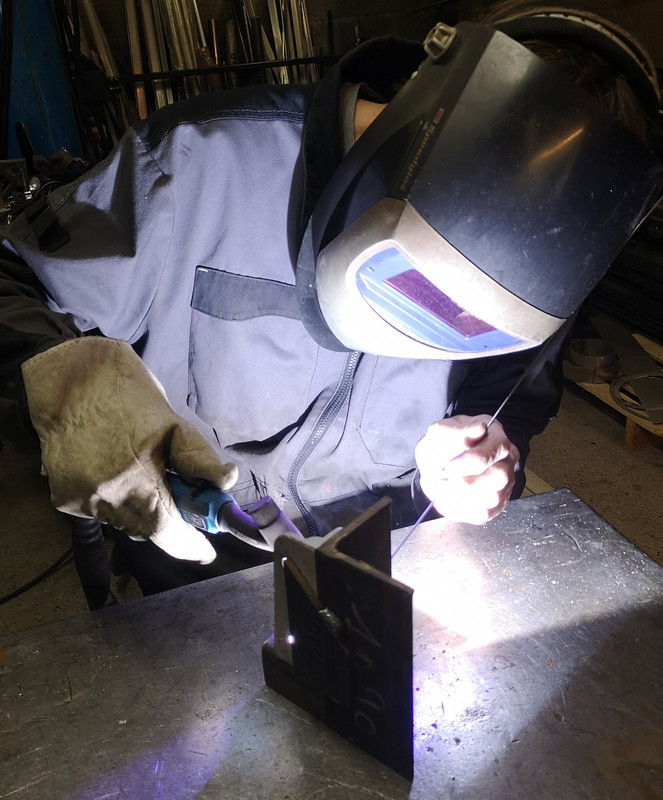
Pre-heating the job with oxy-acetylene apparently makes for a much better weld-pool.
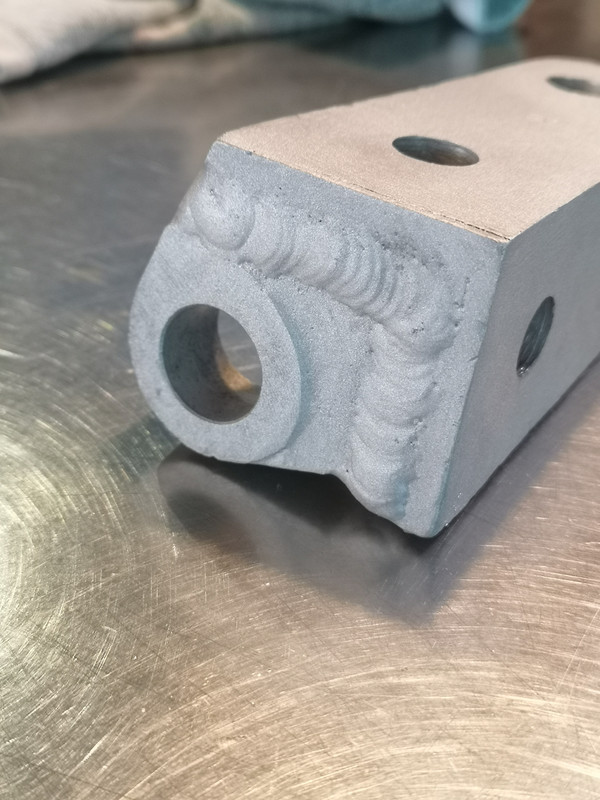
I then ran a 20mm end-mill down to clean up the seatings.
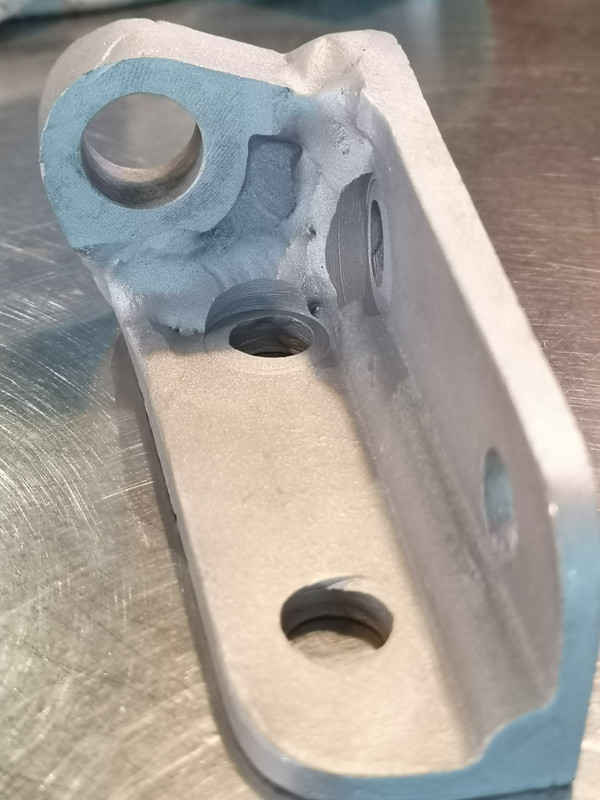
The panel-gap adjustments were, like others implied, iterative rather than absolute ; and the effects of the lateral alignment at the REAR of the bonnet shouldn't be underestimated - the hinges are about 90cm apart, and the rear of the bonnet about 1m30 behind, so at 90/130 you get about 1.40mm of sideways shift at the back for every 2mm you correct at the front.
As is customary with the E-Type, all sorts of other issues can rear their ugly head too.
I had long been convinced that the bodywork that had been done on my car in the UK was slightly rushed through the workshop, and that in truth - amongst a couple of other things - my bonnet actually needed another 8 mm or so adding to the back edge, and the wheel-arch geometry tweaking to suit ; I would have happily paid for this, and tried to infuse the job with that spirit, but space was needed for another job and ..........
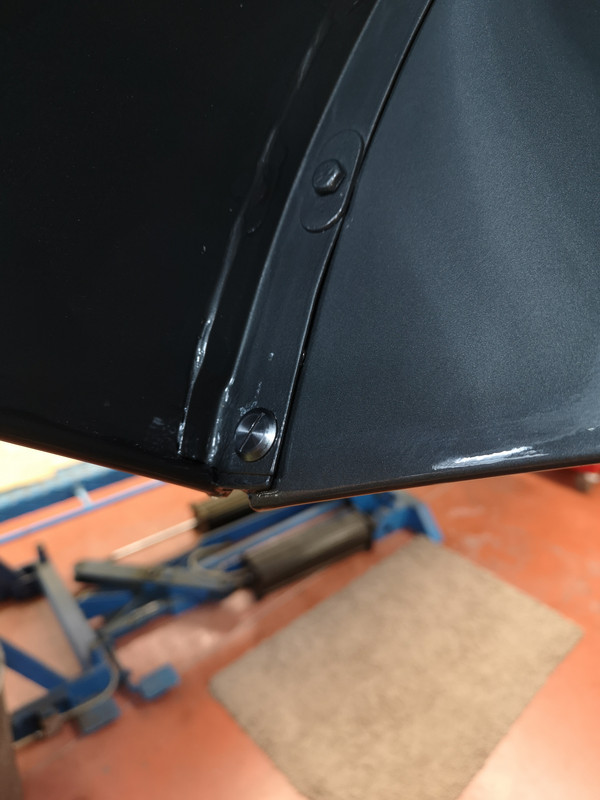
What this has meant is that there is virtually NO space between the valence / mud-guard that's fastened to the front frames, and the corresponding baffle that comes down with the bonnet to form a seal.
As you can see, my rubber seals are almost token in depth, and had to be carefully cut to do their job - no floppy lip to find its own alignment.
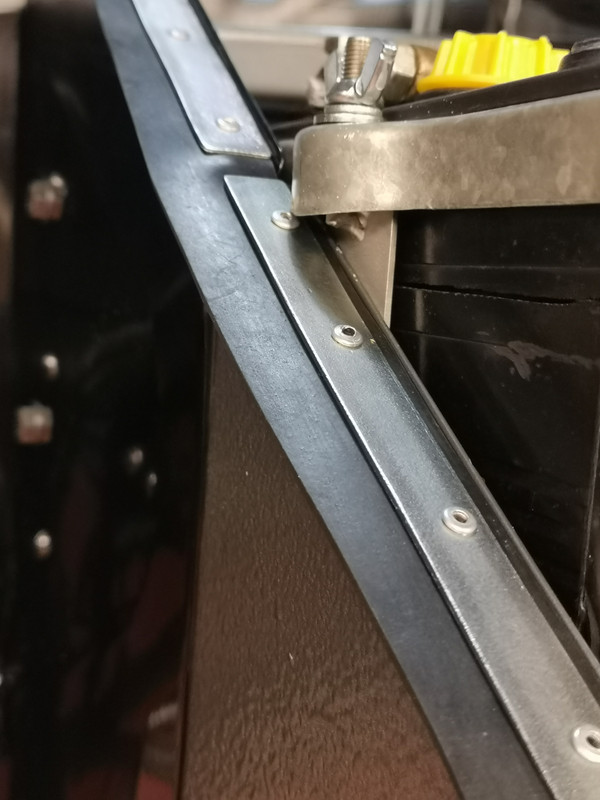
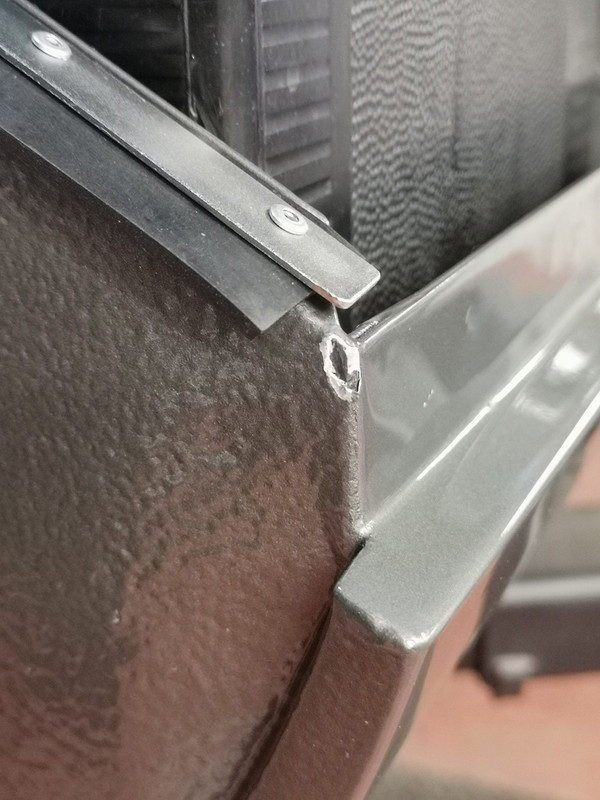
Indeed, the lowest bolt on the bonnet actually struck the front end of the sill (see the paint chip) and it required me to modify a pan-head SS screw to make sure there was no contact at this point.
So altogether rather frustrating.
I have learned that even the most reputable of specialists, many much-lauded in these pages, including by myself, do NOT always have your best interests at heart.
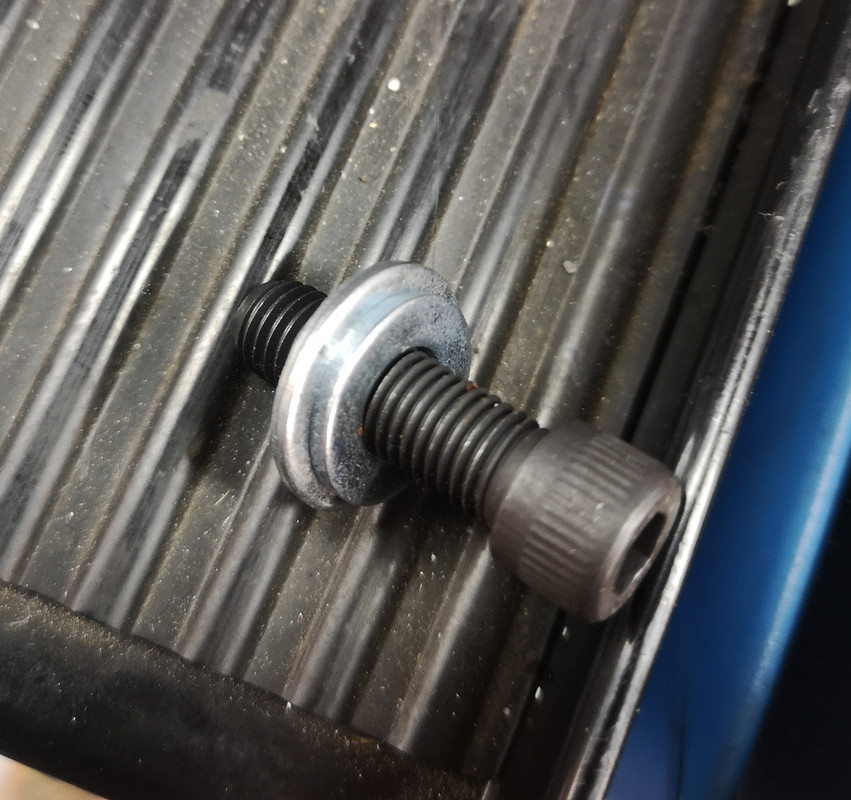
Regarding the hinge bolts, these have to be one of the most frustrating and pointlessly-complicated features of the car ; the idea will have looked great on paper, and I'm sure the job-sheet of interferences and spanner-access requirements will have been respected to the letter by the draughtsman, BUT ......... in practice they are the ultimate PITA for any mechanic.
In theory you can pull the axes of the two sets of fastenings sufficiently far apart to get reasonable access to the heads, what with all the slop in the captive nuts, the oversize holes etc.
But in practice ?
You only have to look at the chewing up of bolt-heads in these areas on other E-Types to understand that it's a problem - and yet, at the last count, I had a choice of no fewer than thirteen different 1/2" AF different spanners/sockets etc to do a job like this.
So I make no apologies for using Unbrako allen-headed bolts here, as they 1. mean that you don't chew stuff up, 2. they enable you to get 2 washers under their heads to cope with the oversize holes in the hinges, and 3. you can get a proper torque when you tighten them up, rather than have to modulate your enthusiasm to cope with what the hex-spanner-bolt combination will take.
I'll get some plated ones to not stand out quite so badly.
The upside is that the panel-gaps eventually came out quite well.
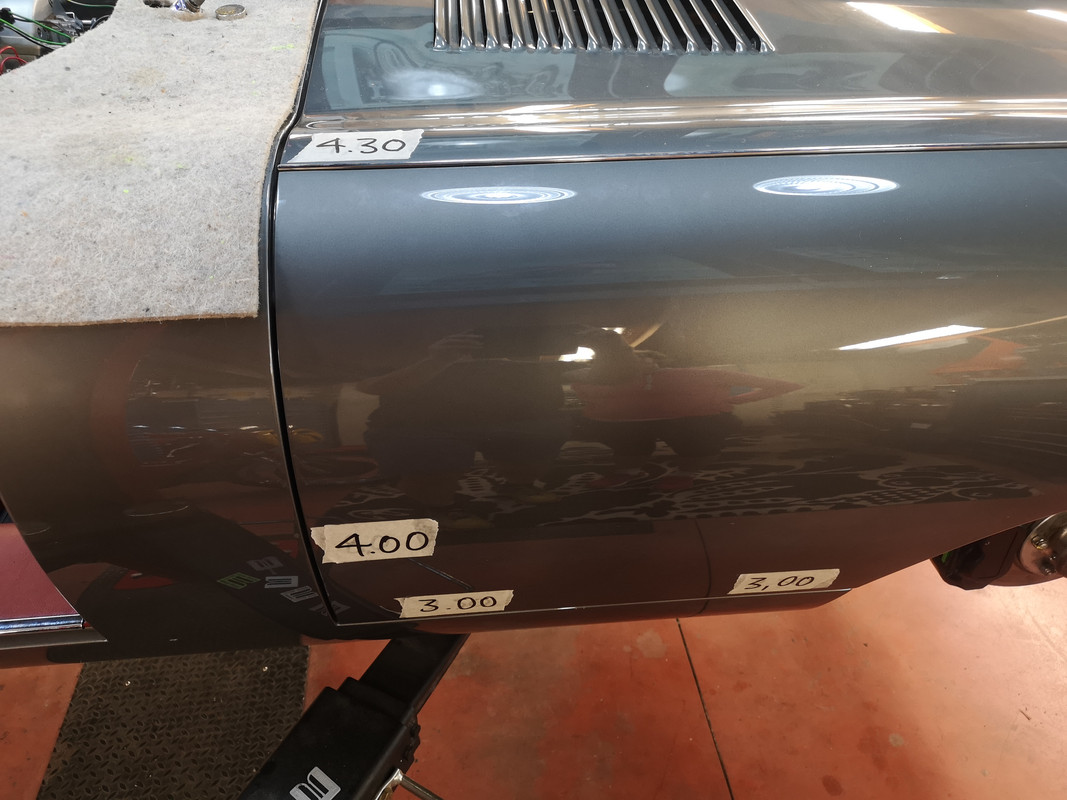
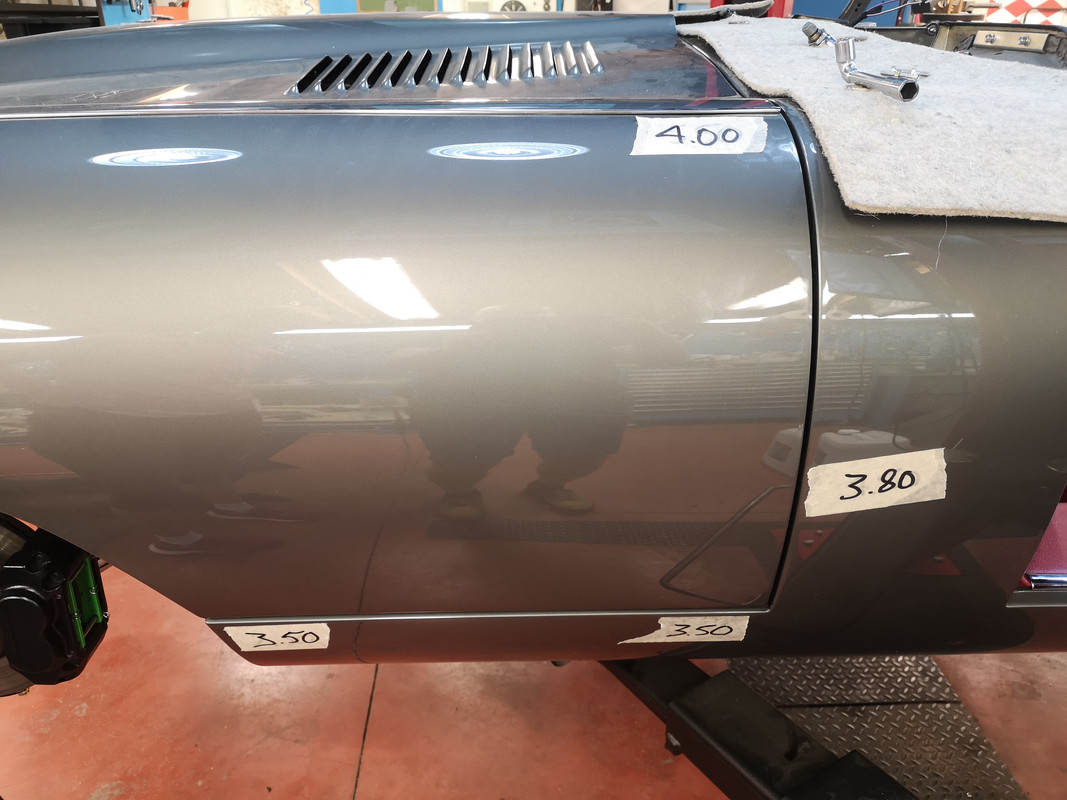
All I have to do now is replicate the same thing with the doors
As I actually only needed to move one hinge (the RHS) in one direction, having no shims to remove to get the bonnet backwards, I opted not to go for the "modified" hinges that I initially considered, as I would have ended up with some quite massive piles of shims in the vertical plane.
The first suggestion I would make would be to mark the hinge with a felt pen ON THE CAR what modification is called for, as it would be very easy to lose your bearings doing what follows - and find you'd done it in the wrong place.
The pictures show a rudimentary jug knocked up from scrap, with a couple of M6 bolts in the critical areas so that the parts can be reassembled square and true.
I needed to move about 4.50mm so cut out about 7.00mm so that I would still have a shim to play with.
The penetrative requirements for the weld led me to make quite severe bevels on all the welding seams, and Yvan the welder was very pleased as the finished seams needed no dressing, just a quick bead-blast to clean everything up.
Pre-heating the job with oxy-acetylene apparently makes for a much better weld-pool.
I then ran a 20mm end-mill down to clean up the seatings.
The panel-gap adjustments were, like others implied, iterative rather than absolute ; and the effects of the lateral alignment at the REAR of the bonnet shouldn't be underestimated - the hinges are about 90cm apart, and the rear of the bonnet about 1m30 behind, so at 90/130 you get about 1.40mm of sideways shift at the back for every 2mm you correct at the front.
As is customary with the E-Type, all sorts of other issues can rear their ugly head too.
I had long been convinced that the bodywork that had been done on my car in the UK was slightly rushed through the workshop, and that in truth - amongst a couple of other things - my bonnet actually needed another 8 mm or so adding to the back edge, and the wheel-arch geometry tweaking to suit ; I would have happily paid for this, and tried to infuse the job with that spirit, but space was needed for another job and ..........
What this has meant is that there is virtually NO space between the valence / mud-guard that's fastened to the front frames, and the corresponding baffle that comes down with the bonnet to form a seal.
As you can see, my rubber seals are almost token in depth, and had to be carefully cut to do their job - no floppy lip to find its own alignment.
Indeed, the lowest bolt on the bonnet actually struck the front end of the sill (see the paint chip) and it required me to modify a pan-head SS screw to make sure there was no contact at this point.
So altogether rather frustrating.
I have learned that even the most reputable of specialists, many much-lauded in these pages, including by myself, do NOT always have your best interests at heart.
Regarding the hinge bolts, these have to be one of the most frustrating and pointlessly-complicated features of the car ; the idea will have looked great on paper, and I'm sure the job-sheet of interferences and spanner-access requirements will have been respected to the letter by the draughtsman, BUT ......... in practice they are the ultimate PITA for any mechanic.
In theory you can pull the axes of the two sets of fastenings sufficiently far apart to get reasonable access to the heads, what with all the slop in the captive nuts, the oversize holes etc.
But in practice ?
You only have to look at the chewing up of bolt-heads in these areas on other E-Types to understand that it's a problem - and yet, at the last count, I had a choice of no fewer than thirteen different 1/2" AF different spanners/sockets etc to do a job like this.
So I make no apologies for using Unbrako allen-headed bolts here, as they 1. mean that you don't chew stuff up, 2. they enable you to get 2 washers under their heads to cope with the oversize holes in the hinges, and 3. you can get a proper torque when you tighten them up, rather than have to modulate your enthusiasm to cope with what the hex-spanner-bolt combination will take.
I'll get some plated ones to not stand out quite so badly.
The upside is that the panel-gaps eventually came out quite well.
All I have to do now is replicate the same thing with the doors
Rory
3.8 OTS S1 Opalescent Silver Grey - built May 28th 1962
3.8 OTS S1 Opalescent Silver Grey - built May 28th 1962
| Link: | |
| BBcode: | |
| HTML: | |
| Hide post links |


#47 Re: Series 1 bonnet fitting
I feel your pain, had the same problem. I think the problem lies in flexing of the hinge panel as per a previous poster.
Randall Botha
'64 3.8 fhc & '51 Mk 7 (now sold), previously 3.8 S-type x2, 2.4 Mk 1, XJ6 S1.
'64 3.8 fhc & '51 Mk 7 (now sold), previously 3.8 S-type x2, 2.4 Mk 1, XJ6 S1.
| Link: | |
| BBcode: | |
| HTML: | |
| Hide post links |
#48 Re: Series 1 bonnet fitting
Refer to post by Eddie Nov '23, I think this is very relevant.
Randall Botha
'64 3.8 fhc & '51 Mk 7 (now sold), previously 3.8 S-type x2, 2.4 Mk 1, XJ6 S1.
'64 3.8 fhc & '51 Mk 7 (now sold), previously 3.8 S-type x2, 2.4 Mk 1, XJ6 S1.
| Link: | |
| BBcode: | |
| HTML: | |
| Hide post links |