Gearbox

Technical advice Q&A

angelw
Posts: 634
Joined: Sat Feb 16, 2013 8:27 pm
Location: Ballarat, Vic, Australia
Australia

#21 Re: Gearbox

Post by angelw » Sun Feb 13, 2022 8:09 pm

Harald Wrote:
9: fine, but after 16mm forward movement it will foul countershaft.
I cant see that countershaft can be moved more out of the way, and looks very much like drawing in service manual.

10: Is rear bearing supposed to be removed when mainshaft is only moved 16mm forward? Is it a loose fit?

And just to be sure, reverse lever pulled rearward / reverse disengaged?
Hello Harald,
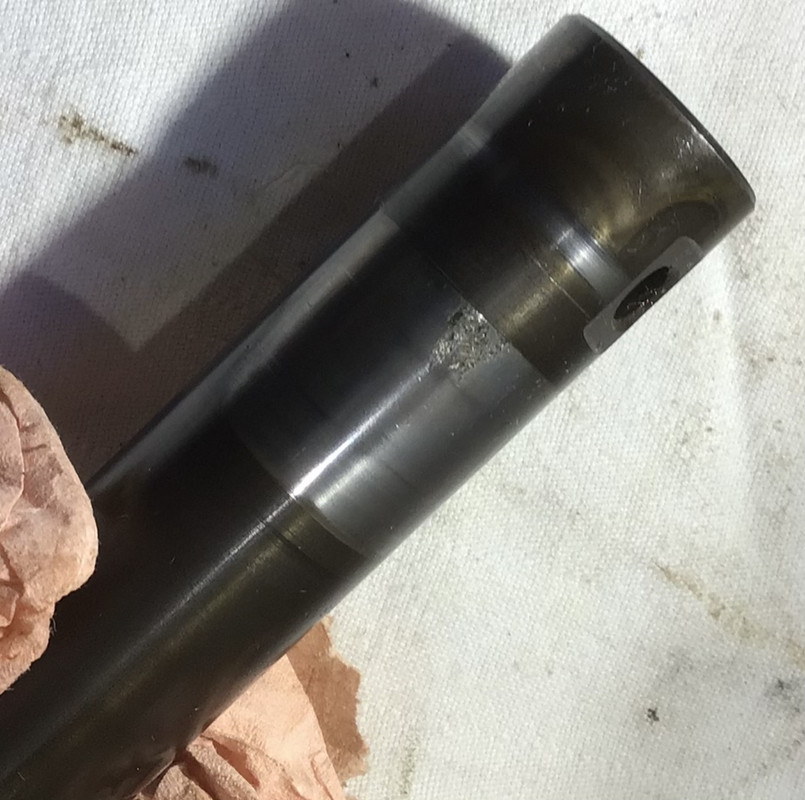
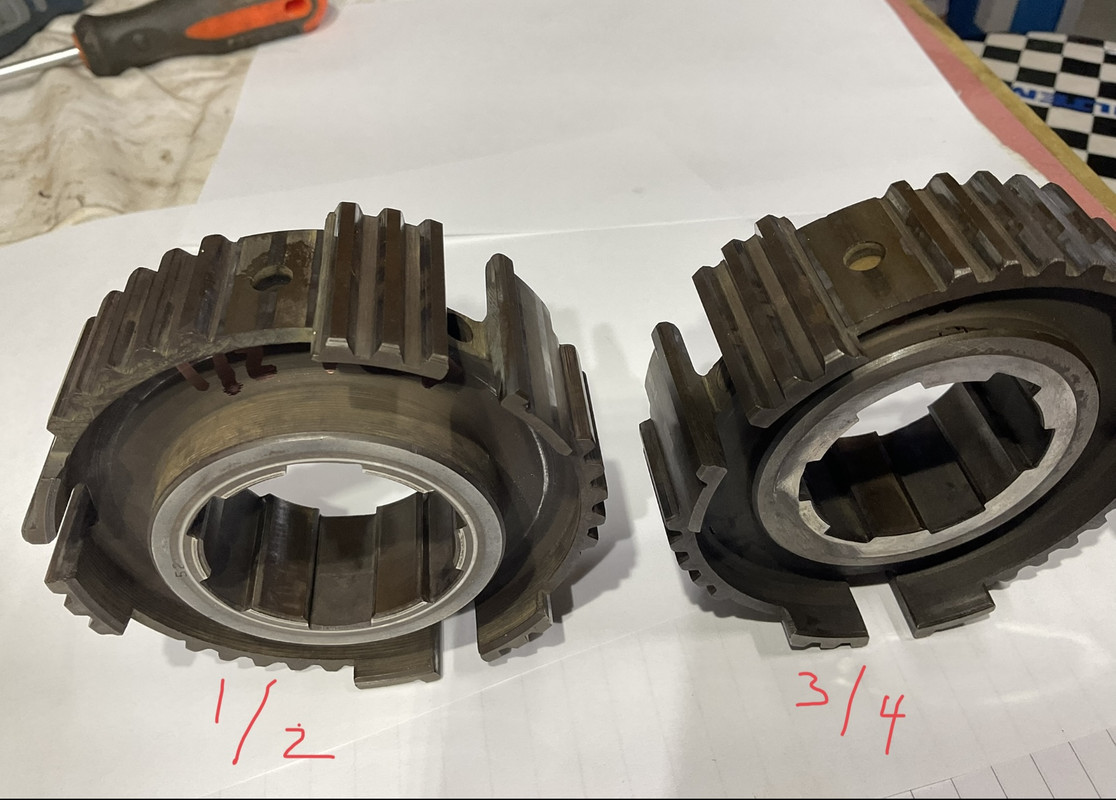
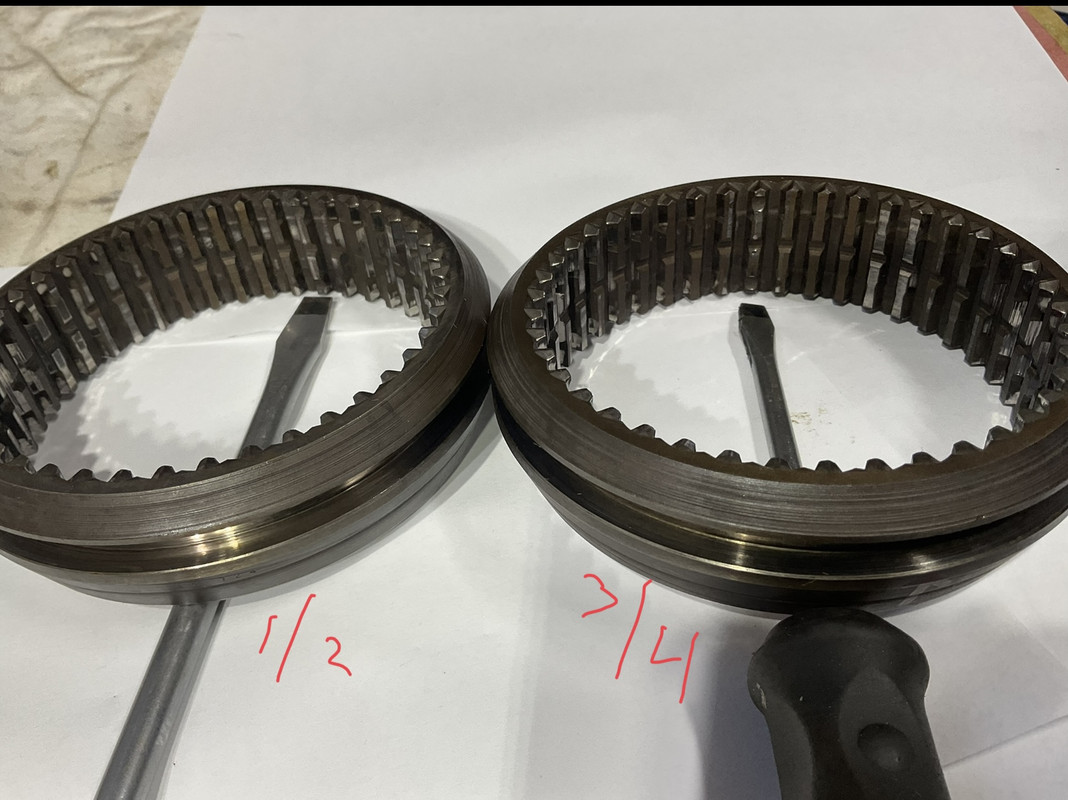
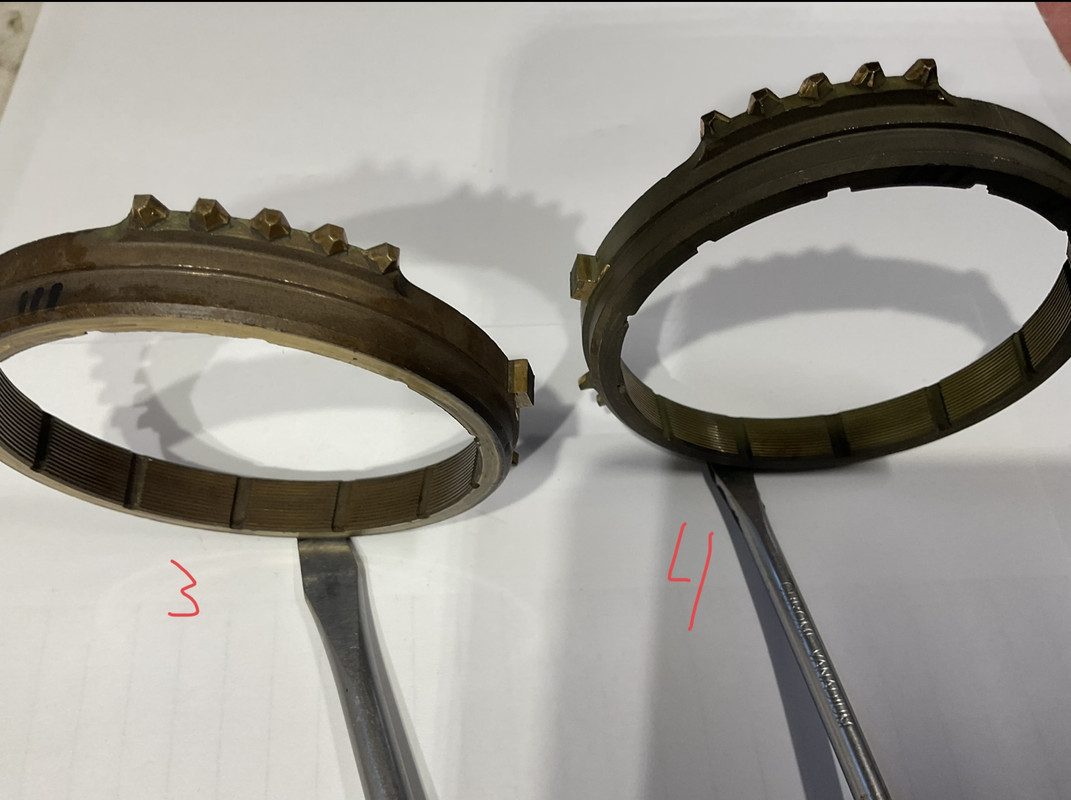
Its hard to see from your picture if you have the cutout of the 3rd/4th synchro in the correct position to not foul with the Lay CLuster. Its a case of moving the Main Shaft Assembly forward relative to the rear bearing. The rear bearing must be removed to be able to remove the Main Shaft Assembly from the Gearbox Housing.

Once you have removed the Rear Bearing, as per the book, secure a hose clamp on the Main Shaft, just to the rear of Reverse Gear, with Reverse Gear pushed forward, snug up against the other assembled parts of the Main Shaft. If you don't get Reverse Gear as far forward on the Main Shaft as possible, you will struggle to remove the assembly out through the top of the Gearbox Housing.

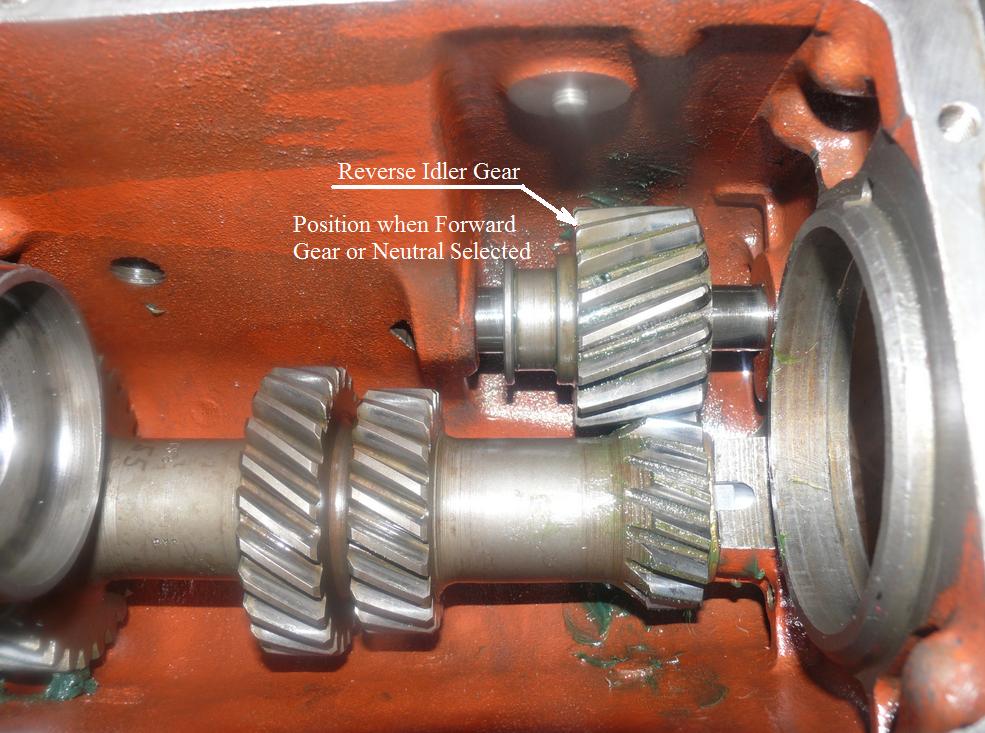
The Reverse Idler Gear normally doesn't present much of a problem. If its in mesh with the Reverse Gear, Reverse Gear will simply slide axially through the Reverse Idler gear. However, by moving the Reverse Gear Selector Lever to the rear will move the Reverse Idler Gear forward out of the way.

When you removed the Lay Shaft and allowed the Lay Shaft Cluster to drop to the bottom of the Gearbox Housing, did you ensure that the Rear Thrust Washer fell the correct way? If not, Reverse Gear may foul with it and wont allow Reverse Gear to be kept pushed up in contact with the remainder of the Main Shaft Assembly.

Regards,

Bill

Link:
BBcode:
HTML:
Hide post links
Show post links

User avatar

lowact
Posts: 627
Joined: Mon Oct 09, 2017 10:05 am
Location: Canberra, Australia
Contact:
Australia

#22 Re: Gearbox

Post by lowact » Sun Feb 13, 2022 10:37 pm

angelw wrote:
Sun Feb 13, 2022 8:09 pm
When you removed the Lay Shaft and allowed the Lay Shaft Cluster to drop to the bottom of the Gearbox Housing, did you ensure that the Rear Thrust Washer fell the correct way? If not, Reverse Gear may foul with it and wont allow Reverse Gear to be kept pushed up in contact with the remainder of the Main Shaft Assembly.
Critical requirment. And if yr banging and shaking has caused this washer to fall the other way, to in front of the reverse gear, sounds like it has, gotta correct this before proceeding. If u don't it will require at least a 12 tonne press and lots of luck to enable the reverse gear teeth to shear thru this 4mm thick brass spacer/thrust washer ...
Regards,
ColinL
'72 OTS manual V12

Link:
BBcode:
HTML:
Hide post links
Show post links

User avatar

lowact
Posts: 627
Joined: Mon Oct 09, 2017 10:05 am
Location: Canberra, Australia
Contact:
Australia

#23 Re: Gearbox

Post by lowact » Sat Feb 19, 2022 6:03 am

And if you are renewing the clutch plate, with the gearbox apart there is opportunity to use the input shaft to centre the new clutch plate, otherwise juggling the gbox from underneath to line up with the clutch plate on the tilted twisted engine could be quite difficult ...
Regards,
ColinL
'72 OTS manual V12

Link:
BBcode:
HTML:
Hide post links
Show post links

User avatar

Topic author
Norton
Posts: 71
Joined: Tue Oct 15, 2019 5:51 pm
Location: Norway
Norway

#24 Re: Gearbox

Post by Norton » Sun Feb 20, 2022 1:20 pm

Hi.
Figured it out, dissaemmbled! Knocked mainshaft forward and removed aft bearing, then it all came out.

But about half of layshaft needle roller bearings fell out and got mixed. Understand they might be graded. Started to measure them with micrometer. Seems like the aft needles are marginally larger diameter. Haven’t measured all but a selection measures 2.93 mm ( some 2.935 ) Forward 2.925 +/-. What could be the difference between rollers supposed to be identical? And between one grade and another? Theese roller pins have ofcourse done long service, and are worn.

Reverse shaft / gears not out yet.

Thanks Harald.

Link:
BBcode:
HTML:
Hide post links
Show post links

User avatar

lowact
Posts: 627
Joined: Mon Oct 09, 2017 10:05 am
Location: Canberra, Australia
Contact:
Australia

#25 Re: Gearbox

Post by lowact » Tue Feb 22, 2022 3:41 am

Been there, done that. Hard to avoid without pre-planning and special dummy shaft.

Spare parts manual list the different sizes, with a micrometer it should be easy to tell what each roller is closest to, wear should be negligible. Mine were all almost spot-on. Note differences are 0.0001" (edited, not mm, thx Bill).

Reassembly requires a dummy shaft to prevent the rollers falling out when installing the lay gear. Here is my dummy shaft, two lengths of 25 mm OD tube that are a close sliding fit over an inner 22 mm OD tube.
Image
The longer 25 mm tube is shorter than the length of the lay gear, just long enough to cover enough of the rollers that they cannot full out when the lay gear, with this section of dummy shaft inserted, is preinstalled into the bottom of the gearbox, when the main shaft is being installed and when the layshaft is then lifted, engaged, held by inserting the 22 mm tube, which is long enough to extend all of the way through the gearbox including the thrust washers.

The shorter 25 mm tube has two functions, it is used to stop the longer tube sliding out of the lay gear when the 22 mm tube is being inserted. Then, when all 3 parts of the dummy shaft are inserted, it is holding the thrust washers in position so that the laygear end float can be accurately measured.

Measuring the end float will tell you which thickness of thrust washer C1862 you need. Getting this end float right can be the difference between a sweet box and a rough box. Don’t just settle for the washer you’ve got. If you can fit a thicker washer while still maintaining the minimum end float – imo you should do it.
Last edited by lowact on Tue Feb 22, 2022 10:57 pm, edited 3 times in total.
Regards,
ColinL
'72 OTS manual V12

Link:
BBcode:
HTML:
Hide post links
Show post links


angelw
Posts: 634
Joined: Sat Feb 16, 2013 8:27 pm
Location: Ballarat, Vic, Australia
Australia

#26 Re: Gearbox

Post by angelw » Tue Feb 22, 2022 9:53 am

Colin Wrote:
Spare parts manual list the different sizes, with a micrometer it should be easy to tell what each roller is closest to, wear should be negligible. Mine were all almost spot-on. Note differences are 0.0001 mm.
Hello Colin,
My parts book, an original, period manual, show the basic size of the roller in mm and the tolerance in imperial units; an unusual method, but I believe that was the intent and not a typo, as 0.1μm (0.0000039") is a very small tolerance and only reliably measurable in a temperature controlled environment with better measuring equipment than is available in most workshops. Anyone that say they can measure a difference of 0.1μm with a micrometer commonly found in a workshop, hasn't measured many parts with a micrometer.

The tolerance spread from the very smallest to the very largest, across the three sizes is actually 0.0003" (0.0076mm), with a tolerance spread in each range of 0.0001" (0.0025mm). There is only one size needle roller available for use with the Lay Shaft and Cluster, that being a nominal size of 3.0mm; the recipient, or end user have to do the grading and a shite load of needle rollers would have to processed to get the required number for each range.

Small tolerances are difficult to achieve and drive the price of the part up accordingly. However, small tolerances on components such as needle rollers are achieved by grading, rather than trying to hit a particular size for the component currently being made. Gauge Blocks AKA Johansson Blocks, for example, are ground and lapped to a target size, then selected on the basis of sorting by measurement; they are so flat that they can be rung together to hold as if by magnetism (they are not magnetic). Bearing balls and rollers are also graded to achieve certain tolerance ranges.

Regards,

Bill
Last edited by angelw on Tue Feb 22, 2022 5:49 pm, edited 3 times in total.

Link:
BBcode:
HTML:
Hide post links
Show post links


angelw
Posts: 634
Joined: Sat Feb 16, 2013 8:27 pm
Location: Ballarat, Vic, Australia
Australia

#27 Re: Gearbox

Post by angelw » Tue Feb 22, 2022 10:27 am

Harald Wrote:
Haven’t measured all but a selection measures 2.93 mm ( some 2.935 ) Forward 2.925 +/-. What could be the difference between rollers supposed to be identical? And between one grade and another? Theese roller pins have ofcourse done long service, and are worn.
Hello Harald,
These rollers are well below the smallest roller specified (bottom tolerance size of the smallest specified).

When you get to measuring the End Float of the Lay Cluster assembly, the repair manual describes measuring the End Float of the Lay Cluster with Feeler Gauges. An easier (in my opinion) and more accurate method is with a Lever Dial Indicator, if you have one available. With only the Lay Shaft, Lay Cluster (complete with needle rollers) and the two Thrust Washers (of thickness that will result in measurable End Float) assembled in the Gearbox Housing, place either end of the Gearbox Housing on a surface so that the Lay Shaft and Cluster are in the vertical plane. In this arrangement, gravity is your friend in achieving one extreme of the End Float. At this point, arrange the dial indicator to indicate on a flat surface of the side face of any gear and Zero the dial indicator. With a suitable lever, raise the Gear Cluster to the other extreme of the End Float and note the reading of the dial indicator. Subtract the dial indicator reading from the required End Float and that will be the difference in the Thrust Washer thickness you need.

When doing the final install of the Lay Shaft, there are better methods than described in the repair manual. Rather than having the Gearbox Housing top side up and have to lift the Lay Cluster assembly, the method I use is to invert the Gearbox housing, placing it on two length of timber, thick enough to provide clearance for the Reverse Gear Selector Lever with the surface you're working on. In this arrangement, gravity is working with you and the maximum vertical misalignment between the bore of the Lay Cluster and the Lay Shaft Cluster bore in the Gearbox Housing is the clearance between the Lay Cluster Gears and the Gears of the Main Shaft (a few thou inches). Misalignment in the horizontal plane can be corrected by hand rotating any gear on the Main Shaft to drive the Lay Cluster into position.

In the repair manual for the S3 cars, the method describes replacing the Lay Cluster Dummy shaft with a smaller diameter rod, using it to lever the assembly up into position; I can't think of a worse method. In the repair manuals for earlier cars, the method described used two lengths of cord passing beneath the Lay Cluster Gear, used to lift the Lay Cluster into position. Although not as good a method as the inverted Gearbox Housing method I use, its far better than using a rod as a lever through the Lay Shaft bore in the Gearbox Housing; accordingly, a big backward step in the evolution of repair method.
Regards,

Bill

Link:
BBcode:
HTML:
Hide post links
Show post links

User avatar

Topic author
Norton
Posts: 71
Joined: Tue Oct 15, 2019 5:51 pm
Location: Norway
Norway

#28 Re: Gearbox

Post by Norton » Wed Feb 23, 2022 1:14 pm

Hi, thank you all got a lot of good tips on how to procede!
Clearified a lot! Checked spare manual and service manuals.
Big question now, what do I replace my needle pins with? Spare suppliers ( sng barrat / sc spares ++ ) I have cheked don’t supply anything but «basic» neddles. I assume theese are nominal size 3 mm. My needles are definite smaller measured with basic handheld micrometer, 2,925 - 2.950. I am aware of limitations measuring such small differences, but I’m sure they have somewhat smaller dia.
Will it be ok to replace with 3mm sizes?
Or will it be better to use the ones I have?

Next will be revese gear / shaft.

And needle roller bearings on the mainshaft. Understand spare manual also list three different sizes, but «one size only per unit»

Thanks Harald.

Link:
BBcode:
HTML:
Hide post links
Show post links

User avatar

lowact
Posts: 627
Joined: Mon Oct 09, 2017 10:05 am
Location: Canberra, Australia
Contact:
Australia

#29 Re: Gearbox

Post by lowact » Wed Feb 23, 2022 2:44 pm

Weird that they are so small (3 thou under), I'd be wanting to understand why, normally it is the shaft that wears, not the rollers, what is the layshaft like? If any doubt remaining, I would be buying new rollers ...

With the mainshaft rollers, they can be different sizes under different gears, you don't want to mix them up or lose track of which ones go where, i would disassemble in a tray/container so none can escape ...
Regards,
ColinL
'72 OTS manual V12

Link:
BBcode:
HTML:
Hide post links
Show post links


angelw
Posts: 634
Joined: Sat Feb 16, 2013 8:27 pm
Location: Ballarat, Vic, Australia
Australia

#30 Re: Gearbox

Post by angelw » Wed Feb 23, 2022 4:39 pm

Harald Wrote:
My needles are definite smaller measured with basic handheld micrometer, 2,925 - 2.950. I am aware of limitations measuring such small differences, but I’m sure they have somewhat smaller dia.
Hello Harald,
They won't have worn 0.003"; accordingly, I would be checking the zero of your micrometer. It's reasonably easy to measure within 1/2 the smallest increment of the micrometer being used, so with a typical 0.01mm micrometer, 0.005mm is plausible.

I would be surprised if the Lay Shaft doesn't need replacing. Typically, it will be worn at the Reverse/First Gear end of the shaft. The size of the replacement shaft will have a bearing (excuse the pun) on the size rollers to use. As I stated in an earlier Post, you will only be able to source the one, nominal size, 3mm needle roller.

Typically, most of the noise from the Gearbox is caused by the Reverse Idler Gear. This is the rumble heard when the engine is running, Neutral is selected and the Clutch engaged (foot off the Clutch Pedal). I check this by installing just the First Motion Shaft, the Lay Cluster and Reverse Idler assembly (as shown in the following pictures), then running the assembled gears up to speed.


Image


Image

Noise is typically heard when the Reverse Idler Gear is in the Forward Position (Forward Gear or Neutral selection) and disappears when in the Reverse Gear engagement position.

I manufacture Reverse Idler Gear shafts using more appropriate material and heat treatment than the original.

Image

Regards,

Bill

Link:
BBcode:
HTML:
Hide post links
Show post links

User avatar

Topic author
Norton
Posts: 71
Joined: Tue Oct 15, 2019 5:51 pm
Location: Norway
Norway

#31 Re: Gearbox

Post by Norton » Sun Feb 27, 2022 9:10 pm

Hi. Thanks for loads of good advice.
Checked my micrometer, zeroes within .005 mm, also same on a new 1/4 inch roller, 6.35mm and same on a 25mm «check rod» that came with the micrometer. So my needles are definitely quite undersize. But I was too preoccupied with the needles. Checking my layshaft, bad condition. Very worn with a distinct wear ridge. And with surface «cracks» on bearing surfaces both ends ( photo 2, 3 ). Could it be possible theese «cracks» could grind down the needles? Definitely need a new, and with only 3mm needles avaiable it may be exiting.

Reassembled layshft with existing bearings and thrustwashers. Found endfloat of .30mm, used a dial gage. Manual says .10 - .15mm. I need thrust washer that are .15 - .20mm thicker.

Reverse idler gear and shaft is also out. Shaft doesn’t look as worn as pictures by Bill earlier in this thread. But hard to tell from a picture, it will be wise to replace now. ( photo 1 )
The rumbling noise I described earlier ( heard at standstill idling, clutch pedal out ), I think it might as well come from very worn layshaft in my box?

Next, selector hub assemblies. Gear lever were moving forward / backwards accellerating / decellerating in third. Probably worn parts somewere. No «crunching» when shifting.

Rgds Harald.
Image

Image

Image

Link:
BBcode:
HTML:
Hide post links
Show post links


angelw
Posts: 634
Joined: Sat Feb 16, 2013 8:27 pm
Location: Ballarat, Vic, Australia
Australia

#32 Re: Gearbox

Post by angelw » Mon Feb 28, 2022 8:14 am

Harald Wrote:
The rumbling noise I described earlier ( heard at standstill idling, clutch pedal out ), I think it might as well come from very worn layshaft in my box?

Next, selector hub assemblies. Gear lever were moving forward / backwards accellerating / decellerating in third. Probably worn parts somewere. No «crunching» when shifting.
Hello Harald,
Assemble the First Motion Shaft, Lay Cluster, plus the Reverse Idler Shaft and Gear as shown in my earlier Post.
1. Get a short piece of flexible hose that is a firm fit on the spigot journal of the First Motion Shaft and secure it in place with a small hose clamp.

2. Insert a short length of 1/2" rod in the other end of the hose, leaving circa 1" protruding from the hose and secure with a small hose clamp.

3. Hold the exposed end of the 1/2" rod in the chuck of an electric pistol drill and drive the Reverse Idler Gear via the First Motion Shaft and Lay Cluster, using the drill.

4. Move the Reverse Idler Gear between the position it would be in for engaging Reverse Gear and when in Neutral or a Forward Gear. Note if there is a change of sound when running the gear in the two locations. This will determine if the Reverse Idler Gear is contributing to the noise of the gearbox.

It is false economy to not replace a component that has clear signs of wear. With the engine and gearbox out of the car and the gearbox dismantled, much time and effort has been expended. If you find that there is still an issue once the engine and gearbox are reinstalled in the car, or an issue soon develops down the track that ultimately is traced back to a worn part that you decided not to replace, I suspect you won't be well pleased.

Regards,

Bill

Link:
BBcode:
HTML:
Hide post links
Show post links

User avatar

Topic author
Norton
Posts: 71
Joined: Tue Oct 15, 2019 5:51 pm
Location: Norway
Norway

#33 Re: Gearbox

Post by Norton » Tue Mar 01, 2022 8:01 pm

Thanks again.
Understand your test set up. But I do intend to replace both reverseshaft and layshaft, would not be wise not to, at this point. I was kind of suggesting that my worn layshaft could be rumbling.
Checked with SngBarrat and they only have the nominal size 3mm rollers. And have not found anything else other places either. Have to start with that and take it from there. Anyone know of supplier of «graded» needle rollers?

Not progressed to mainshaft / synchrohubs but its in near furture!
Very much apreciate help I have had from this forum. Makes life easier and avioding mistakes!

Rgds Harald.

Link:
BBcode:
HTML:
Hide post links
Show post links


angelw
Posts: 634
Joined: Sat Feb 16, 2013 8:27 pm
Location: Ballarat, Vic, Australia
Australia

#34 Re: Gearbox

Post by angelw » Tue Mar 01, 2022 8:20 pm

Harald Wrote:
I was kind of suggesting that my worn layshaft could be rumbling.
Checked with SngBarrat and they only have the nominal size 3mm rollers. And have not found anything else other places either. Have to start with that and take it from there. Anyone know of supplier of «graded» needle rollers?
Hello Harald,
As I wrote in an earlier Post, 3mm is all you will be able to find anywhere; there isn't any manufacturer making these in toleranced grades for Off the Shelf sale. However, no mechanical part is made that has a Zero deviation from the basic size; everything that is made is made to a tolerance and with accurate enough measuring equipment and the right environment, tiny tolerances will be measured. Accordingly, if you were to purchase a large number of the basic 3.0mm needle rollers, you would be able to grade them to satisfy perhaps two of the tolerance grades but I doubt that you would find a total spread of 0.0003"

It's the Reverse Idler Gear that is responsible for most of the "rumble" you refer to, not so much the Reverse Idler Gear and Lay shafts.

Regards,

Bill

Link:
BBcode:
HTML:
Hide post links
Show post links

User avatar

Topic author
Norton
Posts: 71
Joined: Tue Oct 15, 2019 5:51 pm
Location: Norway
Norway

#35 Re: Gearbox

Post by Norton » Wed Mar 02, 2022 10:02 pm

Hello.
Reread every post. As I understand it, its the reverse gears that cause the rumble. In other words, the rumble remains even if I replace the reverse gear shaft?

Bill, I sent you a PM about shaft.

Rgds Harald.

Link:
BBcode:
HTML:
Hide post links
Show post links

User avatar

Topic author
Norton
Posts: 71
Joined: Tue Oct 15, 2019 5:51 pm
Location: Norway
Norway

#36 Re: Gearbox

Post by Norton » Wed Nov 09, 2022 11:45 pm

Hi again.
-73 series 3.
The OD gearbox from a 420G saloon have been working fine. And original box have rested in peace in pieces all summer. But I have now taken most of it apart. Earlier in this thread I got a lot of good advice.
This gearbox had noises which have been discussed.

And gear stick moved forward when accellerating and rearward when decellerating. Have some sugestion that it might be worn synchro hubs. The syncro hubs, synchro rings & operating sleeves are dismanteled, but how can I determine wether they are good / worn / worn out? What to look for?
The box was shifting just fine, no crunches / teeth counting.
The hubs looks good to me, same with sleeves. There are some wear on synchro rings «teeth». But enough to cause any symptoms? I think ring for first is showing most wear.
Also some wear on selector forks.

See pictures, hopefully good enough.

Rgds Harald.
Image

Image

Image

Image

Link:
BBcode:
HTML:
Hide post links
Show post links

Post Reply Previous topicNext topic