


Member Scot Thompson has written a comprehensive set of instructions with the aid of Dick Maury on setting hub shims correctly. I have added it to the Forum KB but here is a direct link to download it: https://www.dropbox.com/s/qla9pv1ahawjv ... s.pdf?dl=0
Alternatively you can read it on the Dick Maury GeorgiaJag web site or on J-L:
http://www.georgiajag.com/Documents/Set ... 0Shims.pdf
https://www.jag-lovers.com/the-maury-me ... b-spacers/
Setting Hub Shims
-
 Heuer
Heuer
Topic author - Administrator
- Posts: 14766
- Joined: Sat Mar 01, 2008 5:29 pm
- Location: Nottinghamshire

#1 Setting Hub Shims
David Jones
S1 OTS OSB; S1 FHC ODB
1997 Porsche 911 Guards Red
Add your E-Type to our World Map: http://forum.etypeuk.com/viewtopic.php?f=1&t=1810
S1 OTS OSB; S1 FHC ODB
1997 Porsche 911 Guards Red
Add your E-Type to our World Map: http://forum.etypeuk.com/viewtopic.php?f=1&t=1810
| Link: | |
| BBcode: | |
| HTML: | |
| Hide post links |

#2 Re: Setting Hub Shims
I have followed Scot,s rear hub set up thread on JL and fully read the above write up on setting the Hub/shims........having set up many rear hubs i now have some experience of doing the job and i understand the procedure as described in the Jaguar service manual and in Scot/Dick write up.........The Jag spec in the manual calls for end float.....however there are many that now suggest that preload is better for taper bearings.....I actually set any that i do with pre load....but its personal choice............I do see a potential problem with the Scot/Dick method.....as its all done by "feel" with no measuring as per the Jag manual.......the difference between endfloat and preload is only 0.002in.....very difficult to detect by "feel".....I have no doubt that Dick can set these by "feel" as he has some 40 plus years of Jag experience ......I would recommend that anyone without experience read both the Jag manual and the Scot/Dick article to fully understand what the process is....as a minimum if following the Scott/Dick method then at least check with a dial gauge after completion...this will show if you have any endfloat but will not be able to measure how much preload.........Steve
Steve
69 S2 2+2 (just sold) ..Realm C type replica, 1960 xk150fhc
69 S2 2+2 (just sold) ..Realm C type replica, 1960 xk150fhc
| Link: | |
| BBcode: | |
| HTML: | |
| Hide post links |

#3 Re: Setting Hub Shims
Hello Steve,
I concur with your comments completely.
Dick's method is carried out with the outer seal installed and therefore, you have to be careful that the drag of the seal is not mistaken for pre-load. There is no concise description of what the correct setting should feel like and how much allowance for the feel of the seal should be made. Feel is very subjective.
Nothing beats a Dial Indicator when setting up bearings in End Float and for those setting up the rear wheel bearings on a regular basis and wanting to set the bearings in Preload, simple comparison with the torque required to rotate the hub and the adjustment amount required to go from End Float, measured with a Dial Indicator, to the desired Preload, will give accurate guidance.
For the DIY person, doing this job for the first time, I doubt using feel alone is a good recommendation, particularly when there are inexpensive tools available to measure End Float and Preload.
With regards to setting the Front Wheel Bearings, I don't think Dick actually got it that the standard system can't be set at close to Zero through to Preload, without taking some step to lock the bearings on the axle. If this is not done, the bearings are guaranteed to spin on the axle; even when set with the End Float specified by Jaguar, there is always evidence of at least the Inner Bearing having spun on the axle on disassembly.
Regards,
Bill
| Link: | |
| BBcode: | |
| HTML: | |
| Hide post links |

#4 Re: Setting Hub Shims
I do agree with both Steve and Bill as to using a dial indicator to check the setup. That is an excellent suggestion and absolutely no reason not to do so in my opinion. This method Dick uses is not a substitute or a replacement for Jaguar's method. It is an alternative and perhaps not for everybody. And, it is certainly accurate that Dick is very experienced with his technique. So everyone needs to bear that in mind in judging whether this method is for you. Jaguar's method provides a consistent, repeatable and accurate method to find the correct Spacer. Dick's method is suitable to those with skills and experience as a mechanic.
When setting Inner Bearing there are several parts of the process. One is to first fit the Inner Bearing quite tightly for the purpose of assuring the grease is squished out so the "drag" due to grease will be in its final state. And then to knock the Hub Carrier upwards so as to not have the Inner Bearing seated very tightly and feel the effort required to turn it: this is then the "drag" due to the Outer Seal and the grease. I found it quite easy to sense that: it turns smoothly but is not free floating. With that baseline feel established, commence with tapping the Inner Bearing down to a point where there is no wobble noticeable by "rocking" the Hub Carrier relative to the Hub and then a bit more to a point where the bearings feel right. Yes, this is a subjective point.
At this point, the wheel bearing is set. It has the right amount of drag or Pre-Load. Personally I did not find this a difficult process and it was very akin to setting the many normal wheel bearings I've done over the years. No relative motion between the Hub Carrier and the Hub means zero End-Float. You will have created either zero End-Float or some Pre-Load. Do you know precisely how much Pre-Load? No. Nor does any mechanic when a normal wheel bearing is set by turning the nut in until resistance is felt and then backing off some amount (a flat, or to fit the cotter pin, or to what feels right - many methods are used) that all mechanics have learned to do - not too tight, not too loose. Except...this is easier than normal wheel bearings because the Inner Bearing stays put when you set it. Note that there is no need to pull the Splined Spindle out multiple times using Jaguars Special Tool.
Having done this (one time!) I think it would be quite possible to find the zero End-Float condition by gently tapping the Inner Bearing down to just the point that all wobble disappears. However, this is not what Dick does. He continues to tap gently until the bearings have more resistance to turning than that caused by the Outer Seal to a point that satisfies him. Experience? Yes. Still, if one were to stop at the point of zero End-Float and then proceed to the part of the process of fitting the spacer, it should be achievable to find the Spacer that is perfect for the zero End-Float condition and then replace that Spacer with one THINNER by 0.002" or 0.001" and thereby creating a known Pre-Load.
My main purpose in writing the article is to contribute to the Jaguar community about the Hub. My way of giving back and paying it forward. I found the description very poorly addressed in the manual, notwithstanding the errors. I received many comments that just confused the issue. I came to believe most members did not understand correctly the geometric relationships in the Hub/Hub Carrier/Spindle. Even though they were able to achieve a satisfactory bearing set. For example, many believe that if you tighten the big nut on the end of the spindle, the bearings get pulled together. That is not so. Only the Spacer determines the bearings set. Tightening that big nut only tightens that big nut! The drawings I created should help with understanding the relationships within the Hub/Hub Carrier/Spindle. That was my main goal and not to convince members to forgo Jaguar's direction in lieu of "better" method.
Last edited by Scottie on Mon Nov 14, 2022 12:41 pm, edited 1 time in total.
| Link: | |
| BBcode: | |
| HTML: | |
| Hide post links |
-
Gfhug
- Posts: 3308
- Joined: Thu Jun 19, 2014 3:08 pm
- Location: Near Andover, Hampshire,in D.O. Blighty
#5 Re: Setting Hub Shims
This is such an excellent example of the value of this forum. Thank you Scot, David, Steve and Bill for your comments and contributions. For us lesser mortals to have a comprehensive description of how to tackle a job most of us will only do once, maybe twice, is a great help and support.

Geoff
Geoff
S2 FHC Light Blue
S2 OTS LHD - RHD full restoration
S2 OTS LHD - RHD full restoration
| Link: | |
| BBcode: | |
| HTML: | |
| Hide post links |
#6 Re: Setting Hub Shims
Scottie Wrote:
Perhaps a Freudian slip on your part, but for the benefit for those that take what is written in these Forums as Gospel, replacing the Test Spacer with a 0.001" to 0.002" Thicker Spacer will do absolutely nothing in the short term and over time, the bearing will probably get smacked back to a 0.001" to 0.002" End Float. The reason being, is that the Bearing has been pressed on to the point of Zero End Float and by using a spacer that is thicker than the Test Spacer will simply create a gap between the end face of the bearing and the Pull Up Face of the Half Shaft. Result; no immediate change and End Float over time.
Getting a baseline feel of the drag of the seal, stays with even the most experienced right up to when that feel changes with preload kicking in. I used to rebuild precision spindles of CNC machine tools. Most of the bearings used are Angular Contact Ball Race Bearings, arranged Back to Back, or Front to Front with the Preload built into the offset of the faces. With systems where the preload is set via shims, one fellow that had been building these spindles forever, sets the preload via feel. When he told me what he did, I put to him the challenge of getting the preload setting of a spindle I had in work, the same at least twice, within a reasonable tolerance, in six assemblies. He never got within a Bull's Roar of the correct setting, or of the same setting twice.
I reiterate, when there are inexpensive tools available to test both End Float and Pre-load, that takes all subjectivity out of the equation, I don't see much of an argument for not using them.
Regards,
Bill
Hello Scottie,it should be achievable to find the Spacer that is perfect for the zero End-Float condition and then replace that Spacer with one thicker by 0.002" or 0.001" and thereby creating a known Pre-Load. It is not rocket science.
Perhaps a Freudian slip on your part, but for the benefit for those that take what is written in these Forums as Gospel, replacing the Test Spacer with a 0.001" to 0.002" Thicker Spacer will do absolutely nothing in the short term and over time, the bearing will probably get smacked back to a 0.001" to 0.002" End Float. The reason being, is that the Bearing has been pressed on to the point of Zero End Float and by using a spacer that is thicker than the Test Spacer will simply create a gap between the end face of the bearing and the Pull Up Face of the Half Shaft. Result; no immediate change and End Float over time.
Getting a baseline feel of the drag of the seal, stays with even the most experienced right up to when that feel changes with preload kicking in. I used to rebuild precision spindles of CNC machine tools. Most of the bearings used are Angular Contact Ball Race Bearings, arranged Back to Back, or Front to Front with the Preload built into the offset of the faces. With systems where the preload is set via shims, one fellow that had been building these spindles forever, sets the preload via feel. When he told me what he did, I put to him the challenge of getting the preload setting of a spindle I had in work, the same at least twice, within a reasonable tolerance, in six assemblies. He never got within a Bull's Roar of the correct setting, or of the same setting twice.
I reiterate, when there are inexpensive tools available to test both End Float and Pre-load, that takes all subjectivity out of the equation, I don't see much of an argument for not using them.
Regards,
Bill
Last edited by angelw on Mon Nov 14, 2022 11:39 am, edited 1 time in total.
| Link: | |
| BBcode: | |
| HTML: | |
| Hide post links |
#7 Re: Setting Hub Shims
As Bill describes the problems in setting by feel.... in my opinion to get to zero end float by "feel" would be at best questionable. ....but to then get to a pre load condition you would need to fit a thinner shim, not a thicker one....the thinner would then allow the bearings to be pulled closer together....Steve
Steve
69 S2 2+2 (just sold) ..Realm C type replica, 1960 xk150fhc
69 S2 2+2 (just sold) ..Realm C type replica, 1960 xk150fhc
| Link: | |
| BBcode: | |
| HTML: | |
| Hide post links |
-
christopher storey
- Posts: 5698
- Joined: Sun Mar 09, 2008 3:07 pm
- Location: cheshire , england
#8 Re: Setting Hub Shims
Can I maks one thing clear, because it is counter-intuitive ? The thicker the shim, the more end float is created
| Link: | |
| BBcode: | |
| HTML: | |
| Hide post links |
#9 Re: Setting Hub Shims
<t>Oh dear me! Yes of course I goofed. Not sure if it's Freudian, but clearly it is incorrect. A THINNER shim is required if more Pre-Load is desired. It may be counter-intuitive but not if one looks carefully at the drawings. <br/>
<br/>
I edited my initial response to correct my mistake.
The Hub is fixed relative to the Hub Carrier by the 3 elements consisting of the Outer Seal Seating Ring, the Outer Bearing Inner Cone (or Inner Race) and the Outer Bearing Cup (or Outer Race). The Inner Bearing is adjustable by moving it towards the Outer Bearing either with a press or a hammer and bearing set tool. Once set with desired Pre-Load, the Spacer is fitted of just the right thickness to maintain that Pre-Load. How does the Spacer do that? Not shown in the drawings, perhaps unfortunately, is the Splined Shaft nor its attendant Inner Seal Seating Ring. (This is mentioned on the drawing itself however.) The Inner Seal Seating Ring rides (maybe not the right term - perhaps "presses?") against the Spacer Face AND the Inner Bearing Face. When the Splined Shaft (the Spindle) is secured with its nut, the relationship between the Hub and the two bearings inside the Hub Carrier cannot change.<br/>
<br/>
Were one to press the Inner Bearing further towards the Outer Bearing (increase Pre-Load) a Thinner Spacer would be required to maintain that increased Pre-Load.</t>
<br/>
I edited my initial response to correct my mistake.
The Hub is fixed relative to the Hub Carrier by the 3 elements consisting of the Outer Seal Seating Ring, the Outer Bearing Inner Cone (or Inner Race) and the Outer Bearing Cup (or Outer Race). The Inner Bearing is adjustable by moving it towards the Outer Bearing either with a press or a hammer and bearing set tool. Once set with desired Pre-Load, the Spacer is fitted of just the right thickness to maintain that Pre-Load. How does the Spacer do that? Not shown in the drawings, perhaps unfortunately, is the Splined Shaft nor its attendant Inner Seal Seating Ring. (This is mentioned on the drawing itself however.) The Inner Seal Seating Ring rides (maybe not the right term - perhaps "presses?") against the Spacer Face AND the Inner Bearing Face. When the Splined Shaft (the Spindle) is secured with its nut, the relationship between the Hub and the two bearings inside the Hub Carrier cannot change.<br/>
<br/>
Were one to press the Inner Bearing further towards the Outer Bearing (increase Pre-Load) a Thinner Spacer would be required to maintain that increased Pre-Load.</t>
Last edited by Scottie on Tue Nov 15, 2022 12:59 pm, edited 1 time in total.
| Link: | |
| BBcode: | |
| HTML: | |
| Hide post links |
#10 Re: Setting Hub Shims
Scottie Wrote:
The Outer Seal Track is part of the assembly, but its the Outer Taper Bearing, Cup and Cone, that actually sets the relative position of the Hub to the Hub Carrier. From your description, in my opinion, its as if the Outer Bearing plays no part in the positioning of the Hub.
Regards,
Bill
With all die respect Scottie, I think some of your explanations could easily be confusing to the newbie to this exercise.The Hub is fixed relative to the Hub Carrier by the Outer Seal Seating Ring.
The Outer Seal Track is part of the assembly, but its the Outer Taper Bearing, Cup and Cone, that actually sets the relative position of the Hub to the Hub Carrier. From your description, in my opinion, its as if the Outer Bearing plays no part in the positioning of the Hub.
Regards,
Bill
| Link: | |
| BBcode: | |
| HTML: | |
| Hide post links |
#11 Re: Setting Hub Shims
Bill, I welcome comments and improvements. I think it is important to get the descriptions right exactly to your point of not confusing newbies...or anyone for that matter.
What I hope to do with the comments, both here and on J-L, is to edit the original document to make the description clear and not confusing as well as to add content that is helpful. Like your and Steve's suggestion of using a dial gauge.
So no, I don't mean the Outer Bearing has no place in setting the relationship between the Hub and the Hub Carrier. It does. And the Outer Seal Setting Ring does too. If I understand it correctly, the Outer Seal Setting Ring fits on the Hub and presses on the Inner Cone of the Outer Bearing. That sub-assembly then fits into the Outer Cup of the Outer Bearing that is itself pressed into the Hub Carrier.
So the Hub's position relative to the Hub Carrier is set by those 3 elements working together. What's a better way to say this so as to avoid confusion? I mean, help me out. Let's get the word right.
| Link: | |
| BBcode: | |
| HTML: | |
| Hide post links |
#12 Re: Setting Hub Shims
Scottie Wrote:
Scottie Wrote:
Particularly with the Hub/Hub Carrier Assembly of an E Type and other models with the same Rear Suspension system, the End Float decreases, if the bearings are set in End Float, and Preload increases, if the bearings are set in Preload, as the Hub Carrier heats up. This expansion of the Hub Carrier is quite manageable when the bearings are set in Preload, if you know what the actual Preload is when the Hub Carrier is at its normal resting temperature. But having it set by feel where that may translate to being towards the top of the Preload tolerance and you shorten the life expectancy of the bearings dramatically as the Preload increases due to the axial expansion of the Hub Carrier.
That's clear.So the Hub's position relative to the Hub Carrier is set by those 3 elements working together.
Scottie Wrote:
With regards to the desired Preload, how do you determine that with just feel? With the challenge I put to the guy assembling machine tool spindles, he never got within cooee of the correct preload by the feel he had been using forever and was inconsistent "as all get out".Once set with desired Pre-Load, the Spacer is fitted of just the right thickness to maintain that Pre-Load.
Particularly with the Hub/Hub Carrier Assembly of an E Type and other models with the same Rear Suspension system, the End Float decreases, if the bearings are set in End Float, and Preload increases, if the bearings are set in Preload, as the Hub Carrier heats up. This expansion of the Hub Carrier is quite manageable when the bearings are set in Preload, if you know what the actual Preload is when the Hub Carrier is at its normal resting temperature. But having it set by feel where that may translate to being towards the top of the Preload tolerance and you shorten the life expectancy of the bearings dramatically as the Preload increases due to the axial expansion of the Hub Carrier.
| Link: | |
| BBcode: | |
| HTML: | |
| Hide post links |

#13 Re: Setting Hub Shims
I am far away to be a spezialist for shimmng hubs. Is it possible, that there shall be an endfloat, because , if the bearing is becomming warm when driving, the endfloat is becomming zero or will become a pre-load ?
Regards Wolfgang Gatza
Regards Wolfgang Gatza
| Link: | |
| BBcode: | |
| HTML: | |
| Hide post links |


#14 Re: Setting Hub Shims
I’m 100pc with Bill on this.
I may be an experienced mechanic, and familiar with end floats and preloads in bearings (Ducati crankshafts, amongst others), but there is NO way I would rely on feel even with those, despite the fact 1. that the parts are much lighter, 2. that there are no seals to drag, and 3. that there’s no grease to appreciate the effects of.
With a Dial Test Indicator and a pair of screwdrivers you can get a reliable and repeatable measure of end float on the Jag rear hub, so why would you just piss in the wind ?
Afterwards, it’s up to you to decide whether you’re part of the pre-load club, or a traditionalist aiming for the 4 thou that Jaguar specified - but at least your baseline is known.
I used to be undecided, but now I’m not so sure ……. So I’ve just set both of mine at 2 thou
Rory
3.8 OTS S1 Opalescent Silver Grey - built May 28th 1962
3.8 OTS S1 Opalescent Silver Grey - built May 28th 1962
| Link: | |
| BBcode: | |
| HTML: | |
| Hide post links |
-
 Series1 Stu
- Posts: 1650
- Joined: Thu Feb 02, 2017 12:26 pm
- Location: Shropshire
#15 Re: Setting Hub Shims
Absolutely right, Rory.
I have avoided joining in this discussion because of some previous negative responses from others but there is no substitution for using the correct equipment to do a job.
Everything we design and make is set up using good quality, properly calibrated tools and equipment so we know that, when it goes out of the door, it is correct to specification. In addition to careful tolerance analyses accounting for all service variables, every last threaded fastener and its application is carefully calculated and specified at the design stage. During build every tool used has calibration records so we know that everything is to spec. If we don't do this then we don't know what's going out the door and people's lives depend on it.
Why would you not build or repair your car in the same way? You might not go to the extremes outlined above but you should at least aim to be consistent and it just isn't possible going by feel - no matter how experienced someone might claim to be.
Pre-load or end float? Suit yourself, but I set mine up to factory specification using calibrated dial gauges and micrometers.
Regards
Stuart
If you can't make it work, make it complicated!
'62 FHC - Nearing completion
'69 Daimler 420 Sovereign
'78 Land Rover Series 3 109
If you can't make it work, make it complicated!
'62 FHC - Nearing completion
'69 Daimler 420 Sovereign
'78 Land Rover Series 3 109
| Link: | |
| BBcode: | |
| HTML: | |
| Hide post links |
#16 Re: Setting Hub Shims
Well resumed.
I found that having a solid pedestal made a big difference to my repeatability when using the DTI.
I knocked this up and it made a big difference ; the pictures are on another post already, but relevant on this thread so here they are again, in case they inspire anyone else.
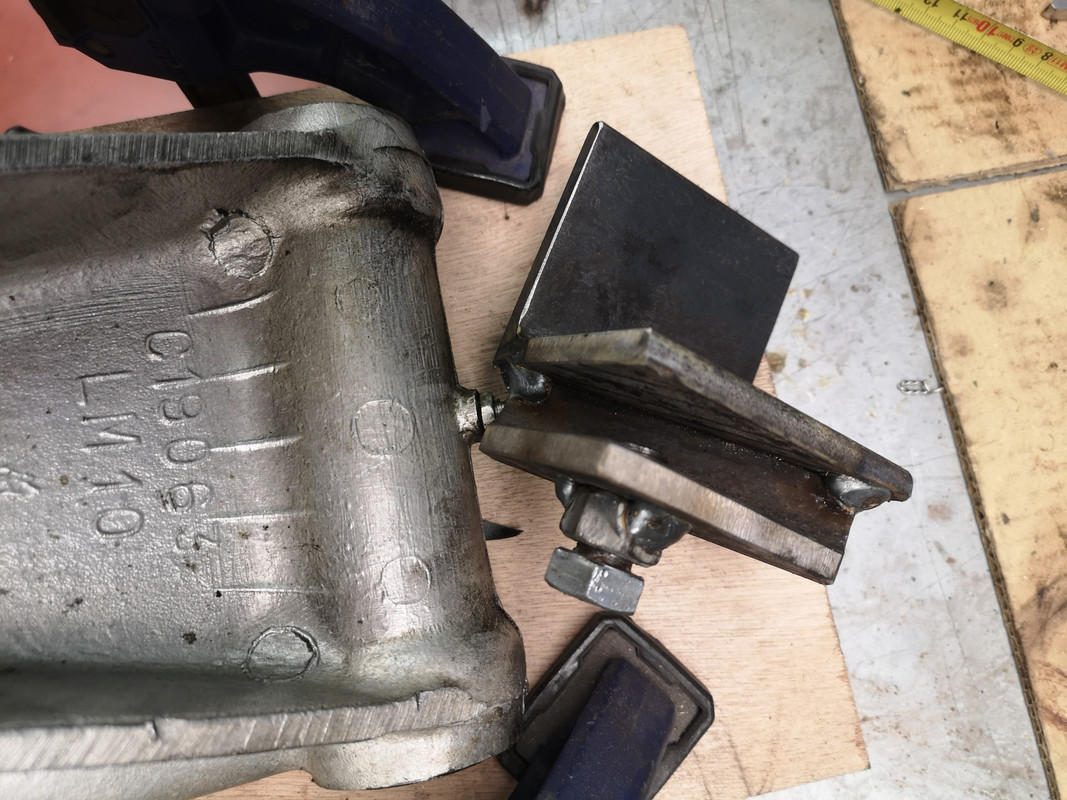
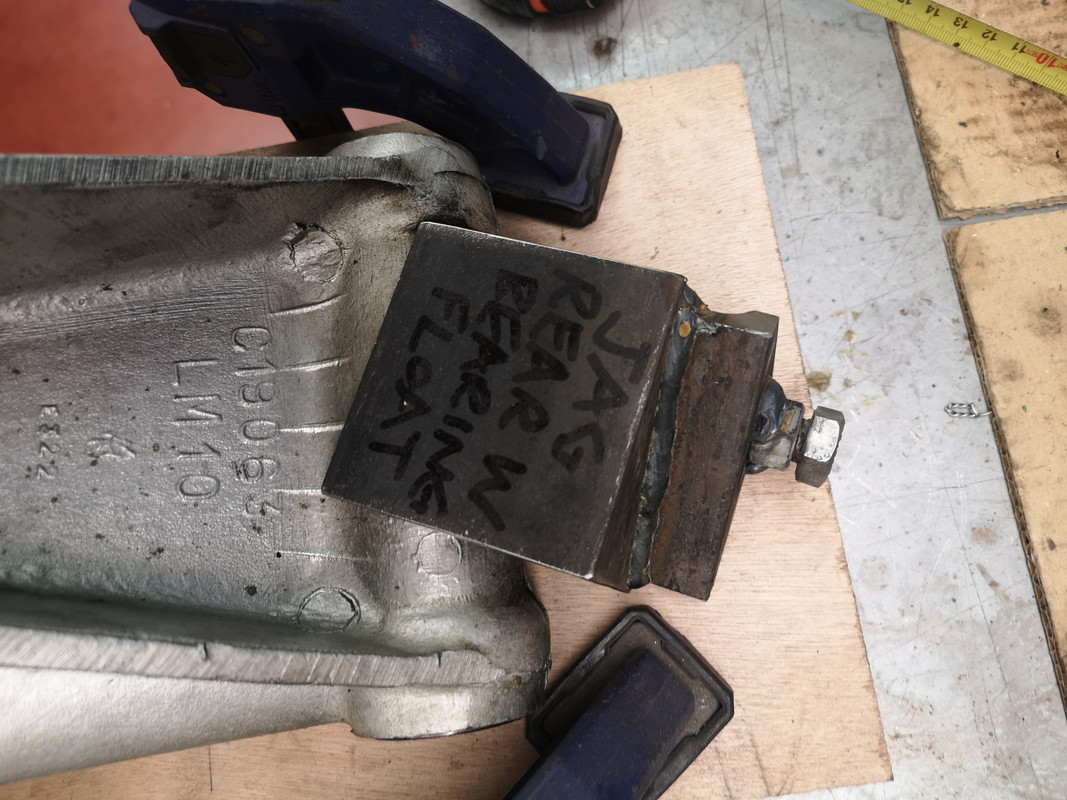
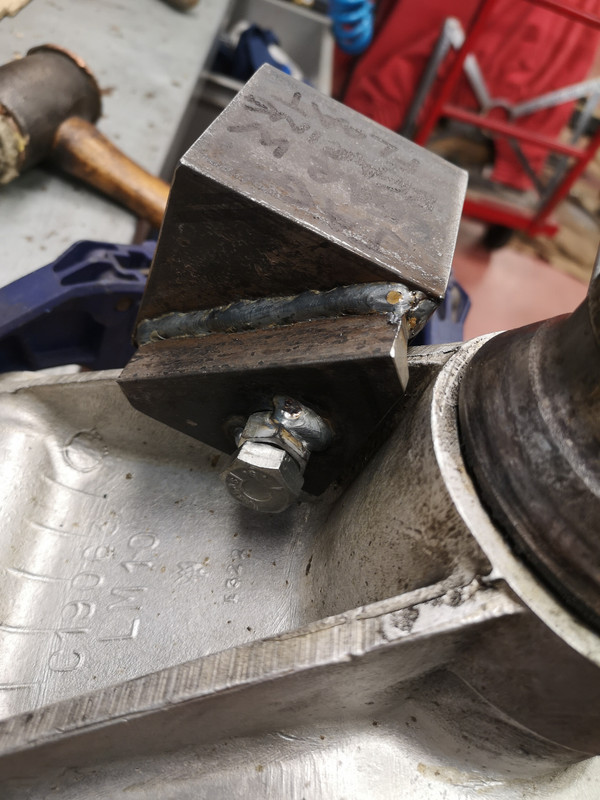
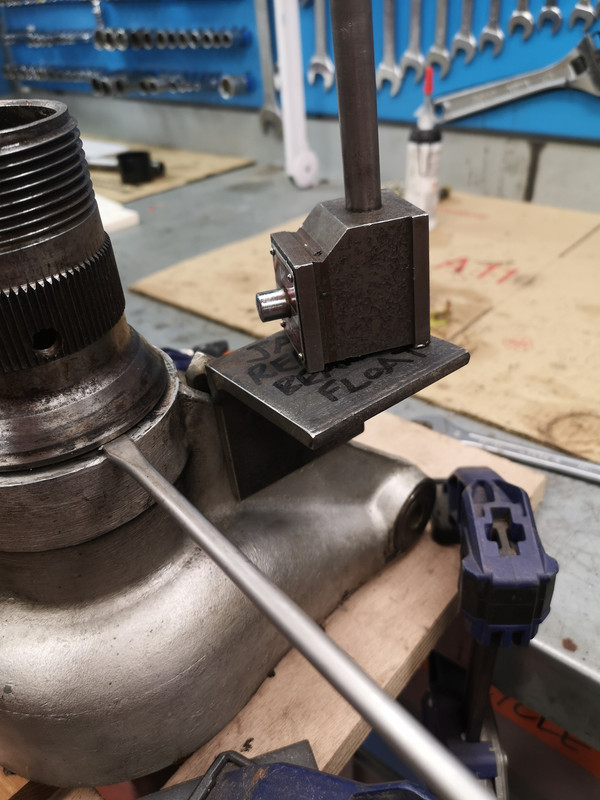
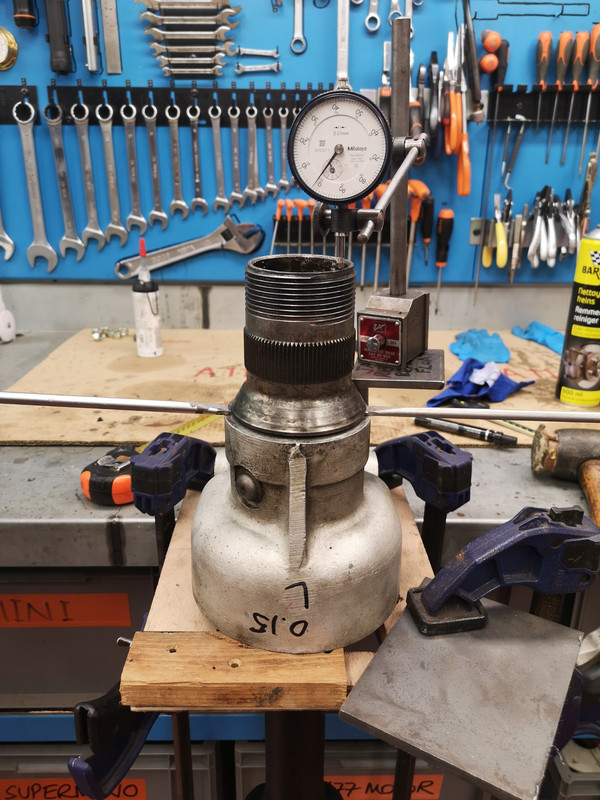
I used a copper hammer each time to push the bearings one-way, which makes the DTI move, of course, so it needs re-aligning with the narrow edge/lip of the splined hub, and then a pair of screwdrivers to maximise the play.
I am confident that this method, albeit depending to some extent on how much effort you put into the screwdrivers, gives me a measurement that is accurate to within 1 thou.
And after a period where there were many gaps in the available range of shims, SNGB were able to fulfill an order spanning 5 sizes last week.
I found that having a solid pedestal made a big difference to my repeatability when using the DTI.
I knocked this up and it made a big difference ; the pictures are on another post already, but relevant on this thread so here they are again, in case they inspire anyone else.
I used a copper hammer each time to push the bearings one-way, which makes the DTI move, of course, so it needs re-aligning with the narrow edge/lip of the splined hub, and then a pair of screwdrivers to maximise the play.
I am confident that this method, albeit depending to some extent on how much effort you put into the screwdrivers, gives me a measurement that is accurate to within 1 thou.
And after a period where there were many gaps in the available range of shims, SNGB were able to fulfill an order spanning 5 sizes last week.
Rory
3.8 OTS S1 Opalescent Silver Grey - built May 28th 1962
3.8 OTS S1 Opalescent Silver Grey - built May 28th 1962
| Link: | |
| BBcode: | |
| HTML: | |
| Hide post links |
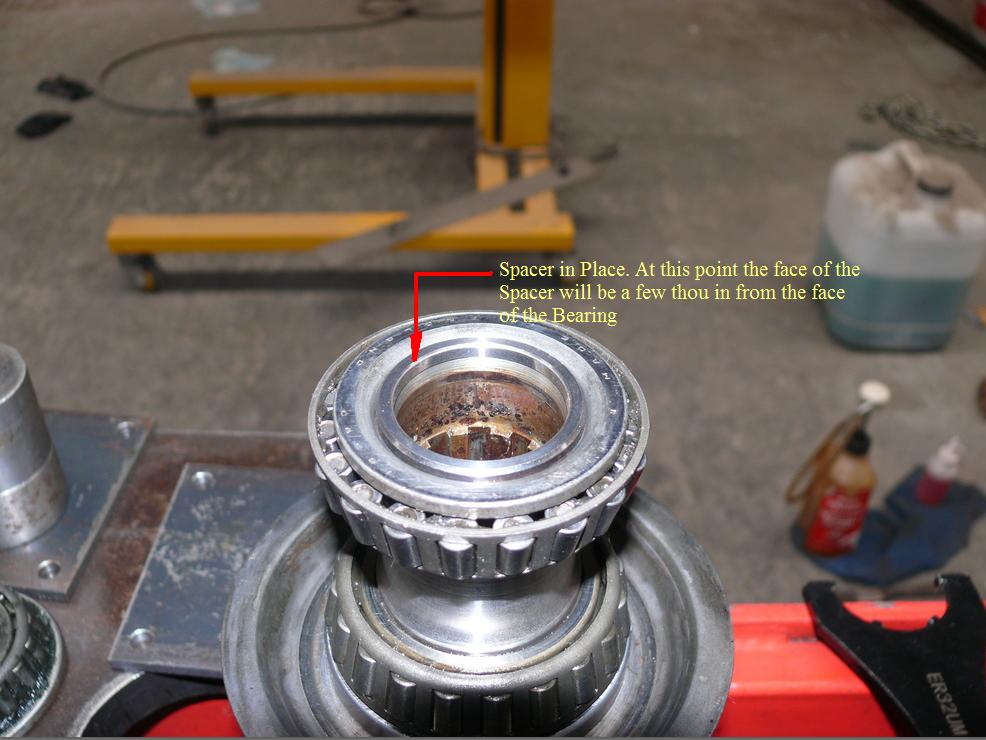
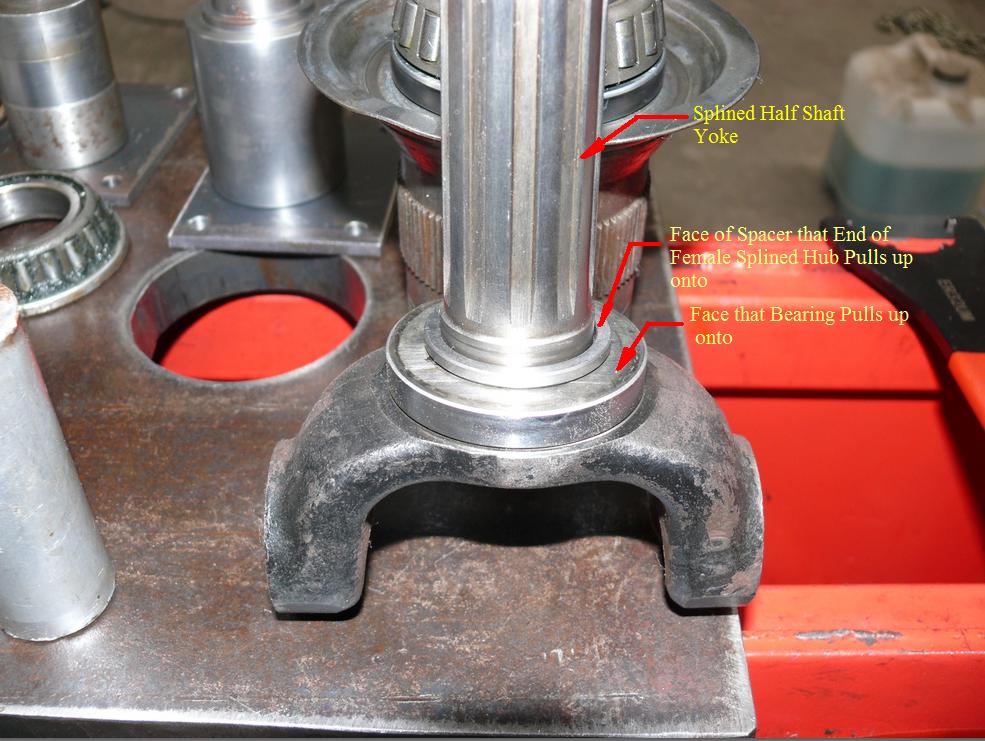
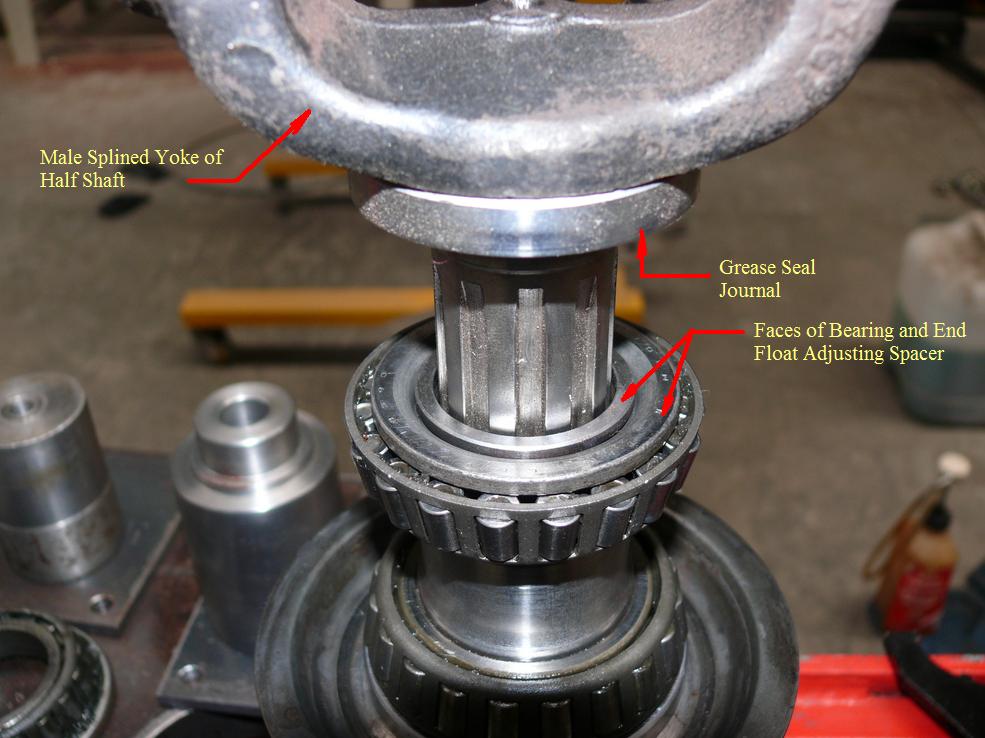
#17 Re: Setting Hub Shims
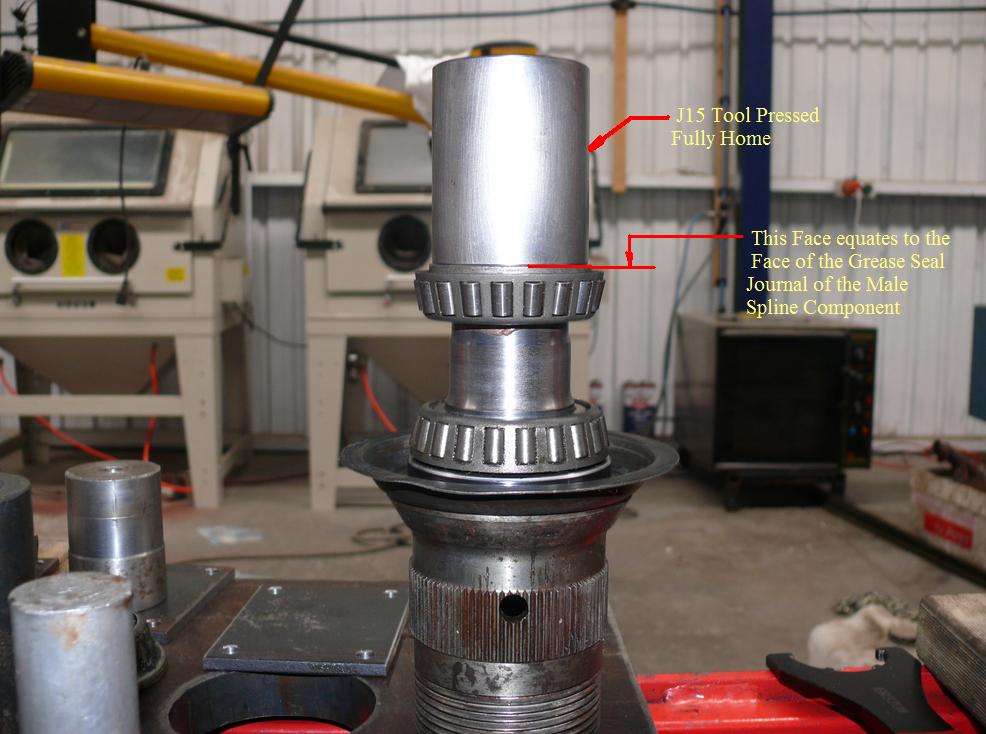
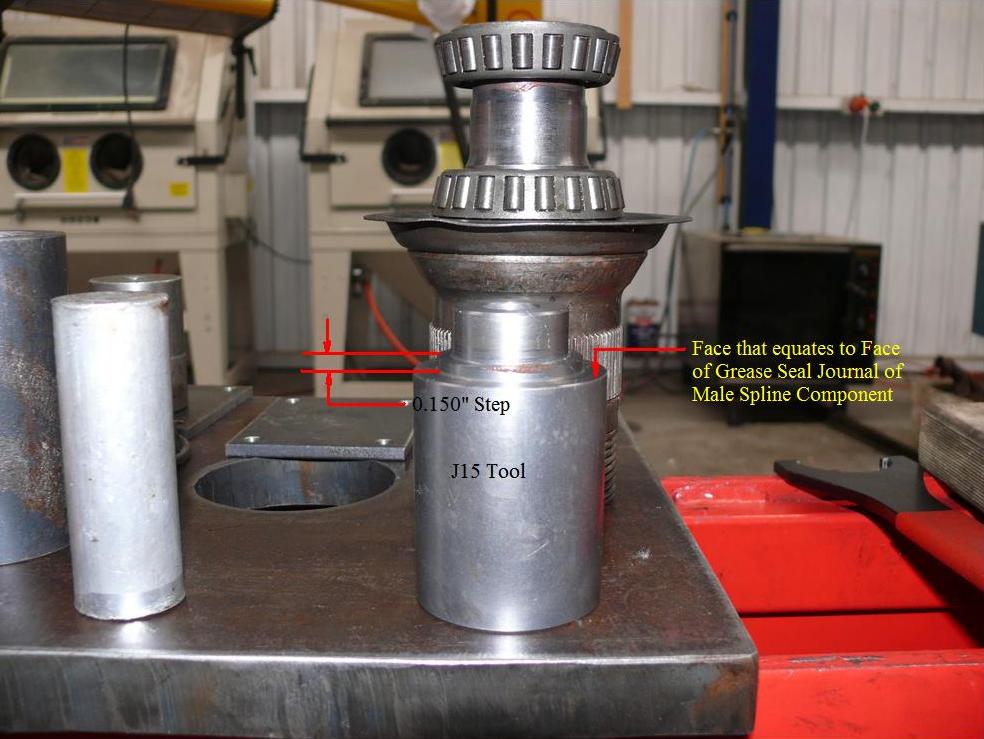
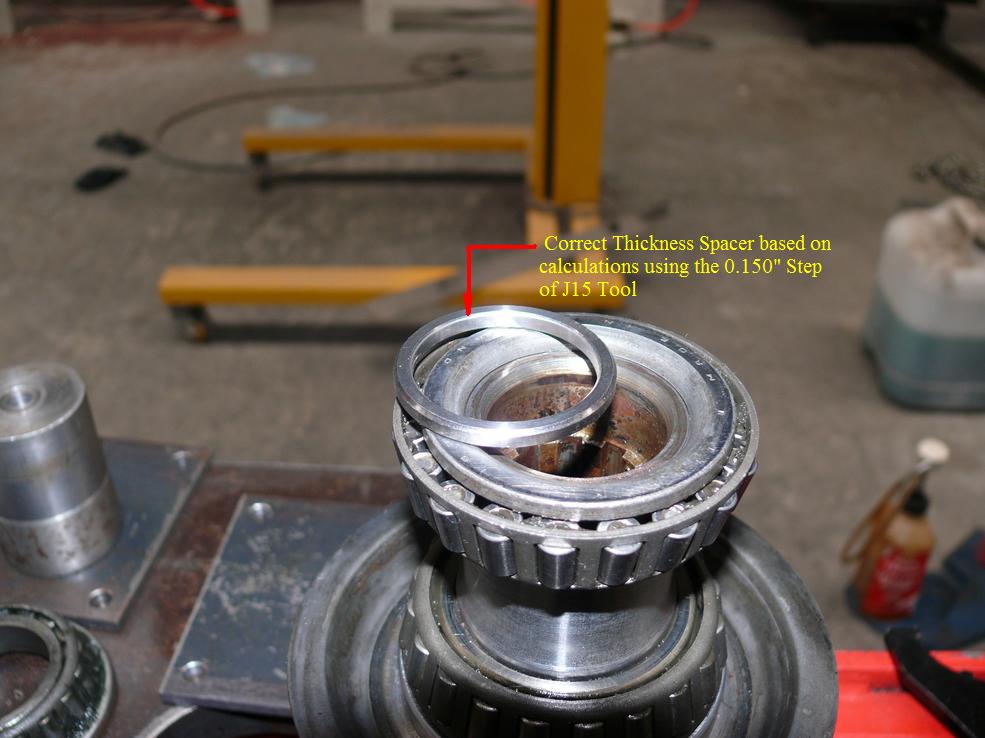
The following pictures are a pictorial explanation of the Rear Hub bearing adjustment. When the JD15 tool is an inexpensive tool to make, or have made, or a Spacer of suitable thickness can be used in lieu of and if your planning on doing maintenance on your car, you will already have a dial indicator, why one would rely on the subjectivity of feel is gobsmacking to me.
What looks like a wood burning heater in the right background, is a commercial Pizza Oven that I use to destroy the characteristics of LocTite when its previously been used in the assembly of the splined shaft with the Hub. Eight ton force is my limit before before employing the use of the oven. Heating with a flame is not all that effective, in my opinion, as there is a lot of insulating air space between the Hub Carrier and where you need to heat. The Oven provides a soaking heat that works very well.
Regards,
Bill
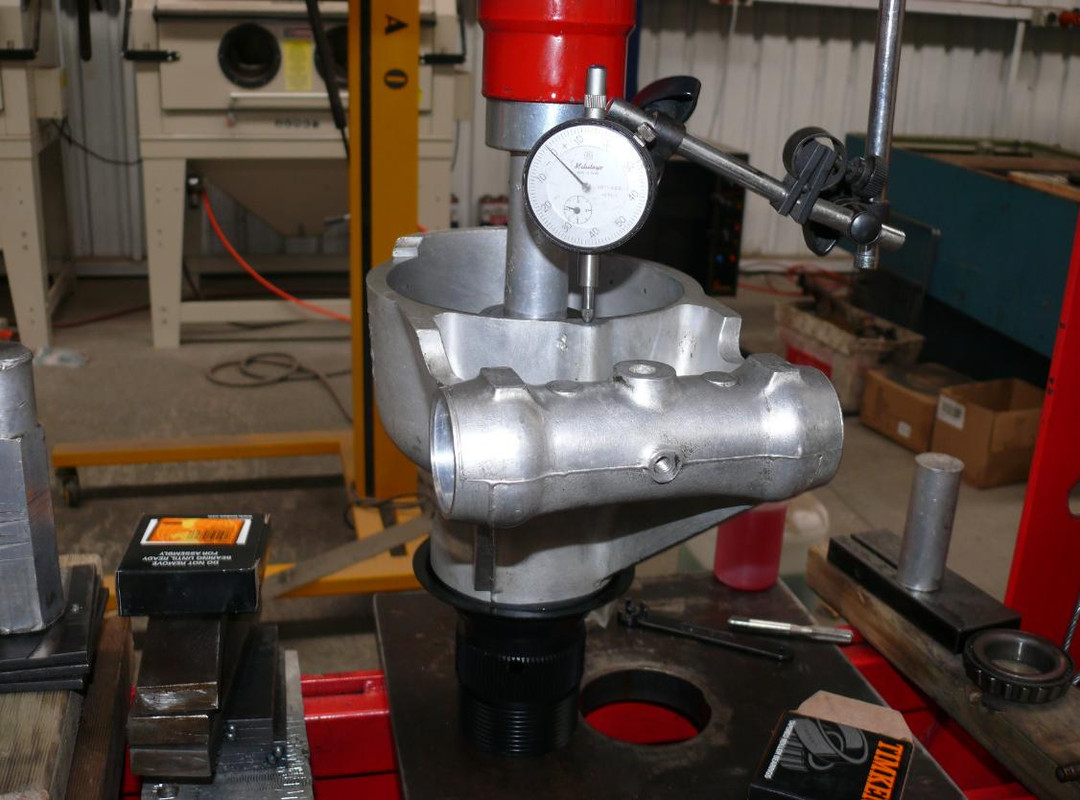
| Link: | |
| BBcode: | |
| HTML: | |
| Hide post links |