Page 1 of 2
#1 Timing chain adjustment
Posted: Tue Jul 02, 2013 6:57 pm
by ChrisC
Chaps,
I need reminding because it is a long time since i have done this....
I have a rattle at the front of the engine and popping off the camshaft covers - I can see that the chain on the exhaust side of the engine BELOW the camshaft is a little floppy. But I know moving the central adjuster only removes slack in the chain BETWEEN the cams.
If I remember rightly - I need to put the Camshafts in the TDC position using the setting tool. Remove the chain drive from the camshaft and rotate it a little to take up as much of the slack at the bottom of the chain as I can and then refit. And THEN take the slack out between the camshafts using the adjuster.
Am I right? It *feels* right... but its been a long day... and I cant remember...
#2
Posted: Wed Jul 03, 2013 3:38 pm
by ChrisC
Aha another knowledge gap requiring a blog post I see.
Ok I will have a play and take some photos :)
#3
Posted: Wed Jul 03, 2013 10:04 pm
by christopher storey
Chris : this is one of those jobs that is largely a question of feel . Set the engine with the timing slots in the 90 degree position with the front piston at TDC . Slacken the locknut ( this is one of those rare nuts which are Whit rather than AF ) . Use the eccentric tensioner to tension one side of the chain - I use a pair of needle nosed pliers to turn the tensioner - usually anti-clockwise - once the locking plunger is depressed , so that the exhaust camshaft side of the chain is tensioned . What I then do - which is perhaps not for the purists but seems to work - is to rotate the crank counter-clockwise sufficiently to untension the chain at its lower end on the other camshaft, and then retension that side by the same process as before . The object is that the chain tension on the outer lower side of each of the sprockets is equal, with slight flexibility when pressed inwards with the finger . You may need to repeat the process more than once to achieve this . The locknut is then retightened, ensuring that the plunger has popped out to lock the serrated adjuster . The job actually is much easier to do than it is to describe, but I hope this helps
#4
Posted: Thu Jul 04, 2013 11:32 am
by ChrisC
Cheers Chris
I think my problem is that i have good tension in all places except the length below the Cam on the exhaust side. I blame the engine builder (doh thats me).
I am pretty sure about my theory of rotating the chain around the CAM leaving all the slack between the 2 cams for tensioning using the adjuster so will give that a go tonight....
#5
Posted: Thu Jul 04, 2013 1:39 pm
by christopher storey
If you do it that way then I feel you will disturb the timing . The chain between the cams needs to have no slack to start with , and both cams in the upright slot position using the cam timing plate to check that , because when you think about it, it is the exhaust cam which pulls the inlet cam round . The slack needs to be on both sides of the run of chain between the sprockets and the idler wheel, so that when the eccentric adjuster moves the idler wheel downwards , it takes up the slack on both sides. If you cannot achieve that with the cams in the correct position, then I suppose it will be necessary to move one or both sprockets on the fine vernier teeth until those conditions can be achieved
#6
Posted: Thu Jul 04, 2013 9:57 pm
by ChrisC
Done.
I first set the engine at TDC and then checked the cams were in the right place to maintain the timing and then moved the chain around the cams on the vernier teeth. Now the cams are still in the right place and the chain only has a little play.
More detail will be in my blog with photos. Essentially I think I made the mistake when putting the engine together and now that it has done 700 miles and the chains have settled in the slack had became more apparent.
#7
Posted: Fri Jul 05, 2013 9:44 am
by PeterCrespin
Hmm, not sure I like the sound of this stuff for public consumption, although what sins we commit behind closed garage doors remain between us and William Heynes...
There should never be any need to tinker with verniers in relation to tension, only timing. I'm also a bit twitchy about tensioning both sides of the chain by reversing the direction of pull.
It's all in the detail of course, and if the chain and timing are OK at the finish then all's well that ends well. But just as with the lower chain, any slack is supposed to be on the inlet side, running up from the driving sprocket, not tight both sides.
Pete
#8
Posted: Fri Jul 05, 2013 10:18 am
by ChrisC
Normally you would be right Chris... you shouldnt need to adjust verniers apart from when you setup the cam timing when building the engine. But mine is a new engine (which I built) and I am not convinced I set the chains up correctly anymore.
You are probably right about not publishing the how-to as really it is more of an engine build item than "maintenance". So I will follow your advice and leave it on my blog outside of this forum :D
Thanks for your help
#9
Posted: Fri Jul 05, 2013 2:37 pm
by christopher storey
Chris C : Having looked at the diagrams , I realise now I have been talking rubbish . I forgot the layout , and that the adjuster , as you correctly said or at any rate implied, tensions the chain between the sprockets, and not below the sprockets . Sorry for wasting everyone's time
#10
Posted: Sat Jul 06, 2013 10:53 am
by ChrisC
Just to finish off the thread...
To tighten the timing chains - remove the breather cover and you will see this:
Well to be honest you dont see a piece of tissue paper - I put that there as a just in case - ie. just in case i dropped the nut which would of course find its way to the sump or if you are really unlucky.... get stuck in the timing chain gear. A piece of tissue is therefore a reasonable safety precaution...
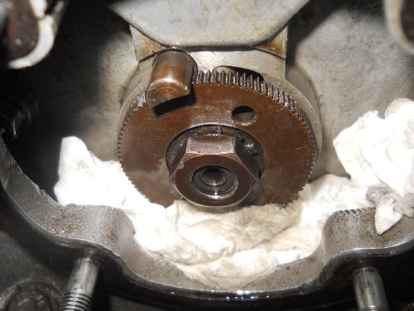
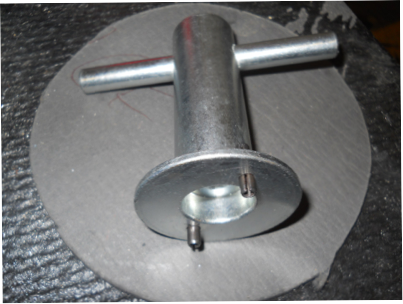
You need to slightly loosen the central nut, press in the locking key (at the top of the picture and then rotate the toothed plate anticlockwise. You can do this with a pair of pliers on any two pronged implement or... you can use the proper tool (which the JEC sell). The advantage of the tool is that it both presses in the locking bar AND rotates the plate - quickly and easily. Granted you wont use it much hey hey Jaguar put a cam setting tool in the tool roll... I am willing to bet that not many owners EVER used it !
As long as the chains were installed correctly in the first place (ahem

) this is all you have to do to remove the slack from a slightly stretched chain.
If you have slack elsewhere in the chain - drop me a PM and I will tell you how to remove that too...
@Chris... no time was wasted Sir :) it never occurred to me that we not talking about the same thing.
#11
Posted: Sat Sep 28, 2013 6:58 pm
by rfs1957
The Jag advice about "there should be slight flexibility on both outer sides below the cam-shaft sprockets" is open to interpretation, and mine felt way too tight upon opening the timing up today - I couldn't find any movement at all using strong fingers, although with a 1/4" screwdriver I could just twist the chain away from the guide-slipper lower down.
How do people interpret this in practice please ?
Whilst on the subject of this thread, I am nonplussed with regard to the comment that "the adjuster ........... tensions the chain between the sprockets, and not below the sprockets" - my italics.
IMHO the tension in the chain is equal everywhere, when stationary, no matter where the tension is applied, unless there are residual torques arising from the camshaft positions - which, in the n?6-TDC-compression position, there are not, as they are comfortably balanced or "parked".
This can be seen by the fact that neither cam moves when the chain tensioner is backed-off, and would explain why Jaguar thought it useful to suggest "turning the engine each way slightly" - whereupon the slack can be moved from the exhaust-side to the inlet-side at will, or split and felt on either side.
As a parting shot, would it not be the case (although I've never done it) that whilst the eccentric can in fact, for the same tension, be turned either CW or CCW (and there's a poster somewhere that did find his chains tensioned CW), for correct synchronisation of the camshafts it's probably important that the tension always be re-applied in the direction that was originally used for the initial vernier-engagements ?
#12
Posted: Sun Sep 29, 2013 9:29 am
by christopher storey
Don't be non-plussed. The tensioner operates on that length of chain which naturally lies between the sprockets . When it is turned it moves eccentrically downwards to increase the distance that the chain travels between the sprockets . Unless in so doing it moves a camshaft ( which ideally it should not do , it is only the tension in that part of the chain between the sprockets which is affected . I think it is a problem of nomenclature really : the adjuster does not really tension the chain - it would be more accurate to say that it takes the slack out of it
If your chains on the outer side below the sprockets are whip tight, which they certainly sound to be , then in some way the chain is over-tight. There should be a small degree of flexibility demonstrable by pushing inwards with a finger . At a rough guess I would say you should be able to see the chain move between1 and 2 mm and spring back again
#13
Posted: Mon Sep 30, 2013 4:20 pm
by rfs1957
Can anyone tell me how difficult it generally is to get the cam-covers oil-tight ?
I'm used to all sorts of leak-issues in a variety of engines made over the last 50 years, and some, and some locations, are more prone than others, hence the question.
With new gaskets, seals, flatted cam-cover surfaces, and scrupulously cleaned head sealing-area, do I need anything dramatic on the gaskets ? Hylomar on both sides, or some Loctite sealant everywhere ?
Please put me in the ball-park so I get it right first time !
#14
Posted: Mon Sep 30, 2013 5:32 pm
by Heuer
Blue Hylomar is my favourite - smear on with your finger leaving a thin film on both sides of the gasket. Leave for about one minute to allow the solvent to evaporate and join things up. Don't forget to re-tighten after 30 minutes or so to take up any shrinkage of the Hylomar. Some people say Red Hermetite is better for cork gaskets and older engines where tolerances are not as accurate as modern engines. Apocryphally they say Rolls Royce use Blue Hylomar because they work to very tight tolerances and therefore it is not so good on the more mundane stuff. Others recommend RTV and although I have some I have not used it as yet.
Take your pick!
#15
Posted: Tue Oct 01, 2013 7:29 am
by christopher storey
I have been using Andy Rayner's ( Hutson's ) stuff which has a German name which I cannot remember , with Paper gaskets , and have been completely leak free as a result. It also has the advantage of coming in a tube with a key on the bottom which makes it easy to squeeze out accurately . Highly recommendable
#16
Posted: Tue Oct 01, 2013 12:52 pm
by JEP41
My Preference when building engines is "Wellseal" and likewise my engines are leak free.
#17
Posted: Tue Oct 01, 2013 5:09 pm
by Durango2k
The german stuff might be either REINZ which is like Hylomar or Curil or Dirko ROT which is a silicone stuff.
DIRKO is available in several temperature ranges. I prefer red, 230 C.
I used it to re- use Maserati head gaskets (nothing to loose at 300 Euros EACH and you need 2) but it WORKED.
Carsten
#18
Posted: Wed Nov 13, 2013 12:42 pm
by rfs1957
No rocket-science apparent here, so I ended up using the usual ThreeBond TB1215 which is extensively used by Ducati and Yamaha - amongst others - as an OM ingredient and is particularly appropriate for alloy/alloy usage if only because of its colour ? grey. Used on XK cam-covers, breather plate etc = perfect result. I have also always used it on radiator-hose fittings, where - incidentally - smearing a tad of silicone grease on the outside of hose behind the clamps seems to spare the hoses somewhat from clamp-tension damage. ThreeBond can be used everywhere for everything oil-water on vehicles but for fuel applications I would only ever use Hylomar.
 http://www.threebond.co.uk/PRODUCTS/TB1 ... fault.aspx
http://www.ebay.co.uk/itm/3-BOND-THREE- ... 2a337ec4df
http://www.ebay.co.uk/itm/Genuine-Ducat ... 27d916e11c
http://www.threebond.co.uk/PRODUCTS/TB1 ... fault.aspx
http://www.ebay.co.uk/itm/3-BOND-THREE- ... 2a337ec4df
http://www.ebay.co.uk/itm/Genuine-Ducat ... 27d916e11c
#19
Posted: Wed Nov 13, 2013 4:12 pm
by Moeregaard
It looks like everyone has covered the subjects of timing-chain tension and leaky cam covers pretty well, but since opinions are like belly buttons (everyone has one), I'll toss out my thoughts.
Upper timing-chain tension is not terribly critical. If it were, then Jaguar would have specified some number value to it, and some tool to measure that value. The important thing is to use the proper tensioning tool and leave just a small amount of slack when the engine is cold. The alloy cylinder head has a high coefficient of thermal expansion (far greater than that of the steel chain), and I suspect that some of the slackness goes away as the engine warms. I've never heard noise from an upper chain on a fresh engine, but a failed tensioner on the lower one will cause rattling. Also, verify that the noise isn't coming from incorrectly set tappet clearances.
Oil leaks from the cam covers are easily rectified. First, dress off any dings on the mating faces. Most cam covers have had screwdrivers, chisels, and a myriad of other implements used against them to force removal. Second, always use new *annealed* copper washers when replacing the covers. Third, use a quality sealant (Hylomar, Permatex, etc.), but ensure that it's of the non-hardening variety. Just ensure it doesn't smell of vinegar, because the acetic acid used in some silicone-base sealants will etch the aluminum, and most RTV sealants aren't good friends with petroleum anyway. Apply a very thin layer on all surfaces, and place a very small blob in all corners (tach drive area, etc.). Finally, put away the large ratchet, and just lightly bring up the nuts with a 1/4" ratchet or T-handled socket, starting with the inner nuts and working your way to the ends, until you see a small amount of sealant squeezing out. I've had to weld up cam covers that were cracked by ham-fisted mechanics, and this is one of those areas where more is not always better.
#20
Posted: Sat May 17, 2014 1:57 pm
by ALAN COCHRANE
Chris
The engine in my OTS was rebuilt in 2005/6 and I reckon between the PO and I, it's probably only covered 1500 miles.
I've noticed the timing chains have a slight rattle when the engine is warmed up. I followed your post with interest and I am now at the point where I was going to use the vernier adjuster to tighten the cam chains. Unfortunately I have discovered the locking nut is 3/8 Whitworth and I only have an open ended spanner of that size in my armoury. So I've come to a temporary halt.
How much adjustment should you try as a start off? I was going to try three "clicks" and see if that cures the noise. Is this about right for a first attempt?
Do I need to check the cams for movement? I would have thought taking up a small amount of slack would not affect their positions-but more learned members may put me right on that!
Cheers
Alan
