


I had a set of Inertia Reel belts off a well-known E-Type supplier and restorer in about 2005/6, and they've had minimal usage in comparison with any normal vehicle dating from then.
They have got progressively slacker, and the driver's side is now worse than useless, albeit not helped by the fact that the hood-bag gets in the way on the OTS. They're not twisted on the reel etc since the rear bulkhead slot is about as effective a bulwark against that as you can get.
The supplier has suggested that their manufacturer, and I quote, "may be able to tension or re spring the belt", and have asked me to return them.
Anyone else been down that route / had that problem / done the tweak themselves ?
Series 1 Seat-Belt fitting, and 'slack' Inertia Reel Belts.
#1 Series 1 Seat-Belt fitting, and 'slack' Inertia Reel Belts.
Last edited by rfs1957 on Thu Jan 02, 2014 4:33 pm, edited 3 times in total.
Rory
3.8 OTS S1 Opalescent Silver Grey - built May 28th 1962
3.8 OTS S1 Opalescent Silver Grey - built May 28th 1962
| Link: | |
| BBcode: | |
| HTML: | |
| Hide post links |

#2
Try pulling it out blowing all the dust out and extending the webbing and sprinkle some talc on the belt and retract it.
The talc will lubricate and allow it draw much easier.
Unless the return coil spring is corroded.
Cheers John
The talc will lubricate and allow it draw much easier.
Unless the return coil spring is corroded.
Cheers John
| Link: | |
| BBcode: | |
| HTML: | |
| Hide post links |

#3
They're seat belts in a car with no passenger protection.
Throw them in the bin and buy some more that work.
Throw them in the bin and buy some more that work.
Andrew.
881824, 1E21538. 889457. 1961 4.3l Mk2. 1975 XJS. 1962 MGB. 1979 MGB.
http://www.projectetype.com/index.php/the-blog.html
Adelaide, Australia
881824, 1E21538. 889457. 1961 4.3l Mk2. 1975 XJS. 1962 MGB. 1979 MGB.
http://www.projectetype.com/index.php/the-blog.html
Adelaide, Australia
| Link: | |
| BBcode: | |
| HTML: | |
| Hide post links |
#4
I took the belts off, wondering whether to follow the helpful advice from down-under.
Some of what now follows might be of interest to other OTS Series 1 owners considering fitting seat-belts and hopefully these pictures will enable them to avoid the pit-falls, and maybe choose more appropriate products than I was supplied.
My belts didn't in fact wind back properly because there was simply too much belt on the drum.

Sold as "specially for E-Types" etc by "passionate E-Type specialists" (cont. p92) they are in fact just standard belts with enough spare webbing to cope with an elephant sitting in a Range Rover with anchorages on the rear parcel shelf.
On a car like the Jag where everything is so close to the seat, and belts so short, as soon as the belts become the slightest bit hairer or less tightly wound or maybe swell with a bit of damp, bearing in mind mine still look brand-new, the outer diameter starts to foul the cage - there was nothing wrong with my re-wind springs.
The answer was to shorten them by 1m00 or so and thus reduce the installed diameter.

This is where the H+S brigade will hold me up for vilification and abuse, so if you're easily offended and/or if your mother doesn't like you working in the kitchen during school-holidays, please look the other way.

The drum can be easily locked using a suitable finger-tight self-tapper as a gentle wedge to stop things flying around.

The belt can be shortened - I believe in complete safety - at the point it is anchored to the re-wind drum ; it traverses the drum, is doubled back round a nylon spigot, stitched double, and then wedged back into a recess that gives a tighter and tighter servo-cramp as any effort on the belt rises ; the stitching isn't doing the work.
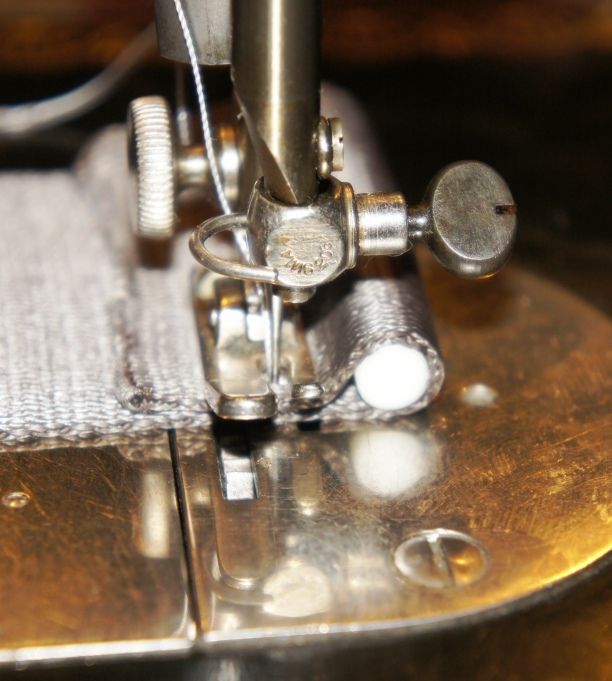

Which must be why the original stitching on mine was crap, and the nylon parachute twine I used on the good-old Singer (takes a bit of adjustment to get top/bottom tension balanced) has made a much neater and more comprehensive job - although not as neat as the panels I used to let into my flares in the 1970's on this very same machine, though you wouldn't want a picture of that.

Note the Jaguar O-ring put to use to drive the Singer bobbin-winding device - surely evidence that this was the right kind of sewing-machine to have used ?

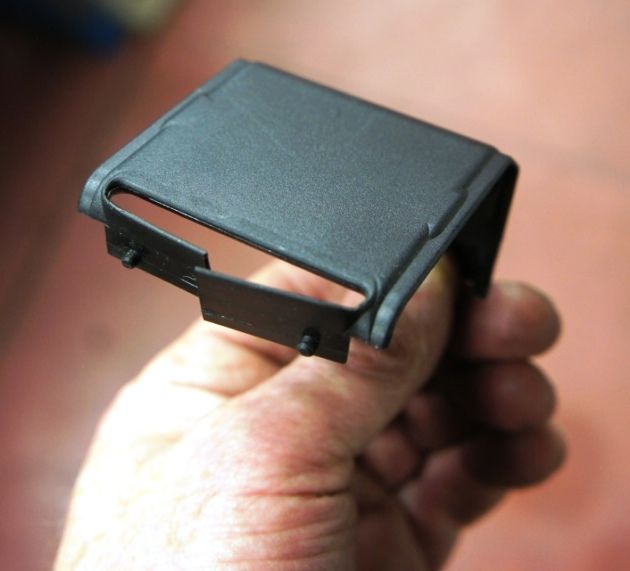
Result : winding/unwinding now unfettered, helped still further by cutting away a section of the plastic cover as shown.

HOWEVER : I can now see that the fundamental problem with these "specially for E-Types" belts sold by "passionate E-Type specialists" is that they are not particularly suitable for the E-Type, because they are being used with the belt being pulled off at 90° to the manufacturer's intended direction of load, and there is no provision for gentle guidance over the square edge of the cage.

You can only mount the ones I was supplied on a vertical surface (the diaphragm behind the seats) because they don't work if fitted horizontally (under the rear shelf) in view of the pendulum or w.h.y. clutch that can tell when things are going wrong.

Therefore you have to be very careful that the slot you cut in the diaphragm is wide enough, aligned correctly, and free of any sharp edges that might damage the belt, since there is no clever guidance of the belt until it reaches the pretty chrome trims that are on the cockpit-side of the diaphragm.

In short, if this is all that is available still, it does work and it can be safely fitted if you understand what's going on and mark-out/drill/cut/fettle your modifications properly.
If I had known just what a lash-up the 90° bend constitutes, I would have gone looking for horizontally-mounted reels and tried to get them under the rear shelf, albeit perhaps with a bit of reinforcing ?
If anyone wants a sketch of where to aim to put the slots as seen from within the boot space, I think mine are about right and will be happy to oblige. Mine's a 1962 so the floor-nuts were already in place and all I had to do was cut slots in the carpets and fit modern eye-bolts, which were the same standard threads (7/16 UNF, no ?) as found on modern seat-belt attachments.
Some of what now follows might be of interest to other OTS Series 1 owners considering fitting seat-belts and hopefully these pictures will enable them to avoid the pit-falls, and maybe choose more appropriate products than I was supplied.
My belts didn't in fact wind back properly because there was simply too much belt on the drum.

Sold as "specially for E-Types" etc by "passionate E-Type specialists" (cont. p92) they are in fact just standard belts with enough spare webbing to cope with an elephant sitting in a Range Rover with anchorages on the rear parcel shelf.
On a car like the Jag where everything is so close to the seat, and belts so short, as soon as the belts become the slightest bit hairer or less tightly wound or maybe swell with a bit of damp, bearing in mind mine still look brand-new, the outer diameter starts to foul the cage - there was nothing wrong with my re-wind springs.
The answer was to shorten them by 1m00 or so and thus reduce the installed diameter.

This is where the H+S brigade will hold me up for vilification and abuse, so if you're easily offended and/or if your mother doesn't like you working in the kitchen during school-holidays, please look the other way.

The drum can be easily locked using a suitable finger-tight self-tapper as a gentle wedge to stop things flying around.

The belt can be shortened - I believe in complete safety - at the point it is anchored to the re-wind drum ; it traverses the drum, is doubled back round a nylon spigot, stitched double, and then wedged back into a recess that gives a tighter and tighter servo-cramp as any effort on the belt rises ; the stitching isn't doing the work.


Which must be why the original stitching on mine was crap, and the nylon parachute twine I used on the good-old Singer (takes a bit of adjustment to get top/bottom tension balanced) has made a much neater and more comprehensive job - although not as neat as the panels I used to let into my flares in the 1970's on this very same machine, though you wouldn't want a picture of that.

Note the Jaguar O-ring put to use to drive the Singer bobbin-winding device - surely evidence that this was the right kind of sewing-machine to have used ?

Result : winding/unwinding now unfettered, helped still further by cutting away a section of the plastic cover as shown.


HOWEVER : I can now see that the fundamental problem with these "specially for E-Types" belts sold by "passionate E-Type specialists" is that they are not particularly suitable for the E-Type, because they are being used with the belt being pulled off at 90° to the manufacturer's intended direction of load, and there is no provision for gentle guidance over the square edge of the cage.

You can only mount the ones I was supplied on a vertical surface (the diaphragm behind the seats) because they don't work if fitted horizontally (under the rear shelf) in view of the pendulum or w.h.y. clutch that can tell when things are going wrong.

Therefore you have to be very careful that the slot you cut in the diaphragm is wide enough, aligned correctly, and free of any sharp edges that might damage the belt, since there is no clever guidance of the belt until it reaches the pretty chrome trims that are on the cockpit-side of the diaphragm.

In short, if this is all that is available still, it does work and it can be safely fitted if you understand what's going on and mark-out/drill/cut/fettle your modifications properly.
If I had known just what a lash-up the 90° bend constitutes, I would have gone looking for horizontally-mounted reels and tried to get them under the rear shelf, albeit perhaps with a bit of reinforcing ?
If anyone wants a sketch of where to aim to put the slots as seen from within the boot space, I think mine are about right and will be happy to oblige. Mine's a 1962 so the floor-nuts were already in place and all I had to do was cut slots in the carpets and fit modern eye-bolts, which were the same standard threads (7/16 UNF, no ?) as found on modern seat-belt attachments.
Last edited by rfs1957 on Sun Feb 12, 2017 4:23 pm, edited 1 time in total.
Rory
3.8 OTS S1 Opalescent Silver Grey - built May 28th 1962
3.8 OTS S1 Opalescent Silver Grey - built May 28th 1962
| Link: | |
| BBcode: | |
| HTML: | |
| Hide post links |

#5
Rory,
That's an interesting write up and I will be investigating my own 62 OTS which has a similar well-known-specialist-fitted setup and belts which are reluctant to rewind.
My reels are mounted vertically like yours, but the slots in my bulkhead are in the flat top section directly above the belt reels, rather than in the vertical section like yours. This means the belt is being pulled vertically up out of the the reel avoiding the inappropriate bend.
Consequently with the hood up, the belts work very well. However this design creates another problem, which is that when folded down, the hood presses down on the belt and causes retraction problems. Careful arrangement of the folded hood helps, but stronger return spring action would also help, otherwise I'll have to make some sort of shroud to keep the belt clear of the folded hood.
John '62 S1 OTS (now sold)
| Link: | |
| BBcode: | |
| HTML: | |
| Hide post links |
#6
Hi John,
Maybe that's what the well-known supplier intended me to do but didn't say so in the instructions ! However it doesn't really change very much in that there is still the 90? bend, it just takes place as you come out of the "parcel shelf" rather than off the reel like mine - neither is satisfactory, but the hood-interference with your installation sounds like an added complication.
I spent years retailing and mail-ordering and fitting in our own workshop either adapted or purpose-built parts for vehicle applications from areas as diverse from seats to petrol tanks to fuel-injection modules to gearboxes, and it was a real point of honour to us to have excellent diagrams and fitting instructions - if only so as to spend less time on the 'phone - so it really irritates me to be sold stuff where I end up having to re-invent the wheel, and feel "I'll do a better job if I ever do it again".
Generally the problem comes from the fact that the retailers never fit the bits themselves, and if they do, their mechanics don't think it's their job to get involved with showing others how to do what they do for a living.

I used to have a Kiwi workshop-foreman who had the best drawing hand I'd ever seen, and could rattle off stuff like this (one of my favourites, that I kept) in 10 minutes - so maybe I was spoiled ! Hey, I'll ask him to do the next seat-belt instructions ..............
Rory
3.8 OTS S1 Opalescent Silver Grey - built May 28th 1962
3.8 OTS S1 Opalescent Silver Grey - built May 28th 1962
| Link: | |
| BBcode: | |
| HTML: | |
| Hide post links |

#7 Inertia Reel Seatbelts
I found the picture below on a VW campervan forum that was discussing seatbelts. Sorry to lower this forum to their level.  Feel free to remove this post moderator!

Last edited by JimmyS on Tue Apr 17, 2018 12:17 pm, edited 3 times in total.
1964 FHC Project
1E20078
1E20078
| Link: | |
| BBcode: | |
| HTML: | |
| Hide post links |
#8
Could she actually wear a seatbelt ?
Neil
1962 S1 OTS
1967 S1 FHC
1962 S1 OTS
1967 S1 FHC
| Link: | |
| BBcode: | |
| HTML: | |
| Hide post links |

#9
I think the airbags get in the way...neil4444 wrote:Could she actually wear a seatbelt ?
:D
1969 S2 FHC - 1R20258
1993 Lancia Delta HF integrale Evo II
2008 Caterham Seven Roadsport
1993 Lancia Delta HF integrale Evo II
2008 Caterham Seven Roadsport
| Link: | |
| BBcode: | |
| HTML: | |
| Hide post links |
-
christopher storey
- Posts: 5698
- Joined: Sun Mar 09, 2008 3:07 pm
- Location: cheshire , england

#10
I assumed automatically that the photo was posted by Heuer, who has a well publicised interest in pneumatics
| Link: | |
| BBcode: | |
| HTML: | |
| Hide post links |

#11
Unfair! There is no E-Type content in that picture - double E possibly.
David Jones
S1 OTS OSB
1997 Porsche 911 Guards Red
2024 Lexus LBX
Add your E-Type to our World Map: http://forum.etypeuk.com/viewtopic.php?f=1&t=1810
S1 OTS OSB
1997 Porsche 911 Guards Red
2024 Lexus LBX
Add your E-Type to our World Map: http://forum.etypeuk.com/viewtopic.php?f=1&t=1810
| Link: | |
| BBcode: | |
| HTML: | |
| Hide post links |
#12 Re: Series 1 Seat-Belt fitting, and 'slack' Inertia Reel Belts.
Keen to pump up (ahem) certain topics, EE-Type related or not.


I was about to look around for a new set of belts in Red, to suit the budding new interior, and then came across these people through a well-informed posting elsewhere on the Forum.
http://www.fdts-seatbelts.co.uk/index.html
Given the hassle of fitting and getting alignments through the bulkhead just right, I really wanted exactly the same belts again, and wonder now whether I can't just get my originals refurbished ?

Before I get abuse about "shut up and buy a new set" I'd like to try and improve on the belt-run through the bulkhead, even if it means modifying the slots and the mounting points.

I'll post the results of my exchanges with FDTS and log the progress.
This time let's keep this on-message, boys.
Last edited by rfs1957 on Sat Feb 18, 2017 2:04 pm, edited 1 time in total.
Rory
3.8 OTS S1 Opalescent Silver Grey - built May 28th 1962
3.8 OTS S1 Opalescent Silver Grey - built May 28th 1962
| Link: | |
| BBcode: | |
| HTML: | |
| Hide post links |

#13 Re: Series 1 Seat-Belt fitting, and 'slack' Inertia Reel Belts.
Where did you get the chrome escutcheon that finishes the belt as it comes out of the rear parcel shelf?
Nick
1969 S2 2+2
1969 S2 2+2
| Link: | |
| BBcode: | |
| HTML: | |
| Hide post links |
#14 Re: Series 1 Seat-Belt fitting, and 'slack' Inertia Reel Belts.
Rory, l have been speaking to FDTS regarding inertias for the OTS. They recommend fitting behind the seat on the vertical and using a guide for the belt where the original mount is. This ensures the belt is at the correct height whilst maintaining the 90° required for the reel.
Angus 67 FHC 1E33656
61 OTS 875047
61 OTS 875047
| Link: | |
| BBcode: | |
| HTML: | |
| Hide post links |

#15 Re: Series 1 Seat-Belt fitting, and 'slack' Inertia Reel Belts.
Rory, I have this weekend fitted inertia belts to my 1967 Roadster.
I used the Seccuron 514/30, which can be mounted in any attitude.
One adjusts the settings on the reel acordingly, which I am sure you know
My car does have belt attachment points, the one on the rear is ontop of the scuttle.
To overcome the problem when the hood is down, I have used stout flat bar 5mm x 30mm, bent to enable the reel to be mounted against the vertical section.


Tony in Devon
1967 Series 1, 4.2, OTS, RHD, Black.
1967 Series 1, 4.2, OTS, RHD, Black.
| Link: | |
| BBcode: | |
| HTML: | |
| Hide post links |
-
 ralphr1780
- Posts: 1103
- Joined: Wed Apr 11, 2012 4:29 pm

#16 Re: Series 1 Seat-Belt fitting, and 'slack' Inertia Reel Belts.
Rory, if I understood correctly, then by lowering the pictured reels positioning in the boot by few cm you should get a vertical pull on the belt. It is then for you "only" another couple of holes to drill.
I am contemplating this installation closely, as I am actually in the process of deciding best option for mine before starting to fit the insulation and carpet.
I am contemplating this installation closely, as I am actually in the process of deciding best option for mine before starting to fit the insulation and carpet.
Ralph
'69 OTS + '62 OTS - Belgium
'69 OTS + '62 OTS - Belgium
| Link: | |
| BBcode: | |
| HTML: | |
| Hide post links |
#17 Re: Series 1 Seat-Belt fitting, and 'slack' Inertia Reel Belts.
Fitting them in the boot of the OTS keeps the cockpit clear and means that any impact load is spread across the whole diaphragm, which I reckoned would absorb a lot of energy as it crumpled and the belts tried to rip their way throught the steel sheet.
In fact, to get the reels in the right place on the RHS of the car means seating it on an area of the diaphragm where there is a corrugation or stiffening dimple and I'm about to sort this out, whilst beefing up the seating for the bolt, so it sits flat - which it didn't before, as I'd fitted the belts whilst the car was upholstered and you couldn't see really what was going on.
The reels as supplied via CMC (which is where the escutcheons came from) have to be mounted on a vertical surface, and as the belt pulls off the reel vertically too, so at some point it has to go through 90°to get to the seat.
I would like to try and avoid this by having the belt pull off the reel and go straight through the bulkhead, although this does carry the penalty of lowering the effective height of the belt anchorage by 40mm.
It's a moot point whether this is matters - it does introduce a slight vertical component on the shoulder in the case of an accident, depending on the hight of the driver and whether the seat has been lowered etc
And as John Kingsetts has pointed out, taking it through the upper horizontal shelf causes complications with the hood, which are largely avoided (some care with the hood bag required) in the solution I adopted.
Another option would be to mount the appropriate "reverse-wound" reels under the shelf, horizontally, and have them pulling straight off the drum through the back diaphragm - but that moves the belt exit a further 40mm lower in relation to a top-shelf exit point.
Last edited by rfs1957 on Sat Feb 18, 2017 2:18 pm, edited 3 times in total.
Rory
3.8 OTS S1 Opalescent Silver Grey - built May 28th 1962
3.8 OTS S1 Opalescent Silver Grey - built May 28th 1962
| Link: | |
| BBcode: | |
| HTML: | |
| Hide post links |

#18 Re: Series 1 Seat-Belt fitting, and 'slack' Inertia Reel Belts.
Hi Rory.....just thought i would post what Chris Vine did..more or less the same as you.....the more info in the thread the better http://etype.chrisvine.com/2015/04/fitt ... eat-belts/
Steve
69 S2 2+2 (sold) ..Realm C type replica, 1960 xk150fhc
69 S2 2+2 (sold) ..Realm C type replica, 1960 xk150fhc
| Link: | |
| BBcode: | |
| HTML: | |
| Hide post links |
#19 Re: Series 1 OTS Seat-Belt fitting, and 'slack' Inertia Reel Belts.
Yes Steve, good idea, there are some interesting observations there.
Personally the width of the slot to be cut for the belts didn't bother me at all, as I consider that whilst you can probably get away with as little as 6mm if you separate the belt from the core upon assembly, you ought to leave enough space to either side to avoid contact with the bulkhead steel anyway - through which the end buckle will then pass.
However Chris has obviously found the solution to the 90° bend as his belts do indeed come "flat off the top" of the reel.

The above resumes, I think, the difference between what some of us have got :
90° Pull Off Reel
and what Chris uses :
Straight Pull Off Reel
The issue of the trim can got around by locating a spacer under the reel-bracket - shown as red squares in the section, I forgot to label them - equivalent to the thickness of the boot bulkhead trim - see Suggested Assembly.
Last edited by rfs1957 on Sat Feb 18, 2017 2:19 pm, edited 1 time in total.
Rory
3.8 OTS S1 Opalescent Silver Grey - built May 28th 1962
3.8 OTS S1 Opalescent Silver Grey - built May 28th 1962
| Link: | |
| BBcode: | |
| HTML: | |
| Hide post links |

#20 Re: Series 1 Seat-Belt fitting, and 'slack' Inertia Reel Belts.
Is the bottom of the bar bolted through the bulkhead, Tony?ETTony wrote: To overcome the problem when the hood is down, I have used stout flat bar 5mm x 30mm, bent to enable the reel to be mounted against the vertical section.
Your setup is similar to the one Jaguar used with inertia reels in later cars. There is a B+W photo in the link Steve gave to Chris Vine's site http://etype.chrisvine.com/2015/04/fitt ... eat-belts/
My understanding is that the bottom of the much thinner (and quite flexible) Jaguar strap is not fixed to the bulkhead, so under load will be pulled up and forwards from the bulkhead.
Joe
1963 3.8 OTS
| Link: | |
| BBcode: | |
| HTML: | |
| Hide post links |