IRS Stands, Diff-Half shafts, Shimming, IRS rubbers, IRS brake-pipes, all things IRS.

Technical advice Q&A
User avatar

Topic author
rfs1957
Posts: 1324
Joined: Sat Jan 15, 2011 2:52 pm
Location: Languedoc - France
France

#1 IRS Stands, Diff-Half shafts, Shimming, IRS rubbers, IRS brake-pipes, all things IRS.

Post by rfs1957 » Sat Jun 14, 2014 3:25 pm

This is a post that grew and grew, I've re-titled it to reflect this (July 2022) at the same time as I've added to the subject matter by introducing brake-pipe routing.

It began thus back in 2014 ..........

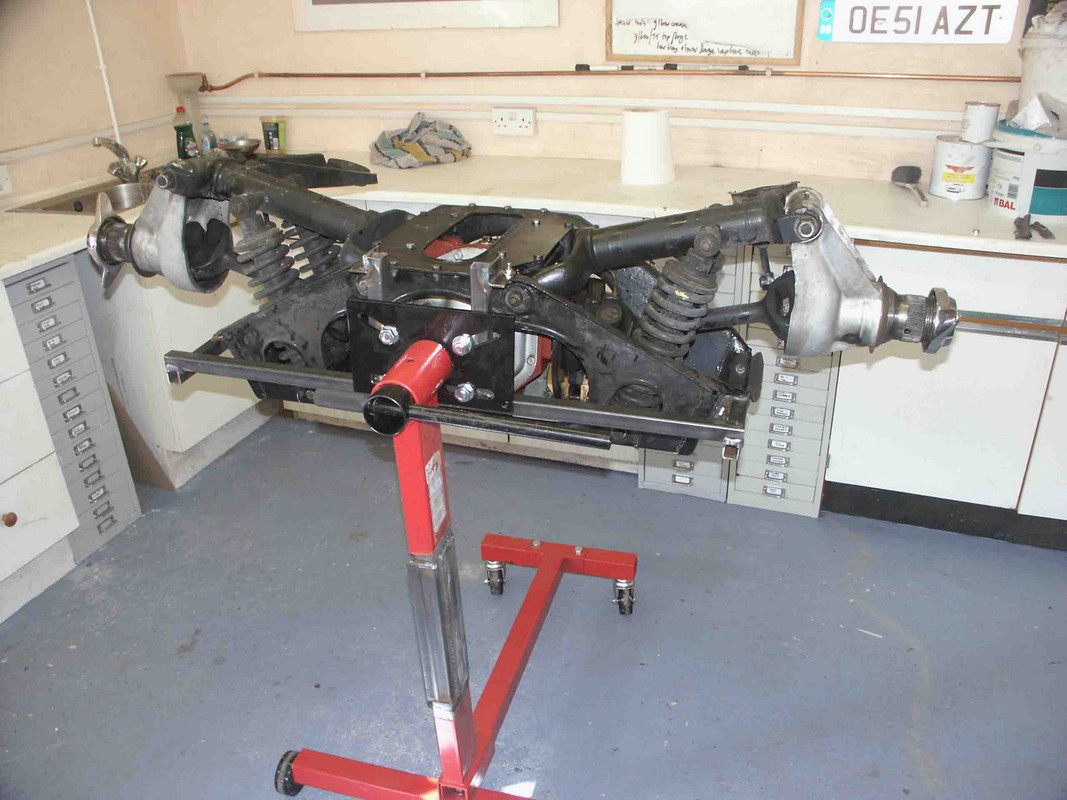
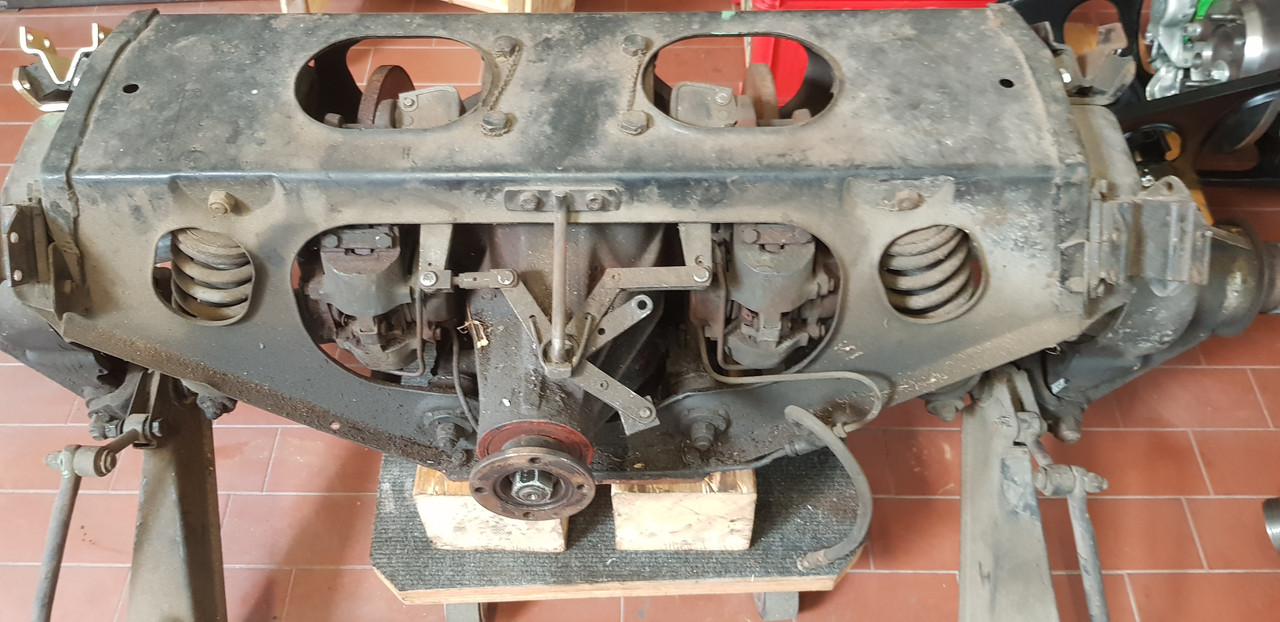
The ease with which the IRS can be got in and out of the car led me to feel that I was using the wrong tools to make the most of it ; yes, it is possible to use a trolley jack judiciously placed, or construct wheeled platforms, but once you?ve got it out the IRS is a bitch to manoeuvre and work on.

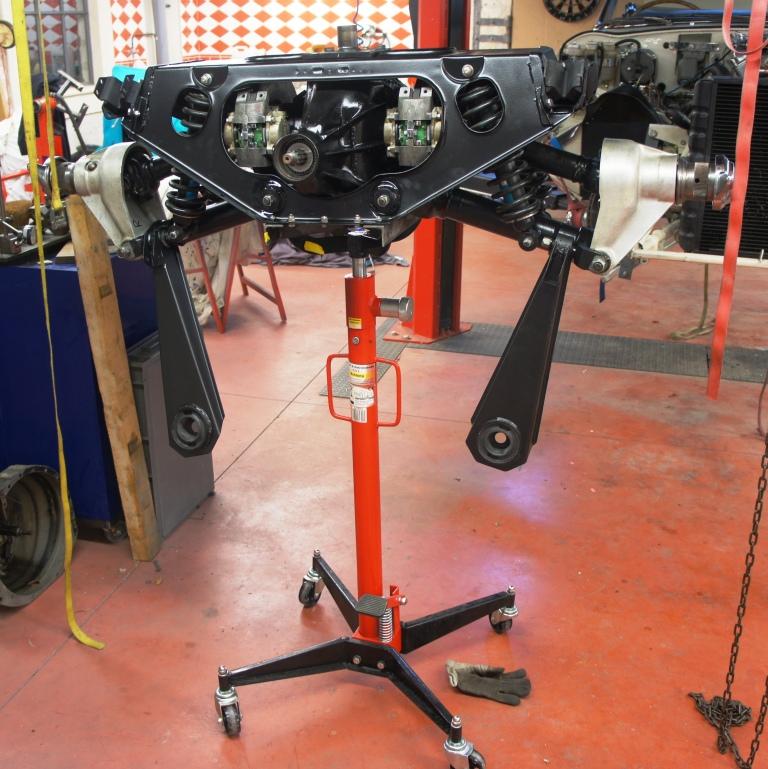
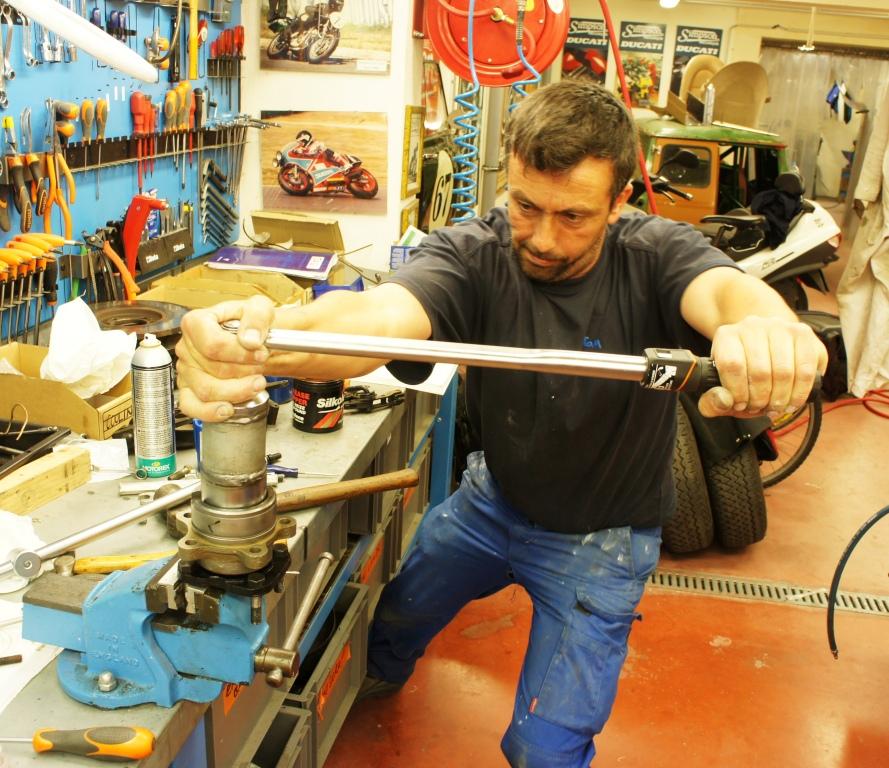
Like an increasing number of Forum contributors, I use a 2-post lift - so the ridiculously low-price (£60 to £100) of hydraulic transmission jacks like these

http://www.ebay.co.uk/itm/Transmission- ... 4d1a84a6c4

seemed like a great starting point to make a tool that would simplify getting the IRS in and out, and make working and stripping it much more comfortable - and even safer, which should find an enthusiastic echo from some Forum contributors.

The one I bought last week is just like that, although with us being so rich in France they cost more here .....

I am not claiming paternity, I think another contributor suggested something not dissimilar to what follows, but I think these refinements are worth the effort.

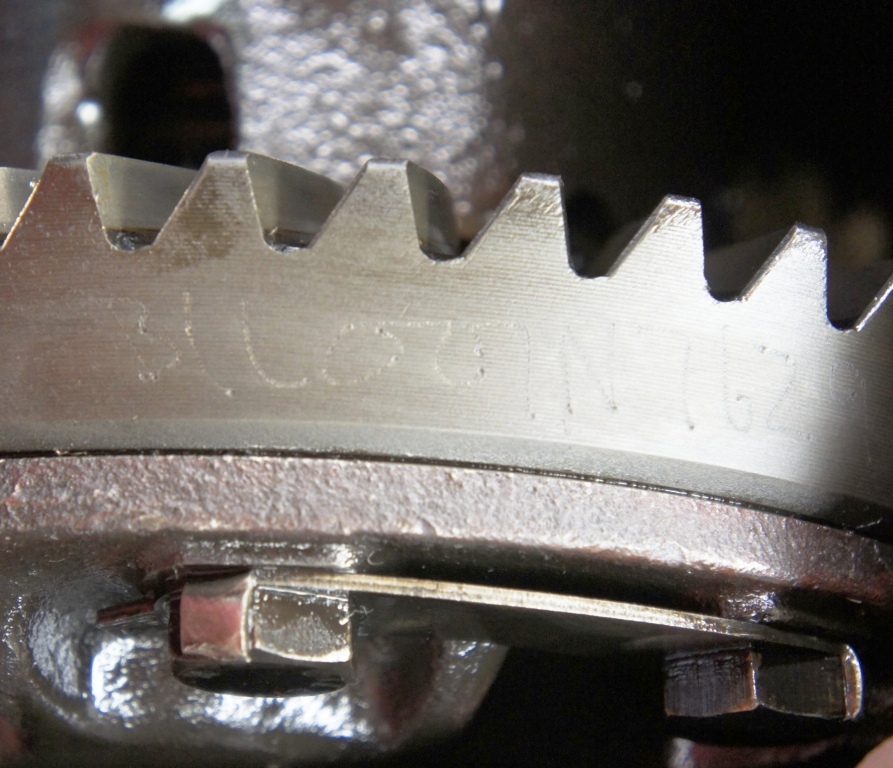
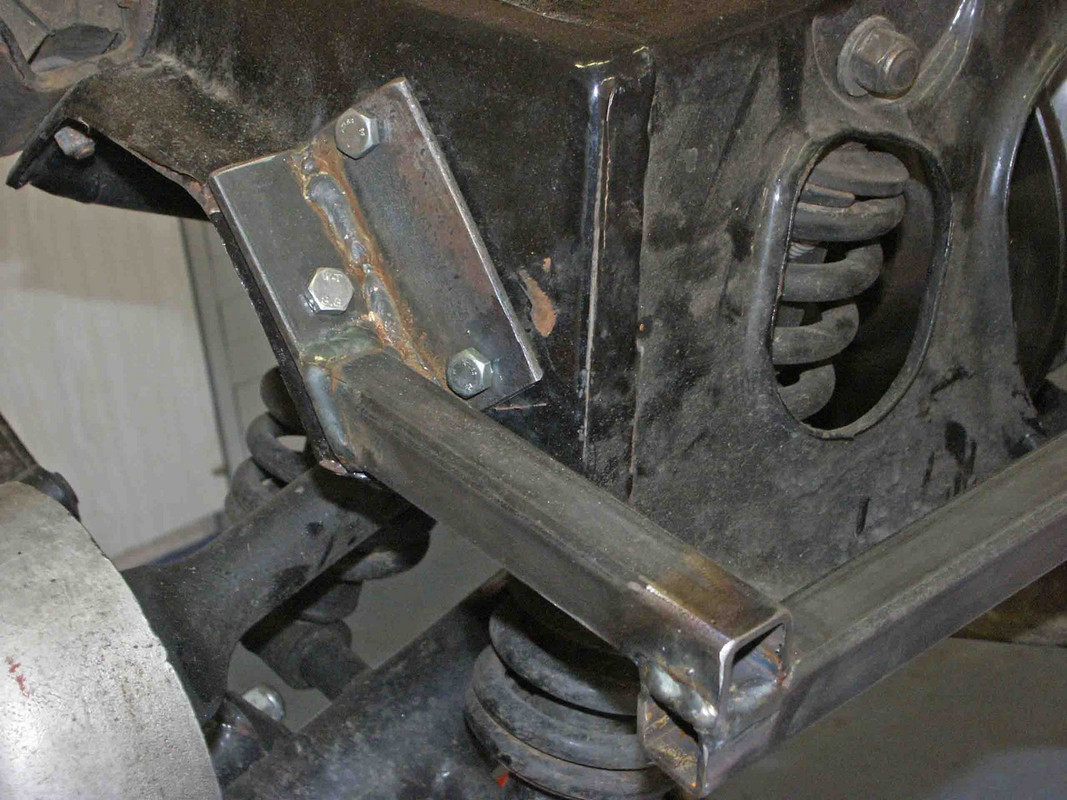
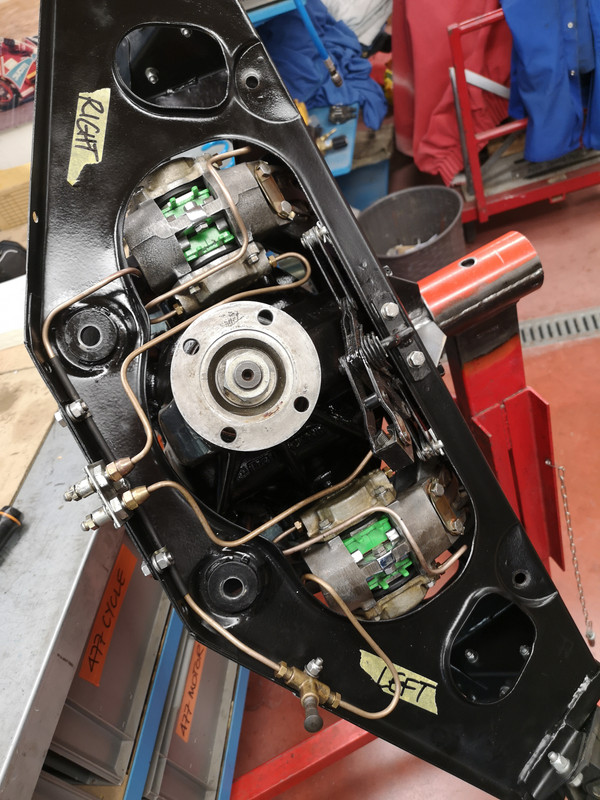
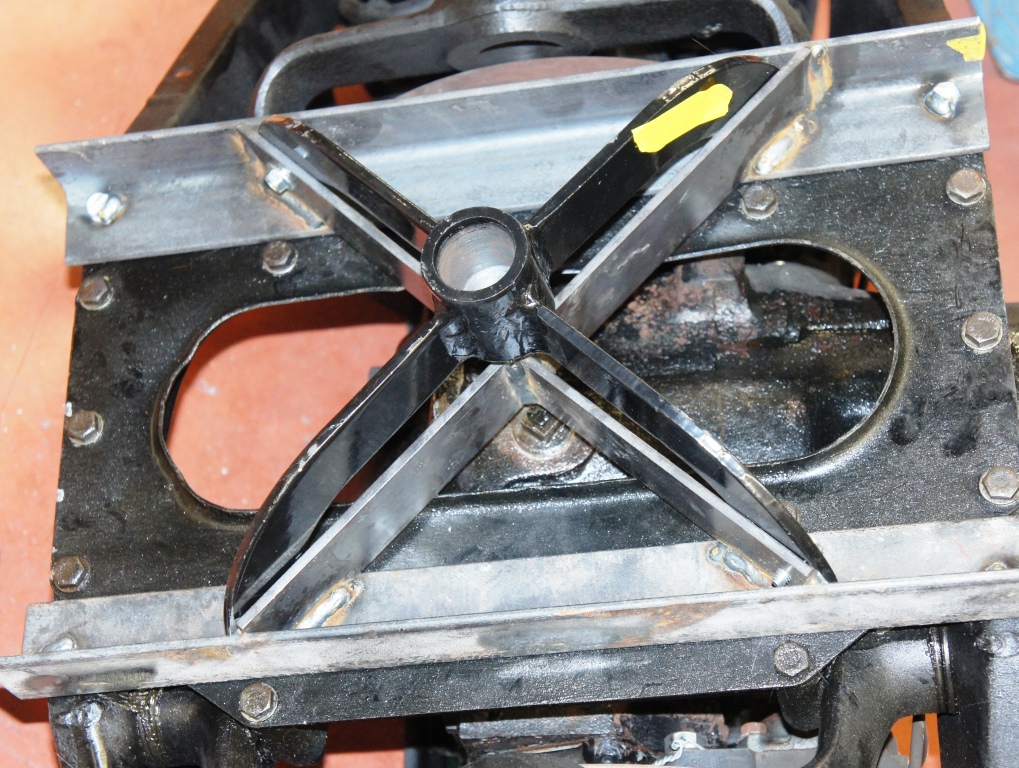
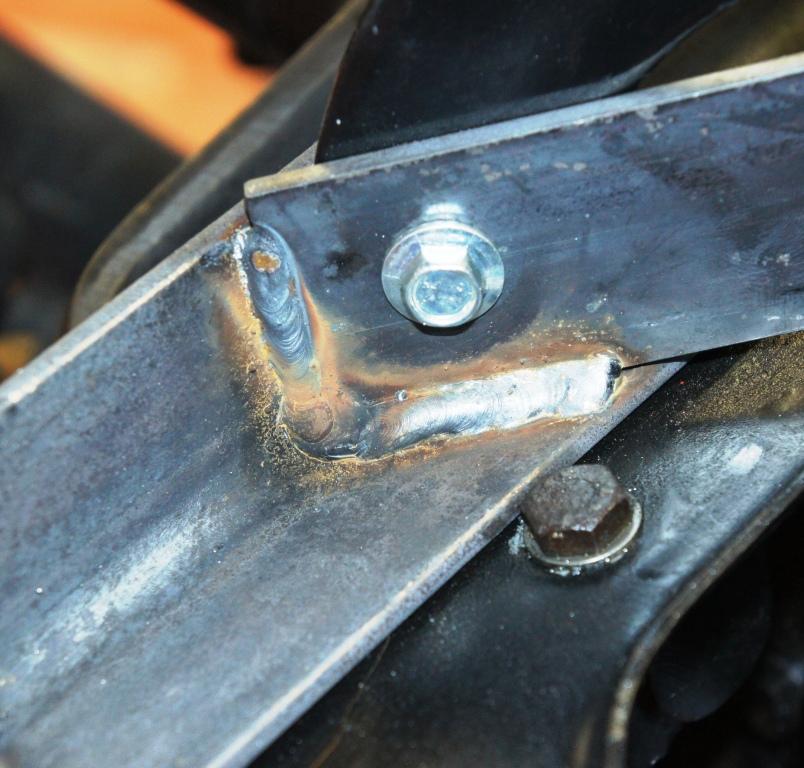
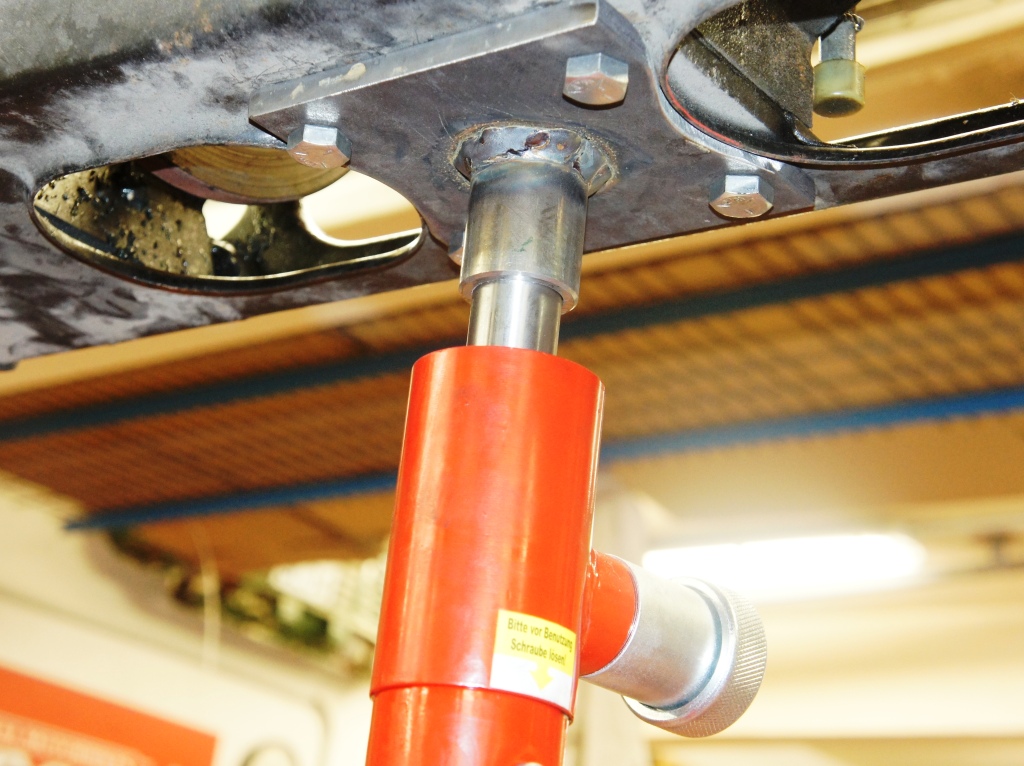
The standard supplied "crab" (as I shall call it) is just a 4-fingered scoop based around a steel slug that is bored to 30mm to accept the top of the ram, and just pops into place.

Image

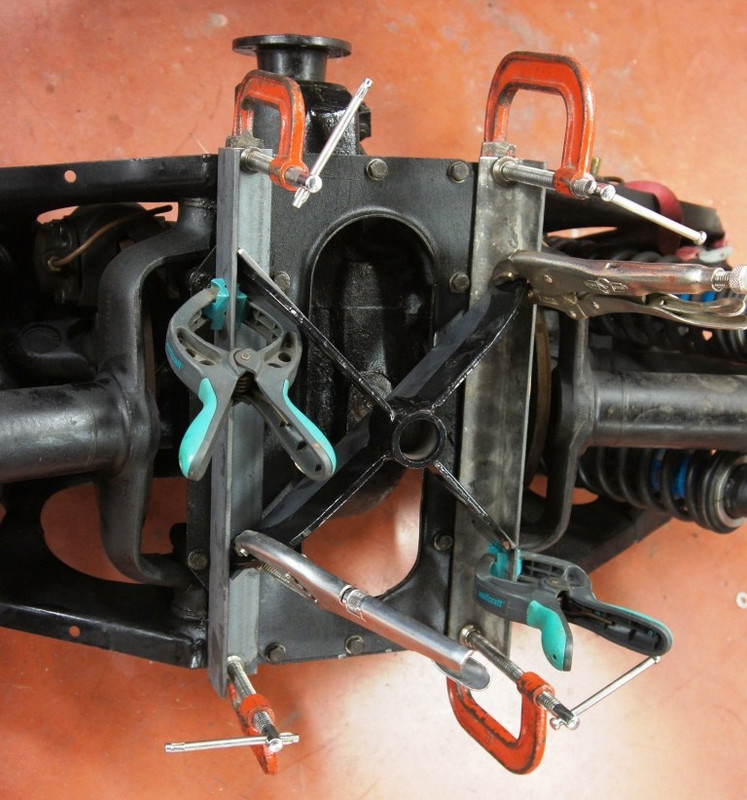
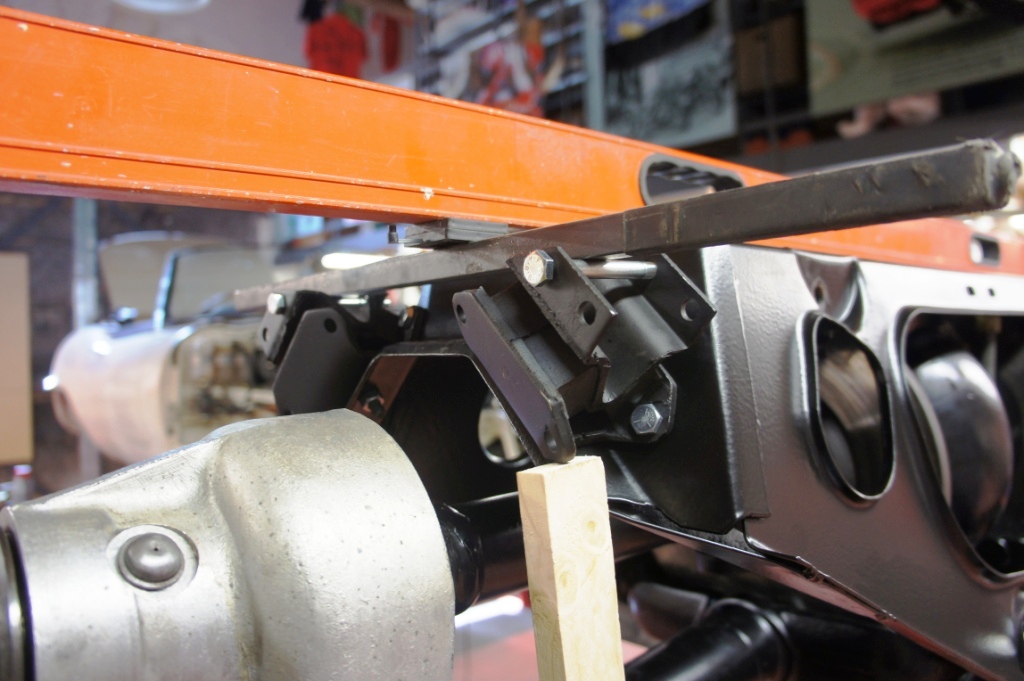
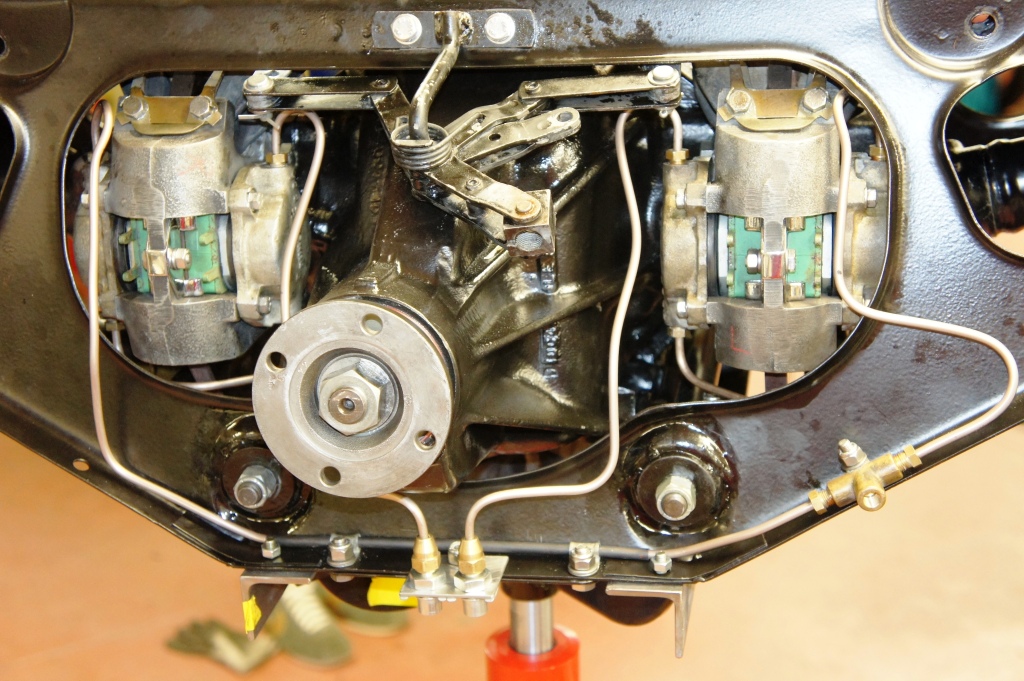
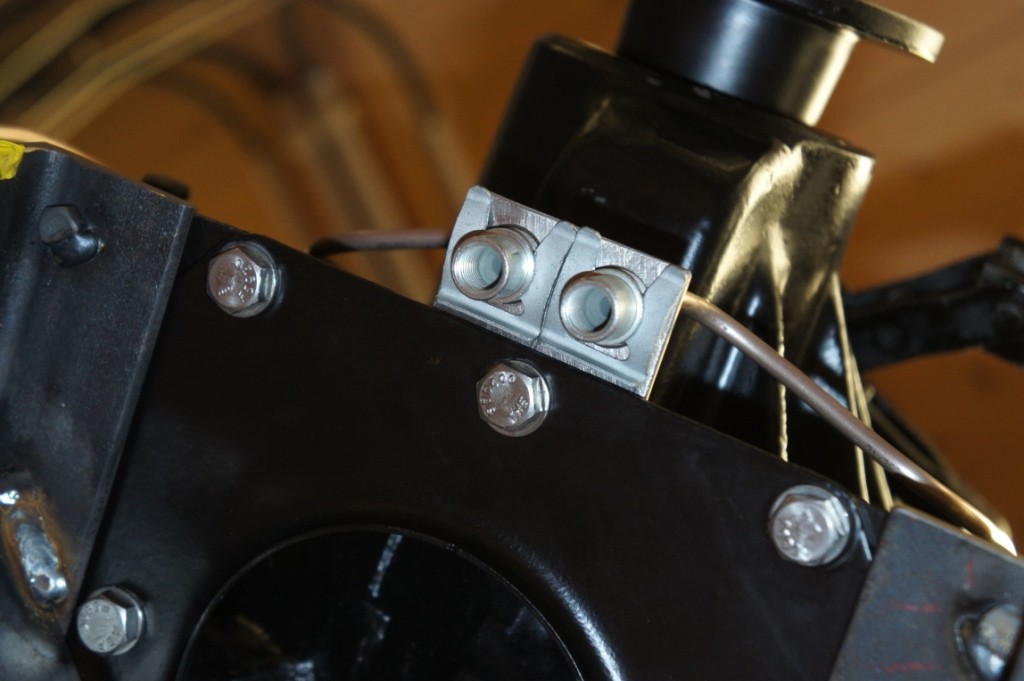
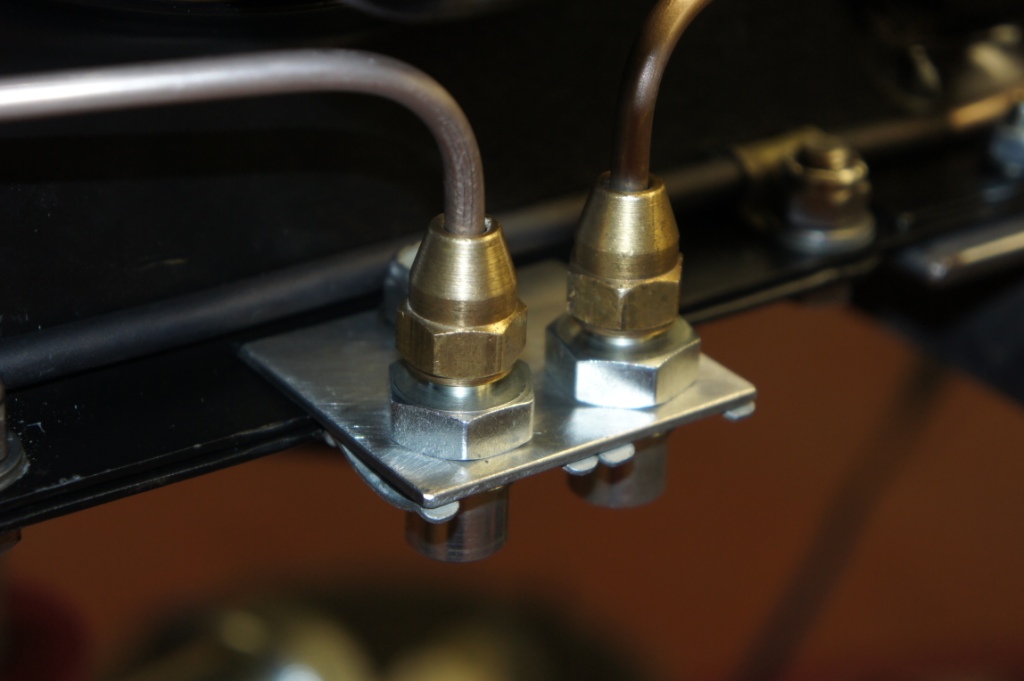
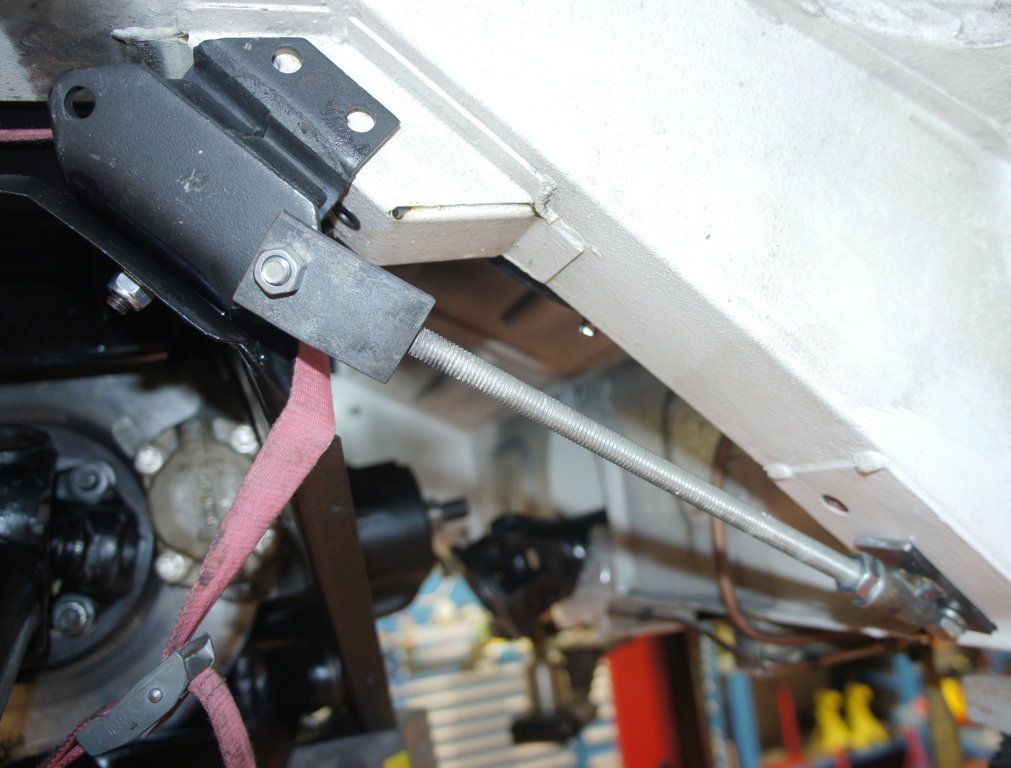
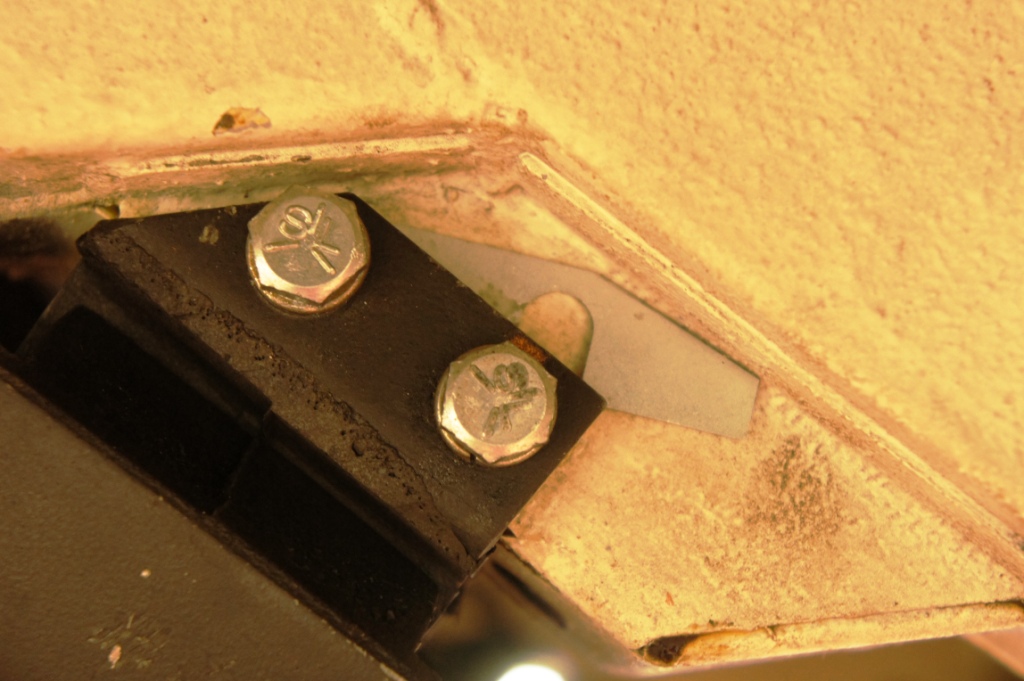
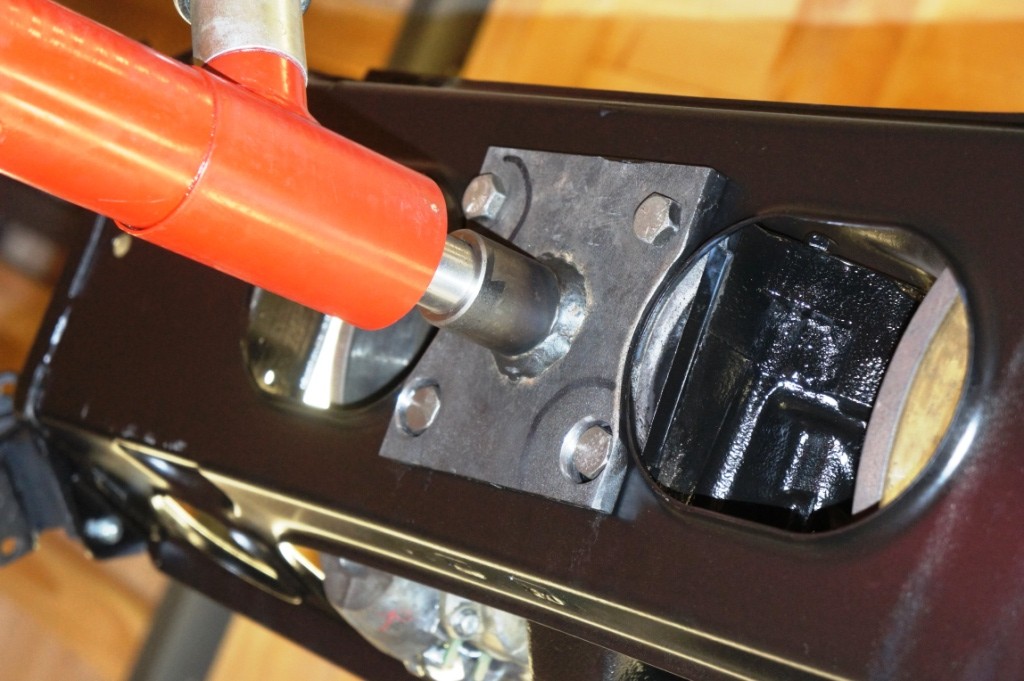
I used two bits 40x40x4 angle 410mm long to sit - conveniently - over flat areas of the IRS cradle base-plate, held in place (parallel and square) with G-cramps, coinciding with - conveniently - four spare free 5/16 holes that were un-used on my cradle, and are presumably found on all models ? If not there would be other ways of obtaining the same grip.

I set the centre of the crab about 25mm off-centre towards the front of the IRS, guessing that it was probably front-heavy, but I don't think it is that critical in practice - as soon as you take bits off the IRS you have lost any pretention of balance, and my 'prototype' works just fine.

Image

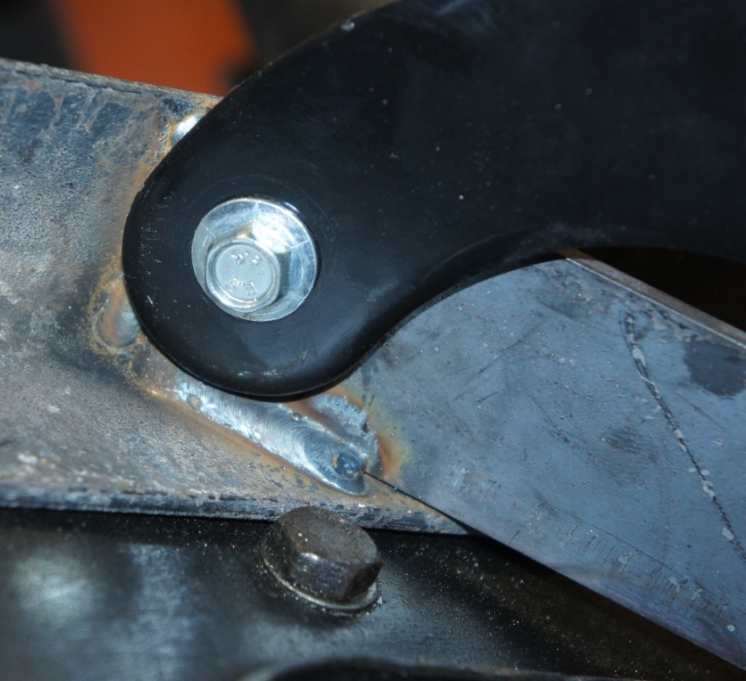
The 4-fingered crab of the jack sits comfortably under the angles, and 3 bits of suitably sized 40x4 strip, clamped temporarily to the fingers, can be welded into position.

Image

Image

Image

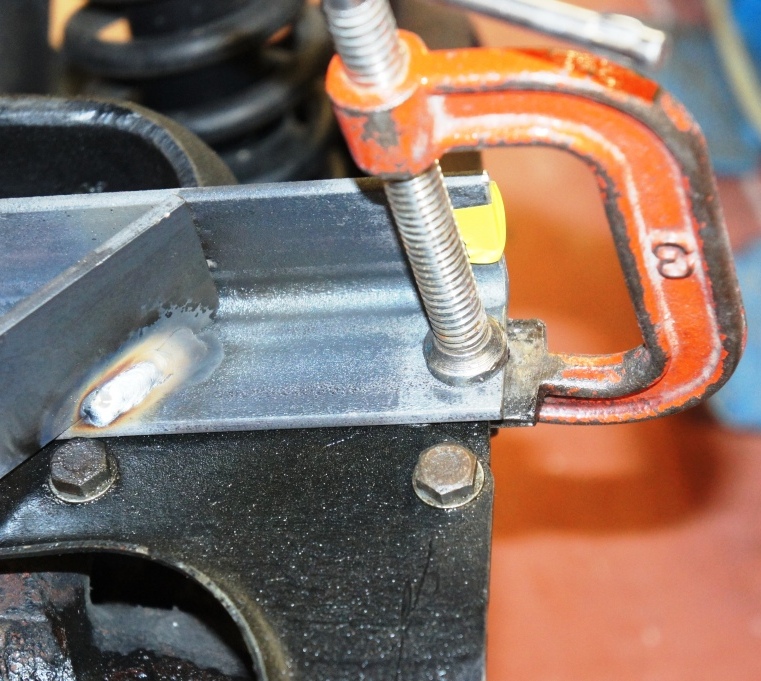
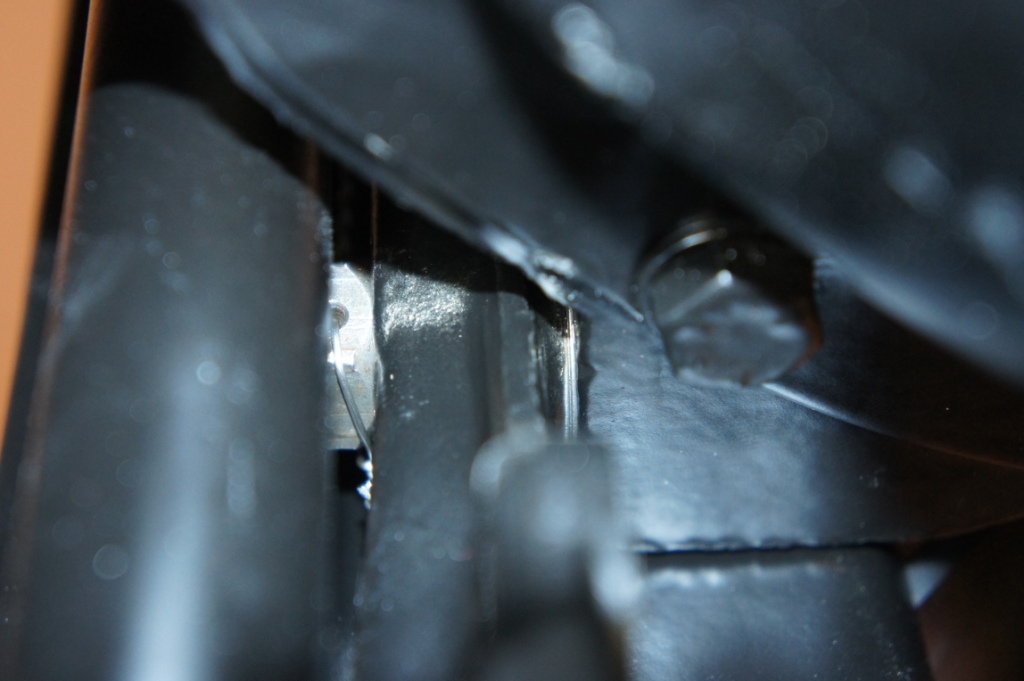
The 4 spare holes can be scribed through to give their position on the steel angles, drilled through (I did 8mm, nothing wrong with a bit of slop) then 4 x 6mm or 1/4 UNF bolts welded into place with the jig sitting on the IRS to get the right alignment.

Image

Image

Image

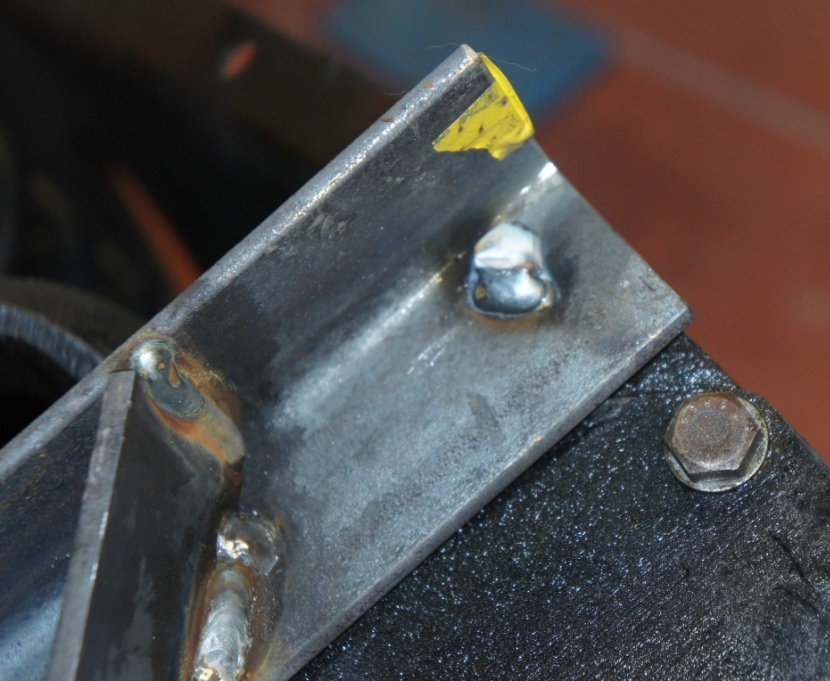
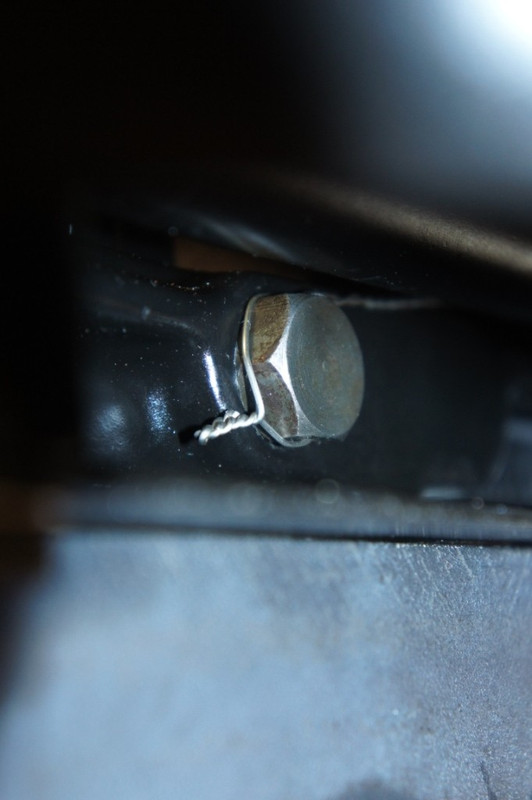
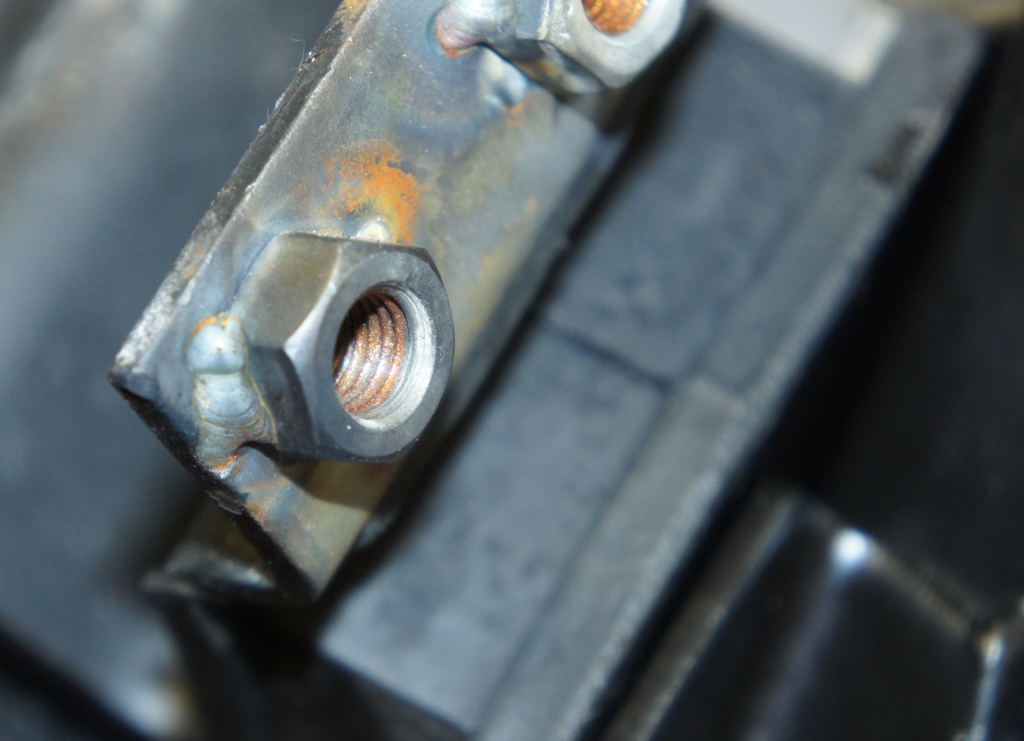
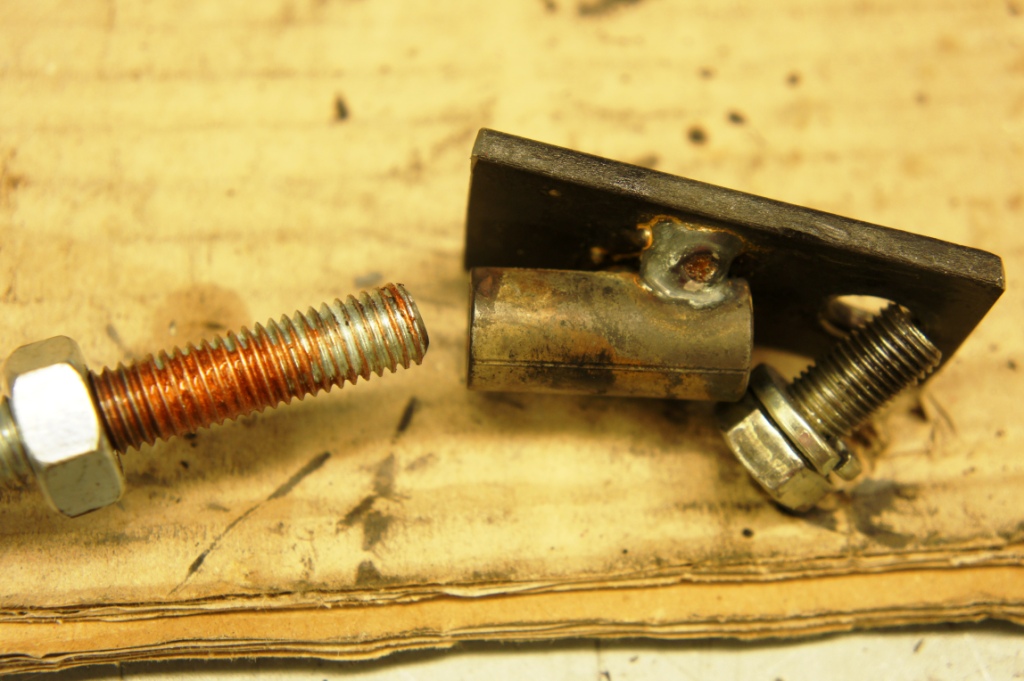
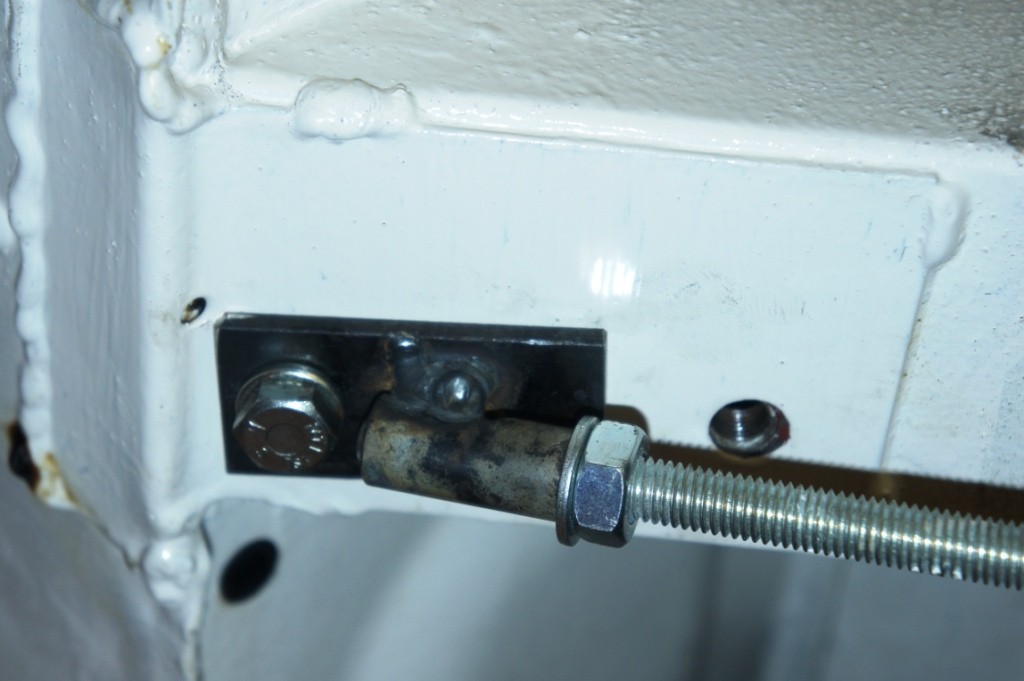
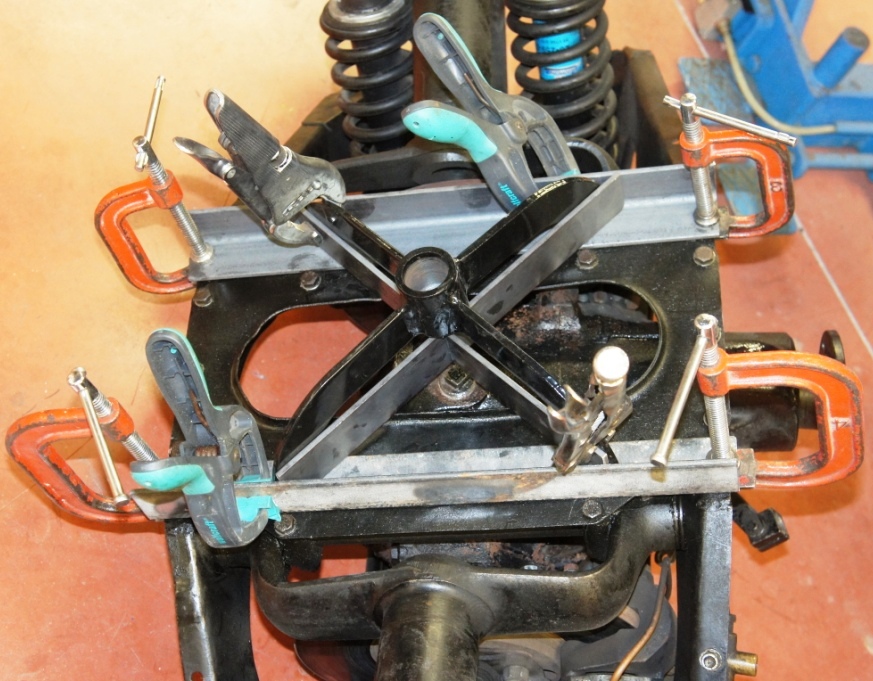
For installation and removal only, you could leave the jig at that - it can't move anywhere, being trapped by the fingers of the crab - but for overhaul and imbalanced conditions it needs a couple of drilled and tapped holes in 2 fingers so that crab and jig are inseparable.

Image

Image

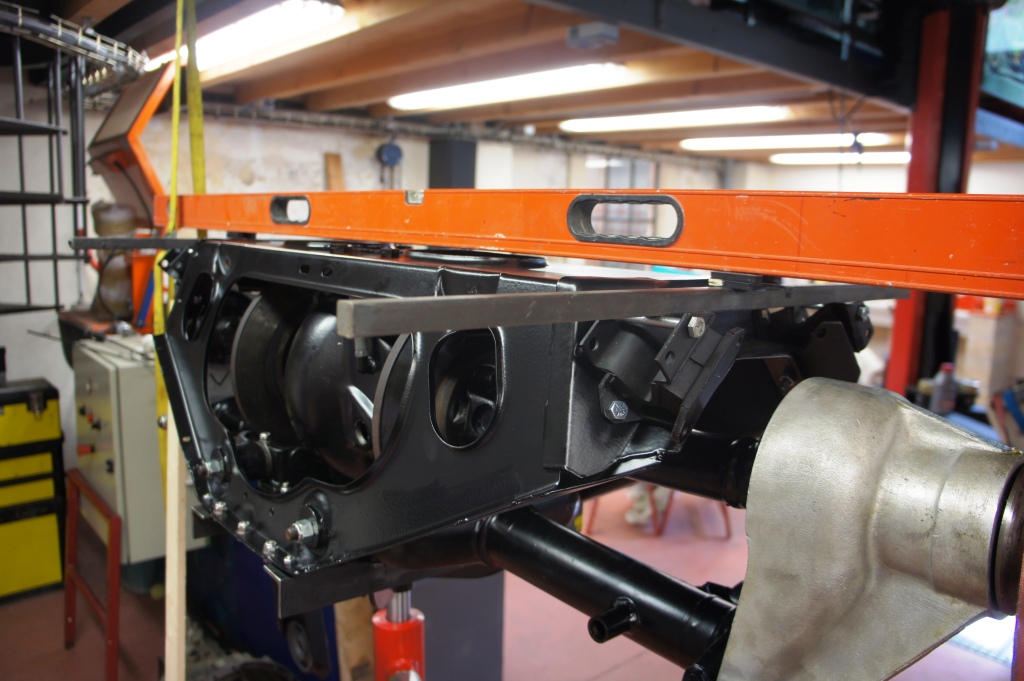
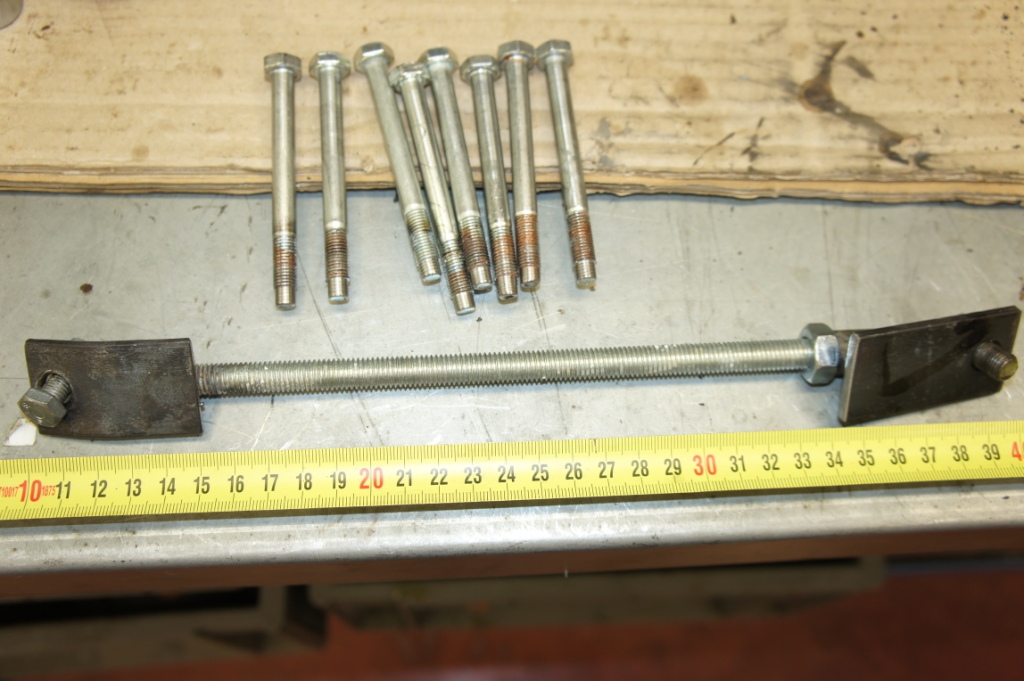
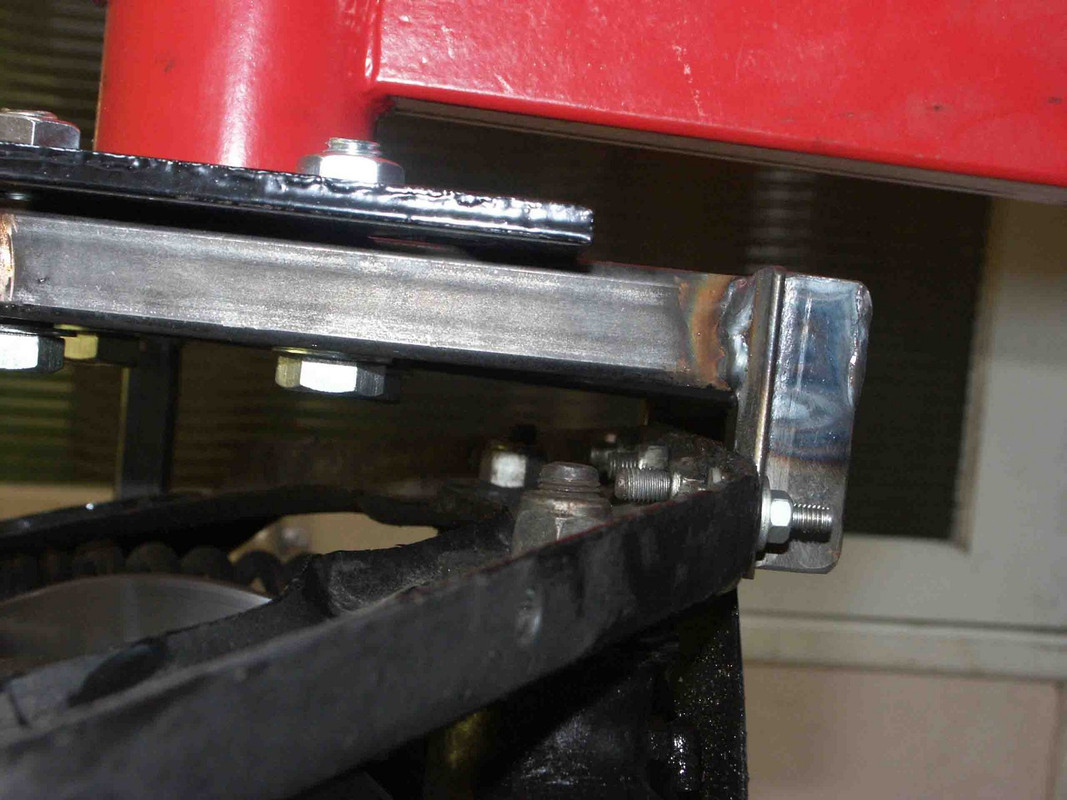
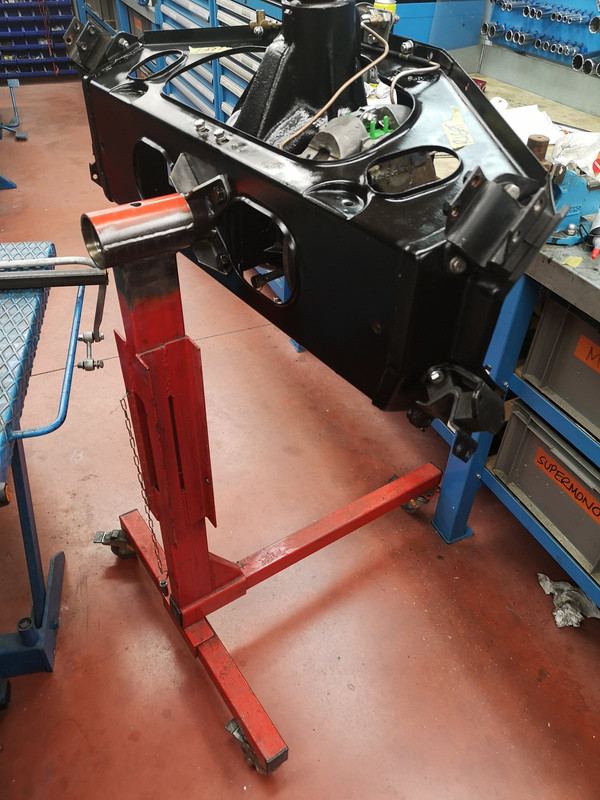
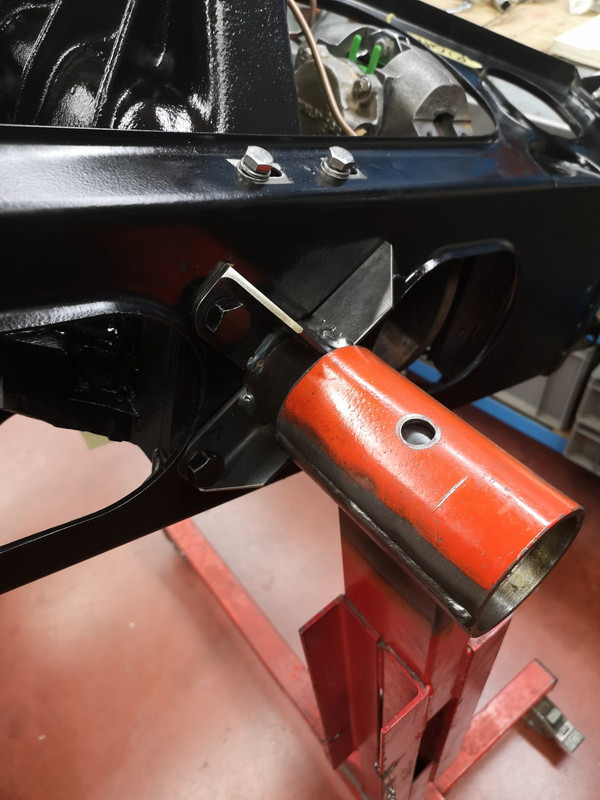
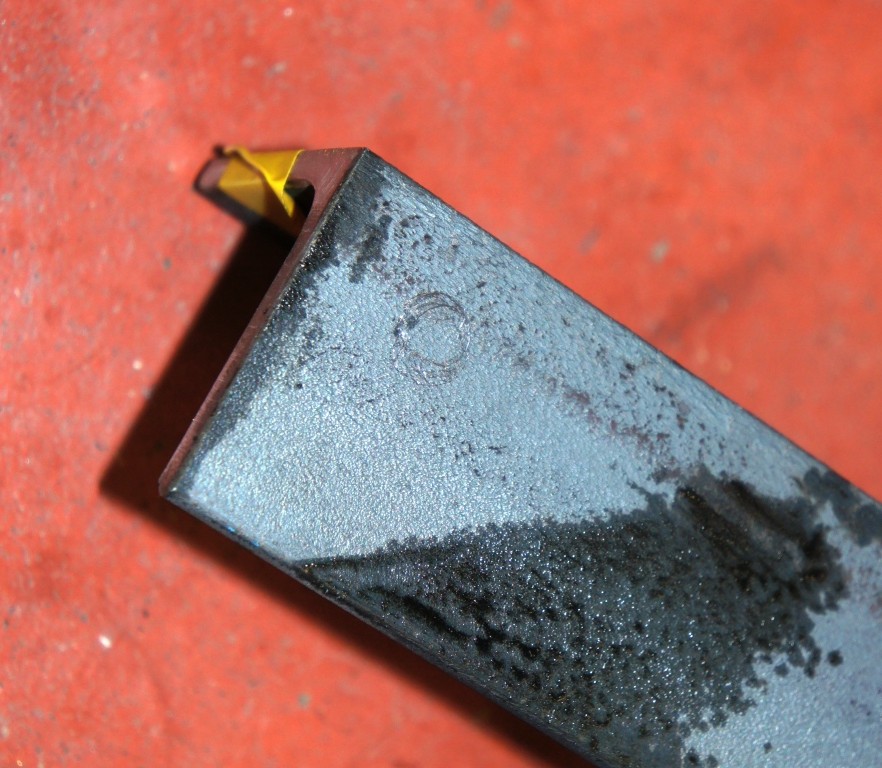
It would be perfectly possible to tweak the design, abandon the supplied crab completely, and just use another bit of 40mm steel bar bored to 30mm as a footing.

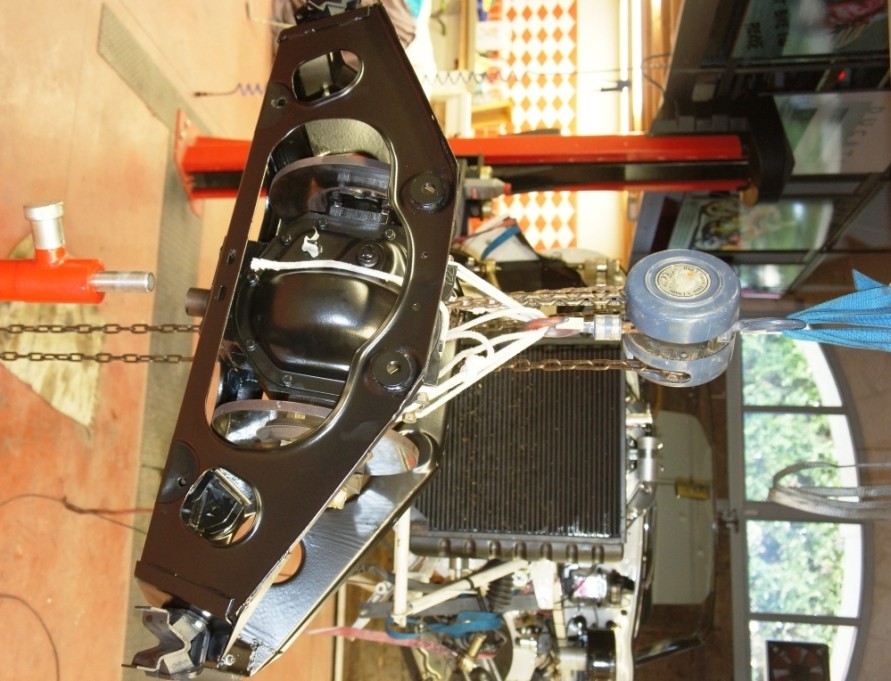
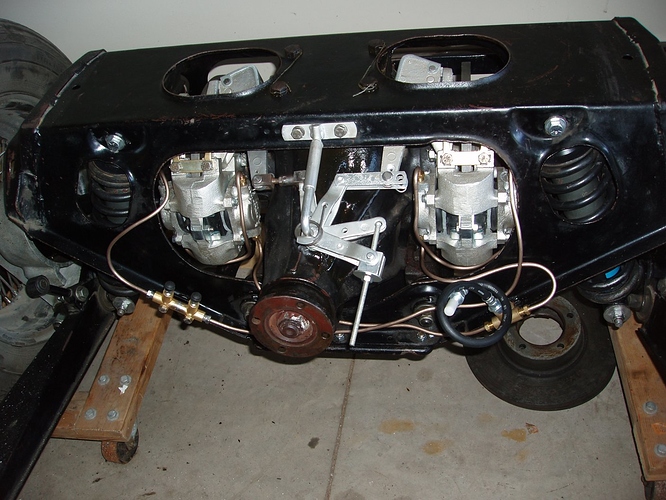
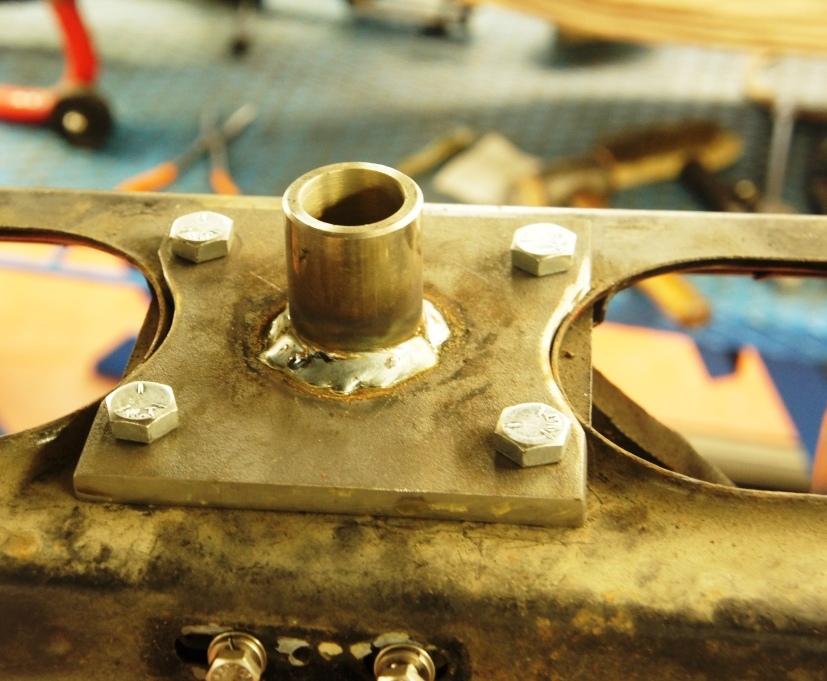
Which is what I did for the other side, since for the purposes of much of the work done on the IRS it?s actually a lot easier to work "upside down".

Image

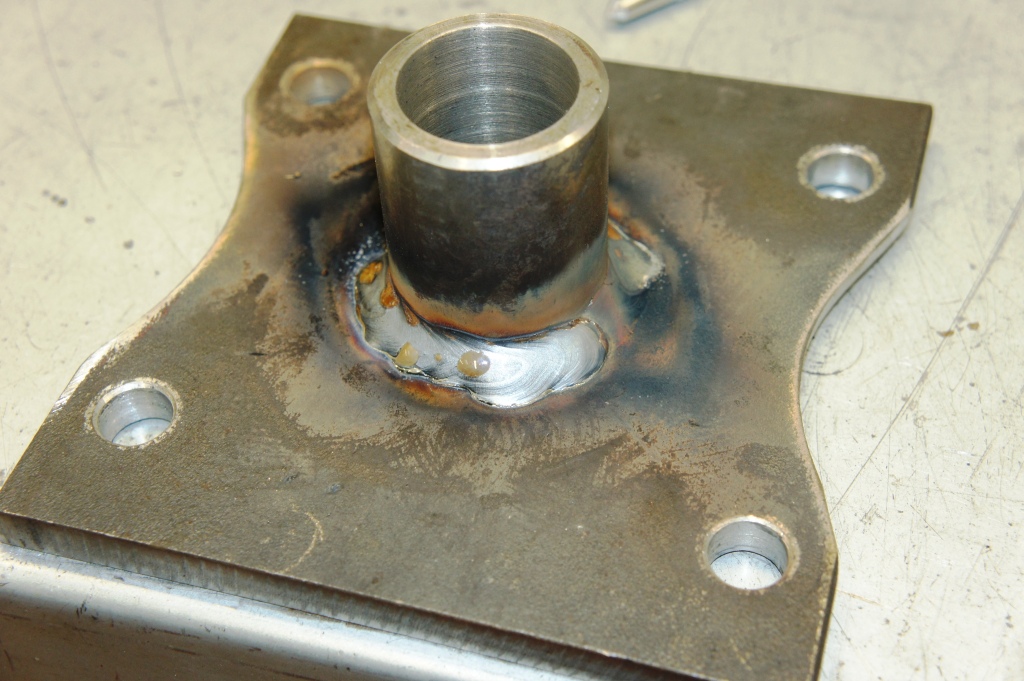
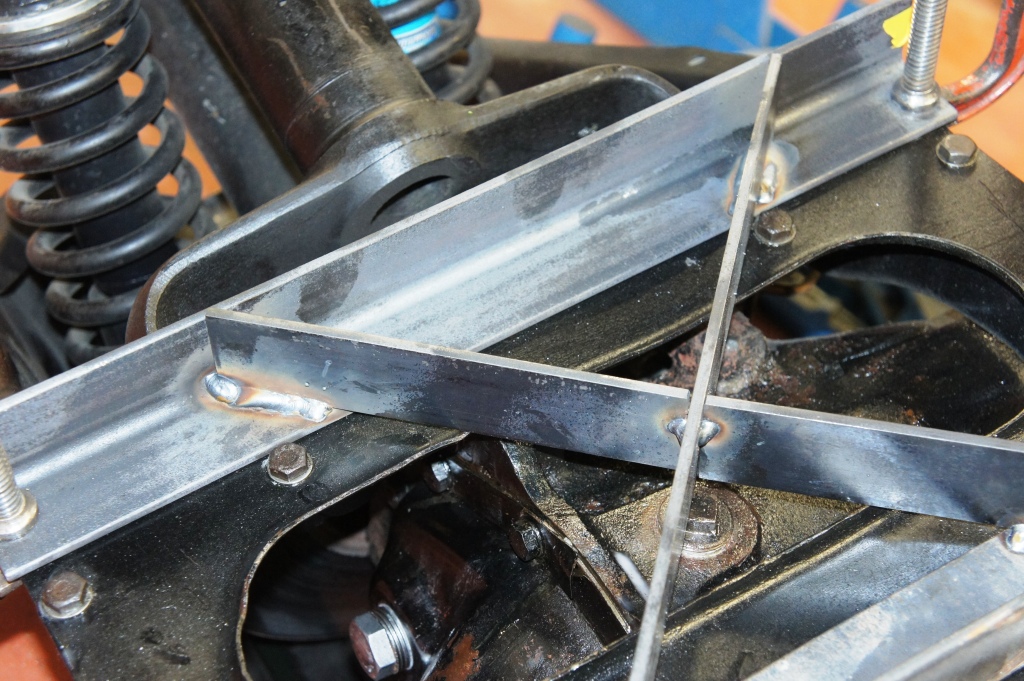
The footing of the drillings works out at a rectangle 109.5mm by 92mm from my measurements, I used a bit of 10mm(excessive) plate 140mm x 140mm, holes taken out to 13mm and used UNC bolts 1-1/2" long ; the profiles for the cage openings are tedious to cut with an angle grinder, best finished with a coarse flap-disc to get a nice radius to accompany the cage's flare, but the result looks nice.

Image

Image

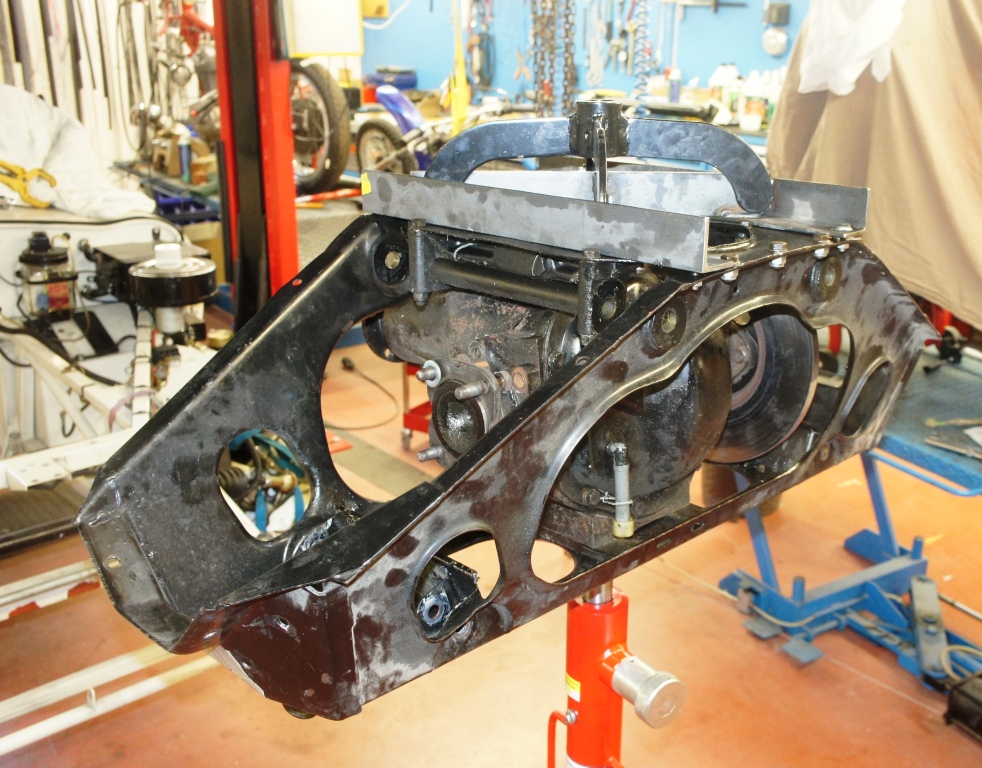
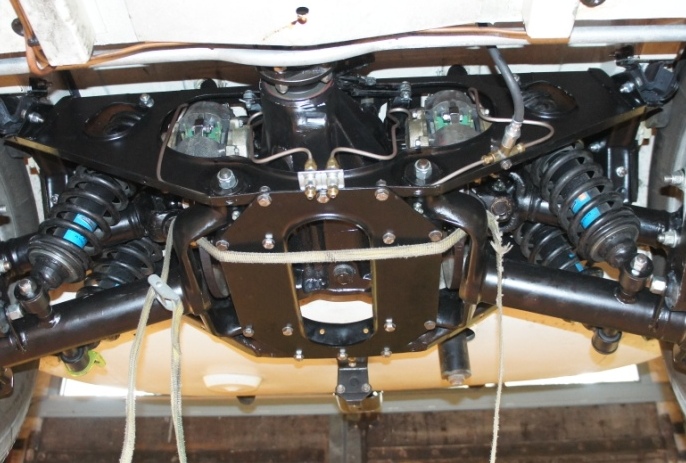
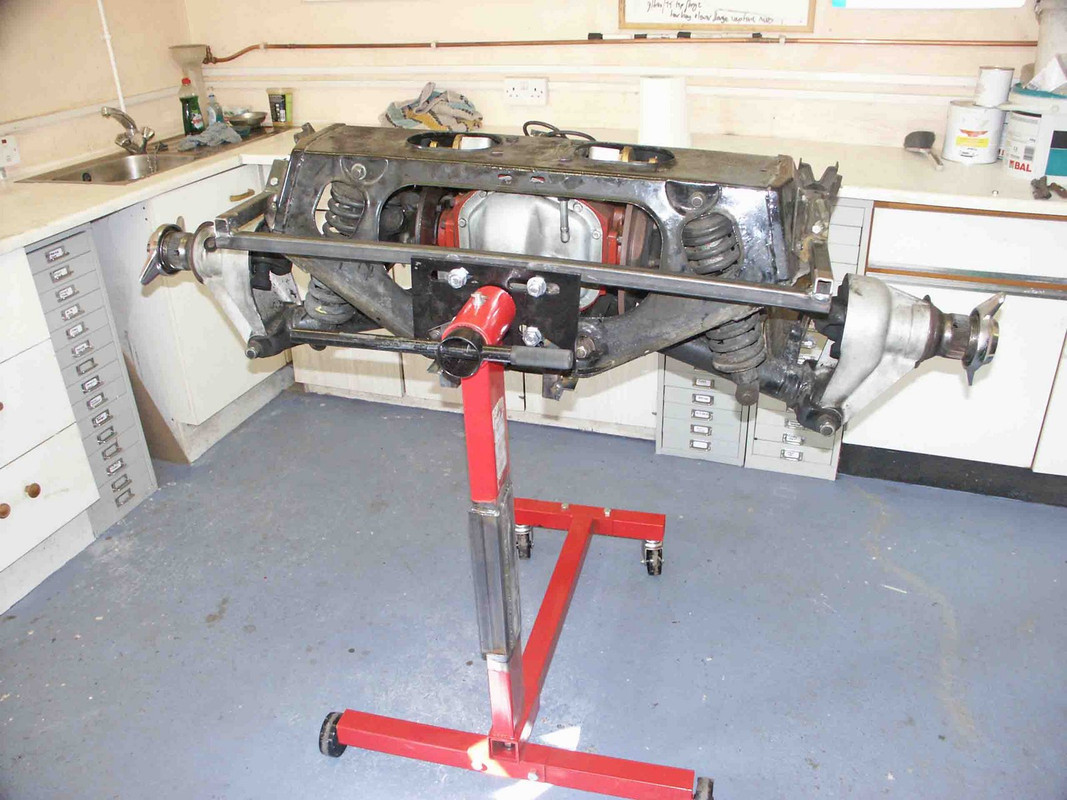
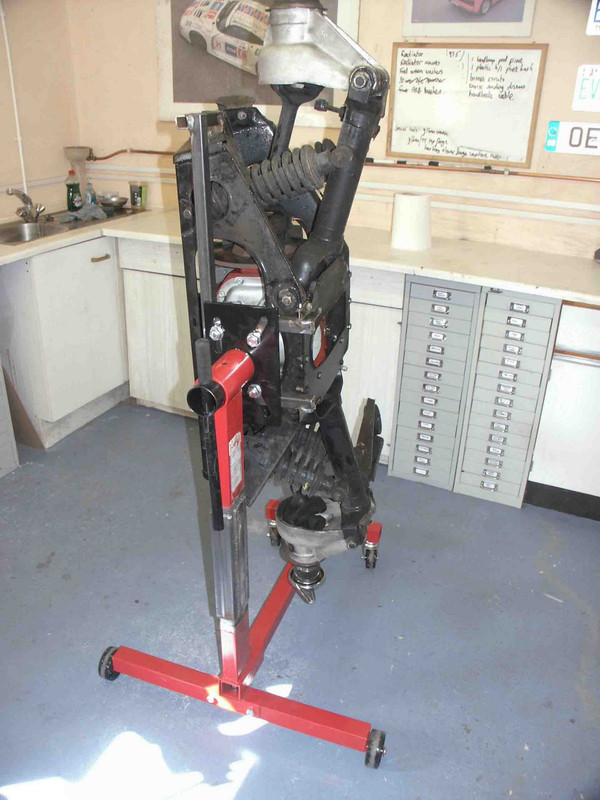
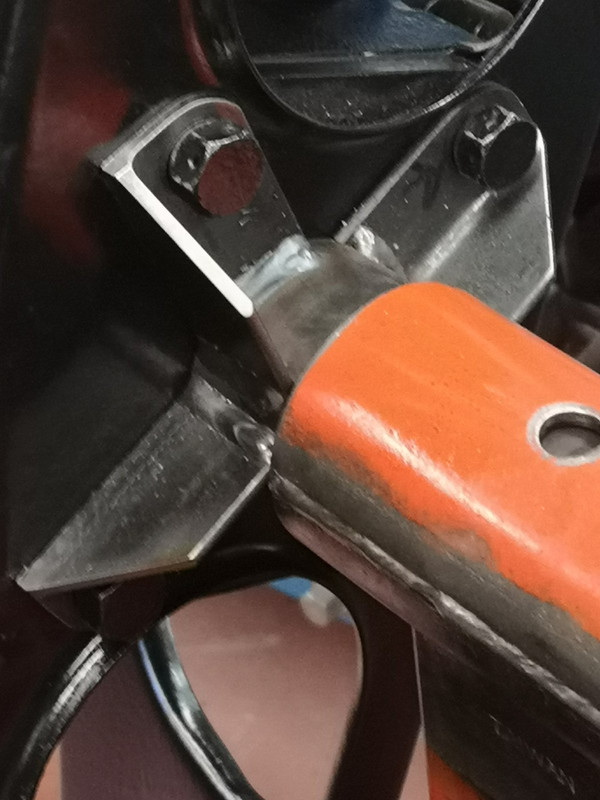
Beyond the obvious advantage of fast and safe installation and removal of the IRS, and the faculty to just wheel the thing about, this set-up is fantastic in the workshop - it can be pumped up to the height that suits best for whatever job is being done, it can be rotated with one finger to cast available light where best needed, and it remains wholly safe and within its balance "envelope" even when just one side of wishbones/drive-shaft/hub assy is removed.

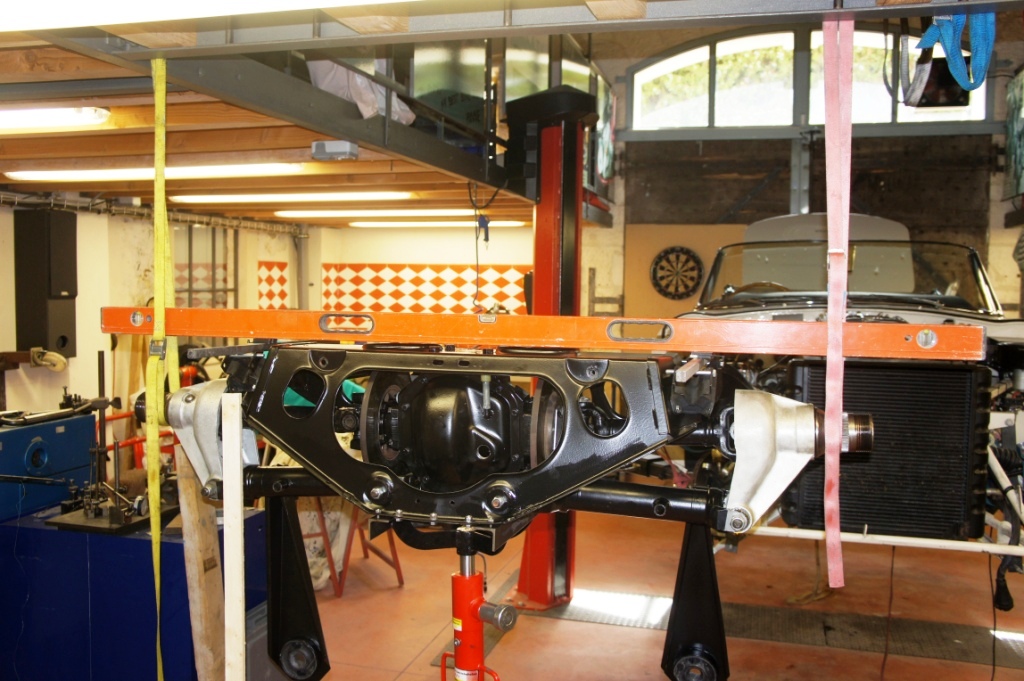
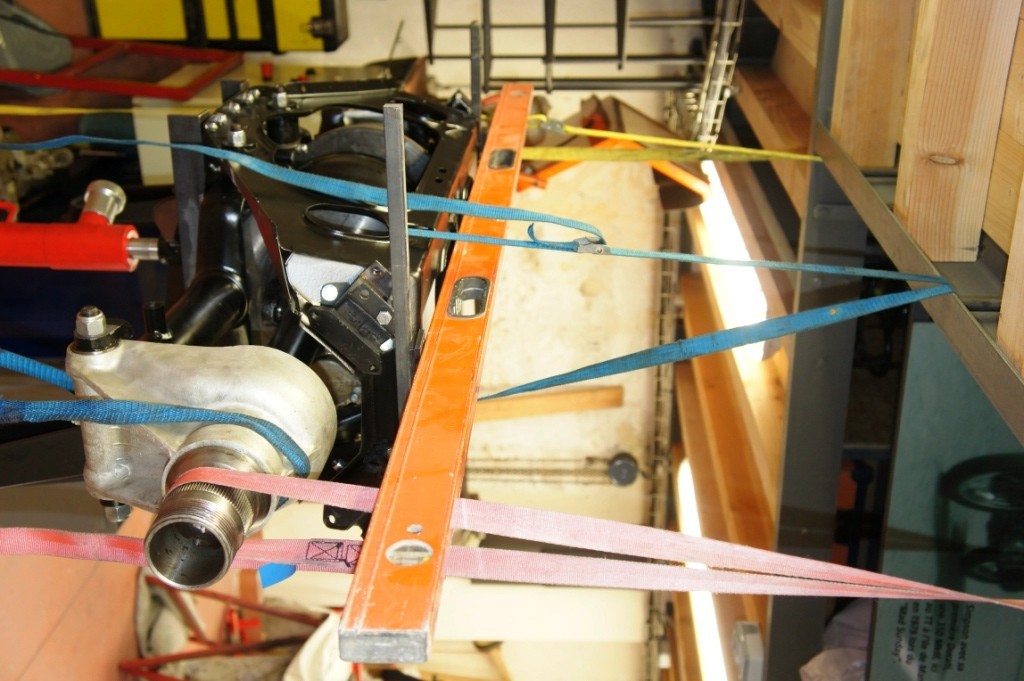
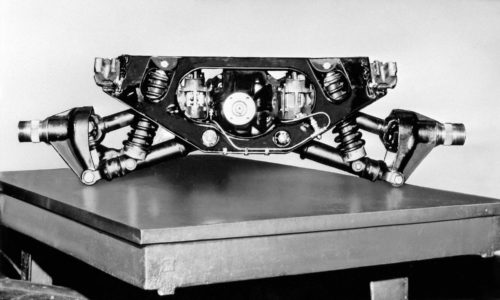
Seen here before removal of the conventional lifting jig.

Next stage : an IRS-shaped rectangular drip-tray that sits snugly over the top of the hydraulic cylinder's crown, to catch parts, tools, white-spirit washing etc ......

Image

You read it here first.

Image
Last edited by rfs1957 on Mon Jul 04, 2022 9:51 am, edited 12 times in total.
Rory
3.8 OTS S1 Opalescent Silver Grey - built May 28th 1962

Link:
BBcode:
HTML:
Hide post links
Show post links

User avatar

kingzetts
Posts: 745
Joined: Thu May 15, 2008 9:33 am
Location: Worcester UK
Great Britain

#2

Post by kingzetts » Sat Jun 14, 2014 5:26 pm

Great piece of kit, Rory. Big thumbs up.

One question - what technique did you use to get it from "right way up" to "upside down"? I've found rotating the IRS to be the most tricky bit on the several occasions I've had mine out.
John '62 S1 OTS (now sold)

Link:
BBcode:
HTML:
Hide post links
Show post links

User avatar

Heuer
Administrator
Posts: 14764
Joined: Sat Mar 01, 2008 5:29 pm
Location: Nottinghamshire
Great Britain

#3

Post by Heuer » Sun Jun 15, 2014 12:54 pm

Nice work - I like it.
David Jones
S1 OTS OSB; S1 FHC ODB
1997 Porsche 911 Guards Red

Add your E-Type to our World Map: http://forum.etypeuk.com/viewtopic.php?f=1&t=1810

Link:
BBcode:
HTML:
Hide post links
Show post links

User avatar

Topic author
rfs1957
Posts: 1324
Joined: Sat Jan 15, 2011 2:52 pm
Location: Languedoc - France
France

#4

Post by rfs1957 » Sun Jun 15, 2014 9:30 pm

Glad you both like it. No trick way that I know of, turning top to bottom requires big teenage sons - now that my hernia operation is slated for 22nd July.

I almost made the second-type support shown (above) with a length of 60mm pipe instead of the 40/30mm slug, so that it would fit into this kind of Clarke/Sealey engine-stand.

http://www.ebay.co.uk/itm/Sealey-Univer ... 48642bd016

I use one of these for many different jobs (with the main post extended upwards by about 9 or 10 inches, I find they're too low for comfort as standard, and I don't mind weakening mine since 750kg is outside my league anyway), having made up various engine jigs based on 60mm-pipe stems in the past.

This approach is a common one apparently - see for example

http://www.ebay.co.uk/itm/Classic-Mini- ... 4181b7bcda

On a support like this the IRS would rotate comfortably into any position, and could be locked with the big dowel pin irrespective of imbalance - I think the footing of the engine stands is wide enough - but I decided that sticking it on top of the transmission jack was probably more useful.

Just remember to drain the diff first ! (Ask me how I know etc cont. p92)
Rory
3.8 OTS S1 Opalescent Silver Grey - built May 28th 1962

Link:
BBcode:
HTML:
Hide post links
Show post links

User avatar

Topic author
rfs1957
Posts: 1324
Joined: Sat Jan 15, 2011 2:52 pm
Location: Languedoc - France
France

#5

Post by rfs1957 » Wed Jul 16, 2014 3:56 pm

Having now used this bit of kit for an intensive IRS re-furb accompanied with concomitant VERY steep learning curve, can I offer some refinements ?

My first time, as usual, so no pretention to being an expert .... but ....

IMHO, those four upper IRS conical bolts are there for a very specific locating purpose ; the conical dimples are what determine the position the diff within the cage, and everything else should be worked out from these.

Image

I therefore immediately got it completely wrong by drilling out (to 25mm or so diameter) two adjacent holes (see above) instead of diagonally opposite holes on the adapter jig, as I had intended before failing to Engage Brain, but the principle remained the same - two of the bolt heads now sit definitively in their final positions, so by tightening all 4 conical bolts first to position the diff, then removing two of them and bolting the jig into place, you get the best of both worlds - IRS/diff position defined, and the whole IRS mounted on your hydraulic stand.

Image

Image

Thos shiny parts in the middle are the shims, they don't need to be anything fancy or cut like combs or w.h.y.

Image

I am lucky enough to have a convenient mezzanine for any lifting exercises, so when the time comes to spin the IRS it just requires a chain hoist and a couple of nylon straps around the hubs to invert the axle and fit the "crab" again for car-installation purposes.

Image

The ease with which I was able to do all this, including fitting different rear-calipers, overhauling the hand-brake stuff, remaking all the brake lines and remote-bleeding in Cunifer etc, setting the rear-camber, all with adjustable height for working, 360° access, and orientable light inclination etc, makes me think that this kind of hydraulic lift with the two adapter plates is well-nigh perfect for IRS work.

Image

PS The rear camber calculation is even more convincing if you use the IRS-mounting-rubber bolts as reference points ..... with a couple of bits of square bar resting on them, and a long spirit level, you are as close to shell-installation as you can get - off the car. My tangents gave me between 0.6 mm and 1.1 mm on the 64mm hub diameter, and I obtained repeatable and coherent readings when juggling with the camber shims - unusual enough in this sort of context to be worth underlining - with differences of 0.1mm / 4 thou being immediately apparent on the bubble.

Image

Image

Image

Image

Image


No offence taken for any corrections to this, so please weigh-in ?? it's just that there didn?t seem much of the kind of detailed info I was looking for when attacking my own IRS and much of the above would have been very useful to me had I known it before I started.
Last edited by rfs1957 on Wed Jul 11, 2018 4:38 pm, edited 6 times in total.
Rory
3.8 OTS S1 Opalescent Silver Grey - built May 28th 1962

Link:
BBcode:
HTML:
Hide post links
Show post links

User avatar

Topic author
rfs1957
Posts: 1324
Joined: Sat Jan 15, 2011 2:52 pm
Location: Languedoc - France
France

#6

Post by rfs1957 » Fri Aug 01, 2014 11:40 am

Here are a few more gems gleaned from the IRS and Diff work I did.

This should be read with this post too :

http://www.etypeuk.com/forum/viewtopic.php?t=5842

and the various meanders of the two posts would have been better combined ... but the meanders were begun long before it came apparent that they would end up joining-up !

The new "special" half-shaft bolts #8510 were NOT the snug/tight fit of the originals ; these had to be drifted out from the flange, and were a true full 7/16" ground diameter ? I forgot to measure the new ones from SNGB but they were an easy sliding fit which meant that they ended up being held in place with heat-shrink during many of the initial operations since otherwise they keep sliding out of place and colliding with the bearing-block and caliper-mounting bolts.

Image

If I were to do this again I would try and find parts that were the true original size since to all intents and purposes these bolts are studs and the fact that they no longer stay in place is a real, real pain when doing the camber shims.

Image

The best way I found to measure the end-float on the bearing-blocks was to clamp the shaft in a vice and clamp the dial-gauge magnetic block to it. This give repeatable results once you've twigged that with conical bearings it's easy to measure all sorts of odd readings unless you pull the shaft in-and-out coaxially and get a true lateral translation between the parts.

Image

When it comes to tightening up with the extended 48mm socket that you made earlier, 200 ft.lbs sounded right, nothing beats a brawny Frenchman on a mission when your own hernia stops you doing it yourself.

Image

There's a ex-spurt-clown on YouTube showing how to measure caliper-centering with the internal-claws of his "newly acquired vernier caliper" - suggest you forget this and get some decent feeler-gauges which are much better at finding the reality of the situation.


Image

Image

I had some difficulty establishing what the various bits of writing on the crown-wheel referred to, since the immediately-apparent stamped stuff

Image

is not the electric-pen engraving you need. Mine in the event looked like this, and was hard to decipher, and hard to photograph

Image

I reckoned this translated as B/L 007 - followed by a number which I think pairs it up with the twinned drive-pinion ; the 007 means 7 thou, according to advice I was given by those wiser than I, and it might just be that the "7" I found elsewhere is a confirmation that was added upon assembly ?

Image

This next picture shows a cock-up that works for some reason - probably because with new pads (that even had to be relieved slightly before they would all fit) there is virtually no space for air in the calipers ? so the fact I plumbed this up wrong actually makes no difference, at the moment.

Image

I did the Cunifer late at night and forgot to cross the caliper-bridging pipes from top-to-bottom, so air would be evacuated upon bleeding - in the event they bled perfectly, but I will have to do this properly one day. I only show it as an example of remote-bleeding without using braided-hoses, which I hate on classic cars.

Image

Image

There are better ways of securing the bleed terminals but our local car-hose specialist didn-t have the right threaded fittings, so I had to do with the clip-type (which I hate !) which mean that the back hex has to be held with one spanner whilst you undo the bleeds with a second - not a big deal, but not ideal.

Image

See the other thread about the IRS problems I had.

http://www.etypeuk.com/forum/viewtopic.php?t=5842

I had to lift the IRS vertically with all the rubber-mounting-claws in situ, rather than do the oblique-lift-and-rotate that is otherwise required.

By rendering 8 x stainless 5/16 UNF nuts captive on the rubber mountings (a quick spot of TIG and a quick cold shower),

Image

and turning down the first 1 / 4 " of the 8 x 4" mounting bolts, I found that you can lift the complete IRS in a pure vertical direction and get the first four rear bolts in relatively easily.

Image

You do then come up against what everyone else finds, which is that the holes in the front rubbers are too far forwards - in my case by what looked like an insurmountable half an inch.

Image

It's quickly obvious that the efforts required to force everything into alignment are not in fact going to be excessive, but will require some horrible levering and wedging, plus spare pairs of hands even.

So I spent 30 minutes and knocked this up, from some scrap and a bit of 10mm studding :

Image

Image

Image

It fits both L and R applications, with the lower buttress bolted with just one 5/16" UNF bolt into the lower anti-roll bar locating points, and the upper lug bolted onto one of the spare out-rigger ears.

Image

Image

With this cheap and cheerful tool the alignment of the mounting rubbers just took 2 minutes of stress-free and predictable adjustment - a few turns with a flat 17mm spanner and the holes just slid into alignment.

Image

"Comme une lettre à la poste" as we say round here - David will translate.

Last word of wisdom, from an amateur : the shims that pack out the claws against the chassis rails wouldn?t fit my car. The holes are in the right place but the geometry of the movement required to pivot them into place had not been taken account of.

Image

So they all had to be tweaked as shown.

Then in one type of application it became apparent that they wouldn't fit, either, because they fouled the upper corner of the rails ?

Image

And had to be chopped (or "charcuté" as we locals say, like charcuterie, geddit ?) before they would slide in.
Last edited by rfs1957 on Tue Apr 24, 2018 8:41 pm, edited 5 times in total.
Rory
3.8 OTS S1 Opalescent Silver Grey - built May 28th 1962

Link:
BBcode:
HTML:
Hide post links
Show post links

User avatar

kingzetts
Posts: 745
Joined: Thu May 15, 2008 9:33 am
Location: Worcester UK
Great Britain

#7

Post by kingzetts » Thu Sep 11, 2014 6:51 pm

Inspired by Rory's lifting ideas, but lacking any strong sons residing locally and raw from struggling with inverting the IRS last time I took it out, I decided I needed another solution and here it is;

Image
Last edited by kingzetts on Sun Feb 18, 2018 11:13 am, edited 1 time in total.
John '62 S1 OTS (now sold)

Link:
BBcode:
HTML:
Hide post links
Show post links

User avatar

kingzetts
Posts: 745
Joined: Thu May 15, 2008 9:33 am
Location: Worcester UK
Great Britain

#8

Post by kingzetts » Thu Sep 11, 2014 7:02 pm

A cheap engine stand off eBay, but I needed to extend the height by 8" to ensure adequate clearance for the track of the IRS. Then a simple bracket of 3mm wall 25mm square box, picking up on the rear rubber mount holes of the cage and a pair of unused holes on the lower edge of the cage,with suitable points for bolting to the engine stand.

Image

Image

Allows 360 rotation and works a treat.

Image

Image

IRS removal now about as easy as it could be. Car on 2 post lift. Drop IRS onto a trolley. Bolt the bracket in place. Use one arm of the lift to hoist the IRS off the trolley and high enough to slide the engine stand into place. Wheel IRS away.
Last edited by kingzetts on Sun Feb 18, 2018 11:18 am, edited 1 time in total.
John '62 S1 OTS (now sold)

Link:
BBcode:
HTML:
Hide post links
Show post links

User avatar

Topic author
rfs1957
Posts: 1324
Joined: Sat Jan 15, 2011 2:52 pm
Location: Languedoc - France
France

#9 Re: IRS lifting, Diff-Half shafts, Shimming, IRS rubbers et al

Post by rfs1957 » Sat Feb 17, 2018 4:25 pm

The thread here

viewtopic.php?f=8&t=8290&start=80 (around pages 5 - 6)

regarding IRS refitting, and the problems of getting the bolts into place, reminded me of this thread and encouraged me to spend a (bloody) hour re-building the photo links to repair the Photobucket vandals' work.

Maybe we could persuade Kingzetts to update the pictures of his own refinements, to complete the post ?
Rory
3.8 OTS S1 Opalescent Silver Grey - built May 28th 1962

Link:
BBcode:
HTML:
Hide post links
Show post links

User avatar

kingzetts
Posts: 745
Joined: Thu May 15, 2008 9:33 am
Location: Worcester UK
Great Britain

#10 Re: IRS lifting, Diff-Half shafts, Shimming, IRS rubbers et al

Post by kingzetts » Sun Feb 18, 2018 11:19 am

Done - photos now reinstated. I thought I'd sorted all my broken PB links, so if anyone spots any others please let me know and I'll fix them too.
John '62 S1 OTS (now sold)

Link:
BBcode:
HTML:
Hide post links
Show post links

User avatar

Topic author
rfs1957
Posts: 1324
Joined: Sat Jan 15, 2011 2:52 pm
Location: Languedoc - France
France

#11 Re: IRS Stands, Diff-Half shafts, Shimming, IRS rubbers, IRS brake-pipes, all things IRS.

Post by rfs1957 » Mon Jul 04, 2022 9:53 am

John Scott's (Kingzetts) pictures have gone down again, at somepoint, he sent me the pictures in a recent exchange we had and so here they are for posterity.

Image

Image

Image

Image

Image
Last edited by rfs1957 on Mon Jul 04, 2022 2:51 pm, edited 1 time in total.
Rory
3.8 OTS S1 Opalescent Silver Grey - built May 28th 1962

Link:
BBcode:
HTML:
Hide post links
Show post links

User avatar

Topic author
rfs1957
Posts: 1324
Joined: Sat Jan 15, 2011 2:52 pm
Location: Languedoc - France
France

#12 Re: IRS Stands, Diff-Half shafts, Shimming, IRS rubbers, IRS brake-pipes, all things IRS.

Post by rfs1957 » Mon Jul 04, 2022 10:01 am

Another approach, FWIIW.

Personally, as I've just been confronted (leaks from the output shaft oil-seals) with the need to work on the diff again, but not needing to actually open the diff and separate it from the cage, I went for a lazier approach and made a 4-fingered support that picks up on the 4 taper-seated bolts that join diff-to-cage.

Note that the fingers are made from 3.50mm x 35 x 35 angle instead of a thick plate (which would also work) BUT by using the thinner section, and deeply countersinking the 13mm holes, you can use the same bolts and still get a good deep thread penetration into the diff.

Image

Image

Image

Confession - I was down to my last bit of 60mm pipe, which was a bit short - in an ideal world I'd have made it 100mm longer, but in point of fact it's perfectly adequate and you could never in any case use a tommy-bar to rotate something this heavy, and would always rotate it via an effort applied to the cage.
Rory
3.8 OTS S1 Opalescent Silver Grey - built May 28th 1962

Link:
BBcode:
HTML:
Hide post links
Show post links

User avatar

Topic author
rfs1957
Posts: 1324
Joined: Sat Jan 15, 2011 2:52 pm
Location: Languedoc - France
France

#13 Re: IRS Stands, Diff-Half shafts, Shimming, IRS rubbers, IRS brake-pipes, all things IRS.

Post by rfs1957 » Mon Jul 04, 2022 10:09 am

And now to cut to the chase ..........

Could someone advise about cunifer-piping the rear calipers ?

For eight years I lived with this cock-up, having not engaged brain before operating hands, and my piping seen here is quite wrong - as bleeding is rendered impossible, since any air in the outer pair of cylinders can never be evacuated.

Image

It worked for me, probably because I had built it with everything full of liquid, plus had new pads, so probably squirted all air out upon assembly, but I was probably very lucky.

So this is what I'm about to attempt.

Image

Is this right, and has anyone got any pictures of what this looks like in practice ?
Rory
3.8 OTS S1 Opalescent Silver Grey - built May 28th 1962

Link:
BBcode:
HTML:
Hide post links
Show post links

User avatar

Heuer
Administrator
Posts: 14764
Joined: Sat Mar 01, 2008 5:29 pm
Location: Nottinghamshire
Great Britain

#14 Re: IRS Stands, Diff-Half shafts, Shimming, IRS rubbers, IRS brake-pipes, all things IRS.

Post by Heuer » Mon Jul 04, 2022 10:26 am

David Jones
S1 OTS OSB; S1 FHC ODB
1997 Porsche 911 Guards Red

Add your E-Type to our World Map: http://forum.etypeuk.com/viewtopic.php?f=1&t=1810

Link:
BBcode:
HTML:
Hide post links
Show post links

User avatar

Topic author
rfs1957
Posts: 1324
Joined: Sat Jan 15, 2011 2:52 pm
Location: Languedoc - France
France

#15 Re: IRS Stands, Diff-Half shafts, Shimming, IRS rubbers, IRS brake-pipes, all things IRS.

Post by rfs1957 » Mon Jul 04, 2022 10:33 am

Thanks David, I did do my research with the "search" function but didn't find any pictures of original Dunlop slave-cylinders being used, where - being symmetrical top/bottom - your linking pipes have to be effectively diagonal.

The pictures on the post you refer to (picture below) show later non-standard calipers where all the arrivals and departures come off the top, which is easier/neater to pipe-up for.

Image

I can pipe this up easily enough but wondered what it looked like originally, as would mimic that if possible.
Rory
3.8 OTS S1 Opalescent Silver Grey - built May 28th 1962

Link:
BBcode:
HTML:
Hide post links
Show post links

User avatar

Heuer
Administrator
Posts: 14764
Joined: Sat Mar 01, 2008 5:29 pm
Location: Nottinghamshire
Great Britain

#16 Re: IRS Stands, Diff-Half shafts, Shimming, IRS rubbers, IRS brake-pipes, all things IRS.

Post by Heuer » Mon Jul 04, 2022 1:38 pm

Any help?

Image
David Jones
S1 OTS OSB; S1 FHC ODB
1997 Porsche 911 Guards Red

Add your E-Type to our World Map: http://forum.etypeuk.com/viewtopic.php?f=1&t=1810

Link:
BBcode:
HTML:
Hide post links
Show post links

User avatar

Topic author
rfs1957
Posts: 1324
Joined: Sat Jan 15, 2011 2:52 pm
Location: Languedoc - France
France

#17 Re: IRS Stands, Diff-Half shafts, Shimming, IRS rubbers, IRS brake-pipes, all things IRS.

Post by rfs1957 » Mon Jul 04, 2022 2:49 pm

Yes, David, thanks - indeed, Plate 23 from J30 gives rough idea.

Anyone with an original picture perchance ?
Rory
3.8 OTS S1 Opalescent Silver Grey - built May 28th 1962

Link:
BBcode:
HTML:
Hide post links
Show post links

User avatar

Heuer
Administrator
Posts: 14764
Joined: Sat Mar 01, 2008 5:29 pm
Location: Nottinghamshire
Great Britain

#18 Re: IRS Stands, Diff-Half shafts, Shimming, IRS rubbers, IRS brake-pipes, all things IRS.

Post by Heuer » Mon Jul 04, 2022 4:01 pm

Image
Image
Image
Image
David Jones
S1 OTS OSB; S1 FHC ODB
1997 Porsche 911 Guards Red

Add your E-Type to our World Map: http://forum.etypeuk.com/viewtopic.php?f=1&t=1810

Link:
BBcode:
HTML:
Hide post links
Show post links

User avatar

mgcjag
Moderator
Posts: 8092
Joined: Fri Jul 09, 2010 6:15 pm
Location: Ludlow Shropshire
Great Britain

#19 Re: IRS Stands, Diff-Half shafts, Shimming, IRS rubbers, IRS brake-pipes, all things IRS.

Post by mgcjag » Mon Jul 04, 2022 4:48 pm

This may help an old jag heritage photo
Image
Steve
69 S2 2+2 (just sold) ..Realm C type replica, 1960 xk150fhc

Link:
BBcode:
HTML:
Hide post links
Show post links

User avatar

Topic author
rfs1957
Posts: 1324
Joined: Sat Jan 15, 2011 2:52 pm
Location: Languedoc - France
France

#20 Re: IRS Stands, Diff-Half shafts, Shimming, IRS rubbers, IRS brake-pipes, all things IRS.

Post by rfs1957 » Mon Jul 11, 2022 4:22 pm

Thanks for everyone's input.

I had to juggle a bit but think these will do the job.

Image

Image

Image

Whilst this post has got some momentum, has anyone else had pattern drive-shaft bolts that are hopelessly undersized ?

Mine came from a Regular some 7-8 years ago and I'm regretting not trying to get better, full-diameter ones that STAY IN PLACE when you're working on stuff, never mind the poor engineering they represent.

Image

FFS these are not just 7/16" bolts for which you can pass a scribble on an envelope to your usual Indian/Chinese/Vietnamese subcontractor.
Rory
3.8 OTS S1 Opalescent Silver Grey - built May 28th 1962

Link:
BBcode:
HTML:
Hide post links
Show post links

Post Reply Previous topicNext topic