Page 1 of 2
#1 Jack Point
Posted: Fri Dec 19, 2014 8:56 pm
by mike837go
Here's a potential upgrade I've yet to read about:
Take a short length (say 6" to 8") of 1.25" x 3/16" walled square tubing and weld (bolt?) it to the center bottom of the picure frame.
A perminant, crush-proof jack point for the front of the car that you can find with a hand light.
Any downsides?
#2
Posted: Fri Dec 19, 2014 9:27 pm
by PeterCrespin
I prefer hardwood as it is less prone to sideways skidding metal-to-metal, but ANYTHING is better than jacking on the edges of the picture frame.
Meanwhile, even jacking and crumpling the bottom of the picture frame is better than jacking under the radiator support and putting two upward dents on the bonnet...

#3
Posted: Sat Dec 20, 2014 8:29 am
by paydase
Arrgh!
I now understand the small dent I have on my bonnet (only on one side).
The picture frame under the radiator is indeed bent because of a stupid PO or garage...
Should I dismantle the rad to try unbending that piece of steel from the top or should I look for a new picture frame?
#4
Posted: Sat Dec 20, 2014 8:52 am
by 288gto
Serge,
Assuming the front frame is not rusty, there is no need to replace it as it will bend back into shape. You could probably pull it back down from underneath without the need to remove the radiator.
Simon
#5
Posted: Sat Dec 20, 2014 10:43 am
by paydase
288gto wrote:Serge,
Assuming the front frame is not rusty, there is no need to replace it as it will bend back into shape. You could probably pull it back down from underneath without the need to remove the radiator.
Simon
Thx for the tip, Simon.
Yes, it is not that thick (and so, not strong...).
I will check if it is still touching the bonnet when this is closed.
And eventually pull it back fom underneath.
And...correct that dent
#6
Posted: Sat Dec 20, 2014 12:41 pm
by David Oslo
Back to original post query. Yes, generally good idea to put in something suitably shaped (be it steel square tube or hardwood) between the U- part of the lower picture frame. I have done so with hardwood, and have retained it with zip-ties. Easy to get on and easy to get off if I wish to do so.
I would not advocate welding. The 'birdcage' is made of thin walled reynolds tubing and is brazed together, to avoid changing the mechanical properties that would occur through welding. Without knowing if the bottom parts of the picture frame are reynolds steel or not, I would play-safe and assume so, hence no welding.
The jacking will always push the block into the U, so in essence you only need to hold it's own weight whilst driving. Hence (light) wood and zip-ties.
#7
Posted: Sat Dec 20, 2014 12:56 pm
by Heuer
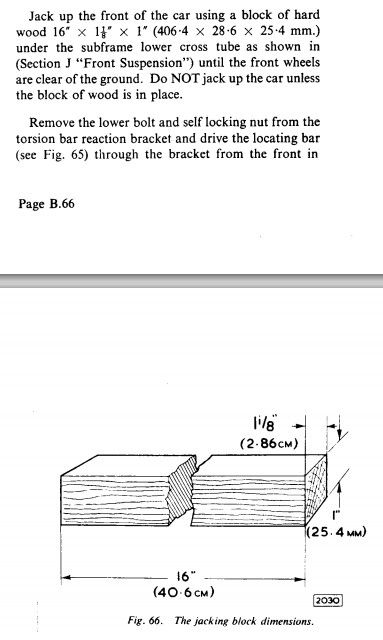
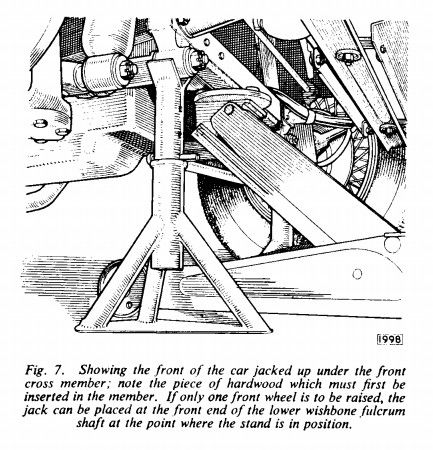
Hardly an 'upgrade' as Jaguar suggested it back in 1961:
#8
Posted: Sat Dec 20, 2014 1:13 pm
by David Oslo
We knew that :D Given that we actually have green workshop manuals. And have read them :D
Go on, buy one, it'll answer most of the questions that have been posted so far regarding jacking and torsion bars.
Anyhow, it always amazes me the details that are shown in the hand drawn illustrations (using photos as underlay) in the workshop manuals, I've worked with the folks who did this for a living, check out the castellated nuts on the suspension. Brilliant !
#9
Posted: Sat Dec 20, 2014 2:11 pm
by paydase
Another question related to the jack point and pictures above. There are two "normal" jack points for an FHC, one per side, approximately on the middle of the shell, and when travelling we are supposed to lift the car using that unique jack point for e.g. changing a wheel.
My question is: was that jack point so defined in order to avoid stresses on the shell when lifting the car? Or is the torsional rigidity of the shell sufficient to safely lift the car under e.g. the front cross member as shown on fig. 7?
#10
Posted: Sat Dec 20, 2014 3:37 pm
by christopher storey
David Oslo wrote:
I would not advocate welding. The 'birdcage' is made of thin walled reynolds tubing and is brazed together, to avoid changing the mechanical properties that would occur through welding. Without knowing if the bottom parts of the picture frame are reynolds steel or not, I would play-safe and assume so, hence no welding.
The jacking will always push the block into the U, so in essence you only need to hold it's own weight whilst driving. Hence (light) wood and zip-ties.
It is quite safe to weld the picture frame if you had a good reason for doing so. There is no Renold (sic) tubing in it . It is composed entirely of pressed steel components spot welded together . However, a wooden block is far more forgiving and authentic, as stated in the workshop manual
#11
Posted: Sun Dec 21, 2014 2:13 pm
by mike837go
Ok, there is a downside, ugly-as-sin and way off any 'official' modifications list!
I love the idea of a properly fitted and finished block of wood secured semi-perminantly in place.
Ready to go and no risk of folding the edges of the picture frame!
#12
Posted: Tue Dec 23, 2014 8:28 pm
by jag68
Mike
This advise is controversial with some of the members of this forum but ....
I've been jacking up the front end of my ots by putting a jack under the torsion bar reaction tie plate. I learned this from a friend who owns a very busy Jaguar repair shop in a major US city. We've both been doing it for years without issue. This area is seldom if ever affected by rust as it is usually coated with oil all it's life. I've got a piece of oak under the picture frame assembly as recommended by Jaguar and I've used it occasionally but I find it's just too hard to get to. You can also jack under either of the lower suspension points where the control arms meet the tube frame (not on the control arm but on the bracket that holds the arm to the frame). It is jacking the car on one side so it will pick up the side you are jacking on a bit - but the point is actually quite close to the center of the car so the entire front end will rise albeit that one side will be a bit lower as the opposite side rear suspension compresses.
Terry Sturgeon
#13
Posted: Wed Dec 31, 2014 2:30 pm
by mike837go
I can understand the controversy...
While the reaction plate is unquestionably another strong point in the structure of the car, it is:
A) Thin and subject to slipping/settling on the lifting jack's pad
B) Very close to the center of mass of the car. Both side-to-side and fore-to-aft. Leaving the car VERY UNSTABLE while putting the safety-stands in place.
I'll stick with blocks of wood under the front frame rail or IRS cage through the exhaust pipes for the time being, thank you.
#14
Posted: Wed Dec 31, 2014 4:41 pm
by Dave K
Heuer wrote:Hardly an 'upgrade' as Jaguar suggested it back in 1961:
I used the shank off an ice hockey stick, it is cable tied to the bottom of the PF. A friend of mine in Sweden sent it to me. We have a few ice hockey sticks at home but I'm not cutting them up.
Dave
#15
Posted: Wed Dec 31, 2014 6:28 pm
by PeterCrespin
Dave K wrote:We have a few ice hockey sticks at home but I'm not cutting them up.
Dave
Very sensible, otherwise you couldn't just puck off whenever you were fed up of garage work. :-)
#16
Posted: Fri Jan 09, 2015 6:59 pm
by mike837go
OK, you guys won.
I straightened the bottom edges of the lower frame (somebodies jacked the car several times without a block of wood).
I then zip-tied a piece of wood in place. It'll stay there for the duration of the mechanical repairs.
#17
Posted: Fri Jan 09, 2015 7:17 pm
by Heuer
Leave it in place for the duration of your ownership!
#18
Posted: Fri Jan 09, 2015 10:31 pm
by mooney1el
mike837go wrote:OK, you guys won.
I straightened the bottom edges of the lower frame (somebodies jacked the car several times without a block of wood).
I then zip-tied a piece of wood in place. It'll stay there for the duration of the mechanical repairs.
If I may be so bold to ask, how did you straighten the bent edges? I cannot grip mine with pliers or vice grips and the doubled/welded section is relatively stiff.
#19
Posted: Sat Jan 10, 2015 3:20 am
by mike837go
The wood will be removed during painting then replaced with a varnished piece of hardwood held by wide plastic straps.
I cheated quite badly on straightening the flanges. The bonnet is off, the engine is out and the car is 5.5 feet in the air on my lift. Regular and duckbilled vice grips were used for the initial attack. Leaving the pliers set to lock just as the metal bent a bit. Then moving to the next section. Tighten redo both flanges. Repeate.
I then used two hose clamps to hold the shank of a 1.25" trailer hitch in the slot to act as a dolly to support hammering the flanges into something resembling "straight" and "flat".
It's far from perfect, but it's a heluva lot better than before.
#20
Posted: Sat Jan 10, 2015 9:20 am
by paydase
Thank you for the clarifications re. straightening the bent edges.
If I understand correctly, the final step was hammering the flanges "in situ".
Isn't there a risk to fragilise pieces of the rest of the structure, frames, bolts and seals or is it safe enough?