


Trico Reservac stencil
-
 Tom Keohan
- Posts: 2
- Joined: Thu Feb 20, 2014 8:19 pm
- Location: Colorado, USA
#21
David, Thank you so much for putting this stencil together. I have been looking for one for many years. Just one question however. When I print the pdf and measure from the "R" to "D", I get a meaurment much less than what Jerry Mouton, who you referenced, says it should be. Does anyone know the proper measurment (from an origional) and thus the correct scale of the stencil?
Tom Keohan
1966 FHC 1E32783
1966 FHC 1E32783
| Link: | |
| BBcode: | |
| HTML: | |
| Hide post links |
-
Harold Lang
- Posts: 23
- Joined: Fri Oct 11, 2013 2:04 am
- Location: CANADA

#22 Trico Reservac Stencil
I had a stencil laser cut out of flexable material by a local sign / trophy shop. They downloaded the example from this thread & cut it out in a few minutes.
Simple, cheap & effective.
Harold
Simple, cheap & effective.
Harold
Last edited by Harold Lang on Wed Mar 11, 2026 5:17 pm, edited 1 time in total.
| Link: | |
| BBcode: | |
| HTML: | |
| Hide post links |
-
 Heuer
Heuer
Topic author - Administrator
- Posts: 15169
- Joined: Sat Mar 01, 2008 5:29 pm
- Location: Nottinghamshire

#23
Finally got around to using the stencil with a tube of acrylic Titanium white and a stippling sponge from Hobbycraft. Reasonable but not quite the effect I was looking for:

Last edited by Heuer on Sun Aug 17, 2014 1:46 pm, edited 8 times in total.
David Jones
S1 OTS OSB
1997 Porsche 911 Guards Red
2024 Lexus LBX
Add your E-Type to our World Map: http://forum.etypeuk.com/viewtopic.php?f=1&t=1810
S1 OTS OSB
1997 Porsche 911 Guards Red
2024 Lexus LBX
Add your E-Type to our World Map: http://forum.etypeuk.com/viewtopic.php?f=1&t=1810
| Link: | |
| BBcode: | |
| HTML: | |
| Hide post links |

#24
David, I think a rubber roller would make cleaner / sharper letters. Unless the fleecy render is wanted.
1E35547
| Link: | |
| BBcode: | |
| HTML: | |
| Hide post links |
-
Heuer
Topic author - Administrator
- Posts: 15169
- Joined: Sat Mar 01, 2008 5:29 pm
- Location: Nottinghamshire
#25
A roller would not work as it would force paint under the stencil.
Last edited by Heuer on Sun Aug 17, 2014 1:46 pm, edited 2 times in total.
David Jones
S1 OTS OSB
1997 Porsche 911 Guards Red
2024 Lexus LBX
Add your E-Type to our World Map: http://forum.etypeuk.com/viewtopic.php?f=1&t=1810
S1 OTS OSB
1997 Porsche 911 Guards Red
2024 Lexus LBX
Add your E-Type to our World Map: http://forum.etypeuk.com/viewtopic.php?f=1&t=1810
| Link: | |
| BBcode: | |
| HTML: | |
| Hide post links |
-
Heuer
Topic author - Administrator
- Posts: 15169
- Joined: Sat Mar 01, 2008 5:29 pm
- Location: Nottinghamshire
#26
It seems the acrylic paint is durable but can be washed off with petrol or oil although you can spray it over with clear lacquer for permanent protection. So I have looked for a better method. Firstly I tried white enamel but the paint is too thin and stippling forces it under the stencil. Secondly I tried white primer from a pot but that was even thinner and the results were not good. Finally I tried white primer from a rattle can but the aerosol force lifts the stencil slightly producing a big feathered edge to the letters. So I bought some low tack repositionable spray adhesive from Homebase:


This is good enough to stop the stencil lifting but you still need to hold the edges in place with masking tape. It then just needs two very light mist coats to get the correct effect- i.e. not perfect! You should be able to see a hint of black behind the white and the density across all letters should not be the same. Think you were being paid piece work for doing it and it was not a Reservac going on anything you owned! Take care when removing the stencil as it has a habit of springing back and touching the paint.
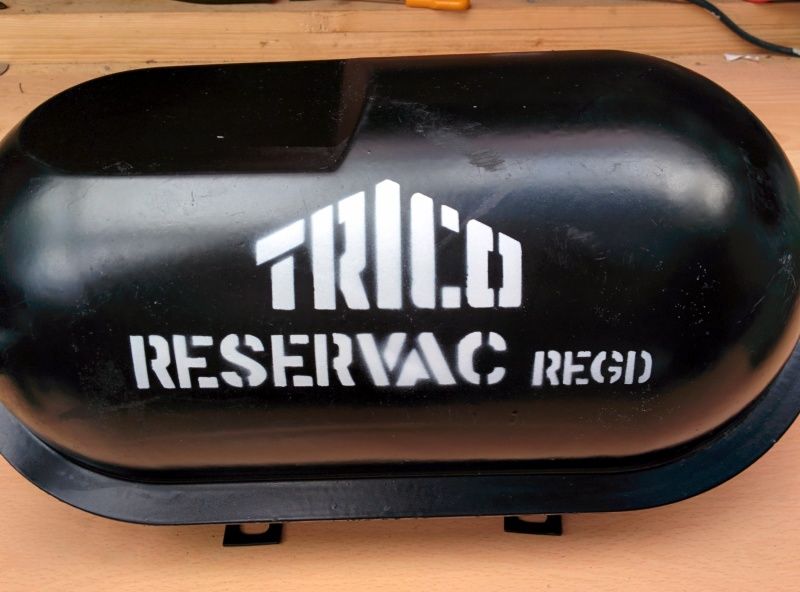
I now understand why the original stencils were so ill defined. The Reservac balloons in the middle slightly so getting a stencil to lay perfectly flat is next to impossible. It is this that produces the slight feathered edge look on the original - spray paint bleeds beneath the stencil letters.
This is good enough to stop the stencil lifting but you still need to hold the edges in place with masking tape. It then just needs two very light mist coats to get the correct effect- i.e. not perfect! You should be able to see a hint of black behind the white and the density across all letters should not be the same. Think you were being paid piece work for doing it and it was not a Reservac going on anything you owned! Take care when removing the stencil as it has a habit of springing back and touching the paint.
I now understand why the original stencils were so ill defined. The Reservac balloons in the middle slightly so getting a stencil to lay perfectly flat is next to impossible. It is this that produces the slight feathered edge look on the original - spray paint bleeds beneath the stencil letters.
David Jones
S1 OTS OSB
1997 Porsche 911 Guards Red
2024 Lexus LBX
Add your E-Type to our World Map: http://forum.etypeuk.com/viewtopic.php?f=1&t=1810
S1 OTS OSB
1997 Porsche 911 Guards Red
2024 Lexus LBX
Add your E-Type to our World Map: http://forum.etypeuk.com/viewtopic.php?f=1&t=1810
| Link: | |
| BBcode: | |
| HTML: | |
| Hide post links |
-
Heuer
Topic author - Administrator
- Posts: 15169
- Joined: Sat Mar 01, 2008 5:29 pm
- Location: Nottinghamshire
#27
Found this in the 1960 Trico catalogue. Seems the Reservac was originally designed for windscreen wipers and a bit of lateral thinking by Jaguar allowed them to use it for the brakes:
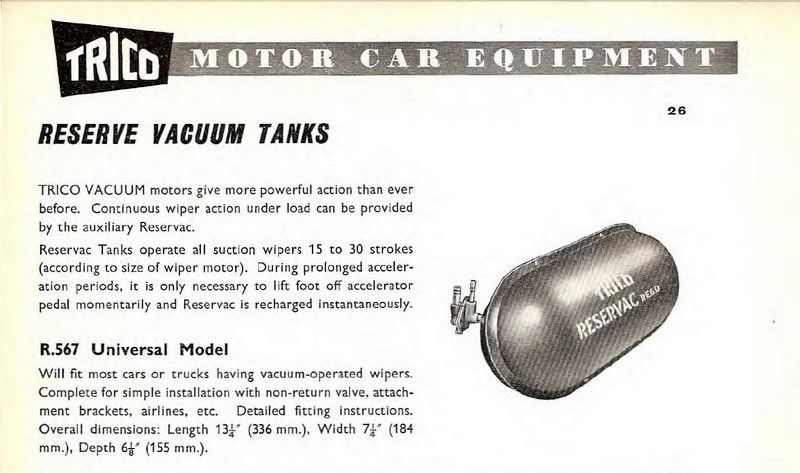
I will update the thread accordingly.
I will update the thread accordingly.
David Jones
S1 OTS OSB
1997 Porsche 911 Guards Red
2024 Lexus LBX
Add your E-Type to our World Map: http://forum.etypeuk.com/viewtopic.php?f=1&t=1810
S1 OTS OSB
1997 Porsche 911 Guards Red
2024 Lexus LBX
Add your E-Type to our World Map: http://forum.etypeuk.com/viewtopic.php?f=1&t=1810
| Link: | |
| BBcode: | |
| HTML: | |
| Hide post links |
#28
Hi David,
Thanks for this thread. I have just replicated the same on my vacuum tank.
I used self-adhesive Fablon film available here:
http://www.ebay.co.uk/itm/200744256084? ... EBIDX%3AIT
I used your original paintshop template (as lines were a little crisper than the official template thus a little easier for my fading eyesight to follow & cut by hand/scalpel). It just needed enlarging a little to the size of the official template.
I found that I could print the image on ticket card & the film was low enough tack to stick over the image & still be removed after cutting. Incidentally I tried glossy photo paper but the film stuck to that like the proverbial.
The film also stuck nicely to the slightly awkward profile of the tank, although in doing so doesn't allow full replication of the original (i.e. with overspray).
I had a couple of white rattle cans sitting in the garage which I thought I would trial - Halfords Appliance Gloss White & Plasti-Kote Antique White.
My first attempt, using the appliance white, was a disaster - half of it peeled off with the template and wrecked the template in the process.
My second attempt was far more successful. After 2 coats of the Plasti-kote the template peeled away nicely without the paint sticking to it or pulling away and the paint has adhered perfectly to the powder coating.
I'm happy with the results although might be a little too crisp compared to the original...

Regards,
Thanks for this thread. I have just replicated the same on my vacuum tank.
I used self-adhesive Fablon film available here:
http://www.ebay.co.uk/itm/200744256084? ... EBIDX%3AIT
I used your original paintshop template (as lines were a little crisper than the official template thus a little easier for my fading eyesight to follow & cut by hand/scalpel). It just needed enlarging a little to the size of the official template.
I found that I could print the image on ticket card & the film was low enough tack to stick over the image & still be removed after cutting. Incidentally I tried glossy photo paper but the film stuck to that like the proverbial.
The film also stuck nicely to the slightly awkward profile of the tank, although in doing so doesn't allow full replication of the original (i.e. with overspray).
I had a couple of white rattle cans sitting in the garage which I thought I would trial - Halfords Appliance Gloss White & Plasti-Kote Antique White.
My first attempt, using the appliance white, was a disaster - half of it peeled off with the template and wrecked the template in the process.
My second attempt was far more successful. After 2 coats of the Plasti-kote the template peeled away nicely without the paint sticking to it or pulling away and the paint has adhered perfectly to the powder coating.
I'm happy with the results although might be a little too crisp compared to the original...
Regards,
Neil
1962 S1 OTS
1967 S1 FHC
1962 S1 OTS
1967 S1 FHC
| Link: | |
| BBcode: | |
| HTML: | |
| Hide post links |
-
Heuer
Topic author - Administrator
- Posts: 15169
- Joined: Sat Mar 01, 2008 5:29 pm
- Location: Nottinghamshire
#29
Looks good Neil! To print the stencil out the correct size you must specify 'Actual size in the printing options (not scale to paper, fit or shrink). As a final check the bottom line should be 6" wide from the outer edge of the 'R' to the outer edge of the 'D'.
David Jones
S1 OTS OSB
1997 Porsche 911 Guards Red
2024 Lexus LBX
Add your E-Type to our World Map: http://forum.etypeuk.com/viewtopic.php?f=1&t=1810
S1 OTS OSB
1997 Porsche 911 Guards Red
2024 Lexus LBX
Add your E-Type to our World Map: http://forum.etypeuk.com/viewtopic.php?f=1&t=1810
| Link: | |
| BBcode: | |
| HTML: | |
| Hide post links |

#30
Thanks for making the file, I made a rough Illustrator trace and need to tune the anchor and handles.
My idea is to vinyl print the file, rip off the letters and apply the piece you usually throw away gently to the tank and paint.
Do not have a place to dump ai files but will put some effort into adjusting the outlines and post it online on a filedump service.
The trace in jpeg.. handles need tuned but it should be a little "rough in the edges" I suppose. (edit, inverted the image to be white on black)

Illustrator give full control over the points in the trace that make up the letters. eg the I in trico and other letters can be corrected. Maybe someone already have an ai or svf file that is good to use?
My idea is to vinyl print the file, rip off the letters and apply the piece you usually throw away gently to the tank and paint.
Do not have a place to dump ai files but will put some effort into adjusting the outlines and post it online on a filedump service.
The trace in jpeg.. handles need tuned but it should be a little "rough in the edges" I suppose. (edit, inverted the image to be white on black)
Illustrator give full control over the points in the trace that make up the letters. eg the I in trico and other letters can be corrected. Maybe someone already have an ai or svf file that is good to use?
61 OTS Black on Red, 62 FHC nuts & bolts resto on the way to OSG & Matador red.
| Link: | |
| BBcode: | |
| HTML: | |
| Hide post links |