Talk about the E-Type Series 1
-
Topic author
Series1 Stu
- Posts: 1648
- Joined: Thu Feb 02, 2017 12:26 pm
- Location: Shropshire

Post
by Series1 Stu » Wed Mar 10, 2021 9:32 pm
Hi Chaps
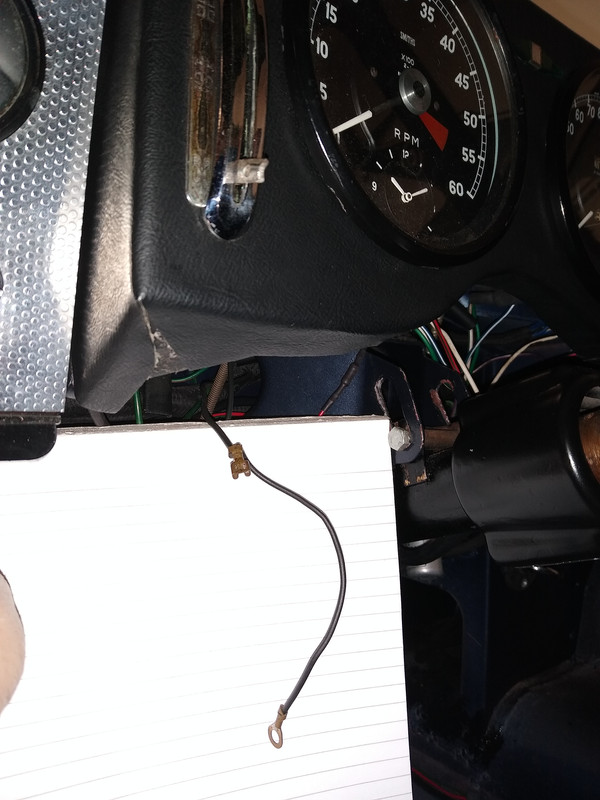
I am finalising the electrical work on my 3.8 FHC and have a stray earth that doesn't appear to have an obvious location. It is exiting the dashboard loom adjacent to the indicator/headlamp flasher switch wiring. Picture attached.
There are no obvious attachment points that I can see.
Any advice appreciated.
TIA
Stuart
If you can't make it work, make it complicated!
'62 FHC - Nearing completion
'69 Daimler 420 Sovereign
'78 Land Rover Series 3 109
-
Tony
- Posts: 1135
- Joined: Mon Nov 02, 2009 2:12 pm
- Location: UK
Post
by Tony » Wed Mar 10, 2021 11:44 pm
Maybe it is an earth to the speedo and fits on the speedo retaining screws. Someone with more knowledge should be along soon.
Tony (E typed)
1962 E Type Series 1 Roadster (OTS)
Tony
-
Topic author
Series1 Stu
- Posts: 1648
- Joined: Thu Feb 02, 2017 12:26 pm
- Location: Shropshire
Post
by Series1 Stu » Thu Mar 11, 2021 2:31 pm
Thanks, I thought that maybe the ring tag was to attach under the bolt head for the steering column up/down adjuster. The hole seems a bit big to go under the speedo clamp screw.
I'll sort something but, from my particular engineering background, I am very precious about earth bonding.
Regards
Stuart
If you can't make it work, make it complicated!
'62 FHC - Nearing completion
'69 Daimler 420 Sovereign
'78 Land Rover Series 3 109
-
Robbiee
- Posts: 692
- Joined: Sun Aug 16, 2015 12:07 pm
- Location: Derbyshire
Post
by Robbiee » Thu Mar 11, 2021 3:29 pm
Maybe I am being simple but as long as it is attached to a metal connector which has good contact with the main frame/body then it’s fine?
Robbie 1962 3.8 Coupe OSG 1962 OTS ODG
-
mgcjag
- Moderator
- Posts: 8092
- Joined: Fri Jul 09, 2010 6:15 pm
- Location: Ludlow Shropshire
Post
by mgcjag » Thu Mar 11, 2021 3:48 pm
Its an earth that should be earthing something not a wire that needs earthing.....also note it has spade connectors further up the wire....so typical of an earth loop ....so you need a home for both connectors....Steve
Steve
69 S2 2+2 (just sold) ..Realm C type replica, 1960 xk150fhc
-
Topic author
Series1 Stu
- Posts: 1648
- Joined: Thu Feb 02, 2017 12:26 pm
- Location: Shropshire
Post
by Series1 Stu » Thu Mar 11, 2021 7:06 pm
I sorted it but whether it is factory correct is a different question.
There was no obvious earth on the panel other than via the mechanical fixings. This is something that I despise because there always should be a 'proper' earth connection using a wire and good electrical connectors.
I followed Christopher's suggestion of connecting the ring tag to one of the speedometer mounting points and then created a new heavy earth cable with a ring tag under one of the 5/16" screws fixing the steering column support. I then connected this to the instrument panel and to the 1/4" blade connector.
Everything is earthed with good earth continuity to frame so I'll leave it at that.
The LED's from Gil fitted in the tacho, speedo and minor instruments look great. I got the Ice Blue versions as used in the continuation E Types and they look amazing.
Regards
Stuart
If you can't make it work, make it complicated!
'62 FHC - Nearing completion
'69 Daimler 420 Sovereign
'78 Land Rover Series 3 109
-
Allrand
- Posts: 400
- Joined: Tue Dec 08, 2020 10:45 am
- Location: Kempton Park, South Africs

Post
by Allrand » Sun Sep 26, 2021 2:31 pm
I had the same question when installing a new wiring loom to my 3.8. I figured it should attach to a tach fixing screw to give a proper earth for the clock which draws such minute current that any resistance in the dash fittings would render it inoperable.
Randall Botha
'64 3.8 fhc & '51 Mk 7
-
PhilBell
- Posts: 146
- Joined: Sat Nov 09, 2013 1:11 pm
- Location: UK
Post
by PhilBell » Fri Oct 01, 2021 12:57 pm
Your question made me wonder if someone can point me in the right direction regarding my indicators struggling to work. They flash OK until I switch the headlamps on, at which point they stop. The hazard flashers work perfectly, ruling out problems with the lamps or bulbs. The hazards use a separate flasher unit.
I've ordered a new indicator flasher unit just in case but
I suspect a poor earth.
Thoughts?
Phil
1962 FHC 885626
-
Topic author
Series1 Stu
- Posts: 1648
- Joined: Thu Feb 02, 2017 12:26 pm
- Location: Shropshire
Post
by Series1 Stu » Fri Oct 01, 2021 9:47 pm
I would tend to agree with it being a poor earth because there is no real connection between the lighting and indicator circuit supplies. Unless your lighting circuits are really pulling down the battery voltage.
Check your central instrument panel earth wire is giving a good earth bond and ensure a good earth connection from the back of the driver's instrument panel.
I seem to recall my electrical circuits giving odd results before I made all of the earth connections.
Regards
Stuart
If you can't make it work, make it complicated!
'62 FHC - Nearing completion
'69 Daimler 420 Sovereign
'78 Land Rover Series 3 109
-
PhilBell
- Posts: 146
- Joined: Sat Nov 09, 2013 1:11 pm
- Location: UK
Post
by PhilBell » Wed Oct 06, 2021 12:13 pm
I've removed and cleaned the earth connection on the back of the central instrument panel and the one on one of the posts securing the speedo to the dash. Also one that links the steering column height adjutment bolt to a lower steering column mounting bolt (this wire looks like a modification). Am I missing any others?
Phil
1962 FHC 885626
-
johnetype
- Posts: 474
- Joined: Sun Feb 26, 2012 11:54 pm
- Location: Worcestershire
Post
by johnetype » Thu Oct 07, 2021 7:48 am
I think you'll find the problem is linked to poor earths in the bonnet loom and the front lights, that's the area to check.
John
1969 Series 2 FHC
-
Topic author
Series1 Stu
- Posts: 1648
- Joined: Thu Feb 02, 2017 12:26 pm
- Location: Shropshire
Post
by Series1 Stu » Thu Oct 07, 2021 7:10 pm
I think you're probably right, John.
I had a near miss with my bonnet wiring because my restorer had transposed the earth and main beam wires on the bonnet side of the connector. It was a squeaky bum moment as the smoke billowed up from under the bonnet.
I considered the burned out, puny earth wire in the RHS of the bonnet to be grossly under-rated so I swapped it for a 25 Amp cable.
Shame the wiring is so difficult to access.
Regards
Stuart
If you can't make it work, make it complicated!
'62 FHC - Nearing completion
'69 Daimler 420 Sovereign
'78 Land Rover Series 3 109
-
PhilBell
- Posts: 146
- Joined: Sat Nov 09, 2013 1:11 pm
- Location: UK
Post
by PhilBell » Wed Oct 13, 2021 1:08 pm
Last night I discovered that the terminals in the large circular connector block for the bonnet lighting were corroded and looked like they'd suffered from water ingress, so I cleaned up the pins and matching holes as best I could, and fitted/removed the plug several times to help improve the connection.
Surely I'd found the reason why my indicators slow down and eventually give up when I switch the headlamps to dip beam?
No such luck.
Phil
1962 FHC 885626
-
PhilBell
- Posts: 146
- Joined: Sat Nov 09, 2013 1:11 pm
- Location: UK
Post
by PhilBell » Wed Oct 13, 2021 1:09 pm
Last night I discovered that the terminals in the large circular connector block for the bonnet lighting were corroded and looked like they'd suffered from water ingress, so I cleaned up the pins and matching holes as best I could, and fitted/removed the plug several times to help improve the connection.
Surely I'd found the reason why my indicators slow down and eventually give up when I switch the headlamps to dip beam?
No such luck.
Phil
1962 FHC 885626
-
Philk
- Posts: 711
- Joined: Wed Dec 07, 2016 7:48 am
Post
by Philk » Wed Oct 13, 2021 3:00 pm
PhilBell wrote: ↑Wed Oct 13, 2021 1:09 pm
Last night I discovered that the terminals in the large circular connector block for the bonnet lighting were corroded and looked like they'd suffered from water ingress, so I cleaned up the pins and matching holes as best I could, and fitted/removed the plug several times to help improve the connection.
Surely I'd found the reason why my indicators slow down and eventually give up when I switch the headlamps to dip beam?
No such luck.
I would look at the large terminal block inside the bonnet cavity. On the other side of the bonnet connector plug, there are eight connector wires which then run to a large terminal block. From there, another set of wires (the bonnet loom) then runs to the various lights etc. The terminals within the terminal block can have a build up of oxidisation which can affect things.

- d1.JPG (244.5 KiB) Viewed 3097 times
Once you have the bonnet (headlamp) apertures open, you can then also do continuity tests from the indicators to earth etc.
Phil
1964 S1 3.8 OTS
-
PhilBell
- Posts: 146
- Joined: Sat Nov 09, 2013 1:11 pm
- Location: UK
Post
by PhilBell » Sat Oct 16, 2021 3:04 pm
Thanks Phil, there's a lot more going on in that hidden area of the bonnet than I expected. To gain access, do I go in from the outside via the headlight, removing the glass cover etc, or do I remove the flat panel on the inside of the bonnet, the one that the headlamp bowl attaches to?
Phil
1962 FHC 885626
-
Philk
- Posts: 711
- Joined: Wed Dec 07, 2016 7:48 am
Post
by Philk » Sat Oct 16, 2021 3:32 pm
PhilBell wrote: ↑Sat Oct 16, 2021 3:04 pm
Thanks Phil, there's a lot more going on in that hidden area of the bonnet than I expected. To gain access, do I go in from the outside via the headlight, removing the glass cover etc, or do I remove the flat panel on the inside of the bonnet, the one that the headlamp bowl attaches to?
You have to do it via the left-hand headlamp as opposed to the flat panel (which would be sealed in place around its edges on the wings and bonnet centre panel). You have to take off the chrome rim, the glass and its rubber seal. You then need to remove the silver "bucket" under the glass (which is via three nuts on the rear of the headlamp panel). The cavity is then revealed! Note that the bucket removal and refitting is a bit of a pain but there are hints and tips elsewhere on the forum as to how to go about things.
Phil
1964 S1 3.8 OTS


