Page 1 of 2
#1 Assembly sequence
Posted: Sat Nov 12, 2022 5:06 pm
by No Quarter
Since I'm now starting to assemble my 63 that I bought in boxes, and I have not restored an E-Type before, I would like to know the right sequence to assemble. E.g. someone told me prop shaft can't be put in after rear end and transmission/engine is installed. Annoying to find out later. Also, I believe, viper mechanism and heater pipes near top of dash are early in proces. But, has anybody written about the right sequence? Either as a simple document, or a book? I really want to try to avoid doing stuff twice...

#2 Re: Assembly sequence
Posted: Sat Nov 12, 2022 5:30 pm
by Gfhug
Mikael, do you have this manual? If you haven’t buy it now!
https://jec.org.uk/shop/e-type-3-8-4-2- ... ice-manual
Amazon also sell it.
A good book is by Classic Motor Cars
https://www.classic-motor-cars.co.uk/
“E Type Jaguar Restoration Manual” author David Barzilay
If you read through the restoration section of this forum you’ll understand how others have gone about doing the work and you can learn from them.
Depending on which metalwork you are doing you can always look at:
https://www.monocoque-metalworks.com/main/ and read some of their blogs.
If you look at the knowledge section of the forum there are several books recommended.
That should give you a good start to understanding and I’m sure others can point you to their own websites to help.
Use the search function to find answers, an example of this is the excellent write up by abowie here:
viewtopic.php?f=5&t=17780 when someone wanted to know how to go about reassembling doors.
Hope that helps.
Geoff
#3 Re: Assembly sequence
Posted: Sat Nov 12, 2022 5:52 pm
by No Quarter
Gfhug wrote: ↑Sat Nov 12, 2022 5:30 pm
Mikael, do you have this manual? If you haven’t buy it now!
https://jec.org.uk/shop/e-type-3-8-4-2- ... ice-manual
Amazon also sell it.
A good book is by Classic Motor Cars
https://www.classic-motor-cars.co.uk/
“E Type Jaguar Restoration Manual” author David Barzilay
If you read through the restoration section of this forum you’ll understand how others have gone about doing the work and you can learn from them.
Depending on which metalwork you are doing you can always look at:
https://www.monocoque-metalworks.com/main/ and read some of their blogs.
If you look at the knowledge section of the forum there are several books recommended.
That should give you a good start to understanding and I’m sure others can point you to their own websites to help.
Use the search function to find answers, an example of this is the excellent write up by abowie here:
viewtopic.php?f=5&t=17780 when someone wanted to know how to go about reassembling doors.
Hope that helps.
Geoff
Thanks Geoff. I think I know how to restore, have restored other brands. And when I don't find answers in my books, I ask here :-). But the sequence...
I'll buy “E Type Jaguar Restoration Manual” author David Barzilay, looks promising
#4 Re: Assembly sequence
Posted: Sat Nov 12, 2022 6:33 pm
by mgcjag
Hi Mikael.....i havent seen a detailed sequence schedule that your after........yes your correct prop shaft befor either engine or IRS....you cant remove or fit it if both are in place. .....fuel pipe that runs over the top of the irs befor you fit irs.......and wiper mechanism and heater pipes befind the dash sooner than later....other than that very similar to other cars youve orobably rebuilt.....others will chip in im sure.....Steve....ps..you dont have to quote everything when you reply....it just takes up server space
#5 Re: Assembly sequence
Posted: Sat Nov 12, 2022 9:06 pm
by Series1 Stu
It's a great question, Mikael.
I have often thought that the factory build sequence must have been documented in process assembly sheets etc.. I wonder if anybody has access to these because they would make life so much easier for people restoring these cars.
It wouldn't take a lot to turn it into a restoration manual.
Regards
#6 Re: Assembly sequence
Posted: Sun Nov 13, 2022 3:48 am
by No Quarter
mgcjag wrote: ↑Sat Nov 12, 2022 6:33 pm
.....fuel pipe that runs over the top of the irs befor you fit irs.......
Exactly. And I didn't know. I have no idea where the fuel line runs since I didn't take it apart. And people I asked about the irs, here and locally, people that have rebuilt themselves, they don't think to say: "Remember to fit fuel line first." Can't blame them. And if I read a book there will be a section on fuel system and a section on irs, but in all likelihood no mention in the irs section to do the fuel line first.
And no, I'm not taking the irs down again, so fuel line will be my solution

#7 Re: Assembly sequence
Posted: Sun Nov 13, 2022 8:34 am
by Series1 Stu
Also, the wiring looms are not particularly well covered in the restoration guides. I'm still not sure that I have my looms running in the correct places, especially where the wiring passes through the bulkhead.
Regards
#8 Re: Assembly sequence
Posted: Sun Nov 13, 2022 8:37 am
by mgcjag
There are bulkhead diagrams in the knowledge base that show what all the holes are for....Steve
#9 Re: Assembly sequence
Posted: Mon Nov 14, 2022 1:53 pm
by No Quarter
mgcjag wrote: ↑Sun Nov 13, 2022 8:37 am
There are bulkhead diagrams in the knowledge base that show what all the holes are for....Steve
Found it and spent almost 2 hours in the knowledge base, very useful, thanks
#10 Re: Assembly sequence
Posted: Mon Nov 14, 2022 2:12 pm
by mgcjag
The Restoration and owners gallery section of the forum is a great resource of info.....there are some long threads showing full restoration from the car arriving being stripped down and rebuilt......Steve
#11 Re: Assembly sequence
Posted: Mon Nov 14, 2022 2:45 pm
by No Quarter
Long thread with assembly sequence, could you point me in the right direction? Would be appreciated
#12 Re: Assembly sequence
Posted: Mon Nov 14, 2022 2:51 pm
by mgcjag
Try this one to start....but plenty of others...Steve
viewtopic.php?f=8&t=8874
#13 Re: Assembly sequence
Posted: Sun Nov 20, 2022 8:10 am
by No Quarter
Your help was helpful, now I have better overview of what goes where, especially on picture frame and bulkhead. And I've been through the stickys, most anyway.
Question now, is there an exploded view of bonnet, so I can which fastener goes where? Bought a complete kit.
Or other advice. my bonnet is such that I can save most of it, but the lower front part, had to buy from another car, and getting ready to put on.
#14 Re: Assembly sequence
Posted: Sun Nov 20, 2022 9:17 am
by Gfhug
Start looking here:
https://www.monocoque-metalworks.com/ma ... metalwork/
Then search through Chuck's very helpful pages and you can find several blogs of assembling the bonnet and you'll see which hardware goes where.
Geoff
#15 Re: Assembly sequence
Posted: Sun Nov 20, 2022 10:17 am
by No Quarter
Chuck?
#16 Re: Assembly sequence
Posted: Sun Nov 20, 2022 10:56 am
by Gfhug
See my link and you’ll understand
#17 Re: Assembly sequence
Posted: Sun Nov 20, 2022 10:57 am
by rswaffie
Chuck owns Monocoque Metalworks.
#18 Re: Assembly sequence
Posted: Mon Nov 21, 2022 8:19 pm
by ysmalkie
Hi Mikael,
I think others more knowledgeable will correct me...
Well, I think there are may ways to skin the cat, however, as a general guide:
-1. get the car out of the paintshop with he body assembled, so that you see no surprises afterwords...
0. Rustproof the car (sills inner structures, ets.
1. Assemble all the subassemblies 1st (rear suspension, engine+gearbox and the small bits like heaters or steering, so that you have all ready.
2. Start with the bulkhead, inner and outer, in general the heater pipes go 1st. Assemble everything you can mount on the bulkhead.
3. Get the harness in alongwith the electrical stuff, like headlamps
4. Assemble the dashboard.
5. Rear bumpers
6. Fuel pipes & tank
7. Rear suspension & driveshaft & handbrake.
8. Brake lines from the rear to the front, clutch pipes.
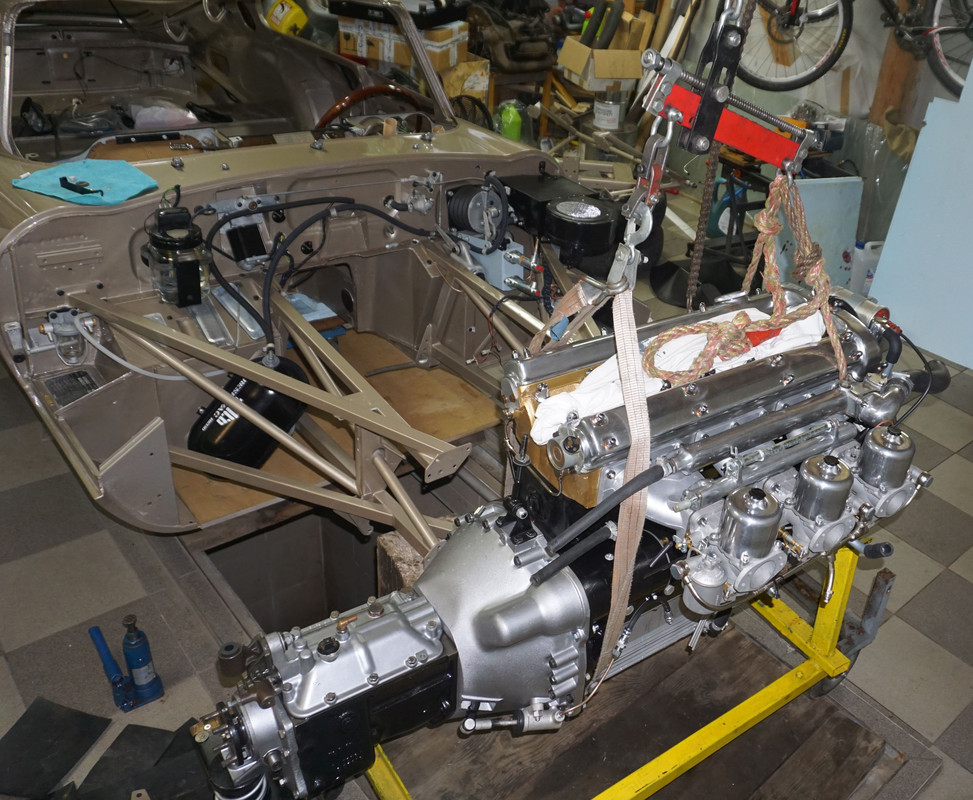
9. Once there is really nothing else that you can mount in the engine bay, fit the engine. I did if with the picture frame off, see photo below.
10. Picture frame, Front suspension, front break pipes, front harness, steering rack
11. Radiator and everything front of the engine.
11b. At this point I released the engine from the hoist.
12. Heat shields, Exhaust.
13. Somewhere along the way assemble entire bonnet.
14. Upholstery
15. Fit the windows incl windshield.
15. Mount the bonnet
16. Start driving.
17. Setup the suspension.
I am at step 17, however my quarter light windows need adjustments...
#19 Re: Assembly sequence
Posted: Tue Nov 22, 2022 5:48 am
by No Quarter
Brilliant Tadek, thanks, I'll print that out and use it
A question because I know knowledgable people read this. One inner frame is loose in the bonnet, the two angle brackets on one side that are supposed to be glued on have gone loose. Any suggestions on what glue to use, brand name welcome, guess it has to be some high quality stuff?
#20 Re: Assembly sequence
Posted: Tue Nov 22, 2022 7:10 am
by Mich7920
SIKA 221