


So....I've fallen at the last hurdle! The final part to fit on my front-end is the headlamp glass and chrome bezels. Thought it would be a pain, and wasn't disappointed!
I have the original chrome trims and glass, with new rubber seals and screws from Martin Robey. Before fitting, I thought I would try the screws in each of the captive nuts to check that they run in OK. About half were fine, the other half won't go, probably due to either rust or paint in the threads. 2 or 3 of the seemingly very cheap screws have snapped.
I can bend the cages and remove the captive nuts to replace them, but can't seem to find the captive nuts alone - they are supplied with the cages that I don't need. This part: https://www.martinrobey.com/part/8540
Is there anywhere that I can get just the captive nuts from?
Captive nuts for headlamp bezel screws
-
Knightrider
Topic author - Posts: 91
- Joined: Wed May 28, 2025 7:03 pm
- Location: High Wycombe, UK

#1 Captive nuts for headlamp bezel screws
Last edited by Knightrider on Mon Mar 02, 2026 4:11 pm, edited 1 time in total.
Simon
1966 Series 1 2+2
1966 Series 1 2+2
| Link: | |
| BBcode: | |
| HTML: | |
| Hide post links |
#2 Re: Captive nuts for haedlamp bezel screws
Simon
If you have the captive nuts and they are full of rust or paint all you need is a tap to clean them out.
What we need is someone to tell us the thread. You actually have the screws so if you have the technology you could identify the thread.
If you have the captive nuts and they are full of rust or paint all you need is a tap to clean them out.
What we need is someone to tell us the thread. You actually have the screws so if you have the technology you could identify the thread.
Mike
1969 S2 FHC
1969 S2 FHC
| Link: | |
| BBcode: | |
| HTML: | |
| Hide post links |
-
Knightrider
Topic author - Posts: 91
- Joined: Wed May 28, 2025 7:03 pm
- Location: High Wycombe, UK
#3 Re: Captive nuts for haedlamp bezel screws
I did consider that - not sure what the thread size is. All my taps are metric... I
'm not sure if I can extract all of the broken screws so was looking for the easy option of just replacing the nuts!
'm not sure if I can extract all of the broken screws so was looking for the easy option of just replacing the nuts!
Simon
1966 Series 1 2+2
1966 Series 1 2+2
| Link: | |
| BBcode: | |
| HTML: | |
| Hide post links |

#4 Re: Captive nuts for haedlamp bezel screws
8/32 unc
Steve
69 S2 2+2 (sold) ..Realm C type replica, 1960 xk150fhc
69 S2 2+2 (sold) ..Realm C type replica, 1960 xk150fhc
| Link: | |
| BBcode: | |
| HTML: | |
| Hide post links |
-
Gfhug
- Posts: 3819
- Joined: Thu Jun 19, 2014 3:08 pm
- Location: Near Andover, Hampshire,in D.O. Blighty
#5 Re: Captive nuts for haedlamp bezel screws
A set of unf/unc taps and dies are inexpensive and well worth having for this sort of task. You’ll then be able to use the correct size screws, nuts and bolts.
Geoff
Geoff
S2 FHC Light Blue
S2 OTS LHD - RHD full restoration
S2 OTS LHD - RHD full restoration
| Link: | |
| BBcode: | |
| HTML: | |
| Hide post links |
#6 Re: Captive nuts for haedlamp bezel screws
These nuts give rise to one of my stories I tell about a certain group of annoying “armchair experts” sometimes found in the classic car fraternity.
I too had trouble with these original captive nuts as I like to keep my headlight bowls clean, so I need occasionally to remove the headlight rim and glass. My car was at a show years ago and a person came up to me to ask what year my car was because I have my own registration plate on it and he appeared to be trying to find fault with it. The car was manufactured in May 1967 by the way. The guy proceeded to tell me that I had the wrong screws in my headlight rim as for that year the should be cross-headed screws. I asked him what screws he had in his E-type - to which he replied that he didn’t have an E-type, but he had read that fact in a book. I was unimpressed !
I replied that I didn’t care about that level of concours on my own car, as due to my need to remove the rims and the poor threads in the original nuts, I had choose to simply make some new nuts from 1/2 inch wide bar by 3/16 inch thick and by tapping a M4 thread centrally into them, I could use M4 stainless steel screws of my own choice and length, which by grinding a taper on the end of the thread I could easily locate the captive nuts. It just summed up why some “classic car enthusiasts” could be so annoying !
A photo of the old original nuts and screws to the below left and then my new alternative nuts and screws to the right top :-
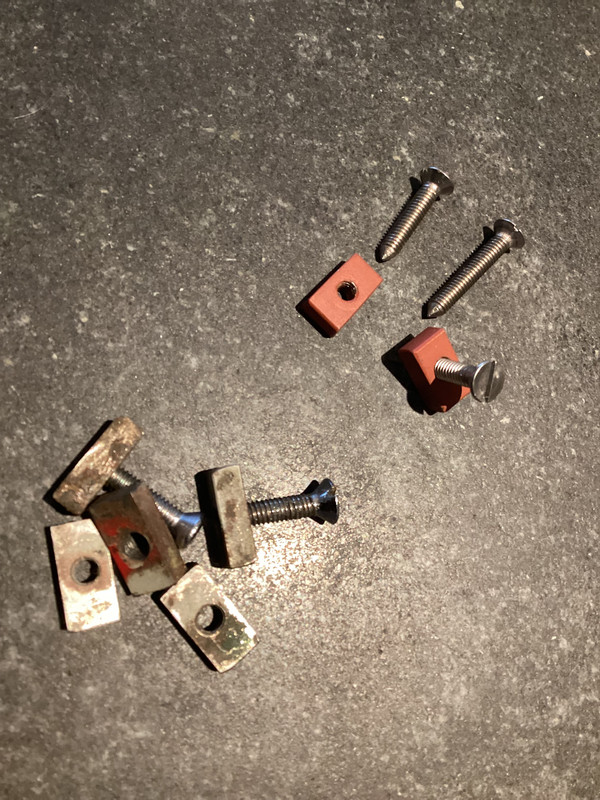
The old worn captive nuts were easily removed by bending down their retaining tabs, so that was my personal solution.
Cheers,
Dave
I too had trouble with these original captive nuts as I like to keep my headlight bowls clean, so I need occasionally to remove the headlight rim and glass. My car was at a show years ago and a person came up to me to ask what year my car was because I have my own registration plate on it and he appeared to be trying to find fault with it. The car was manufactured in May 1967 by the way. The guy proceeded to tell me that I had the wrong screws in my headlight rim as for that year the should be cross-headed screws. I asked him what screws he had in his E-type - to which he replied that he didn’t have an E-type, but he had read that fact in a book. I was unimpressed !
I replied that I didn’t care about that level of concours on my own car, as due to my need to remove the rims and the poor threads in the original nuts, I had choose to simply make some new nuts from 1/2 inch wide bar by 3/16 inch thick and by tapping a M4 thread centrally into them, I could use M4 stainless steel screws of my own choice and length, which by grinding a taper on the end of the thread I could easily locate the captive nuts. It just summed up why some “classic car enthusiasts” could be so annoying !
A photo of the old original nuts and screws to the below left and then my new alternative nuts and screws to the right top :-
The old worn captive nuts were easily removed by bending down their retaining tabs, so that was my personal solution.
Cheers,
Dave
Last edited by 44DHR on Sun Mar 01, 2026 10:47 pm, edited 2 times in total.
Dave Rose
1967 Series 1 4.2 FHC
1967 Series 1 4.2 FHC
| Link: | |
| BBcode: | |
| HTML: | |
| Hide post links |

#7 Re: Captive nuts for haedlamp bezel screws
| trust you did the measuring, marking, drilling and tapping prior to slicing the aforementioned bar 
Danny
1962 S1 3.8 FHC (1012/1798)
2015 Range Rover Sport SVR
"Experience is something you don't get until just after you need it."
1962 S1 3.8 FHC (1012/1798)
2015 Range Rover Sport SVR
"Experience is something you don't get until just after you need it."
| Link: | |
| BBcode: | |
| HTML: | |
| Hide post links |
-
 bitsobrits
- Posts: 580
- Joined: Tue Dec 27, 2011 2:09 am
- Location: Omaha, NE area

#8 Re: Captive nuts for haedlamp bezel screws
I would say virtually all of the many annoying run-ins I have had with automotive anoraks is with those who don't own, and have never owned, the car in question. While I have on occasion simply walked away, usually I verify their lack of ownership history then say something like "So you've never owned one of these? Interesting." and then walk away.
Steve
'65 S1 4.2 FHC (early)
'65 S1 4.2 FHC (early)
| Link: | |
| BBcode: | |
| HTML: | |
| Hide post links |
#9 Re: Captive nuts for haedlamp bezel screws
There are three people to trust in this as far as I am concerned, Angus Moss, Maikel Lemke and Richard Michael Owen, with more or less direct access. I am sure there are a few more I don't know of .
Danny
1962 S1 3.8 FHC (1012/1798)
2015 Range Rover Sport SVR
"Experience is something you don't get until just after you need it."
1962 S1 3.8 FHC (1012/1798)
2015 Range Rover Sport SVR
"Experience is something you don't get until just after you need it."
| Link: | |
| BBcode: | |
| HTML: | |
| Hide post links |
-
Knightrider
Topic author - Posts: 91
- Joined: Wed May 28, 2025 7:03 pm
- Location: High Wycombe, UK
#10 Re: Captive nuts for headlamp bezel screws
Thanks all - and to mcgjag for the correct thread size. I can confirm that a 8/32 unc tap does the trick. Managed to remove the snapped bolts using a vice and mole-grips, and have rethreaded all of the nuts. New screws run through easily.
Now to just get the headlights covers fitted...!
Now to just get the headlights covers fitted...!
Simon
1966 Series 1 2+2
1966 Series 1 2+2
| Link: | |
| BBcode: | |
| HTML: | |
| Hide post links |
-
Gfhug
- Posts: 3819
- Joined: Thu Jun 19, 2014 3:08 pm
- Location: Near Andover, Hampshire,in D.O. Blighty
#11 Re: Captive nuts for headlamp bezel screws
Simon, if the glass isn’t working out to a nice fit, despite being original, I’m sure someone has made high quality plastic replacements that have been used and appreciated by others on the forum. Just worth considering if you have difficulty.
Have you read the topic of using relays for the headlamps to give brighter light? viewtopic.php?f=9&t=4919
Could be worth doing while you’re working in that area.
Geoff
Have you read the topic of using relays for the headlamps to give brighter light? viewtopic.php?f=9&t=4919
Could be worth doing while you’re working in that area.
Geoff
S2 FHC Light Blue
S2 OTS LHD - RHD full restoration
S2 OTS LHD - RHD full restoration
| Link: | |
| BBcode: | |
| HTML: | |
| Hide post links |
#12 Re: Captive nuts for headlamp bezel screws
The guy that supplies these is Mark Clapp.
Search in forum will find him
Search in forum will find him
Series 1 FHC purchased 50 years ago. Courted my wife in it.
Series 1 2+2 when the kids were small now sold.
Series 1.5 OTS in opalescent maroon, Californian car. My retirement present.
Series 1 2+2 when the kids were small now sold.
Series 1.5 OTS in opalescent maroon, Californian car. My retirement present.
| Link: | |
| BBcode: | |
| HTML: | |
| Hide post links |
-
Knightrider
Topic author - Posts: 91
- Joined: Wed May 28, 2025 7:03 pm
- Location: High Wycombe, UK
#13 Re: Captive nuts for headlamp bezel screws
I have fit them up and they seem OK - will see how I get on but thanks for the tip!Gfhug wrote: ↑Mon Mar 02, 2026 5:02 pmSimon, if the glass isn’t working out to a nice fit, despite being original, I’m sure someone has made high quality plastic replacements that have been used and appreciated by others on the forum. Just worth considering if you have difficulty.
Have you read the topic of using relays for the headlamps to give brighter light? viewtopic.php?f=9&t=4919
Could be worth doing while you’re working in that area.
Geoff
Bulbs replaced with LEDs - lower power draw so should be OK without a relay?
Simon
1966 Series 1 2+2
1966 Series 1 2+2
| Link: | |
| BBcode: | |
| HTML: | |
| Hide post links |
-
Knightrider
Topic author - Posts: 91
- Joined: Wed May 28, 2025 7:03 pm
- Location: High Wycombe, UK
#14 Re: Captive nuts for headlamp bezel screws
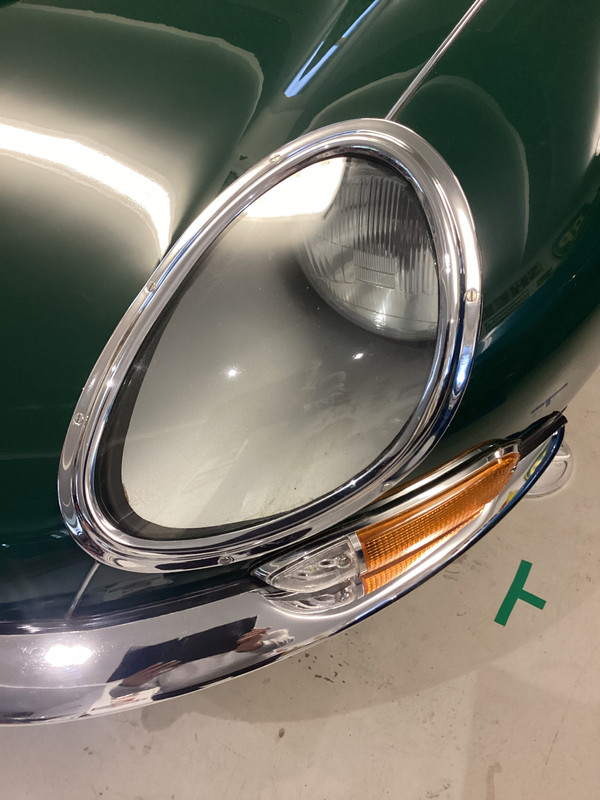
So one lens on. I need to wait for more screws to do the other.
Took about 4 hours - the chrome surround seems to be a different shape to the aperture and lining up the screws with the captive nuts is a nightmare. Thankfully I'm not too worried about the paint at this stage as I plan to get the car painted next year. Some of the rubber seal hangs.out on one side but it will do for now.
I'd rather refit the heater pipes than do the other side......
Simon
1966 Series 1 2+2
1966 Series 1 2+2
| Link: | |
| BBcode: | |
| HTML: | |
| Hide post links |
-
bitsobrits
- Posts: 580
- Joined: Tue Dec 27, 2011 2:09 am
- Location: Omaha, NE area
#15 Re: Captive nuts for headlamp bezel screws
Extra long screws, used temporarily and threaded in just a few turns, can be helpful in getting the cage nuts aligned before installing the correct screws.
Steve
'65 S1 4.2 FHC (early)
'65 S1 4.2 FHC (early)
| Link: | |
| BBcode: | |
| HTML: | |
| Hide post links |
-
Knightrider
Topic author - Posts: 91
- Joined: Wed May 28, 2025 7:03 pm
- Location: High Wycombe, UK
#16 Re: Captive nuts for headlamp bezel screws
I was thinking that yesterday - a few of the screws were struggling to reach the cage nuts and I thought they could do with being half an inch longer...bitsobrits wrote: ↑Wed Mar 04, 2026 1:21 amExtra long screws, used temporarily and threaded in just a few turns, can be helpful in getting the cage nuts aligned before installing the correct screws.
Simon
1966 Series 1 2+2
1966 Series 1 2+2
| Link: | |
| BBcode: | |
| HTML: | |
| Hide post links |
#17 Re: Captive nuts for headlamp bezel screws
That’s exactly the reason I used M4 Stainless Steel screws, so I could get exactly the length I needed, long or cut down shorter, both to engage and to avoid seeing the ends of the screws through the glass covers. I did mention grinding a taper on the screw ends to help picking up the captive nut - and as Steve “bitsobrits” said - use longer temporary screws to help alignment.
Cheers,
Dave
Cheers,
Dave
Dave Rose
1967 Series 1 4.2 FHC
1967 Series 1 4.2 FHC
| Link: | |
| BBcode: | |
| HTML: | |
| Hide post links |
-
Knightrider
Topic author - Posts: 91
- Joined: Wed May 28, 2025 7:03 pm
- Location: High Wycombe, UK
#18 Re: Captive nuts for headlamp bezel screws
The new screws from MR do have a point at the end already which helps a bit...
Simon
1966 Series 1 2+2
1966 Series 1 2+2
| Link: | |
| BBcode: | |
| HTML: | |
| Hide post links |