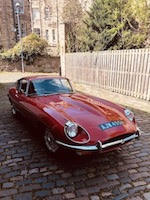
Thanks for your replies and technical advice. The novice has now removed front and rear bumpers by
himself today. No major blood loss and car paintwork not scratched!
The front bumper was by far the easiest to remove.
I'm sure others know this already, but for me it was a first time. Here's what I did......
There are four bolts to undo, allowing the whole front bumper to come off in one piece.
Using 14mm spanner I removed the two bolts nearest to the ends of the bumpers on each side. I was
waiting for the sound of nuts to drop (!) but it appears all bolts go into captive threads.
If you loosen the bolts just to the left and right of each over rider, then the whole front bumper will now be loose.
Caution here as to not allow flapping bumper to mark paintwork. Make a visual note or photo of how the rubber strips are fitted, before they fall off when removing the bumper. I sat directly in front of the car with each knee supporting the left and right bumpers. I continued undoing the two central bolts and the bumper came away.


Image of RH side, showing slot for central bolt.

Image of LH side

Side bracket, showing bolt slot.

Image of rear of jaguar badge on central bumper.

Image of rubber strip on front bumper. Note pinch point

Image of captive thread into over rider.

Image of how the sections come apart.
I noted that there were varying numbers of washers on some of the bolts. Bumpers all taken into house and laid on carpet for thorough inspection (deciding on which bits to re-chrome).
Now the rear bumpers...........
Unlike the front bumpers, there are six mounting points to address, before the whole bumper comes off in one section. Inside each wheel arch is a nut. I used a 13mm spanner to undo this. I removed the nut from each wheel arch. I then removed the nut from just above the small red side light on each side. The bolt is visible from the boot. You have to hold the bolt in the boot to stop it spinning. I used a 15mm on the nut and 14mm on the bolt. I could not get the bolt out from the left hand side, since the petrol tank is in the way. This actually helped - see later.

Image shows location of wheel arch and boot bolt holes.
I then removed the two screws holding each reversing lamp cover in place. This also removes the whole reversing lamp fitting. Careful to note the earth connection which just comes loose. I then removed each side light cover - 4 bolts. Remove the bulbs - note their positions first. I then remove the middle electrical housing for each lamp (4 bolts of which two were self tappers).
Listen out for nuts and washers dropping behind as you remove the bolts. Then remove the rear light housing (3 bolts). It will come loose.
Caution as to not put excessive strain on wires as each lamp housing just dangles. Use wire or string to support them or just remove them if you have convenient electrical connections.
Looking to the left and right of each over rider, you will look up to see a bolt on each side. These are the final two. 14mm.

Caution : do not remove these completely otherwise the whole rear bumper section may drop (bad). While holding the bumper on the right hand side, start loosening each bolt.
The bolt that would not come out earlier (due to the petrol tank) provides temporary support to the left hand side. Further loosening of the two main bolts will allow the whole bumper section to be pulled back and removed. I did this by myself and luckily did not damage anything or myself.
Caution: be careful that the two small chrome sections where each light fitting was do not drop on
the floor - they can come loose by themselves.
Rear of the car did look like:

It now looks like:

I will take this opportunity to re-locate the reversing lights.
Photos of the bumper placed on the garage floor....

showing wheel arch bolt slot

showing boot bolt slot

showing slotted bracket for the last two bolts

showing positions of short and long bolt and how sections are joined together with over rider.
So off to the re-chromers soon (6 to 8 weeks estimate time). I will use this time to see what work can be done around all the newly exposed areas. The chrome strip going around the lip of the bonnet mouth looks in a real bad state and Probably should be replaced. Can I buy this directly on the web?