


About to start restoring my bonnet and apart from the rust, some of the louvers are bent.
Are there any do's and don'ts when tackling this problem?
Series 2 Bonnet Luvers
#1 Series 2 Bonnet Luvers
Denis
1969 Series 2 E Type FHC
1968 Daimler 250
1977 Series 2 Daimler XJ6
1969 Series 2 E Type FHC
1968 Daimler 250
1977 Series 2 Daimler XJ6
| Link: | |
| BBcode: | |
| HTML: | |
| Hide post links |
-
Jack the lad
- Posts: 115
- Joined: Mon Aug 18, 2014 5:44 pm
- Location: Newton Abbot, Devon

#2 Re: Series 2 Bonnet Luvers
It all depends how badly the louvres are damaged, if they are just lightly bent it is a simple matter of returning them to original shape with hammer and dolly or a thin spoon. Badly damaged and the metal will have thinned which means you will have a longer louvre than is needed. You will then need to shrink the metal back to its original thickness which will reduce its length. This is done with heat application and the use of shrinking hammers and dollies. Practise the technique of shrinking on small pieces of metal the same gauge as the bonnet louvres before you have a go on the car. Otherwise a proper panel beater will be skilled in this art but will no doubt charge accordingly.
| Link: | |
| BBcode: | |
| HTML: | |
| Hide post links |
-
Gfhug
- Posts: 3324
- Joined: Thu Jun 19, 2014 3:08 pm
- Location: Near Andover, Hampshire,in D.O. Blighty
#3 Re: Series 2 Bonnet Luvers
Denis, if you’ve got a couple of good louvres could you then make a former or two out of MDF that fit, then use them to help shape the bent ones? The two louvres nearest the windscreen (one per side) seem less well formed on my car and I don’t know if that is the same for all cars.
Good luck
Geoff
Good luck
Geoff
S2 FHC Light Blue
S2 OTS LHD - RHD full restoration
S2 OTS LHD - RHD full restoration
| Link: | |
| BBcode: | |
| HTML: | |
| Hide post links |
#4 Re: Series 2 Bonnet Luvers
Jack and Geoff,
Thank you both for the advice. I should be able to work with that.
Denis
Thank you both for the advice. I should be able to work with that.
Denis
Denis
1969 Series 2 E Type FHC
1968 Daimler 250
1977 Series 2 Daimler XJ6
1969 Series 2 E Type FHC
1968 Daimler 250
1977 Series 2 Daimler XJ6
| Link: | |
| BBcode: | |
| HTML: | |
| Hide post links |
#5 Re: Series 2 Bonnet Luvers
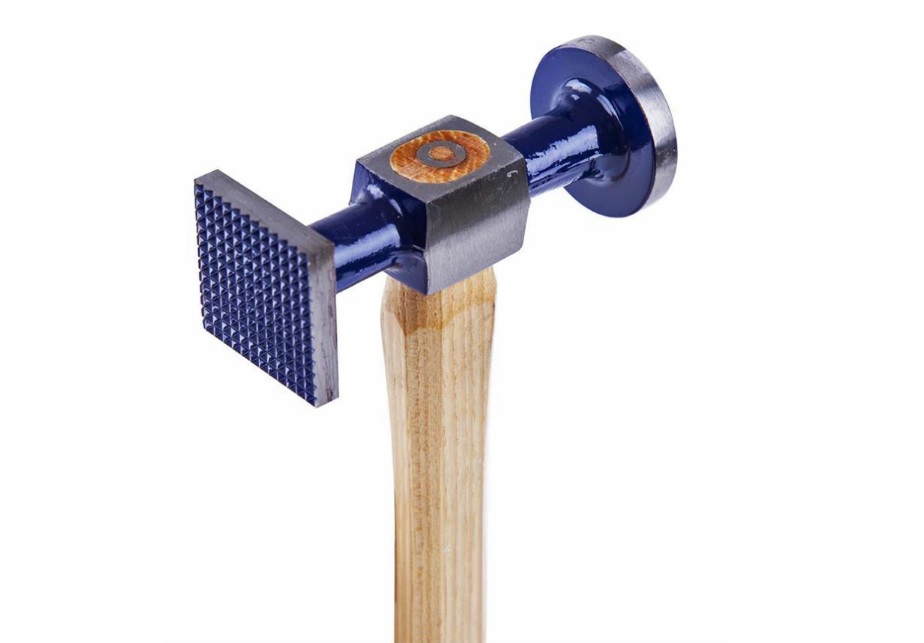
The following picture is of a Shrinking Hammer, which is defined by the checkered face. In my experience, it's a misnomer, as this hammer will stretch far quicker than a smooth faced hammer. Accordingly, I would never use this type of hammer when Hot Shrinking. For those not experienced with making a Hot Shrink, a safer tool to use is a Tinsman Mallet, or a hammer with Nylon faces.
Regards,
Bill
Regards,
Bill
| Link: | |
| BBcode: | |
| HTML: | |
| Hide post links |
#6 Re: Series 2 Bonnet Luvers
Bill,
I have had a shrinking hammer for more than 30 years and have never used it. When I heat shrink metal I use a smooth face hammer. I have never thought of using a tinsman mallet, wouldn't the hot metal damage to the mallet?
Denis
I have had a shrinking hammer for more than 30 years and have never used it. When I heat shrink metal I use a smooth face hammer. I have never thought of using a tinsman mallet, wouldn't the hot metal damage to the mallet?
Denis
Denis
1969 Series 2 E Type FHC
1968 Daimler 250
1977 Series 2 Daimler XJ6
1969 Series 2 E Type FHC
1968 Daimler 250
1977 Series 2 Daimler XJ6
| Link: | |
| BBcode: | |
| HTML: | |
| Hide post links |
#7 Re: Series 2 Bonnet Luvers
Denis Wrote;
No at all. The Mallet is in contact with the hot spot for such a short time and as the Hot Shrink exercise is over in just a few bows of the mallet, the mallet is not damaged.
The issue with using a Tinsman Mallet in the area you're going to be repairing, is the relatively large diameter of the head. Unless you can get, or make a wooden mallet with a small diameter head, a Nylon faced mallet with a circa 30mm diameter head would be a better choice. The Nylon won't be damaged for the same reason as for the Tinsman Mallet.
Where many go wrong when attempting to Hot Shrink a full area using a planishing hammer, is that they end up stretching the metal more due to the plastic state of the hot spot, which is easily stretched.
Regards,
Bill
Hello Denis,I have never thought of using a tinsman mallet, wouldn't the hot metal damage to the mallet?
No at all. The Mallet is in contact with the hot spot for such a short time and as the Hot Shrink exercise is over in just a few bows of the mallet, the mallet is not damaged.
The issue with using a Tinsman Mallet in the area you're going to be repairing, is the relatively large diameter of the head. Unless you can get, or make a wooden mallet with a small diameter head, a Nylon faced mallet with a circa 30mm diameter head would be a better choice. The Nylon won't be damaged for the same reason as for the Tinsman Mallet.
Where many go wrong when attempting to Hot Shrink a full area using a planishing hammer, is that they end up stretching the metal more due to the plastic state of the hot spot, which is easily stretched.
Regards,
Bill
| Link: | |
| BBcode: | |
| HTML: | |
| Hide post links |
#8 Re: Series 2 Bonnet Luvers
Bill,
I can understand your logic that using a planishing hammer could stretch the metal. My tinsman mallet would be too big for the louvers, but I could easily pick up a small nylon one and give it a try.
Many thanks
Denis
I can understand your logic that using a planishing hammer could stretch the metal. My tinsman mallet would be too big for the louvers, but I could easily pick up a small nylon one and give it a try.
Many thanks
Denis
Denis
1969 Series 2 E Type FHC
1968 Daimler 250
1977 Series 2 Daimler XJ6
1969 Series 2 E Type FHC
1968 Daimler 250
1977 Series 2 Daimler XJ6
| Link: | |
| BBcode: | |
| HTML: | |
| Hide post links |
#9 Re: Series 2 Bonnet Luvers
Hello Denis,
Post a picture of the louvers before you start trying hot shrinking on them, as its not often that's required. If any of the louvers are actually stretched, more often than not, you can roll the curved part of the louver over, resulting in a convex edge which can be filed straight. But its a bit hard to give general advice without seeing the damage.
Regards,
Bill
| Link: | |
| BBcode: | |
| HTML: | |
| Hide post links |
-
Gfhug
- Posts: 3324
- Joined: Thu Jun 19, 2014 3:08 pm
- Location: Near Andover, Hampshire,in D.O. Blighty
#10 Re: Series 2 Bonnet Luvers
Bill, his July video update in the restoration section will show you.
Geoff
Geoff
S2 FHC Light Blue
S2 OTS LHD - RHD full restoration
S2 OTS LHD - RHD full restoration
| Link: | |
| BBcode: | |
| HTML: | |
| Hide post links |
#11 Re: Series 2 Bonnet Luvers
Geoff Wrote:
Hello Denis,
From the image following, captured from your video, I very much doubt that the damage to the louvers shown in the Top Ellipse will need any shrinking and you could easily make it a lot worse if hot shrinking was your first go to method. I would be using either a length of wooden dowel that fits the inside radius of a good louver, or shape the end of a circa 5/8" x nearly as wide as the louver, to the inside profile of a good lover to use as a punch from the inside of the bonnet. You will see that the damage to the forward louvers shown in your video will straighten out quite well, being only bent, not stretched.

The area shown in the Lower Ellipse is where shrinking is often required to get a nice looking bonnet. It's common for this area to be stretched on the bonnet when the cars were new from the factory. I suspect that such bonnets had the louvers cut and formed when the tool was reaching its last legs and the result is a greater curve in the area shown in the Ellipse than at the rear edge of the bonnet. The peak of the curve will always be closer to the raised edge of the louver than at the extreme ends of the louver, but when the gap between the peak of the area in the ellipse and the louver is profoundly diminished, compared to the gap at the end of the louver, then its a clear indication that the area in the ellipse is stretched.
When the curve in this area is greater than at the rear edge of the bonnet and therefore stretched, the alternatives are to leave it as factory, or hot shrink the edge close to the louver.
Regards,
Bill
Thanks for that Geoff.Bill, his July video update in the restoration section will show you.
Hello Denis,
From the image following, captured from your video, I very much doubt that the damage to the louvers shown in the Top Ellipse will need any shrinking and you could easily make it a lot worse if hot shrinking was your first go to method. I would be using either a length of wooden dowel that fits the inside radius of a good louver, or shape the end of a circa 5/8" x nearly as wide as the louver, to the inside profile of a good lover to use as a punch from the inside of the bonnet. You will see that the damage to the forward louvers shown in your video will straighten out quite well, being only bent, not stretched.
The area shown in the Lower Ellipse is where shrinking is often required to get a nice looking bonnet. It's common for this area to be stretched on the bonnet when the cars were new from the factory. I suspect that such bonnets had the louvers cut and formed when the tool was reaching its last legs and the result is a greater curve in the area shown in the Ellipse than at the rear edge of the bonnet. The peak of the curve will always be closer to the raised edge of the louver than at the extreme ends of the louver, but when the gap between the peak of the area in the ellipse and the louver is profoundly diminished, compared to the gap at the end of the louver, then its a clear indication that the area in the ellipse is stretched.
When the curve in this area is greater than at the rear edge of the bonnet and therefore stretched, the alternatives are to leave it as factory, or hot shrink the edge close to the louver.
Regards,
Bill
| Link: | |
| BBcode: | |
| HTML: | |
| Hide post links |
#12 Re: Series 2 Bonnet Luvers
Bill,
Thank you for a very detailed analysis. Shrinking was never my first option and I was hoping that most of the louvers could be straightened by other methods. As for the area in the second ellipse, it does appear to be stretched but I couldn't understand how that might have happened. As my vehicle left the factory in December 69, the worn bonnet tool fits well with your explanation.
Armed with the information you have given, I am confident that I can repair the louvers.
Denis
Denis
1969 Series 2 E Type FHC
1968 Daimler 250
1977 Series 2 Daimler XJ6
1969 Series 2 E Type FHC
1968 Daimler 250
1977 Series 2 Daimler XJ6
| Link: | |
| BBcode: | |
| HTML: | |
| Hide post links |