


I have a 1972 V12 Roadster
I have purchased a DAB113HE ignition conversion kit and following advise from several posts on this forum I have also purchased a JLM519 vacuum advance module so that I can replace the vacuum retard module that comes with the conversion kit.
I am looking for advise on how to remove and refit these modules. It appears to be held in place with a very small diameter interference fit pin that is driven through the dissy body and the module that needs driving out or drilling out to release the module, can anyone let me know if this is the correct method or advise on how to do it please?
Many thanks in advance.
George
Fitting a Vacuum Advance Module
#2 Re: Fitting a Vacuum Advance Module
Hi
From memory thats right i had to move my distributor round a tooth to get the timing right
Regards
From memory thats right i had to move my distributor round a tooth to get the timing right
Regards
Rob 1972 s3 roadster
Aston Martin DB9 Volante
Aston Martin DB9 Volante
| Link: | |
| BBcode: | |
| HTML: | |
| Hide post links |
#3 Re: Fitting a Vacuum Advance Module
OK Madjack4 and thank you for your reply.
George
George
George
1972 S3 V12 ROADSTER
1972 S3 V12 ROADSTER
| Link: | |
| BBcode: | |
| HTML: | |
| Hide post links |


#4 Re: Fitting a Vacuum Advance Module
Hi George,
MadJack is right that you will have to check/adjust the timing, the advance unit has a different spindle length to the original, so you have to move the distributor accordingly. Not quite sure about the reference to teeth however, as the V12 distributor has two adjustments, a course adjustment effected by loosening the three mounting Allen bolts (accessed through slots in the rotor - you may have to remove it entirely) and a fine one on the side of the distributor with a locking nut and screw adjuster - this probably won't give enough for the replacement in this case, but you might get lucky.
The advance unit is secured with a small roll pin, requiring an equally small punch to remove it. I made one from an old jeweller's screwdriver - removed the rotating cap and ground off the point, I think I had to grind down the diameter to fit too:
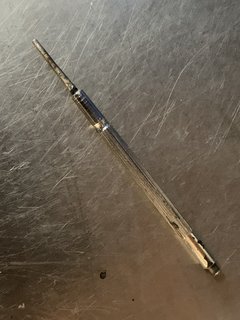
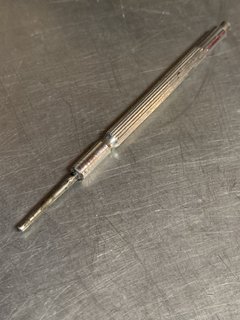
Go gently when drifting the pin out - small taps to begin with. DON'T try drilling it out, its much harder than the surrounding alloy and you will slip off and damage the casting. I guess if it won't move, you could carefully try a little heat, but remove the unit from the car and remove any electronic and/or plastic components. Mine moves fairly easily with the right punch.
Hope that helps,
Regards Simon
MadJack is right that you will have to check/adjust the timing, the advance unit has a different spindle length to the original, so you have to move the distributor accordingly. Not quite sure about the reference to teeth however, as the V12 distributor has two adjustments, a course adjustment effected by loosening the three mounting Allen bolts (accessed through slots in the rotor - you may have to remove it entirely) and a fine one on the side of the distributor with a locking nut and screw adjuster - this probably won't give enough for the replacement in this case, but you might get lucky.
The advance unit is secured with a small roll pin, requiring an equally small punch to remove it. I made one from an old jeweller's screwdriver - removed the rotating cap and ground off the point, I think I had to grind down the diameter to fit too:
Go gently when drifting the pin out - small taps to begin with. DON'T try drilling it out, its much harder than the surrounding alloy and you will slip off and damage the casting. I guess if it won't move, you could carefully try a little heat, but remove the unit from the car and remove any electronic and/or plastic components. Mine moves fairly easily with the right punch.
Hope that helps,
Regards Simon
Regards,
Simon
Series III FHC
Simon
Series III FHC
| Link: | |
| BBcode: | |
| HTML: | |
| Hide post links |
#5 Re: Fitting a Vacuum Advance Module
Hi Simon
Many thanks for the excellent tips I will definitely take on board your good advice.
Jaguar didn’t do us any favours by locating the timing marks under the car as far away from the dizzy as possible.
George
Many thanks for the excellent tips I will definitely take on board your good advice.
Jaguar didn’t do us any favours by locating the timing marks under the car as far away from the dizzy as possible.
George
George
1972 S3 V12 ROADSTER
1972 S3 V12 ROADSTER
| Link: | |
| BBcode: | |
| HTML: | |
| Hide post links |
#6 Re: Fitting a Vacuum Advance Module
"Jaguar didn’t do us any favours by locating the timing marks under the car as far away from the dizzy as possible."

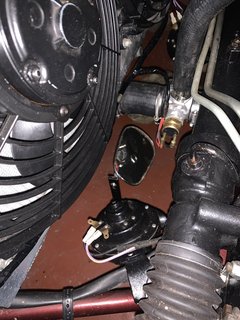
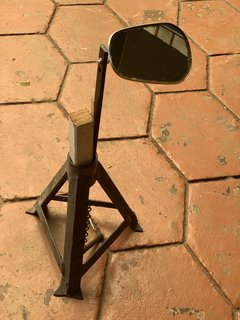
Try mounting a mirror on an axle stand - I use a spare wing mirror, it helps when timing by yourself, but might be best to get someone to check when finalising the setting. Set it up to get minimum parallax error when viewed from above and use a decent timing light with good light output. If you set it up by looking from below (static) then set the mirror so it shows the same reading you get close up, then you should be pretty accurate. I raise the car and place the wheels on wooden blocks - less bending and more accessible to the timing marks. The blocks have built in chocks. Photos are a bit dark but zoom in and you should get the idea.
Regards,
Simon
Regards,
Simon
Series III FHC
Simon
Series III FHC
| Link: | |
| BBcode: | |
| HTML: | |
| Hide post links |
#7 Re: Fitting a Vacuum Advance Module
Hi Simon,
Love the mirror idea it will certainly help. Fortunately I have a lift in the garage so access is not too bad and yes I do have a good timing light but like you I will be timing it by myself so the mirror idea is most welcome. Also many thanks for taking the time to send photo's.
Cheers
George
Love the mirror idea it will certainly help. Fortunately I have a lift in the garage so access is not too bad and yes I do have a good timing light but like you I will be timing it by myself so the mirror idea is most welcome. Also many thanks for taking the time to send photo's.
Cheers
George
George
1972 S3 V12 ROADSTER
1972 S3 V12 ROADSTER
| Link: | |
| BBcode: | |
| HTML: | |
| Hide post links |


#8 Re: Fitting a Vacuum Advance Module
Anyone else contemplating this, consider getting the DAB113HEF (F on the end) ignition conversion kit. This is the vacuum advance version.
Regards,
ColinL
'72 OTS manual V12
ColinL
'72 OTS manual V12
| Link: | |
| BBcode: | |
| HTML: | |
| Hide post links |

#9 Re: Fitting a Vacuum Advance Module
I once looked into vacuum advance and there was a huge amount of info on the internet. All seemed to revolve on where you tap the vacuum from and drilling one of the carb bodies. I didn't peruse and stuck with the retard unit that I've replaced many times over the years. It cuts out quite quick anyway once revs go up.
I think there's a lot on the subject on this forum or Jaglovers.
I think there's a lot on the subject on this forum or Jaglovers.
Adam
S3 V12 E Type FHC Manual 1972-owned since 1978
1957 XK150 since 1976
S3 V12 E Type FHC Manual 1972-owned since 1978
1957 XK150 since 1976
| Link: | |
| BBcode: | |
| HTML: | |
| Hide post links |