Kev Wrote:
Drill out the shear bolt and the existing screw holding the housing to the column.
Rotate the housing until the alternative slot for the shear bolt can be seen and insert new shear bolt.
Tap for new screw to fix housing to column in alternative position and drill hole in column for dog point.
Have I got that right?
Hello Kev,
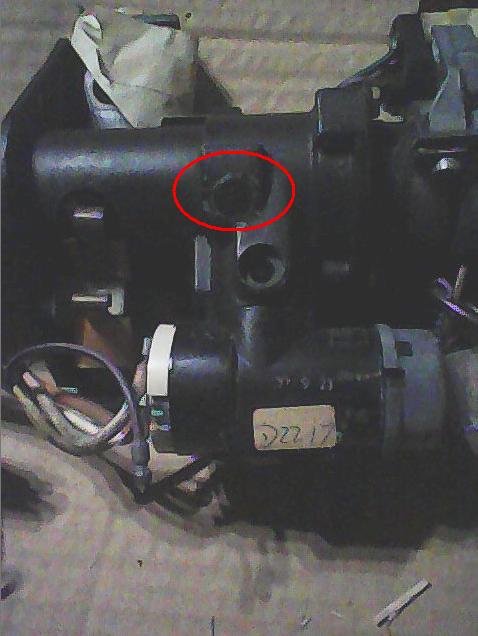
In a word, No. There is no shear bolt, or existing screw holding the housing to the column. The following picture shows a steel plug enclosed in the Red Ellipse, that has been inserted using brute force and holds the housing in place via the pressure it exerts on the Outer Steering Column. This plug is a bastard to get out; I've tried drilling and tapping the centre of the plug then used various methods of jacking or pulling the plug out, but its interference in the bore in which its inserted is too great. I have a good system now employing a fixture to hold the Steering Column in a Machining Center and a CNC Program to machine the plug to make swarf out of it, just kissing the bore in which the plug resides. The same can be achieved with a manual Milling Machine.
The plug can be drilled out, using progressively larger drills until close to the ID of the bore. The advantage of using a machine tool that can use an End Mill, is that you can get very close to the bottom of the plug, right out to its OD, whereas, with a twist drill and its 118 degree included angle point, you can't unless you drill into the wall of the Steering Column. One Forum Member, who will remain nameless, suffice to say that he also perpetrated sacrilege by trimming a Radio Fascia with black gaffer tape

, removed this plug by simply drilling right trough into the bore of the Outer Steering Column.
I like to keep things as pristine as possible and if using a drill to get rid of most of the plug, a Dremel, or similar tool can be used to worry the remainder of the plug away until it can be picked out.
The following picture shows the alternate bore to use when converting a Steering Column to the opposite hand to what it was originally.
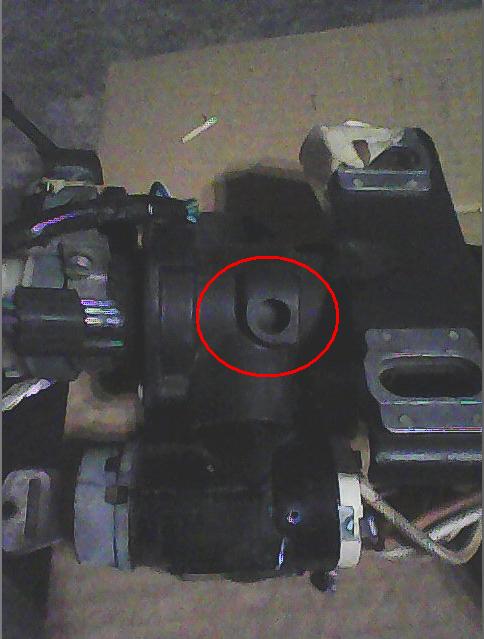
Once the original Steel Plug has been removed, the housing that holds the Ignition Switch and Steering Lock Mechanism can be rotated to its new, correct position. You will see that there is another hole, identical in size and shape to the hole the shot pin of the Steering Lock engaged when the housing was in its original position. This new position hole is used to correctly index the housing to its new position. Simply rotate the Housing until the Steering Lock Shot Pin will engage with the new position hole. Once the shot pin is roughly engaged with the new position hole, the position of the housing can be fine tuned by rotating the housing until the shot pin appears to be centred in the hole.
By the time you're up to positioning the housing as explained above, the hole shown in the picture immediately above should have been tapped M12 x 1.5 through. To do this the housing is removed from the Steering Column. I chose the M12 x 1.5 thread because the ID of the hole is the correct size for that Thread size. With the hole tapped and the housing in position, as described above, the Drill Guide grub screw described in the other Thread relating to this procedure, is screwed into the hole and firmed up on the OD of the Steering Column to hold the housing firmly in place whilst the 5mm hole is drilled through the wall of the Steering Column for the 5mm spigot of the Dog Point Grub Screw used to permanently hold the housing in place. Once finally held in place via the Dog Point Grub Screw, I wash the old location bore and the top of the Dog Point Grub Screw with Wax and Grease Remover and fill both with Epoxy Resin. This step is not necessary, I just like things to look tidy and it adds some form or anti tamper to it.
Regards,
Bill


