


Sorry about causing some confusion.
The front rubber seal was just worn and a light scoring around the collar.
The visible gap i mentioned was between the old rubber seal and collar. Noticeable once all removed and held to the light. I have fitted the new yet.
The cork seal I’m talking about is the seal that fits in the sump groove.
Hope this clarifies. I am confident this sump hasn’t been off before.
Interesting article from Hemings
https://www.hemmings.com/blog/article/t ... ing-leaks/
Front Crank Seal Fitting Tips Please
#41 Re: Front Crank Seal Fitting Tips Please
Series 1 FHC purchased 50 years ago. Courted my wife in it.
Series 1 2+2 when the kids were small now sold.
Series 1.5 OTS in opalescent maroon, Californian car. My retirement present.
Series 1 2+2 when the kids were small now sold.
Series 1.5 OTS in opalescent maroon, Californian car. My retirement present.
| Link: | |
| BBcode: | |
| HTML: | |
| Hide post links |


#42 Re: Front Crank Seal Fitting Tips Please
I shall miss some of the thrill of this as my engine assembly is of course carried out in clinically clean and optimised conditions, with full lighting and 360°rotation available thanks to this

which will probably mean the crank will fall out and break my toes.
https://www.sngbarratt.com/UK/#!/Englis ... dbb1150862
(Julian has promised to make more of them and drop the price ...........)
Re fitting the nose oil-seal, do these remarks regarding "centreing" the seal apply to the Series 1 as well ? I had assumed one fitted the seal to the crank, and then lubricated its periphery with some gasket-sealing-compound as first the timing-cover and then the sump were sandwiched around it, et basta.
Or is there more to it ?
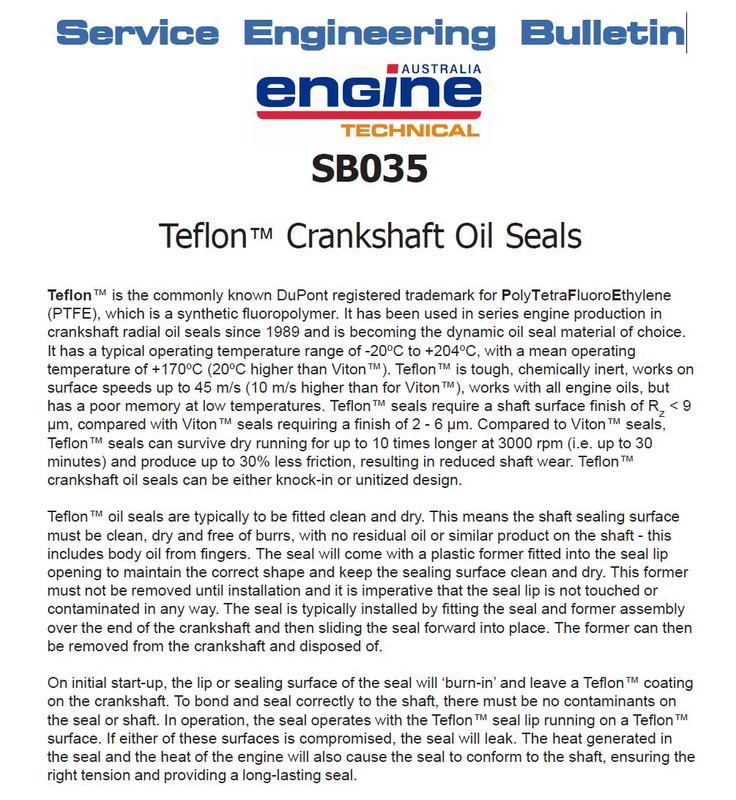
And what's this business of a Teflon seal ? What's wrong with the usual run-of-the-mill seal ?
which will probably mean the crank will fall out and break my toes.
https://www.sngbarratt.com/UK/#!/Englis ... dbb1150862
(Julian has promised to make more of them and drop the price ...........)
Re fitting the nose oil-seal, do these remarks regarding "centreing" the seal apply to the Series 1 as well ? I had assumed one fitted the seal to the crank, and then lubricated its periphery with some gasket-sealing-compound as first the timing-cover and then the sump were sandwiched around it, et basta.
Or is there more to it ?
And what's this business of a Teflon seal ? What's wrong with the usual run-of-the-mill seal ?
Rory
3.8 OTS S1 Opalescent Silver Grey - built May 28th 1962
3.8 OTS S1 Opalescent Silver Grey - built May 28th 1962
| Link: | |
| BBcode: | |
| HTML: | |
| Hide post links |

#43 Re: Front Crank Seal Fitting Tips Please
Hi All..this is one of those very usefull threads....could do with a few more photos of installing as and when you do this job....thanks Steve
Steve
69 S2 2+2 (sold) ..Realm C type replica, 1960 xk150fhc
69 S2 2+2 (sold) ..Realm C type replica, 1960 xk150fhc
| Link: | |
| BBcode: | |
| HTML: | |
| Hide post links |
#44 Re: Front Crank Seal Fitting Tips Please
I’m going with the old fashioned rubber seal. The Teflon one may be better in an environment That is clinically clean but I’m on my back under the car. The Teflon one sounds like an opportunity to remove the sump for a second time.
Pictures of my old sump rear seal below shown against the new one. I’m going to fit the rubber version using the Wynns gasket maker as advertised by James !

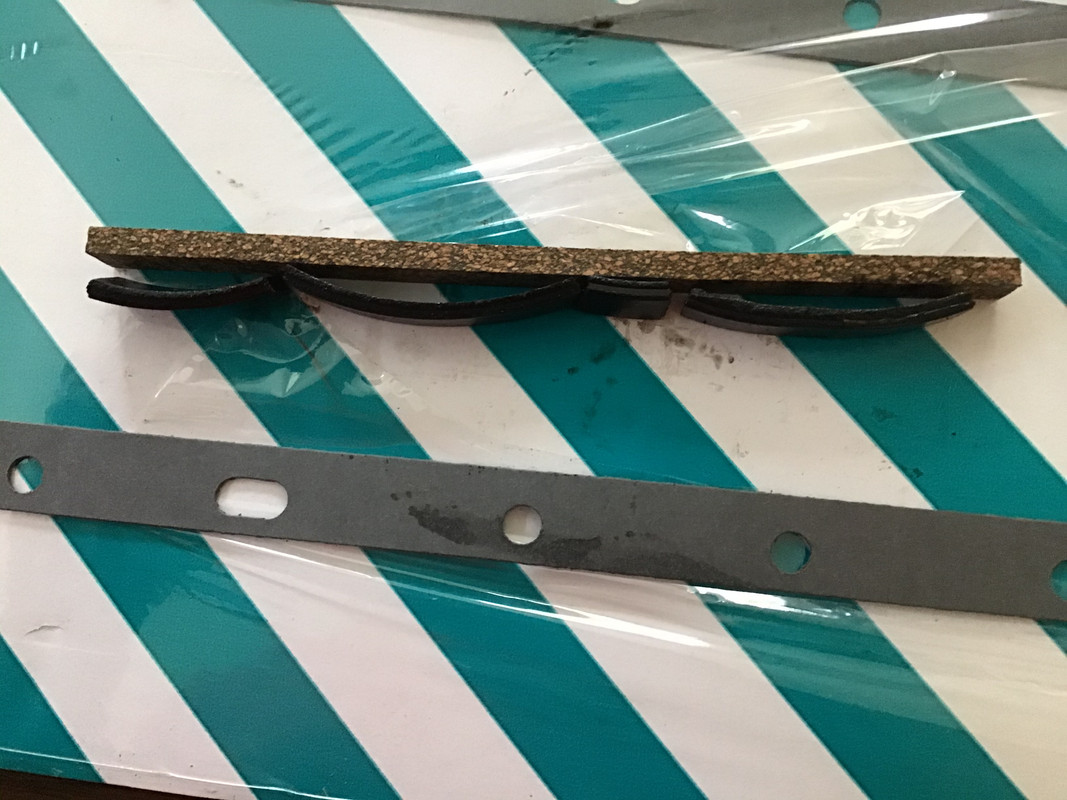
Pictures of my old sump rear seal below shown against the new one. I’m going to fit the rubber version using the Wynns gasket maker as advertised by James !
Series 1 FHC purchased 50 years ago. Courted my wife in it.
Series 1 2+2 when the kids were small now sold.
Series 1.5 OTS in opalescent maroon, Californian car. My retirement present.
Series 1 2+2 when the kids were small now sold.
Series 1.5 OTS in opalescent maroon, Californian car. My retirement present.
| Link: | |
| BBcode: | |
| HTML: | |
| Hide post links |
#45 Re: Front Crank Seal Fitting Tips Please
Ok, So my new seal and collar have arrived.
The collar is a genuine jaguar one without a key slot. That’s not an issue since I’ve removed the key.
What may be an issue is that this collar is designed for the Teflon seal which needs the oil slinger removed and is thus slightly longer than the collar design for a rubber seal which I’m using.
So I’m now in a potential problem area. I don’t want to use a Teflon seal. Do i remove the oil slinger anyway or leave it in place and hope that the additional length isn’t an issue?
Any comments .
Series 1 FHC purchased 50 years ago. Courted my wife in it.
Series 1 2+2 when the kids were small now sold.
Series 1.5 OTS in opalescent maroon, Californian car. My retirement present.
Series 1 2+2 when the kids were small now sold.
Series 1.5 OTS in opalescent maroon, Californian car. My retirement present.
| Link: | |
| BBcode: | |
| HTML: | |
| Hide post links |
#46 Re: Front Crank Seal Fitting Tips Please
I'm fascinated by these complications regarding the Teflon seal.
Rob Beere consider that this is an area that just requires "an oil-seal", end of story, nothing special, and that the original works just fine - I had a long chat with Carl only this morning on precisely this subject.
I buy most of my engine parts from RBR as they are only few place that I've come across where 1) they build nothing but XK engines, 2) they have a building stuffed full of spares that they use themselves and sell by mail-order, and 3) they answer the 'phone and will share advice.
Their web-site is crap and doesn't cover half of what they've actually got, but the people more than make up for it.
I don't get the business of this Teflon seal requiring more cooling - removing the thrower to give it more oil, is that the reasoning ? - as the temperature of the seal will be either dictated by the temperature of the surrounding metal and the crank, to which the thrower will make no difference, or by the oil that gets thrown at it, whose temperature will be identical whether there is a lot or a little of it.
Could someone expound on this - I'm happy to stand corrected, and enlightened, but it appears for the time being to be the creation of a solution to a problem that doesn't exist, and that brings a whole load of problems with it.
As regards the length of the spacer, keyed or un-keyed, I would have thought that it would only change the alignment of the crank pulley and its attendant belt by 1mm at most - the thickness of the thrower ? - and in my experience the alignment of the other ancilliaries is nowhere near as precise as that, so would be of no consequence.
Rory
3.8 OTS S1 Opalescent Silver Grey - built May 28th 1962
3.8 OTS S1 Opalescent Silver Grey - built May 28th 1962
| Link: | |
| BBcode: | |
| HTML: | |
| Hide post links |
-
 politeperson
Topic author - Posts: 1386
- Joined: Tue Jun 07, 2016 8:26 pm
- Location: Boston UK

#47 Re: Front Crank Seal Fitting Tips Please
Tim,
Is your collar designed to incorporate an O ring?
The O ring is between the collar and the crank. Dont forget it.
I would leave the oil slinger in situ.
The interference fit of the collar to the crank means the crank has to be completely de-burred and clean for the collar to slide over the end. The O ring doesnt help either. Needs a good tap with the correct size socket to seat properly on the sprocket.
Finishing off an S1 roadster
| Link: | |
| BBcode: | |
| HTML: | |
| Hide post links |
#48 Re: Front Crank Seal Fitting Tips Please
Thanks all for responses
I’m going to leave the slinger in place.
The collar was machined for the O ring but came without. The O ring isn’t listed on the SNG website although I have no doubt they sell it. Another major supplier does list it but with post etc just under a tenner!
Purchased on off eBay from a close associate of SNG for £1.
Tim
Series 1 FHC purchased 50 years ago. Courted my wife in it.
Series 1 2+2 when the kids were small now sold.
Series 1.5 OTS in opalescent maroon, Californian car. My retirement present.
Series 1 2+2 when the kids were small now sold.
Series 1.5 OTS in opalescent maroon, Californian car. My retirement present.
| Link: | |
| BBcode: | |
| HTML: | |
| Hide post links |
#49 Re: Front Crank Seal Fitting Tips Please
Further confirmation via Carl at Rob Beere this morning ; this is my interpretation of the advice.
They never use the Teflon seal as they have seen too many of them damaged when fitting, they use a bog-standard run-of-the-mill seal on every engine they build, be it for road - they do not only build race engines, for race, or for the XK engines they build for Jaguar themselves (which I have seen).
There are actually three versions of the spacer (referred to as the seal track) - the original one, which is keyed, a second one without a key-way (but relieved on the rear face to clear the end of the pinion key) but fitted with an O-ring in the bore, both of the same length and designed to be used with the oil-slinger ; then there is the third type, identical to the second except for its length, which is longer by the thickness of the now-no-longer-fitted oil-slinger, which I measure at 0.85mm.
Carl says they flatten the gear and spacer faces on 240-grit flat-blocks during the cleaning process to remove any traces or marks that might provide a passage-way for oil between the components, and do not ditch any pre O-ring seal tracks as they think there is never an issue when the engines are built in this way.
I would hasard that a smear of Three-Bond sealant on the crank between the seal-track and the timing gear is as good as any O-ring anyway.
Maybe the Teflon seal is easier to jemmy into place on an engine that is having the seal changed in-situ, and the pre-stretch of the bore with its spacer is to help protect it from getting damaged as it is slid over the crank nose with its inevitable key-way sharp edges, rather like - on Ducatis - we would always use a thin wrapping of insulating tape around shafts such as these when sliding oil seals into place.
As for the lubrication of the Teflon seal - "stopping it drying out" etc - being behind the suppression of the oil thrower, I don't believe a word of it.
Rory
3.8 OTS S1 Opalescent Silver Grey - built May 28th 1962
3.8 OTS S1 Opalescent Silver Grey - built May 28th 1962
| Link: | |
| BBcode: | |
| HTML: | |
| Hide post links |
#50 Re: Front Crank Seal Fitting Tips Please
The sump is now back on. Thankfully!
It really is a bit of a bugger to do when lying on your back. I had a spare jack handy to slip under the sump and support it whilst engaging the first few bolts. I’m fairly confident that the front seal will no longer be an issue
Getting the seal track in place was made easier by winding it in with the crank bolt to ensure it was nice and square . Plenty of lubricant on the crank nose helped. And yes I did remember the O ring.
What concerns me however is whether the rear sump seal stayed in place whilst I waggled the sump over the “little bollocks”. This won’t be evident until start up time. If this is a problem them I’m considering removing the reaction plate next time. My god I hope this isn’t the case.
The rest of the job is simple spannering.
Series 1 FHC purchased 50 years ago. Courted my wife in it.
Series 1 2+2 when the kids were small now sold.
Series 1.5 OTS in opalescent maroon, Californian car. My retirement present.
Series 1 2+2 when the kids were small now sold.
Series 1.5 OTS in opalescent maroon, Californian car. My retirement present.
| Link: | |
| BBcode: | |
| HTML: | |
| Hide post links |
#51 Re: Front Crank Seal Fitting Tips Please
Rory, I believe the need to ensure oil reaches the junction of the seal lip and crank is to ensure the safe local temperature at the edge of the seal where it meets the crank isn't exceeded due to friction. Other than at the critical point where the seal edge and the crank meet where friction would raise the local temperature, the temperature will otherwise be as you say be the same throughout the engine, circa 90 degrees.rfs1957 wrote: ↑Wed Feb 05, 2020 9:40 pmI don't get the business of this Teflon seal requiring more cooling - removing the thrower to give it more oil, is that the reasoning ? - as the temperature of the seal will be either dictated by the temperature of the surrounding metal and the crank, to which the thrower will make no difference, or by the oil that gets thrown at it, whose temperature will be identical whether there is a lot or a little of it.
John
1969 Series 2 FHC
1969 Series 2 FHC
| Link: | |
| BBcode: | |
| HTML: | |
| Hide post links |
-
politeperson
Topic author - Posts: 1386
- Joined: Tue Jun 07, 2016 8:26 pm
- Location: Boston UK
#52 Re: Front Crank Seal Fitting Tips Please
Good luck with the rest of the spannering Tim.
I am sure it will be fine!
I am sure it will be fine!
Finishing off an S1 roadster
| Link: | |
| BBcode: | |
| HTML: | |
| Hide post links |
-
 PeterCrespin
- Posts: 4561
- Joined: Fri Mar 05, 2010 8:22 pm
- Location: Gaithersburg, Maryland.
- Contact:

#53 Re: Front Crank Seal Fitting Tips Please
John is correct, Rory is correct, everyone has a bit of the puzzle correct but nobody put all the pieces together and found the missing parts that fell down the side of the sofa. Clue: there are pros and cons for each design (NOT French cons, Rory).
The real story is that...
[Excuse me, the phone’s ringing]
Sorry, that was my publisher, er, no, I mean milkman. Yes, the milkman, calling from Vel-o-chay Dairy in Dorset. Lots of nice cows in the West Country. My friend married one. Big brown eyes.
Anyway, Where were we? Seals? Yes, very clever animals. Bloody fast swimmers. And who doesn’t like a bit of cod for supper? Apparently there’s a flap on in Dorset. An embargo they said. I think it’s some kind of fishing boat. I’ll have to look it up.
Carry on. Don’t mind me. “Premature explanation” - it affects a lot of over-eager young men and annoys their girlfriends. Most unsatisfactory.
1E75339 UberLynx D-Type; 1R27190 70 FHC; 1E78478; 2001 Vanden Plas
| Link: | |
| BBcode: | |
| HTML: | |
| Hide post links |
#54 Re: Front Crank Seal Fitting Tips Please
Keep an eye on those meds Pete.
You’ll need an owl next.
You’ll need an owl next.
Rory
3.8 OTS S1 Opalescent Silver Grey - built May 28th 1962
3.8 OTS S1 Opalescent Silver Grey - built May 28th 1962
| Link: | |
| BBcode: | |
| HTML: | |
| Hide post links |
#55 Re: Front Crank Seal Fitting Tips Please
I suspect the answer will be in Peter,s new book 
Steve
69 S2 2+2 (sold) ..Realm C type replica, 1960 xk150fhc
69 S2 2+2 (sold) ..Realm C type replica, 1960 xk150fhc
| Link: | |
| BBcode: | |
| HTML: | |
| Hide post links |
#56 Re: Front Crank Seal Fitting Tips Please
I thought I would update with my experience of changing this seal.
Having read through this thread I decided on using the original type seal and with the new type seal track with the o ring seal.
Disassembly went according to plan; stabiliser loosened, engine mounts undone, engine raised.
Small jack under the gearbox and sump came down easily.
Old seal visibly worn and slight marking on the seal track. Refitted sump with new parts and started up.
Horrendous noise from sump/ timing cover area!
Strip down again and all I can imagine is that the new (slightly longer) seal track is forcing the oil slinger onto the timing chain. One of the later posts in this thread mentions 3 differing seal tracks. So it seems that certainly in my case the original sized track is the one to use.
So; polished up the old track to remove the slight marking, reassemble and noise gone.
I used wynns gasket maker when I first refitted the sump, I can tell you that my god this stuff sticks.
Expecting the sump to drop off having only been on a few days I was sorely disappointed. Repeated taps with a rubber mallet proved fruitless. Resorting to a scraper into the joint likewise. I finally used a small bottle jack to exert some force, came off with a thump.
On the good side my new rear sump seal remained firmly fixed.
Hopefully job done and no need to remove the sump again.
Series 1 FHC purchased 50 years ago. Courted my wife in it.
Series 1 2+2 when the kids were small now sold.
Series 1.5 OTS in opalescent maroon, Californian car. My retirement present.
Series 1 2+2 when the kids were small now sold.
Series 1.5 OTS in opalescent maroon, Californian car. My retirement present.
| Link: | |
| BBcode: | |
| HTML: | |
| Hide post links |
-
PeterCrespin
- Posts: 4561
- Joined: Fri Mar 05, 2010 8:22 pm
- Location: Gaithersburg, Maryland.
- Contact:
#57 Re: Front Crank Seal Fitting Tips Please
Doesn’t make sense, sorry. The slinger sits against the sprocket no matter what length of spacer you use. So the noise cannot have been a change in distance between chain and a slinger ‘forced’ against it by a different spacer. Maybe you bent the slinger taking the spacer off?
1E75339 UberLynx D-Type; 1R27190 70 FHC; 1E78478; 2001 Vanden Plas
| Link: | |
| BBcode: | |
| HTML: | |
| Hide post links |


#58 Re: Front Crank Seal Fitting Tips Please
I can confidently tell you, having done both that the nitrile rubber seals are way easier to get into place.
Andrew.
881824, 1E21538. 889457. 1961 4.3l Mk2. 1975 XJS. 1962 MGB. 1979 MGB.
http://www.projectetype.com/index.php/the-blog.html
Adelaide, Australia
881824, 1E21538. 889457. 1961 4.3l Mk2. 1975 XJS. 1962 MGB. 1979 MGB.
http://www.projectetype.com/index.php/the-blog.html
Adelaide, Australia
| Link: | |
| BBcode: | |
| HTML: | |
| Hide post links |
#59 Re: Front Crank Seal Fitting Tips Please
From my reading about teflon seals after I had several failures and wondered what the hell I was doing wrong, it is exactly the opposite, at least on first start up.
The seal runner is supposed to be scrupulously clean with no oil on it. The Teflon seal is supposed to be left for a period of (hours/days take your pick) to allow it to come in and rest on the seal runner.
Then, on startup, the friction between seal edge and runner is supposed to allow deposition of some teflon onto the metal of the seal runner. So you actually end up with a Teflon to Teflon seal. This is why the surface smoothness of the runner and lack of oil contamination is deemed critical.
I know this all sounds like bollocks but I read this in an installation PDF from a manufacturer of Teflon seals used in air compressors.
Personally I have no idea how you actually achieve this in practice with an engine full of oil.
I now stick to using nitrile seals and the do not leak.
Last edited by abowie on Sat Mar 28, 2020 2:09 am, edited 1 time in total.
Andrew.
881824, 1E21538. 889457. 1961 4.3l Mk2. 1975 XJS. 1962 MGB. 1979 MGB.
http://www.projectetype.com/index.php/the-blog.html
Adelaide, Australia
881824, 1E21538. 889457. 1961 4.3l Mk2. 1975 XJS. 1962 MGB. 1979 MGB.
http://www.projectetype.com/index.php/the-blog.html
Adelaide, Australia
| Link: | |
| BBcode: | |
| HTML: | |
| Hide post links |
#60 Re: Front Crank Seal Fitting Tips Please
Andrew.
881824, 1E21538. 889457. 1961 4.3l Mk2. 1975 XJS. 1962 MGB. 1979 MGB.
http://www.projectetype.com/index.php/the-blog.html
Adelaide, Australia
881824, 1E21538. 889457. 1961 4.3l Mk2. 1975 XJS. 1962 MGB. 1979 MGB.
http://www.projectetype.com/index.php/the-blog.html
Adelaide, Australia
| Link: | |
| BBcode: | |
| HTML: | |
| Hide post links |