


When I first had my E it quickly developed accelerating wear in the RHS upper ball joint. I couldn’t chase the wear with shims as the hardening of the wishbone had failed. So I replaced the whole unit with an updated wishbone assembly, which had a non adjustable ball joint.
Now, a few summers and about 35,000 miles later....... I have a worn upper ball joint and no possibility of adjusting the wear with shims.
My options are limited. Repair the original wishbones (which I retained); replace the upgraded wishbones with new ones, hoping they last a little longer than 35,000 gentle, mostly straight miles.
Are there any other options?
Cost isn’t a factor. This car doesn’t owe me anything, in other words I am Ok with spending around £500 (depending on whatever discount I can arrange with Julian B.) to get the car back to fully MOT passing status.
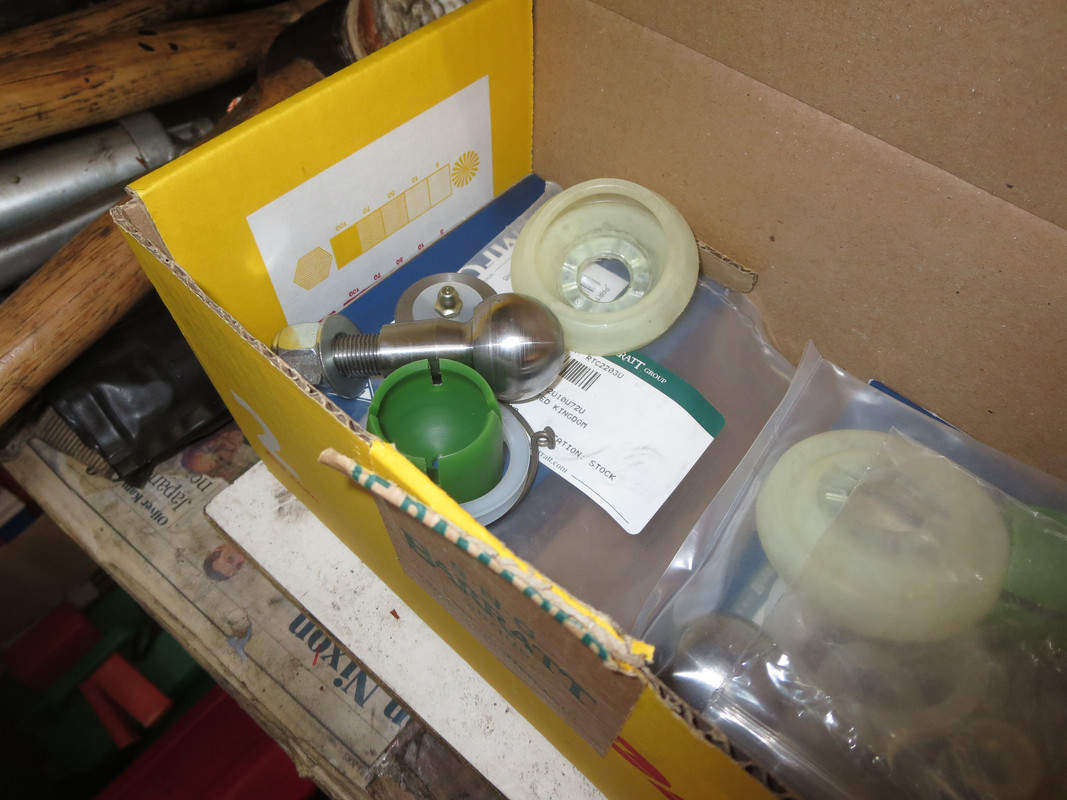
Upper ball joint
-
christopher storey
- Posts: 5698
- Joined: Sun Mar 09, 2008 3:07 pm
- Location: cheshire , england

#2 Re: Upper ball joint
Chris : I suggest you have a talk with Andy Rayner at Hutsons . I can't remember all the details now, but at one stage IIRC they were doing an exchange scheme on the upper wishbones . At the very least he could advise you what he thinks is now the best way forward when you still have the originals to hand
01274 669052
01274 669052
| Link: | |
| BBcode: | |
| HTML: | |
| Hide post links |

#4 Re: Upper ball joint
Have a chat with Angus....Steve
Steve
69 S2 2+2 (just sold) ..Realm C type replica, 1960 xk150fhc
69 S2 2+2 (just sold) ..Realm C type replica, 1960 xk150fhc
| Link: | |
| BBcode: | |
| HTML: | |
| Hide post links |


#5 Re: Upper ball joint
Hi Chris.
Which updated assembly did you replace your worn unit with? If it's the CMC one the ball runs on a plastic insert that can just be removed and replaced.
Which updated assembly did you replace your worn unit with? If it's the CMC one the ball runs on a plastic insert that can just be removed and replaced.
Andrew.
881824, 1E21538. 889457. 1961 4.3l Mk2. 1975 XJS. 1962 MGB
http://www.projectetype.com/index.php/the-blog.html
Adelaide, Australia
881824, 1E21538. 889457. 1961 4.3l Mk2. 1975 XJS. 1962 MGB
http://www.projectetype.com/index.php/the-blog.html
Adelaide, Australia
| Link: | |
| BBcode: | |
| HTML: | |
| Hide post links |
#6 Re: Upper ball joint
There has been a clarification. I sought out the invoice for the wishbones I fitted several years back. They included the uprated ball joint with the Nylon cup. So replacement will be easy and cheap. Speaking to the supplier of the wishbones I mentioned that the ball joint had only lasted 35,000 miles. Given that they are supposed to be modern technology, and should therefore last as long as modern ball joints fitted to modern cars, this was a surprise. Ofcourse, it has to be said that most owners of E-Types today will not drive their cars 35,000 miles in total during their ownership and thus will never encounter premature wear of this uprated ball joint. Of all the Es that are local to me, I think mine is the only one that ever gets the engine up to temperature. One I know has only covered 2,000 miles in the last ten years.
Anyway, I will replace all four ball joints as a matter of precaution, and because it is easier to do upper and lowewr at one time than to have to come back and replace the lowers in a few miles time.
Thx for all the helpful comments.
Anyway, I will replace all four ball joints as a matter of precaution, and because it is easier to do upper and lowewr at one time than to have to come back and replace the lowers in a few miles time.
Thx for all the helpful comments.
Chris '67 S1 2+2
| Link: | |
| BBcode: | |
| HTML: | |
| Hide post links |
#7 Re: Upper ball joint
Hello Chris,
On a fairly regular basis, I modify Upper Wishbones and fit the Nylon Inserts and have been for some time now. Also on a fairly regular basis, for evaluation purposes, I strip and examine the Ball Pin and Nylon Insert of one of my client's car that is used as a daily driver. For this car the assembly has lasted well, with the fit of the Ball Pin in the Nylon Socket still quite firm. The car to date with the Nylon Inserts installed, has done circa 28K miles.
If you replace the Ball Pin/Nylon Insert yourself, the assembly is a firm press fit in the socket of the Wishbone. Accordingly, you will have to press the old unit out. Pressing it out is not an issue, simply use the installed Ball Pin as the press mandrel. Pressing the new one in, if you don't replace the plastic ring that the Dust Shield Gator attaches to, you need to support the ring close to its ID so as to avoid damaging it. Use the thick Top Plate, that is part of the supplied assembly, on top or the Nylon Insert when pressing it in, so as to spread the load over the whole top face of the insert.
Regards,
Bill
| Link: | |
| BBcode: | |
| HTML: | |
| Hide post links |
#8 Re: Upper ball joint
Bill, Noted . Many thanks. As with all my trials with this car, I will be taking pictures. Might even try a vid. If they are decent I will share.
Chris '67 S1 2+2
| Link: | |
| BBcode: | |
| HTML: | |
| Hide post links |
#9 Re: Upper ball joint
New ball joint assembly has been fitted. It was relatively straighforward and required no special tools.
The components are more simple than the OE ball joint. There are no shims, no spring, but there is a nylon cup for which the wishbone will need to have been machined.
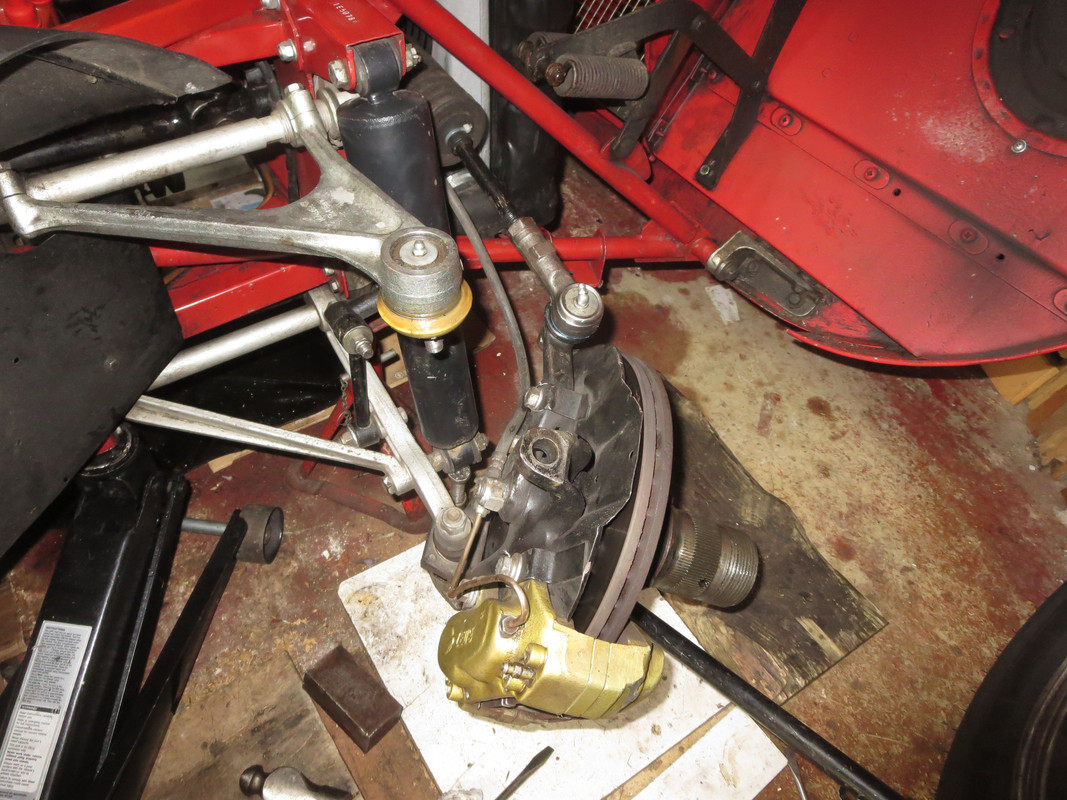
The old ball joint came loose with just a hammer blow directed at the hub (not the wishbone). A couple of sharp taps with a substantial hammer loosened the taper.
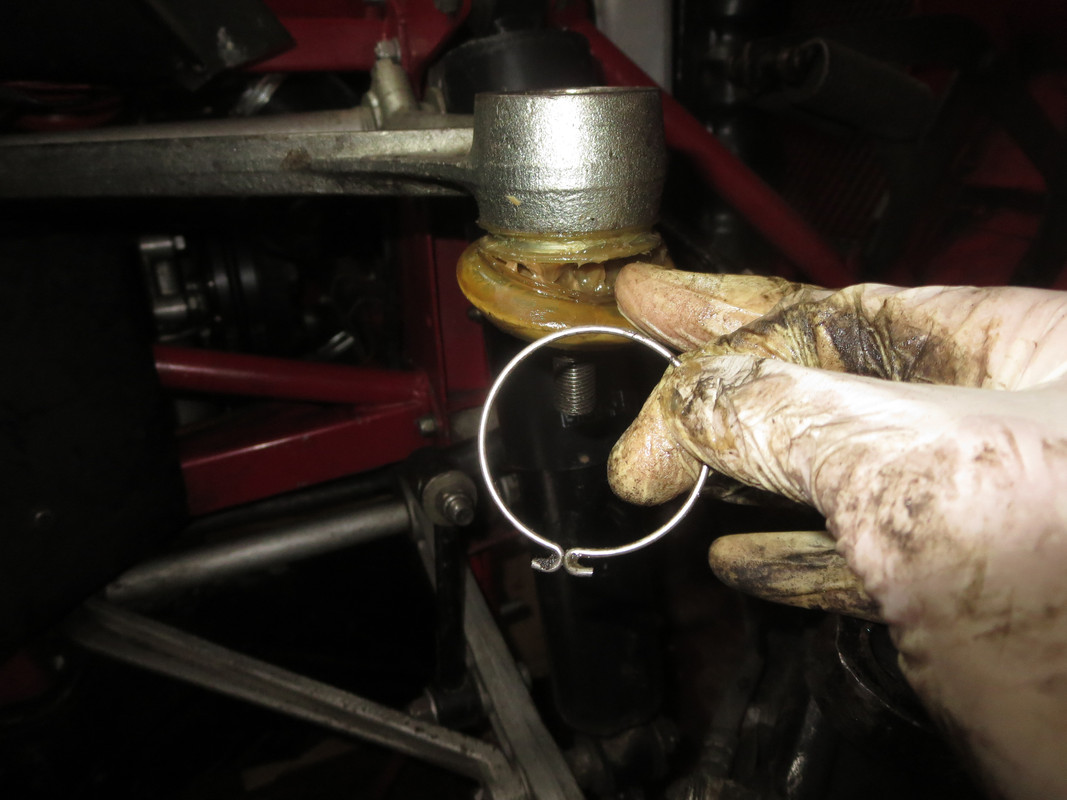
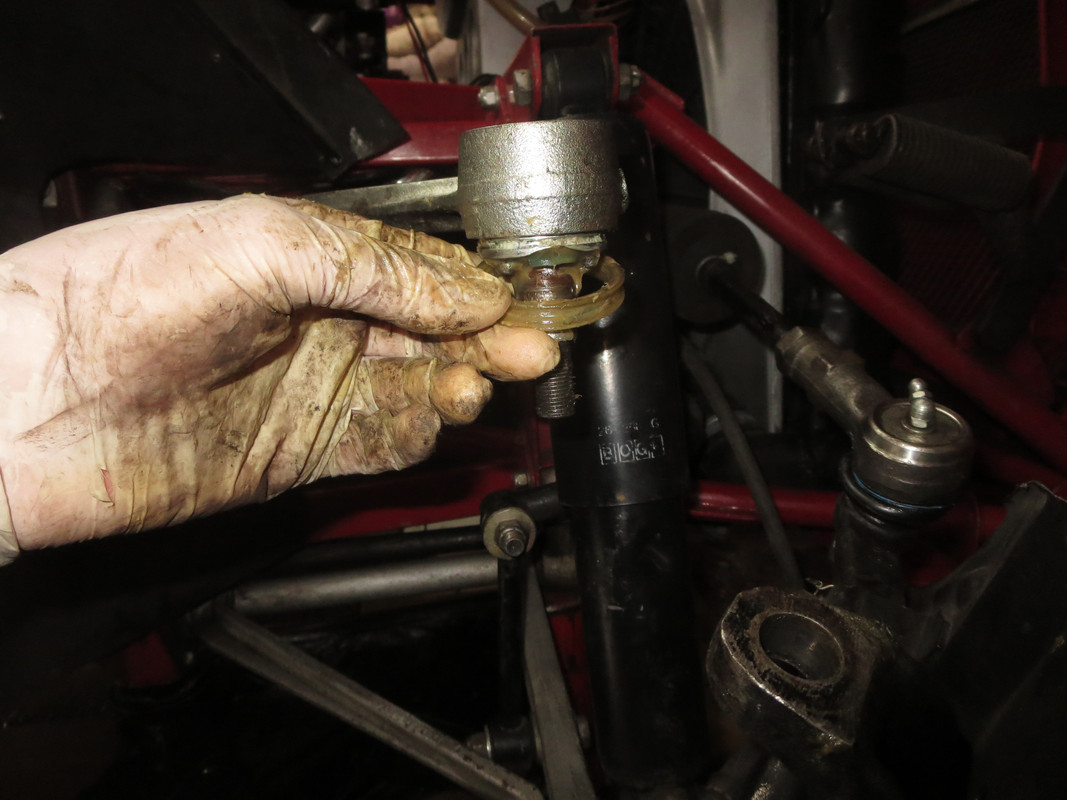
WIth the dust seal clip removed the dust seal was eased out of its collar. Then the collar was removed.
Then the old ball joint was driven up through the top of the wishbone. It came out without any issues. Despite generous greasing throughout its life the ball shows evidence of rust.
The new assembly was driven home and the circlip engaged all round. This was a very tight fit.
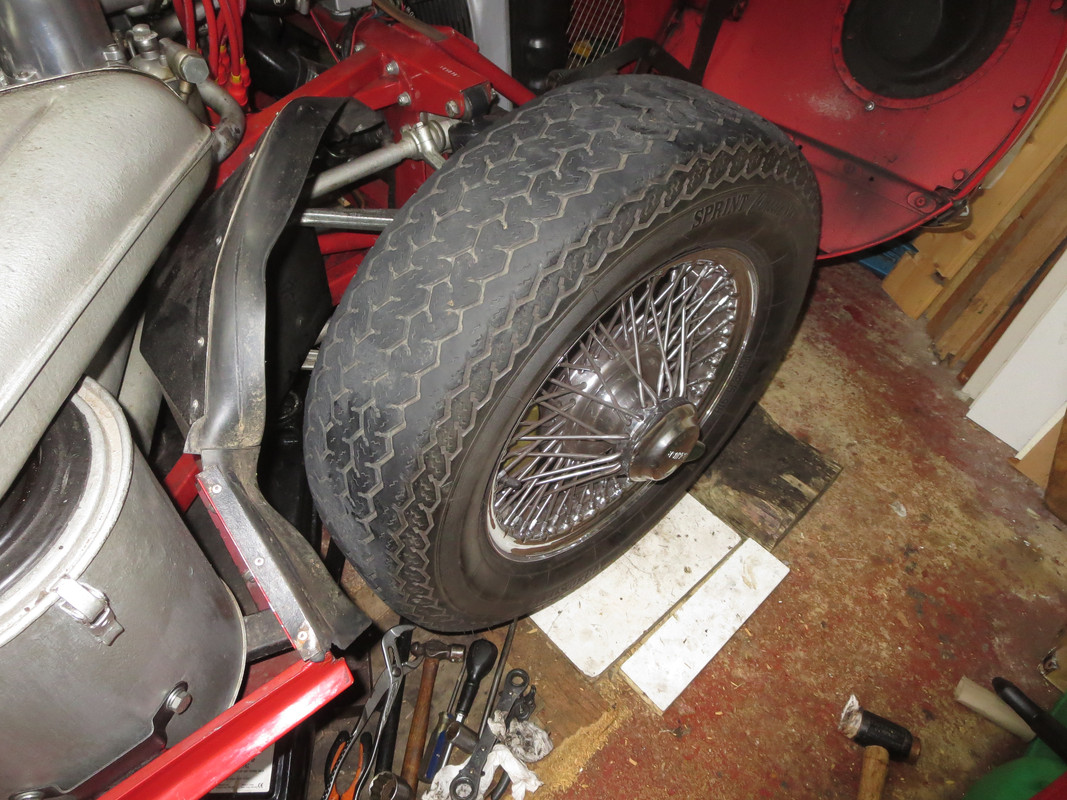
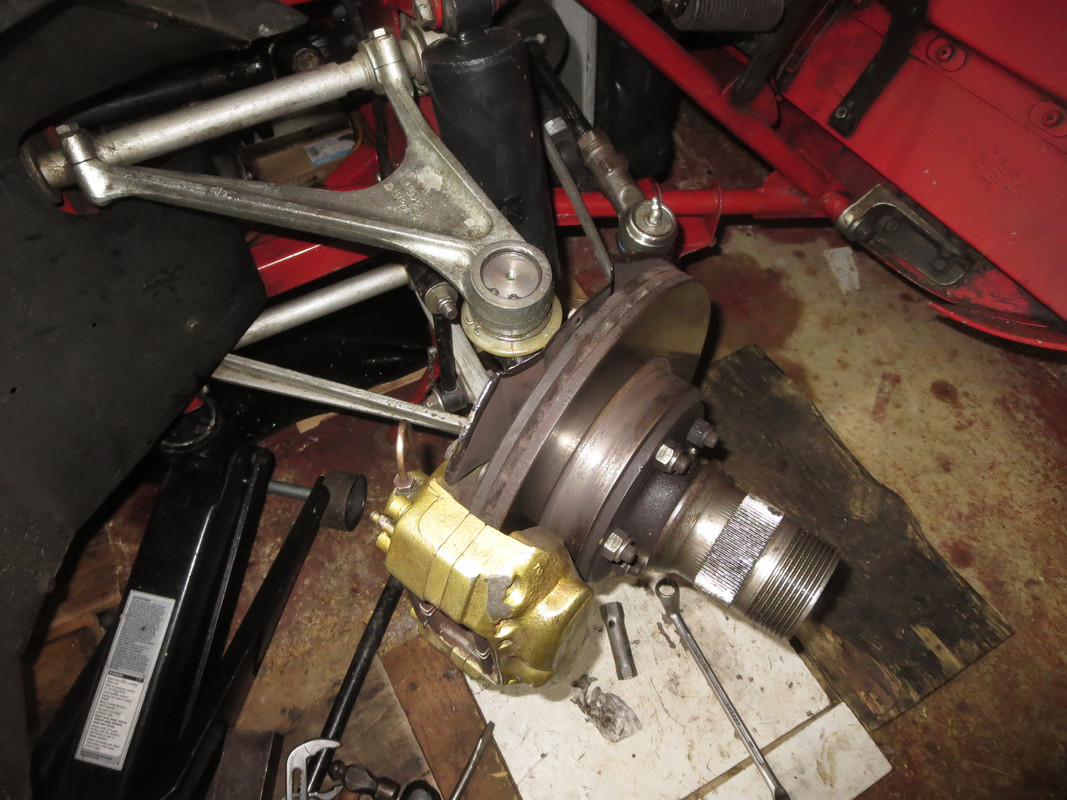
With the wheel back on and the suspension loaded to put the wishbones in their 'driving' position, the play which had previously been detected had gone.
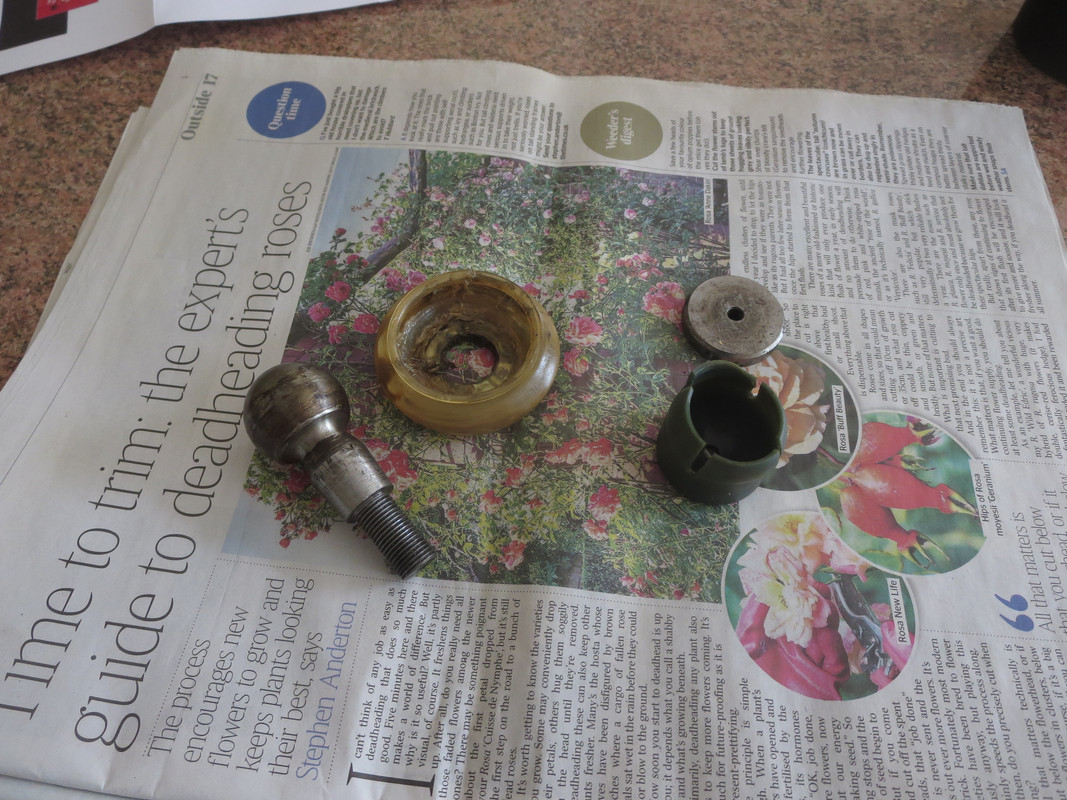
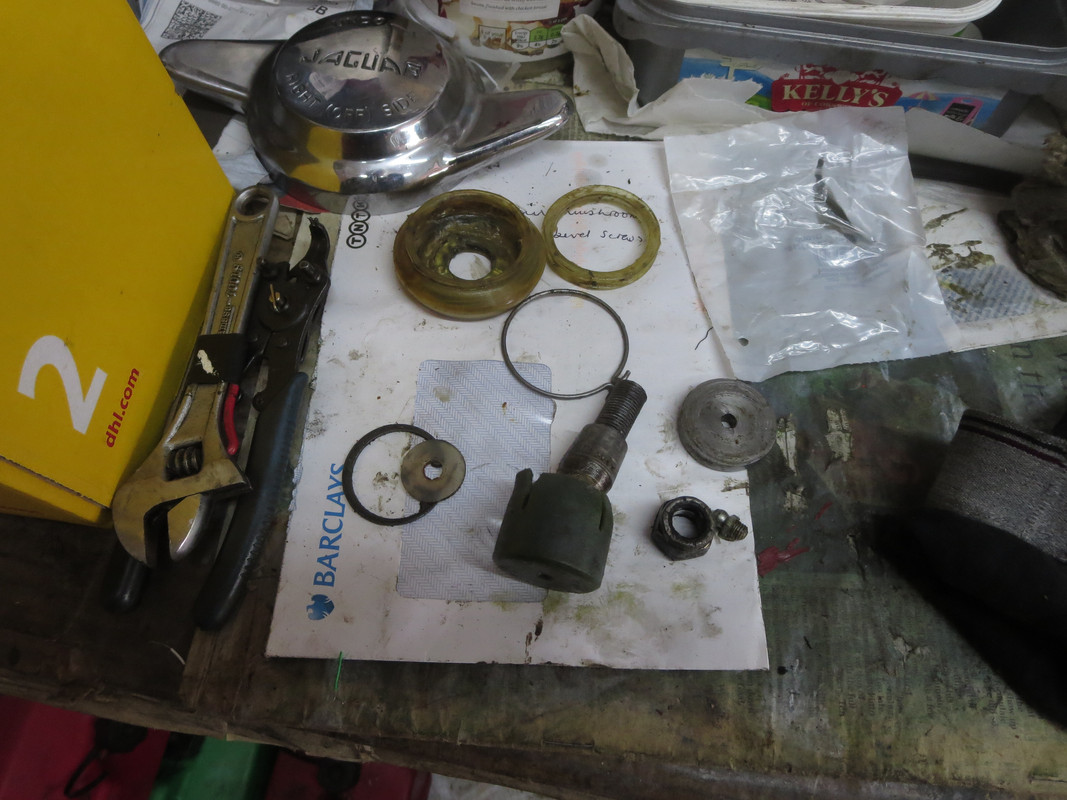
Even cleaned up there is clear evidence of pitting and rust on the ball end. The dust seal had not been compromised, but it was not full of grease. I made sure the new one was full before assembly.
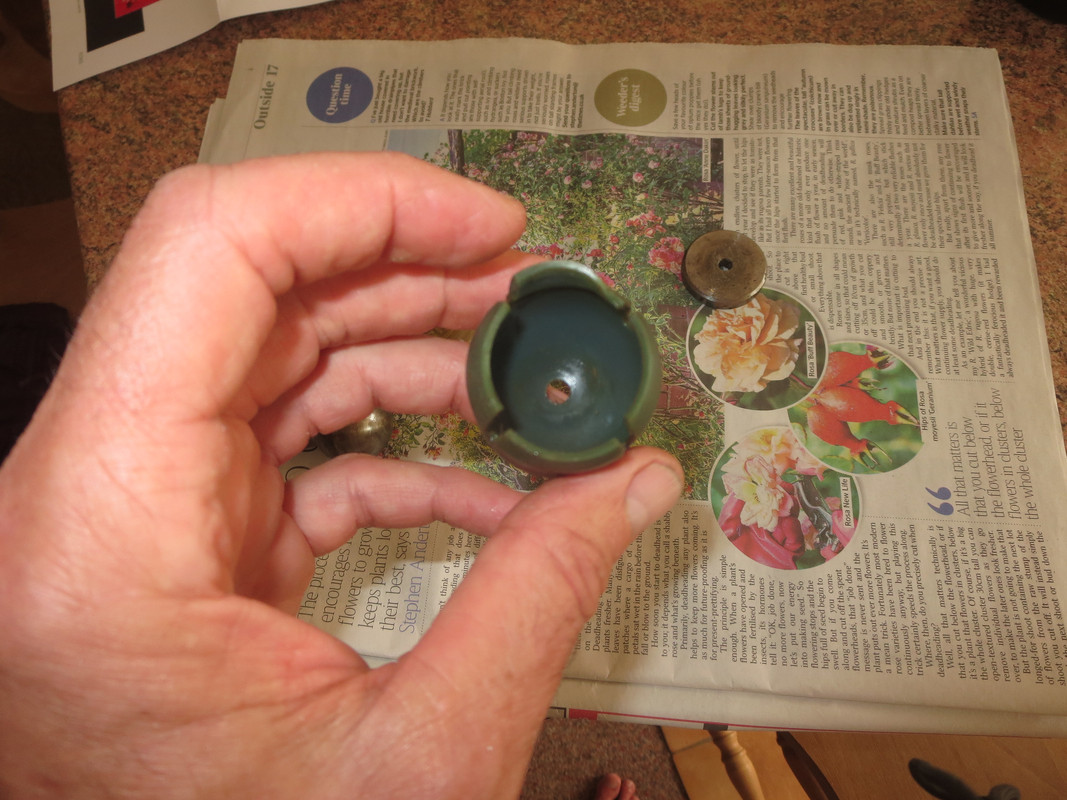
The nylon cup shows clear signs of distress when the suspension was in full drop.
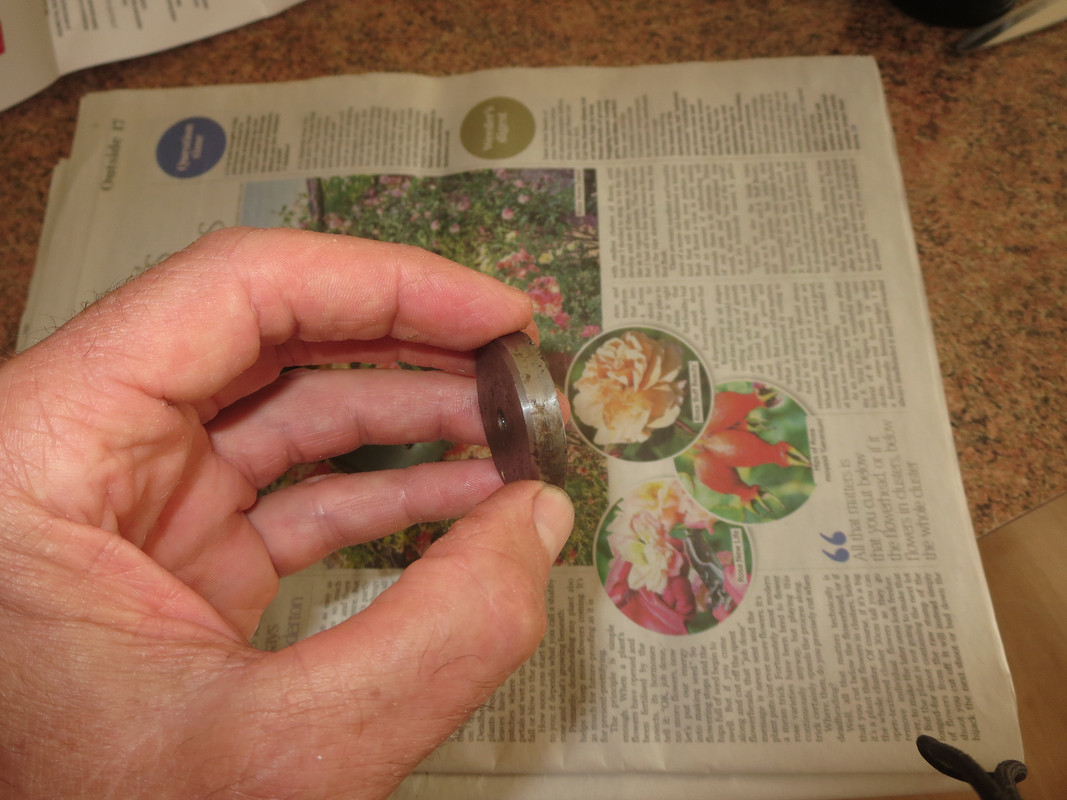
The spacer in the new assembly is smaller than this spacer from the old ball joint.
I suspect that the original uprated ball joint was assembled dry, and that despite generous greasing through the nipple there was not enough grease in the joint to prevent moisture ingress and damage. Over the years this got worse and the rust and scale on the ball wore the nylon cup, which produced the play.
I'd like to know the experiences of others in fitting this uprated ball joint.
The components are more simple than the OE ball joint. There are no shims, no spring, but there is a nylon cup for which the wishbone will need to have been machined.
The old ball joint came loose with just a hammer blow directed at the hub (not the wishbone). A couple of sharp taps with a substantial hammer loosened the taper.
WIth the dust seal clip removed the dust seal was eased out of its collar. Then the collar was removed.
Then the old ball joint was driven up through the top of the wishbone. It came out without any issues. Despite generous greasing throughout its life the ball shows evidence of rust.
The new assembly was driven home and the circlip engaged all round. This was a very tight fit.
With the wheel back on and the suspension loaded to put the wishbones in their 'driving' position, the play which had previously been detected had gone.
Even cleaned up there is clear evidence of pitting and rust on the ball end. The dust seal had not been compromised, but it was not full of grease. I made sure the new one was full before assembly.
The nylon cup shows clear signs of distress when the suspension was in full drop.
The spacer in the new assembly is smaller than this spacer from the old ball joint.
I suspect that the original uprated ball joint was assembled dry, and that despite generous greasing through the nipple there was not enough grease in the joint to prevent moisture ingress and damage. Over the years this got worse and the rust and scale on the ball wore the nylon cup, which produced the play.
I'd like to know the experiences of others in fitting this uprated ball joint.
Chris '67 S1 2+2
| Link: | |
| BBcode: | |
| HTML: | |
| Hide post links |
-
neal herridge
- Posts: 171
- Joined: Wed Aug 13, 2014 4:20 pm
- Location: devon
#10 Re: Upper ball joint
Chris.
Did you get the replacements from SNG.
Thanks Neal.
Did you get the replacements from SNG.
Thanks Neal.
| Link: | |
| BBcode: | |
| HTML: | |
| Hide post links |


#12 Re: Upper ball joint
Hi Chris,
where did you get the modified upper wishbones? Recommended suppliers?
Thank you,
Mark
where did you get the modified upper wishbones? Recommended suppliers?
Thank you,
Mark
Mark
1963 OTS 880436
1963 OTS 880436
| Link: | |
| BBcode: | |
| HTML: | |
| Hide post links |
#13 Re: Upper ball joint
Hello Mark,
SNG Barratt supply new Upper Wishbones equipped with the Nylon Insert ball joint arrangement. described as Up-rated.
Regards,
Bill
SNG Barratt supply new Upper Wishbones equipped with the Nylon Insert ball joint arrangement. described as Up-rated.
Regards,
Bill
| Link: | |
| BBcode: | |
| HTML: | |
| Hide post links |
#14 Re: Upper ball joint
Mine came via SNGB. I think they are getting low in stock. If you want a pair you might have to hurry.
Chris '67 S1 2+2
| Link: | |
| BBcode: | |
| HTML: | |
| Hide post links |
#15 Re: Upper ball joint
Bill and Chris,
thank you.
Do you know if a machining service for existing wishbones is available as well?
Would be nice to keep my original ones.
thank you.
Do you know if a machining service for existing wishbones is available as well?
Would be nice to keep my original ones.
Mark
1963 OTS 880436
1963 OTS 880436
| Link: | |
| BBcode: | |
| HTML: | |
| Hide post links |
#16 Re: Upper ball joint
Mark Wrote:
I provide that service, but I'm on the other side of the World. I believe there are a couple of companies in the UK that do also.
As you can see from the pictures Posted by Chris, the supplied Top Plate is quite thick. With the After Market Wishbone supplied by SNGB, the cavity in the Wishbone is machined deep enough to accept the whole assembly, including the thick Top Plate. I see that you have a 63 S1. If the Wishbones of your car have the Grease Nipple located on the side of the Wishbone Head and not in the Top Plate, these can't be machined deep enough to accept the thick Top Plate. Accordingly, don't just take them to a machine shop to have the conversion done, unless they are fully aware of what can and can't be done. I use CNC machine tools to carry out the machining.
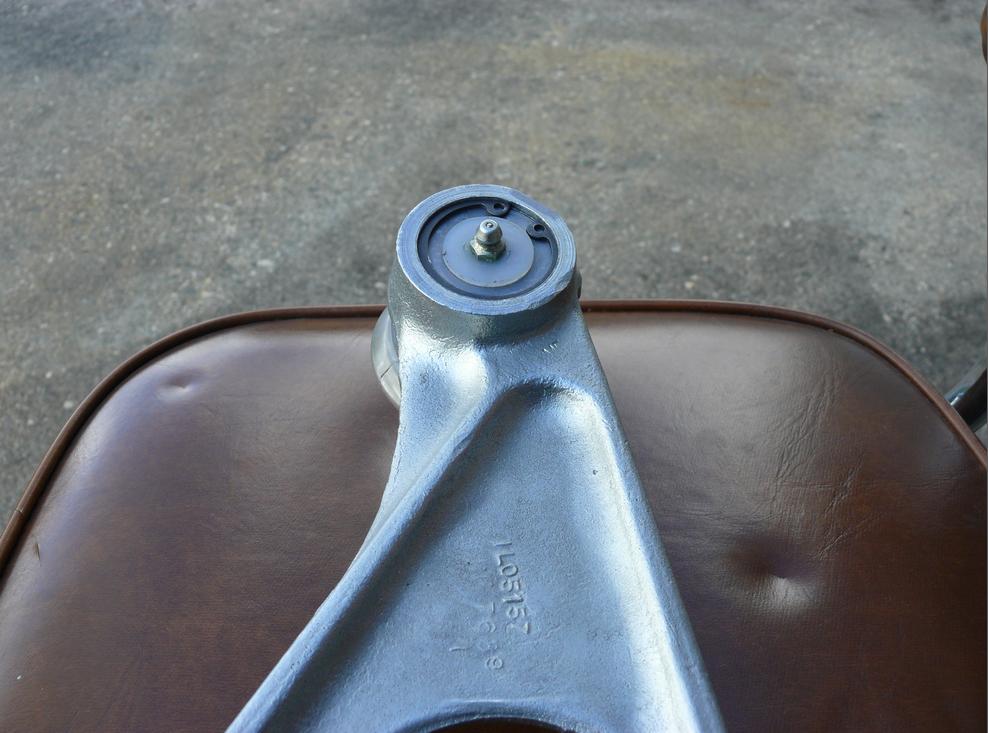
The following picture is of a finished Wishbone after modification.
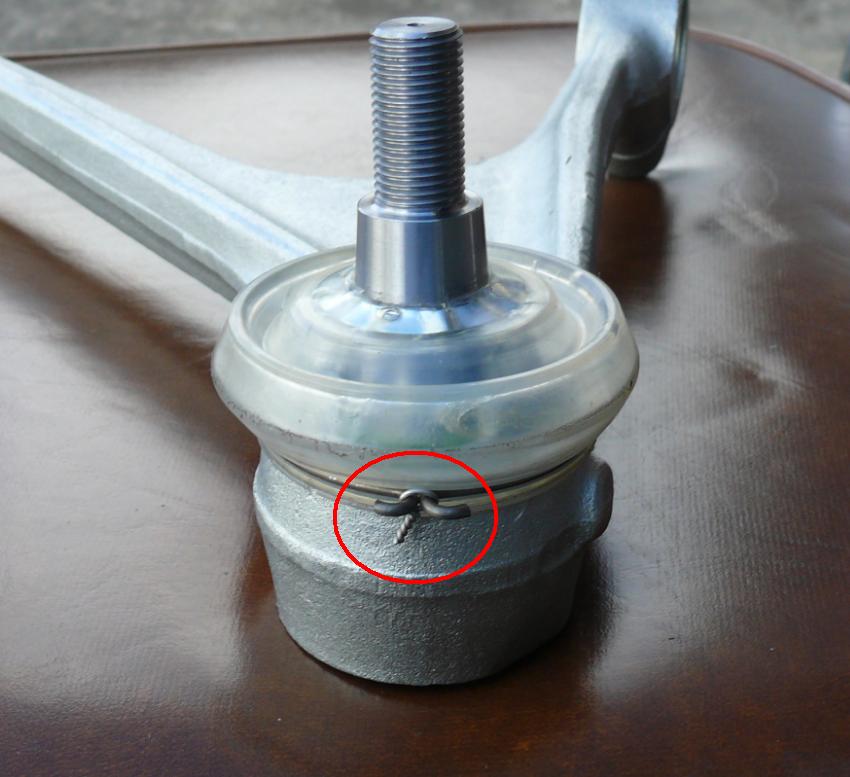
The two following pictures are of the assembled unit, where it can be seen that its hard to pick from the original item. I finish the job by applying a wire tie to the Dust Cover Retaining Clip.
Regards,
Bill
Hello Mark,Do you know if a machining service for existing wishbones is available as well?
Would be nice to keep my original ones.
I provide that service, but I'm on the other side of the World. I believe there are a couple of companies in the UK that do also.
As you can see from the pictures Posted by Chris, the supplied Top Plate is quite thick. With the After Market Wishbone supplied by SNGB, the cavity in the Wishbone is machined deep enough to accept the whole assembly, including the thick Top Plate. I see that you have a 63 S1. If the Wishbones of your car have the Grease Nipple located on the side of the Wishbone Head and not in the Top Plate, these can't be machined deep enough to accept the thick Top Plate. Accordingly, don't just take them to a machine shop to have the conversion done, unless they are fully aware of what can and can't be done. I use CNC machine tools to carry out the machining.
The following picture is of a finished Wishbone after modification.
The two following pictures are of the assembled unit, where it can be seen that its hard to pick from the original item. I finish the job by applying a wire tie to the Dust Cover Retaining Clip.
Regards,
Bill
Last edited by angelw on Tue Jul 28, 2020 9:02 am, edited 1 time in total.
| Link: | |
| BBcode: | |
| HTML: | |
| Hide post links |
#17 Re: Upper ball joint
Hi Bill.
How does your CNC machine cope with the hardening in the socket?
How does your CNC machine cope with the hardening in the socket?
Andrew.
881824, 1E21538. 889457. 1961 4.3l Mk2. 1975 XJS. 1962 MGB
http://www.projectetype.com/index.php/the-blog.html
Adelaide, Australia
881824, 1E21538. 889457. 1961 4.3l Mk2. 1975 XJS. 1962 MGB
http://www.projectetype.com/index.php/the-blog.html
Adelaide, Australia
| Link: | |
| BBcode: | |
| HTML: | |
| Hide post links |
#18 Re: Upper ball joint
Andrew Wrote:
The original part was Induction Hardened to 650VPN, which equates to circa 58 Rockwell C, for a depth of 0.03" min to 0.05" max, Carbide inserts will handle that hardness and I routinely hard turn case hardened material that is above 65RHC with CBN inserts.
As you can see from the picture in my previous post, the finish is quite good and that's direct from the tool; no polishing. The profile needs to be accurate so that it conforms to the outside profile of the Nylon Insert before the slots were cut in it. This ensures that the outside profile of the Insert is forced back to its design shape and therefore, good wrap around contact with the Ball of the Ball Pin. The set up needs to be very rigid to achieve good results.
Regards,
Bill
Hello Andrew,How does your CNC machine cope with the hardening in the socket?
The original part was Induction Hardened to 650VPN, which equates to circa 58 Rockwell C, for a depth of 0.03" min to 0.05" max, Carbide inserts will handle that hardness and I routinely hard turn case hardened material that is above 65RHC with CBN inserts.
As you can see from the picture in my previous post, the finish is quite good and that's direct from the tool; no polishing. The profile needs to be accurate so that it conforms to the outside profile of the Nylon Insert before the slots were cut in it. This ensures that the outside profile of the Insert is forced back to its design shape and therefore, good wrap around contact with the Ball of the Ball Pin. The set up needs to be very rigid to achieve good results.
Regards,
Bill
| Link: | |
| BBcode: | |
| HTML: | |
| Hide post links |
#19 Re: Upper ball joint
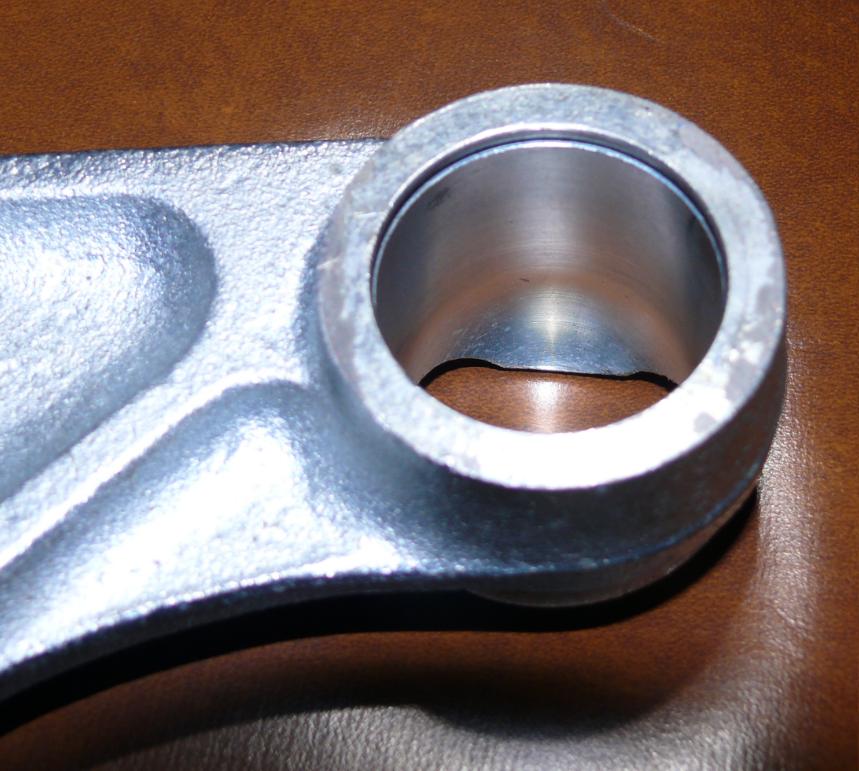
These pictures show the original wishbone, which hasn't been machined. Quite a bit of material needs to be cut away to remove the shoulder inside the wishbone down to the rounded profile at the bottom of the ball joint.
What I dont have is the precise dimensions of this revised profile. Nor, for that matter, do I have access to a CNC milling machine. Indeed I haven't programmed one of these for about forty years. In those days the program was created on a punched tape from a teletype machine and fed by hand into a Bridgeport machine! None of this modern CAD/CAM malarky.
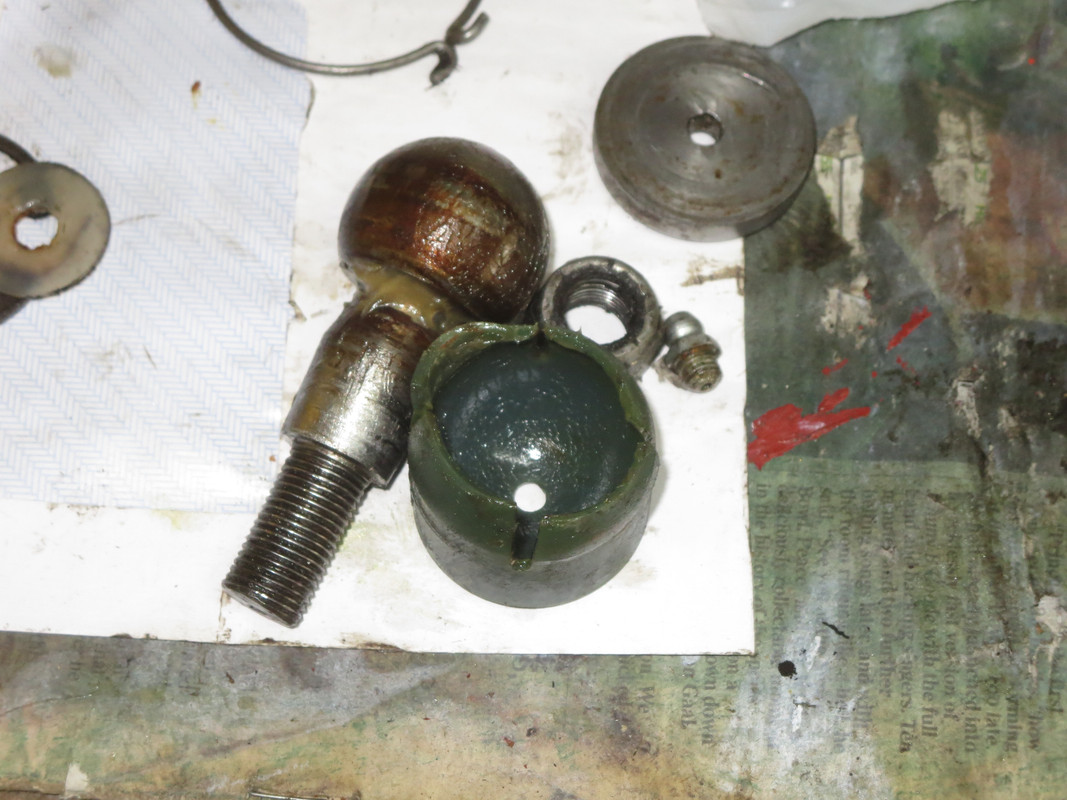
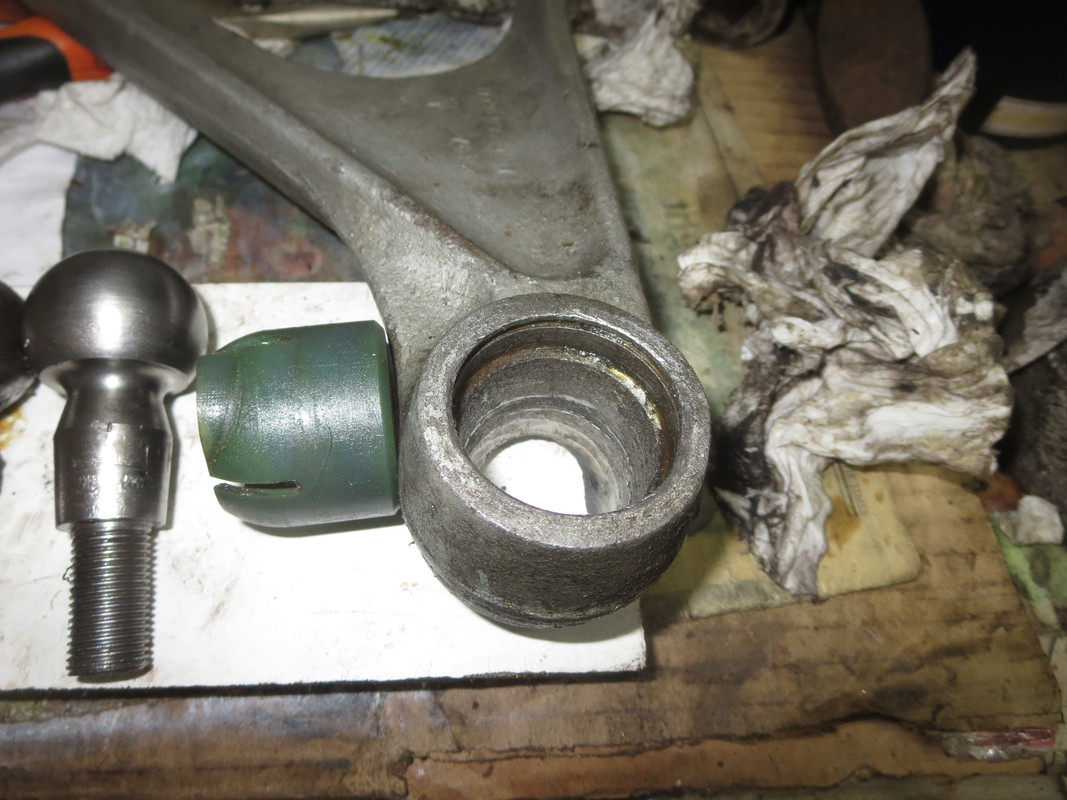
Next photo shows the difference in size between the two ball ends.
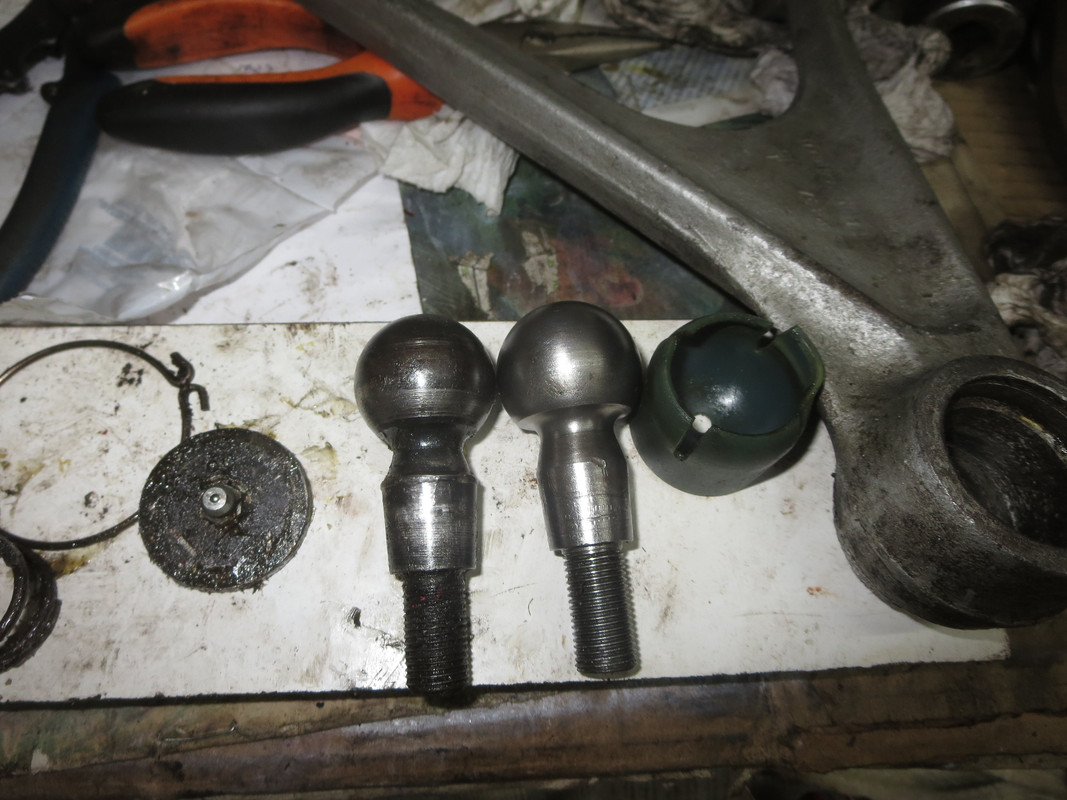
The new ball end on the right is slightly larger than the OE item.
What I dont have is the precise dimensions of this revised profile. Nor, for that matter, do I have access to a CNC milling machine. Indeed I haven't programmed one of these for about forty years. In those days the program was created on a punched tape from a teletype machine and fed by hand into a Bridgeport machine! None of this modern CAD/CAM malarky.
Next photo shows the difference in size between the two ball ends.
The new ball end on the right is slightly larger than the OE item.
Chris '67 S1 2+2
| Link: | |
| BBcode: | |
| HTML: | |
| Hide post links |

#20 Re: Upper ball joint
Hi everyone
I contacted SNG NL to get the upgraded ball joint with the intention to get my wishbone machined to accept it. It’s apparently not available from them. They can supply the full upgraded wishbone only.
Any idea if it is available somewhere else?
Thanks!
Alban
I contacted SNG NL to get the upgraded ball joint with the intention to get my wishbone machined to accept it. It’s apparently not available from them. They can supply the full upgraded wishbone only.
Any idea if it is available somewhere else?
Thanks!
Alban
Alban
E-type S2 2+2, 3 Weber’s, O/D gearbox
Range Rover Classic 1987
E-type S2 2+2, 3 Weber’s, O/D gearbox
Range Rover Classic 1987
| Link: | |
| BBcode: | |
| HTML: | |
| Hide post links |