



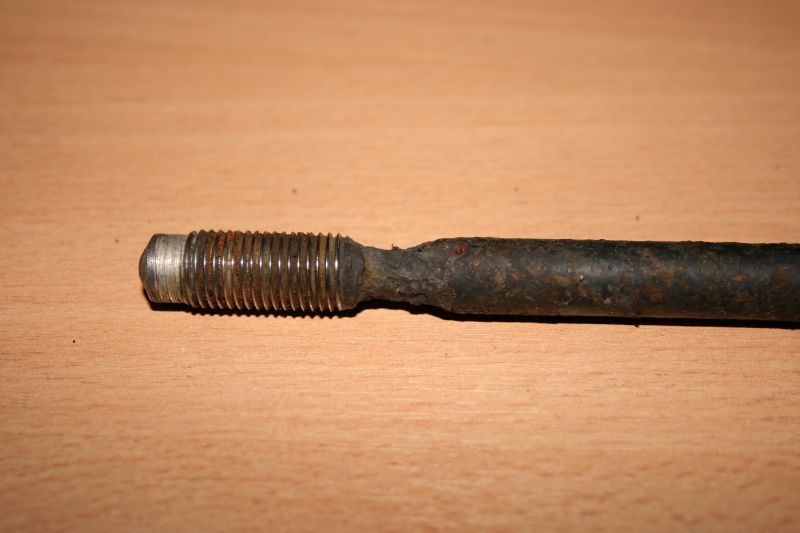
Hi all, with changing my core plugs due to them being rotten, my head studs are in not very fine fettle with a bit of wasteage at the bottom. What are the best studs to buy to replace the existing ones. As I have to drop the engine to get the new core plugs in, I am going to have a quick strip and re-build of the engine. It has only done a genuine 75K so should not need much apart from maybe guides and a change of all the bottom end bearings to be on the safe side?
Any tips for changing the studs and any pointers on what else to change as a matter of course. i have never done an XK engine before so am all ears!
Alasdair
Head stud replacement
#2
Hi Alasdair,
I am building a 3.8 engine at present myself and I used head studs supplied by Rob Beere Racing they are not cheap but very good quality ARP I think, I was going to use ARP nuts but Rob recommended just the standard chrome dome nuts which I have done.
Professionally have the waterways flushed after removal of the core plugs all kinds of crap builds up in the waterways over time. I was amazed when I saw what came out of mine :)
I am building a 3.8 engine at present myself and I used head studs supplied by Rob Beere Racing they are not cheap but very good quality ARP I think, I was going to use ARP nuts but Rob recommended just the standard chrome dome nuts which I have done.
Professionally have the waterways flushed after removal of the core plugs all kinds of crap builds up in the waterways over time. I was amazed when I saw what came out of mine :)
Kind Regards John
| Link: | |
| BBcode: | |
| HTML: | |
| Hide post links |


#3
Don't forget that two of the studs are specials with a thicker base in order to locate the head. Also, some studs may be longer depending on whether you have the lifting brackets or not.
You don't say what engine you have but if it's a 3.8 I'd suggest doing the valve seal mod on the inlets. I recently did that to mine with good results.
And yes, re the crud in the block, I spent ages with a hammer and chisel getting that out. The bottom of the waterways was almost solid although I've never had cooling problems (Ihave the big alloy rad).
You don't say what engine you have but if it's a 3.8 I'd suggest doing the valve seal mod on the inlets. I recently did that to mine with good results.
And yes, re the crud in the block, I spent ages with a hammer and chisel getting that out. The bottom of the waterways was almost solid although I've never had cooling problems (Ihave the big alloy rad).
Clive, 1962 Coupe 860320
(sold)
(sold)
| Link: | |
| BBcode: | |
| HTML: | |
| Hide post links |
#4
Car is a series 2 FHC. There was a fair bit of crud behind the core plugs. One stud came out with the head nuts when I removed them so hopefully this bodes well! Will see about the ARP studs as I would rather pay for decent quality and do the job once as the car will be a keeper!
Alasdair
Alasdair
| Link: | |
| BBcode: | |
| HTML: | |
| Hide post links |
-
 PeterCrespin
- Posts: 4561
- Joined: Fri Mar 05, 2010 8:22 pm
- Location: Gaithersburg, Maryland.
- Contact:

#5
Do as much of your cleaning as you can with the studs in situ to stop crud falling in, but in practice some will get in once you remove them with the double-nut method and you will then need to be meticuluous in blowing/swabbing the crap out. You'll see the original studs, and hopefully your replacements, will have a threadless lower portion with a drill-bit-like profile. This is to contact the exact same female profile in the base of the stud hole perfectly and spread the loads into the crank saddle by fully tightening down the stud on fitment. If your studs are just plain on the end or rounded then reject them as they are not correct.
Personally, unless you are going in for VERY serious tuning, the standard studs are better, especially as you are just freshening up the engine. If you use hi-tensile fasteners and clamp them down tighter than stock you will distort the bore and you should rebore using a torque plate. As you are not reboring (very wise if all is in spec) you cannot correct for the higher torque. If you are going to fit hi-torque studs but NOT tighten to a higher torque you have wasted your money. Dipping the block to clear out the passages is ideal but it does mean a 100% strip down and lugging the heavy chunk around. If it's not too bad after your scraping and digging then if the rest of the cooling system is good you should be fine. I'd put a filter in line on the return hose for the first hour of running, to catch any disturbed crud once you rebuild her, if you don't get the block professionally dipped. Just put some nylons/tights material over the top hose radiator stub before you clamp the hose on. Leave it a bit baggy inside to increase the surface area and take it off after an hour or so of running. You'll see bits of crud which would otherwise have gone into your radiator.
Rings, shells and a chain or two should see you fine - all carefully measured and fitted of course. Measure the thrust washer and oil pump clearances too. New thrust washers are only about a fiver and usually the 4-thou oversize fits great. Guides and valves may be OK at those miles, given a light grinding-in. Don't cut back the seats heavily unless they are bad - which they shouldn't be - as that will cause all kinds of assembly and clearance issues 'upstairs'. Have a good look at the water pump as it's easier to replace at this stage and the seal rubbing sufrace can deteriorate on standing depending how good the coolant was, even if the bearing is still OK. Usual 'Shipwright's Disease' rules apply :-)
A half decent engine - which many of them are unless they've been abandoned for decades - can be put back into good order with a hand hone and new 'consumables for a couple of hundred quid. That'll give you another ten years of hobby use.
Personally, unless you are going in for VERY serious tuning, the standard studs are better, especially as you are just freshening up the engine. If you use hi-tensile fasteners and clamp them down tighter than stock you will distort the bore and you should rebore using a torque plate. As you are not reboring (very wise if all is in spec) you cannot correct for the higher torque. If you are going to fit hi-torque studs but NOT tighten to a higher torque you have wasted your money. Dipping the block to clear out the passages is ideal but it does mean a 100% strip down and lugging the heavy chunk around. If it's not too bad after your scraping and digging then if the rest of the cooling system is good you should be fine. I'd put a filter in line on the return hose for the first hour of running, to catch any disturbed crud once you rebuild her, if you don't get the block professionally dipped. Just put some nylons/tights material over the top hose radiator stub before you clamp the hose on. Leave it a bit baggy inside to increase the surface area and take it off after an hour or so of running. You'll see bits of crud which would otherwise have gone into your radiator.
Rings, shells and a chain or two should see you fine - all carefully measured and fitted of course. Measure the thrust washer and oil pump clearances too. New thrust washers are only about a fiver and usually the 4-thou oversize fits great. Guides and valves may be OK at those miles, given a light grinding-in. Don't cut back the seats heavily unless they are bad - which they shouldn't be - as that will cause all kinds of assembly and clearance issues 'upstairs'. Have a good look at the water pump as it's easier to replace at this stage and the seal rubbing sufrace can deteriorate on standing depending how good the coolant was, even if the bearing is still OK. Usual 'Shipwright's Disease' rules apply :-)
A half decent engine - which many of them are unless they've been abandoned for decades - can be put back into good order with a hand hone and new 'consumables for a couple of hundred quid. That'll give you another ten years of hobby use.
1E75339 UberLynx D-Type; 1R27190 70 FHC; 1E78478; 2001 Vanden Plas
| Link: | |
| BBcode: | |
| HTML: | |
| Hide post links |
#6
Many thanks for your informative answer Peter. I will probably just steam clean the bloc to get all the debris out, it is not that bad in there as I have already given it a right good flush. Have managed to get 12 of the 14 studs out this afternoon and ran out of time to get the other 2 done. Engine being dropped out on Thursday night with a couple of mates to help get the bonnet off. Pic of the worst stud below. I have went and put another ?10 on the lottery after this one came out intact, there was a bit of sweating going on before it cracked!
Alasdair
Alasdair
| Link: | |
| BBcode: | |
| HTML: | |
| Hide post links |
-
christopher storey
- Posts: 5698
- Joined: Sun Mar 09, 2008 3:07 pm
- Location: cheshire , england

#7
I do not want to be my ususal prophet of doom, but I am going to give the warning in any event ! Getting the studs back in is not always straightforward . Crud tends to drop to the bottom of the holes and this, and accumulated corrosion in the base of the hole , can make it difficult if not impossible to insert the new stud accurately . Also, the threads are often heavily corroded . I spent about 2 days getting mine in and even then had to turn the boss on 2 or 3 of the studs down to enable them to seat properly and have an even - and correct - height above deck level ( important with closed end dome nuts because if a stud is too high the nut may feel torqued down even when it isn't ) . A number of people have suggested welding the appropriate size tap ( can't remember but think it may be 3/8 UNF) to an old stud and using this as a thread chaser, and I can see that it would be a good idea . Just so long as you don't snap the tap off in situ!! Also, it is a good idea to remove the square plate on the rear face of the block and give this area a very thorough clean out, as this area often gets heavily silted up . Check the plate also - they can be come very thin with corrosion on the inner face - I had to build mine up with weld
| Link: | |
| BBcode: | |
| HTML: | |
| Hide post links |
#8
Hi Christopher, they all came out nice and easily and all threads were in good condition. I had already flushed the block and dried the bottom lands to avoid all the crud going down them. The studs were pretty clean as well when they came out to,
Alasdair
Alasdair
| Link: | |
| BBcode: | |
| HTML: | |
| Hide post links |
-
christopher storey
- Posts: 5698
- Joined: Sun Mar 09, 2008 3:07 pm
- Location: cheshire , england
#9
Well, I've given the warning. My block had been chemically cleaned and I still had a lot of trouble, and I've encountered the same problem on another occasion. It's not the crud that is so much the problem as the fact that the block tends to "grow" round the base of the stud. That said, I hope you have no difficulties of installation
| Link: | |
| BBcode: | |
| HTML: | |
| Hide post links |
#10
Advice is always welcome Christopher. I have a UNF tap I will attach to a bit of rod to clean out the muck anyway and trial fit the new studs to the correct deck height.
Alasdair
Alasdair
| Link: | |
| BBcode: | |
| HTML: | |
| Hide post links |
-
christopher storey
- Posts: 5698
- Joined: Sun Mar 09, 2008 3:07 pm
- Location: cheshire , england
#11
Just one more suggestion : we have found that the length of the studs sold in sets is not always universally to specification, so it is worth measuring and marking each stud before you start to see a. that they are within tolerance , and b. to identify where each one goes
| Link: | |
| BBcode: | |
| HTML: | |
| Hide post links |
#12
If you have an old stud thats in good condition you can use it to clean out the threads in the block, grind 3 vertical slots through the threads with an angle grinder ,works a treat.sulzeruk wrote:Advice is always welcome Christopher. I have a UNF tap I will attach to a bit of rod to clean out the muck anyway and trial fit the new studs to the correct deck height.
Alasdair
Steve
| Link: | |
| BBcode: | |
| HTML: | |
| Hide post links |
-
PeterCrespin
- Posts: 4561
- Joined: Fri Mar 05, 2010 8:22 pm
- Location: Gaithersburg, Maryland.
- Contact:
#13
Your'e right Steve - this is a safe and easy option, given that the length of the stud gives you something to turn above the block.
With a soft metal like cast iron, in such a critical fastener area, I would be verrrry careful using a sharp tap to clean threads. It is very easy to remove part of the thread and with cast iron you won't even see any curly swarf - just easily-missed greyish dust. You need every bit of thread you can get in that location and since some of it may have been damaged on removal (if the stud was partly corroded in place) you may not be starting with a 100% thread in the first place.
For cleaning female threads with an actual tap, you should use either the correct Chasing Tap or a worn-out ordinary one. Few amateur workshops have a set of the former, some have examples of the latter, but anyone can cut or grind some slots to give 'cutting' edges on a used stud. You can make a similar tool of course with an old plug body to chase plug threads.
With a soft metal like cast iron, in such a critical fastener area, I would be verrrry careful using a sharp tap to clean threads. It is very easy to remove part of the thread and with cast iron you won't even see any curly swarf - just easily-missed greyish dust. You need every bit of thread you can get in that location and since some of it may have been damaged on removal (if the stud was partly corroded in place) you may not be starting with a 100% thread in the first place.
For cleaning female threads with an actual tap, you should use either the correct Chasing Tap or a worn-out ordinary one. Few amateur workshops have a set of the former, some have examples of the latter, but anyone can cut or grind some slots to give 'cutting' edges on a used stud. You can make a similar tool of course with an old plug body to chase plug threads.
1E75339 UberLynx D-Type; 1R27190 70 FHC; 1E78478; 2001 Vanden Plas
| Link: | |
| BBcode: | |
| HTML: | |
| Hide post links |