Center console assembly tips

Talk about the E-Type Series 1
User avatar

Topic author
No Quarter
Posts: 285
Joined: Wed Sep 22, 2021 3:20 pm
Location: Denmark
Denmark

#1 Center console assembly tips

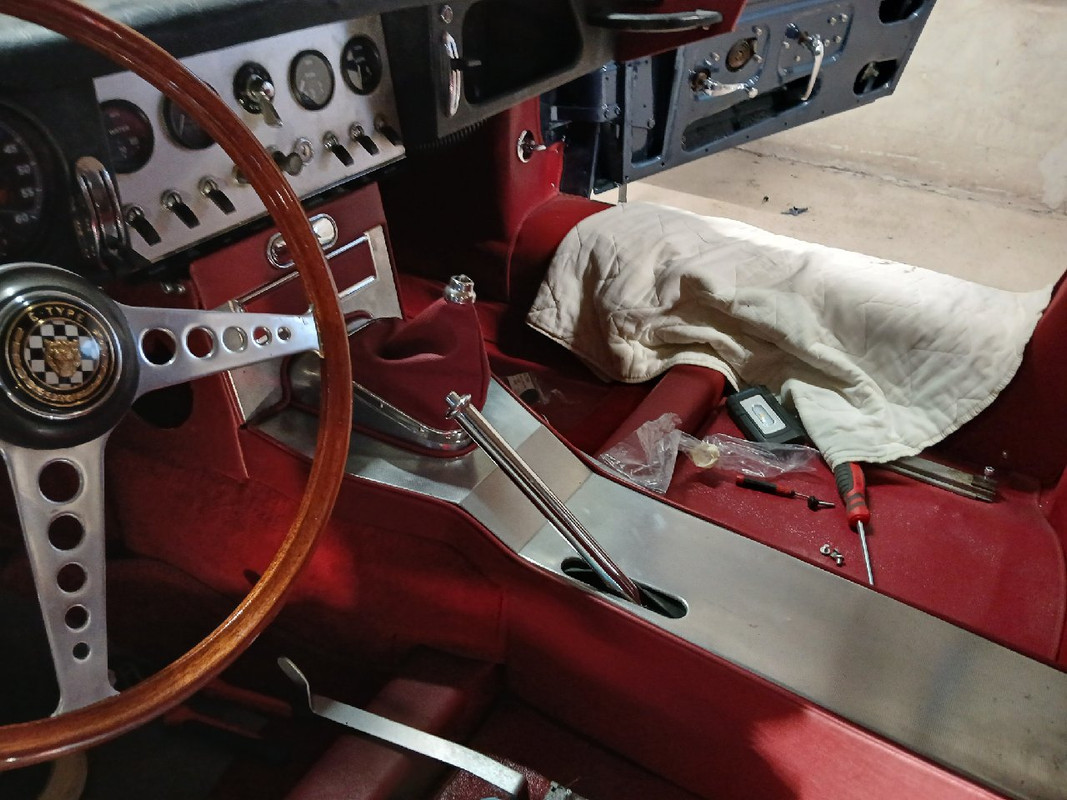
Post by No Quarter » Mon Nov 18, 2024 12:52 pm

My center console was not taken apart by me, but by previous owner. Before him, some American owner replaced most of the rare crosshatch alu with plastic leather and plastic wood, and riveted it on console :shock:

So I had to source all alu parts except gauge panel. Center console is the original from the car, both alu pieces are from another car

So the questions now are:
1-Does the shifter alu sit on top of or below the center console opening?
2-Is it attached with screws or rivets or?
3-The red bead, is it also screwed/riveted or just glued in?
4-The large alu piece, I have no idea how that's attached. There are no markings on the wood on the underside from either screws or glue? It looks unused, but it isn't, a few scratches on top
5-When all this is assembled, what do I install first in the car, this center console or the radio console?

(Don't worry about screws in shifter surround, just thought it was easier to get the leather correct, will be replaced by correct rivets)
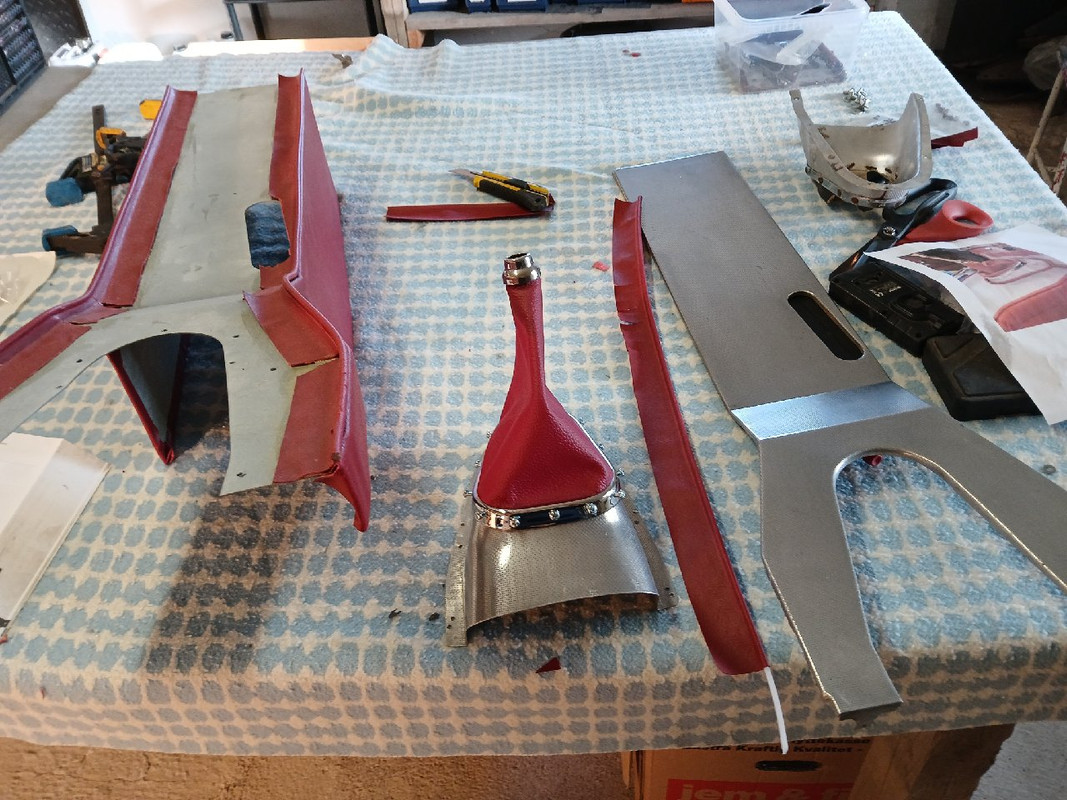

Image
Mikael
63 E-Type FHC, 64 E-Type OTS, 07 XKR
Author of "Tuning Made Easy"
https://www.amazon.com/Tuning-Made-Easy ... 373&sr=8-1

Link:
BBcode:
HTML:
Hide post links
Show post links

User avatar

TGN
Posts: 123
Joined: Sun Oct 31, 2021 1:07 pm
Location: Farnborough
Great Britain

#2 Re: Center console assembly tips

Post by TGN » Tue Nov 19, 2024 11:58 pm

Hi Mikael

Check both panels fit nicely together on the bench first.

5. Fit the radio console with the ashtray panel fitted (angle detail at the top) first. Fit this with the two tunnel side carpet panels only, omit any soundproofing at this stage and ensure the gauge panel opens and closes without interference. Select 4th gear and have the handbrake on as hard as it will go. Tip the leading edge of the centre console down at the front, guide it over the gear lever then the handbrake. Again without any soundproofing to get them both to sit correctly. Fit these multiple times whilst adding any desired soundproofing this will save you a lot of trouble when it’s fitted for the last time. If that’s your final covering to avoid snagging the vinyl on the centre console then use some plastic where the console slides into he radio panel aperture. A couple of credit cards would probably suffice and a spare pair of hands is helpful.

1. The shifter ali panel sits on top of the steel of the console and under the Ali/wood panel,

2. Select screws carefully to ensure they don’t come through from underneath and damage the Ali panel. Screw from underneath through console, shift Ali and wood.

3. The piping is glued with contact adhesive to the Ali panels, once it’s firmly attached to the Ali/ wood panel you’ll find out how well components go together. I have had to splice the centre console panel and re weld it to get it to fit uniformly between the edges of the console. You’ll probably find it sits nicely one side then too high on the opposite side. It should fit neatly between the two parts not on top of either the console edge or the ali. And not full between them either. To finish the piping around the console and shift you’ll need to cut to length ignoring other piping and then expose the plastic insert, chop it back around 3mm from each end, and glue and pinch the ends together. This will help where it intersects with other piping and panels.

4. The Ali panel has longer tangs at the front either side of the shift and two at the rear. These fold over and clamp to the console. Do this last once everything fits. They’ll only tolerate so much flexing before the fail. I think they’re also around the handbrake hole but can’t be sure. Maybe the odd screw if there’s some bounce from front to rear. It should sit nicely on top of the console without the piping, with an even gap down the sides. If it doesn’t fit nicely either your piping is placed wrongly or the gap around is insufficient.

Good luck
Trevor.
62 FHC 8607**, 64 Panhard 24CT, 68 Mini Cooper, Caterham 7, 64 Mini pickup

Link:
BBcode:
HTML:
Hide post links
Show post links

User avatar

Topic author
No Quarter
Posts: 285
Joined: Wed Sep 22, 2021 3:20 pm
Location: Denmark
Denmark

#3 Re: Center console assembly tips

Post by No Quarter » Wed Nov 20, 2024 6:13 am

Thanks Trevor, addressed all my questions! :bigrin:
Mikael
63 E-Type FHC, 64 E-Type OTS, 07 XKR
Author of "Tuning Made Easy"
https://www.amazon.com/Tuning-Made-Easy ... 373&sr=8-1

Link:
BBcode:
HTML:
Hide post links
Show post links

User avatar

Mich7920
Posts: 777
Joined: Sun Mar 15, 2015 4:43 pm
Location: France
France

#4 Re: Center console assembly tips

Post by Mich7920 » Wed Nov 20, 2024 12:38 pm

Hi Mickael

"Select 4th gear and have the handbrake on as hard as it will go"
To have the handbrake nearly vertical, wich is more easy for fiting the center console, disconnect the cable to the braking compensator assembly.

Don't forget there is a thin strip of rubber, glued and slit to allow handbrake passage.

Image

Hope it's help you
Mich
Michel
1965 E Type FHC - On the road / 1963 E Type OTS - on the road after Angus Restoration

Link:
BBcode:
HTML:
Hide post links
Show post links


Dr.No007
Posts: 42
Joined: Sun Jun 16, 2024 3:49 pm
Germany

#5 Re: Center console assembly tips

Post by Dr.No007 » Wed Nov 20, 2024 6:49 pm

Hi, I'm reading this with interest as I also have to rebuild my console. How and where exactly is the rubber strip for the handbrake lever attached? Is it glued under the upper part of the console or under the lower part?
Thanks in advance for the information.
Klaus

Link:
BBcode:
HTML:
Hide post links
Show post links

User avatar

Topic author
No Quarter
Posts: 285
Joined: Wed Sep 22, 2021 3:20 pm
Location: Denmark
Denmark

#6 Re: Center console assembly tips

Post by No Quarter » Wed Nov 20, 2024 8:06 pm

Mine is glued under upper alu part. If glued under console itself, some of console will be visible, rather not have that.
Mikael
63 E-Type FHC, 64 E-Type OTS, 07 XKR
Author of "Tuning Made Easy"
https://www.amazon.com/Tuning-Made-Easy ... 373&sr=8-1

Link:
BBcode:
HTML:
Hide post links
Show post links

User avatar

TGN
Posts: 123
Joined: Sun Oct 31, 2021 1:07 pm
Location: Farnborough
Great Britain

#7 Re: Center console assembly tips

Post by TGN » Wed Nov 20, 2024 9:05 pm

It’s glued under the steel console or the ali panel won’t sit down on the console nicely.
Paint the top of the console black it will hide it.
Trevor.
62 FHC 8607**, 64 Panhard 24CT, 68 Mini Cooper, Caterham 7, 64 Mini pickup

Link:
BBcode:
HTML:
Hide post links
Show post links

User avatar

Mich7920
Posts: 777
Joined: Sun Mar 15, 2015 4:43 pm
Location: France
France

#8 Re: Center console assembly tips

Post by Mich7920 » Thu Nov 21, 2024 1:29 pm

:yeahthat:
Michel
1965 E Type FHC - On the road / 1963 E Type OTS - on the road after Angus Restoration

Link:
BBcode:
HTML:
Hide post links
Show post links


ysmalkie
Posts: 550
Joined: Fri May 16, 2014 9:11 am
Location: Poland
Poland

#9 Re: Center console assembly tips

Post by ysmalkie » Sat Nov 23, 2024 6:27 pm

Once you assemble it with the radio panel, make sure the central instrument console tilts freely so that you can reach the fuses.
Tadek

e-type S1 3.8 FHC - in restoration phase...
Jaguar XK120 OTS
Austin-Healey 100 BN2

Link:
BBcode:
HTML:
Hide post links
Show post links

User avatar

Topic author
No Quarter
Posts: 285
Joined: Wed Sep 22, 2021 3:20 pm
Location: Denmark
Denmark

#10 Re: Center console assembly tips

Post by No Quarter » Sun Nov 24, 2024 12:01 pm

Thanks all. FInally got it assembled and installed
Image
Mikael
63 E-Type FHC, 64 E-Type OTS, 07 XKR
Author of "Tuning Made Easy"
https://www.amazon.com/Tuning-Made-Easy ... 373&sr=8-1

Link:
BBcode:
HTML:
Hide post links
Show post links

User avatar

rfs1957
Posts: 1593
Joined: Sat Jan 15, 2011 2:52 pm
Location: Languedoc - France
France

#11 Re: Center console assembly tips

Post by rfs1957 » Thu Dec 05, 2024 3:57 pm

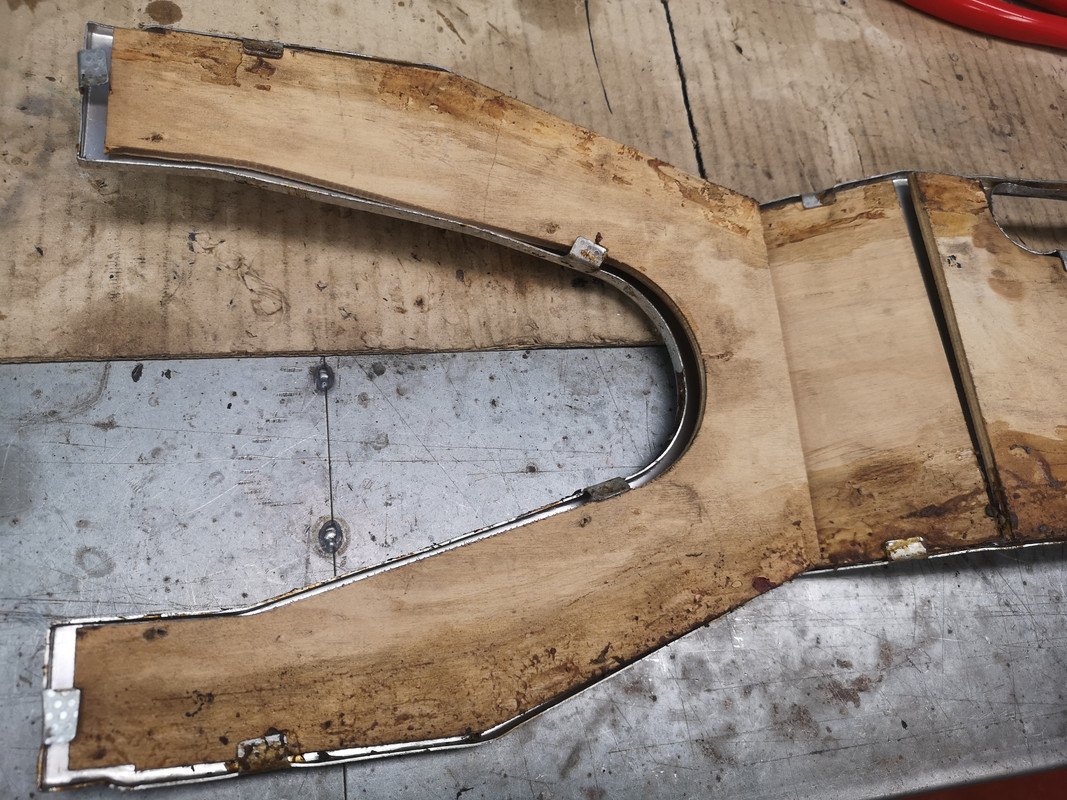
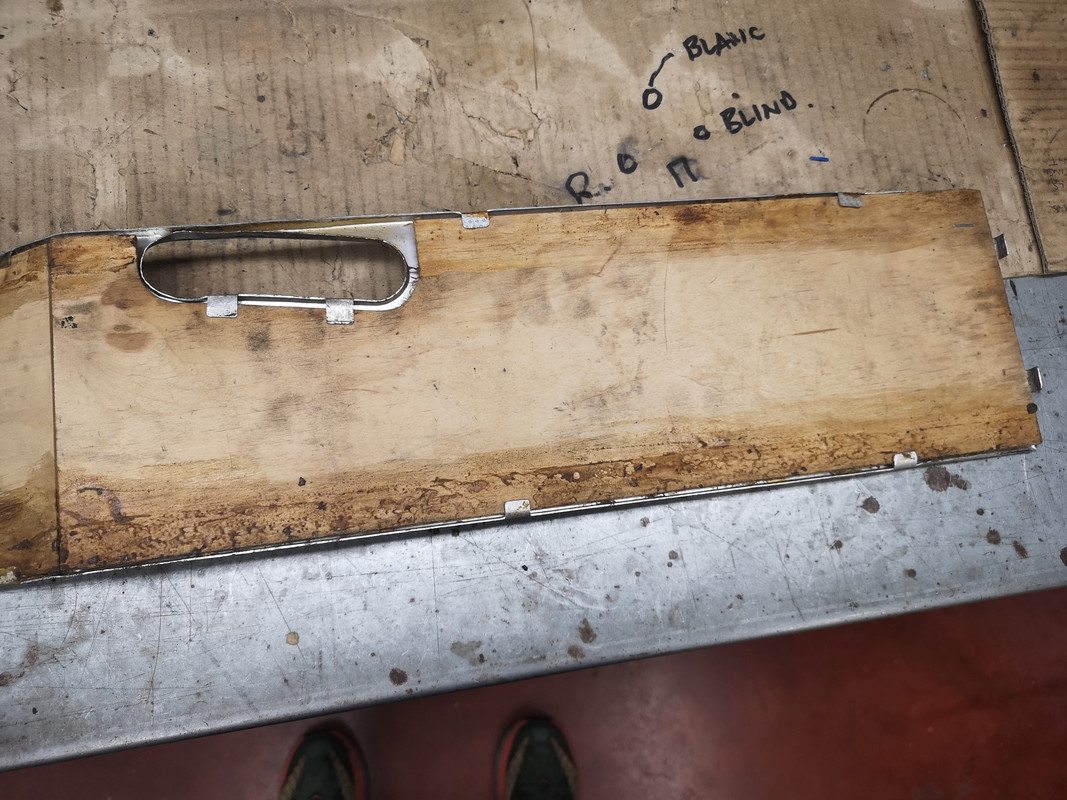
Too late for Mikael, but might be useful for someone else.

Here's a view of the aluminium tangs from what is believed an original centre console.

Image

Image
Rory
3.8 OTS S1 Opalescent Silver Grey - built May 28th 1962

Link:
BBcode:
HTML:
Hide post links
Show post links

Post Reply Previous topicNext topic