


Torsion bar removal
-
Freddie116
Topic author - Posts: 31
- Joined: Tue Jul 12, 2016 7:51 pm

#1 Torsion bar removal
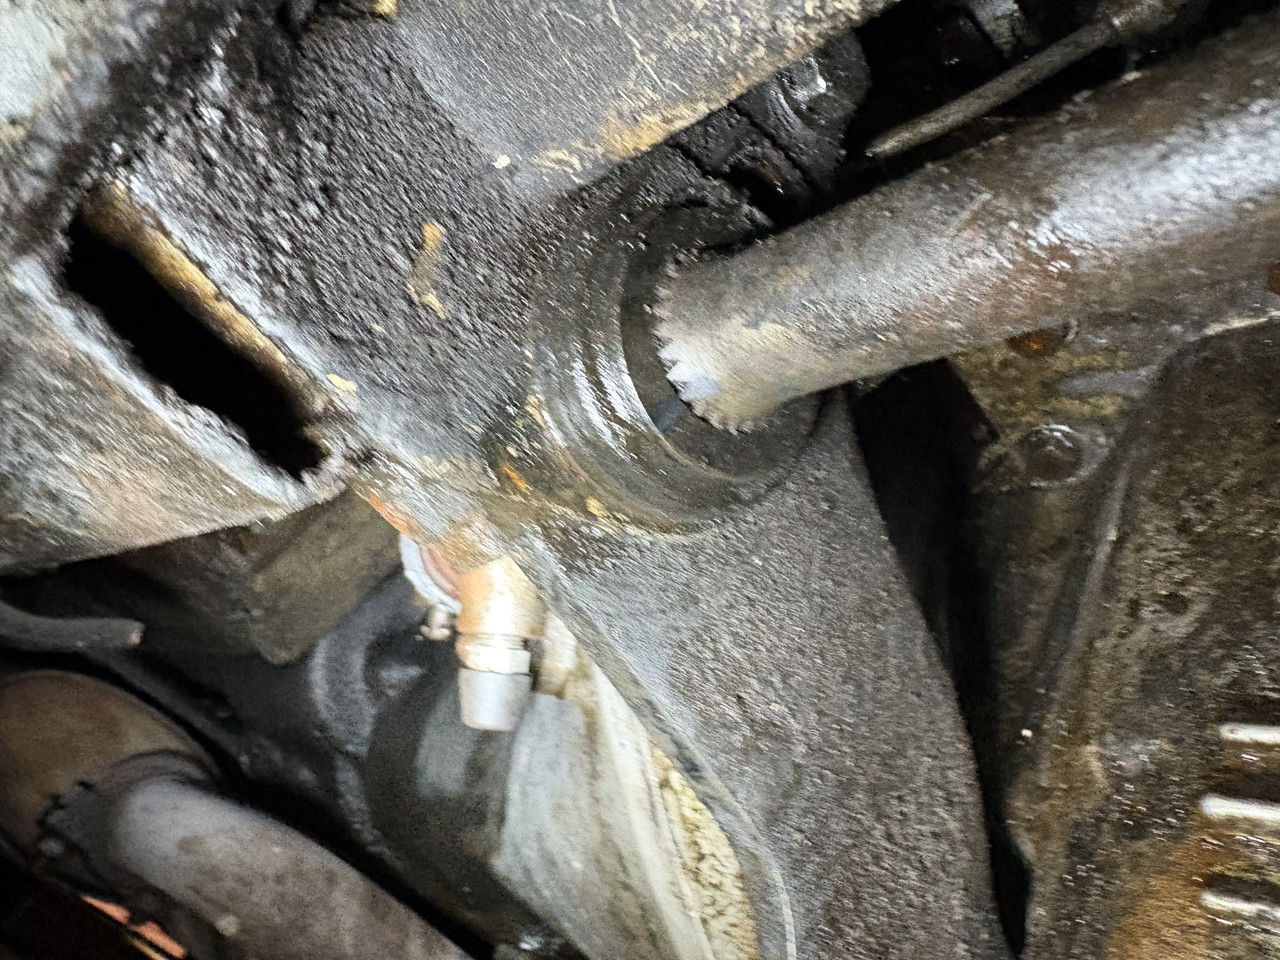
I’m removing TBs to replace lower wishbone bushes. However, I’ve got stuck as the upper bolt on the rear ‘teardrop’ is proving hard to drift out and the teardrop will not budge forward nor will the Tb move backwards. Any advice on how to move forward!?
| Link: | |
| BBcode: | |
| HTML: | |
| Hide post links |

#2 Re: Torsion bar removal
Have you fully released all the tension from the torsion bar by separating the lower wishbone balljoint...removal procedure in the service manual.....if there is no tension then there is no reason the bolt shouldn't come out....Steve..ps there is a small thin bolt locking the torsion bar to the lower wishbone
Steve
69 S2 2+2 (sold) ..Realm C type replica, 1960 xk150fhc
69 S2 2+2 (sold) ..Realm C type replica, 1960 xk150fhc
| Link: | |
| BBcode: | |
| HTML: | |
| Hide post links |
-
Freddie116
Topic author - Posts: 31
- Joined: Tue Jul 12, 2016 7:51 pm
#3 Re: Torsion bar removal
Yes, everything is apart and lower wishbone hsnging free. Securing bolt out….
| Link: | |
| BBcode: | |
| HTML: | |
| Hide post links |
#4 Re: Torsion bar removal
There can still be slight tension on the torsion bar even though the lower wishbone is disconnected....move the wishbone up/down slightly to find the spot where it feels like there is no tension.....your upper teardrop bolt may have been previously damaged in its hole and need unscrewing instead of tapping out.....take care useing a hammer....ideally use a brass drift so you dont damage the splines...
Steve
Steve
Steve
69 S2 2+2 (sold) ..Realm C type replica, 1960 xk150fhc
69 S2 2+2 (sold) ..Realm C type replica, 1960 xk150fhc
| Link: | |
| BBcode: | |
| HTML: | |
| Hide post links |
-
 politeperson
- Posts: 1387
- Joined: Tue Jun 07, 2016 8:26 pm
- Location: Boston UK
#5 Re: Torsion bar removal
As Steve says, sometimes you have to pull the wishbone down beyond the free hanging position to get the bolt free. It is locked up by the teardrop. I quite often have to waggle the whole lower arm assembly from underneath the car to get the bolt to start moving.
Finishing off an S1 roadster
| Link: | |
| BBcode: | |
| HTML: | |
| Hide post links |
-
Freddie116
Topic author - Posts: 31
- Joined: Tue Jul 12, 2016 7:51 pm
#6 Re: Torsion bar removal
Thanks for the advice. I will try moving the lower wishbone around and down.. I have seen mention elsewhere of the use of a turnbuckle attached to the shock mountings to facilitate the movement of the lower wishbone is this something that you recommend?
| Link: | |
| BBcode: | |
| HTML: | |
| Hide post links |
#7 Re: Torsion bar removal
Hi ...in my opinion there is absolutely no reason to use these.....and some only use them as an adjustable setting link or if they have removed the engine and then want to remove the torsion bars...at the moment your just dismantling with engine in place....the service manual has a great section on this.......Steve
Steve
69 S2 2+2 (sold) ..Realm C type replica, 1960 xk150fhc
69 S2 2+2 (sold) ..Realm C type replica, 1960 xk150fhc
| Link: | |
| BBcode: | |
| HTML: | |
| Hide post links |

#8 Re: Torsion bar removal
Freddie Wrote:
A Turnbuckle is useful for controlled release of the torque in the torsion bar, but once fully released, it is of little use in removing the torsion bar.
If you're only replacing the bushes for the lower wishbone assembly, there is no need to remove the torsion bar from its rear attachment. You can scribe a witness mark on the front surface of the torsion bar and the wishbone member and then pull the assembly from the front spline of the torsion bar.
Regards,
Bill
Hello Freddie,I have seen mention elsewhere of the use of a turnbuckle
A Turnbuckle is useful for controlled release of the torque in the torsion bar, but once fully released, it is of little use in removing the torsion bar.
If you're only replacing the bushes for the lower wishbone assembly, there is no need to remove the torsion bar from its rear attachment. You can scribe a witness mark on the front surface of the torsion bar and the wishbone member and then pull the assembly from the front spline of the torsion bar.
Regards,
Bill
| Link: | |
| BBcode: | |
| HTML: | |
| Hide post links |
-
Freddie116
Topic author - Posts: 31
- Joined: Tue Jul 12, 2016 7:51 pm
#9 Re: Torsion bar removal
That’s great if possible! I thought the wishbone wouldn’t come off the front and I had to take the full TBs off.
| Link: | |
| BBcode: | |
| HTML: | |
| Hide post links |
-
Freddie116
Topic author - Posts: 31
- Joined: Tue Jul 12, 2016 7:51 pm
#10 Re: Torsion bar removal
Forgive me Bill but how do you remove it forwards? I may be being thick but I can’t see how the wishbone can move forward unless you drop the front mounting out of the body and the TB prevents you from doing that?
| Link: | |
| BBcode: | |
| HTML: | |
| Hide post links |
-
 bitsobrits
- Posts: 580
- Joined: Tue Dec 27, 2011 2:09 am
- Location: Omaha, NE area

#11 Re: Torsion bar removal
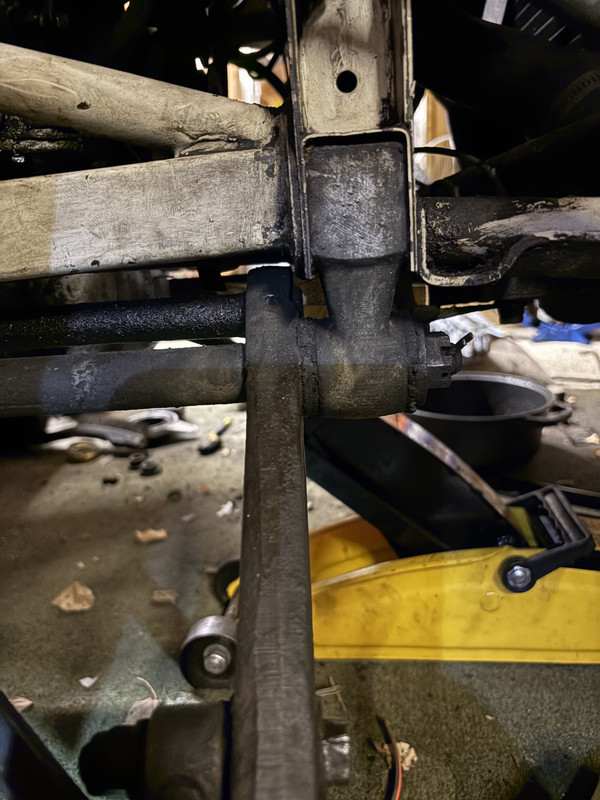
After you remove the bolts holding the mount into the picture frame (and loosen the nut where the bushing is located) you can move the mount down just a bit and rotate it out of the picture frame.
Steve
'65 S1 4.2 FHC (early)
'65 S1 4.2 FHC (early)
| Link: | |
| BBcode: | |
| HTML: | |
| Hide post links |


#12 Re: Torsion bar removal
Hello Freddie,
My very recent experience of working in this area (from me, the recent ones are the only ones of any value ) would encourage you to find out why the tear-drop is stuck, and free it off.
This ought to be less work than disturbing those picture frame bolts and blocks at the front.
If the price is knackering that last 3/8 UNF bolt then so be it. My guess would be that the teardrop is being pinched between the body flange and the reaction plate, due to slight misalignment, and that freeing off the bolts that clamp the reaction plate to the chassis rails may ease that.
On my car the teardrops will ONLY enter both of those orifices when those four rail-clamping bolts are done up hard, but the opposite is perfectly plausible too, as the precision required of these alignments is a bit unrealistic 65 years down the line.
I find working on the teardrop bolts impossible without a UJ 3/8 - drive articulated 9/16 socket on a nice long extension, and a good long alloy 1/2 inch drift to encourage various parts to move.
On my car, the front and rear splined components are NOT perfectly aligned, and there is no way you can drive the torsion bar forwards, or rearwards, unless the rear teardrop is out, to reduce the « bend » in the bar, and thus the friction in the front.
Even so, on mine, and this is with original components restored to as new condition, and greased, driving the torsion bar rearwards through the lower wishbone componentry requires some conviction, a good drift, and a big hammer.
The long ? 2BA ? security bolts on the front splines should probably go in from the top, I have always assumed, and it’s easy to forget to do this whilst you still can, as the chassis frame otherwise stops you doing this.
Good luck, and don’t forget to only finally tighten up your new lower bushes, and pin the castellated nuts, once the car is in its mid-laden position.
My very recent experience of working in this area (from me, the recent ones are the only ones of any value
This ought to be less work than disturbing those picture frame bolts and blocks at the front.
If the price is knackering that last 3/8 UNF bolt then so be it. My guess would be that the teardrop is being pinched between the body flange and the reaction plate, due to slight misalignment, and that freeing off the bolts that clamp the reaction plate to the chassis rails may ease that.
On my car the teardrops will ONLY enter both of those orifices when those four rail-clamping bolts are done up hard, but the opposite is perfectly plausible too, as the precision required of these alignments is a bit unrealistic 65 years down the line.
I find working on the teardrop bolts impossible without a UJ 3/8 - drive articulated 9/16 socket on a nice long extension, and a good long alloy 1/2 inch drift to encourage various parts to move.
On my car, the front and rear splined components are NOT perfectly aligned, and there is no way you can drive the torsion bar forwards, or rearwards, unless the rear teardrop is out, to reduce the « bend » in the bar, and thus the friction in the front.
Even so, on mine, and this is with original components restored to as new condition, and greased, driving the torsion bar rearwards through the lower wishbone componentry requires some conviction, a good drift, and a big hammer.
The long ? 2BA ? security bolts on the front splines should probably go in from the top, I have always assumed, and it’s easy to forget to do this whilst you still can, as the chassis frame otherwise stops you doing this.
Good luck, and don’t forget to only finally tighten up your new lower bushes, and pin the castellated nuts, once the car is in its mid-laden position.
Last edited by rfs1957 on Mon Nov 17, 2025 3:54 pm, edited 1 time in total.
Rory
3.8 OTS S1 Opalescent Silver Grey - built May 28th 1962
3.8 OTS S1 Opalescent Silver Grey - built May 28th 1962
| Link: | |
| BBcode: | |
| HTML: | |
| Hide post links |
#13 Re: Torsion bar removal
Follow the procedure in the service manual....short cuts are OK on a car thats been apart and recently restored but older seized parts can cause issues and eventually take longer.....Steve
Steve
69 S2 2+2 (sold) ..Realm C type replica, 1960 xk150fhc
69 S2 2+2 (sold) ..Realm C type replica, 1960 xk150fhc
| Link: | |
| BBcode: | |
| HTML: | |
| Hide post links |
#14 Re: Torsion bar removal
Rory Wrote:
Yes, I agree that some investigation should be made to see why the bolts through the tear drop won't come out is warranted, But Freddie is wanting to replace the lower wishbone bushes, and to do so, the blocks at the front have to be removed, but the picture frame not.
The following picture is of one I prepared earlier
The scope of work was to refurbish the front suspension and brakes, plus repair the bottom member of the picture frame. If not for the damaged picture frame, it would not have been removed. The suspension components were removed prior to removing the picture frame. If there is no reason to remove the Torsion Bar, removing just the lower wishbone and leaving the Torsion Bar in place is not a difficult job, and considerably less work than removing the Torsion Bar as part of the exercise. Even if the Torsion Bar was to be removed, I still remove the lower wishbone from the Torsion Bar with it in place.
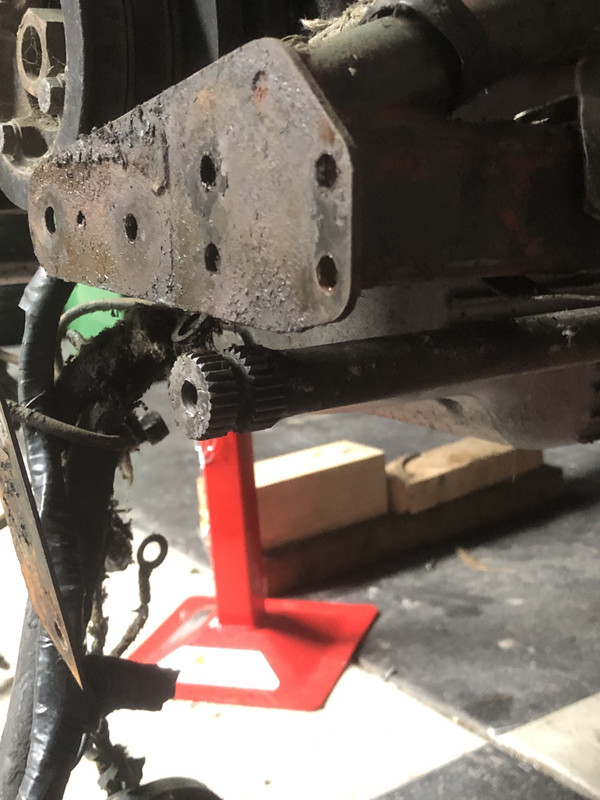
Often, due to corrosion, the lower wishbone can be difficult to separate from the forward spline of the Torsion Bar. If it isn't going to move with firm hand pressure, the center hole in the front face of the Torsion Bar facilitates nicely, the use of a small, two legged bearing puller. I clean the front face of the Torsion Bar well and allow penetrating fluid to soak into the splined joint, then use the gear puller to apply light pulling force to the lower wishbone main beam.
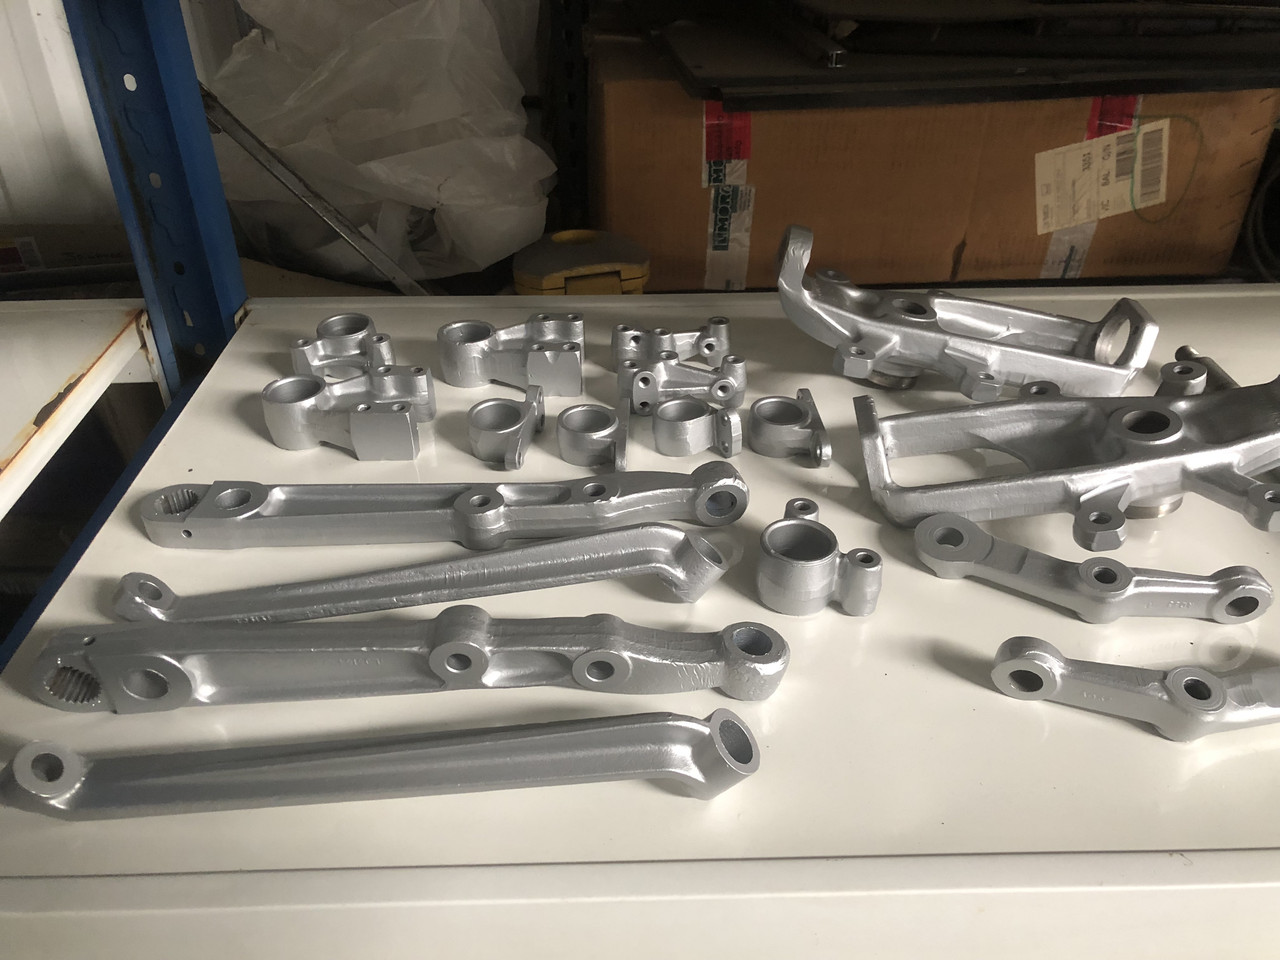
The following picture shows the front suspension parts cleaned, replated and ready to assemble.
Regards,
Bill
Hello Rory,This ought to be less work than disturbing those picture frame bolts and blocks at the front.
Yes, I agree that some investigation should be made to see why the bolts through the tear drop won't come out is warranted, But Freddie is wanting to replace the lower wishbone bushes, and to do so, the blocks at the front have to be removed, but the picture frame not.
The following picture is of one I prepared earlier
The scope of work was to refurbish the front suspension and brakes, plus repair the bottom member of the picture frame. If not for the damaged picture frame, it would not have been removed. The suspension components were removed prior to removing the picture frame. If there is no reason to remove the Torsion Bar, removing just the lower wishbone and leaving the Torsion Bar in place is not a difficult job, and considerably less work than removing the Torsion Bar as part of the exercise. Even if the Torsion Bar was to be removed, I still remove the lower wishbone from the Torsion Bar with it in place.
Often, due to corrosion, the lower wishbone can be difficult to separate from the forward spline of the Torsion Bar. If it isn't going to move with firm hand pressure, the center hole in the front face of the Torsion Bar facilitates nicely, the use of a small, two legged bearing puller. I clean the front face of the Torsion Bar well and allow penetrating fluid to soak into the splined joint, then use the gear puller to apply light pulling force to the lower wishbone main beam.
The following picture shows the front suspension parts cleaned, replated and ready to assemble.
Regards,
Bill
Last edited by angelw on Mon Nov 17, 2025 1:33 pm, edited 2 times in total.
| Link: | |
| BBcode: | |
| HTML: | |
| Hide post links |
#15 Re: Torsion bar removal
Rory Wrote:
What are you talking about? The Torsion Bar doesn't pass through any block at the front, only the Main Beam of the lower wishbone. Even with this interface between the Torsion Bar front spline and the wishbone, the Torsion Bar must be insert from the rear of the lower wishbone main beam.
The splined joints should go together without force. If you need to use a big hammer, there is something wrong.
Regards,
Bill
Hello Rory,Even so, on mine, and this is with original components restored to as new condition, and greased, driving the torsion bar rearwards through the front block requires some conviction, a good drift, and a big hammer.
What are you talking about? The Torsion Bar doesn't pass through any block at the front, only the Main Beam of the lower wishbone. Even with this interface between the Torsion Bar front spline and the wishbone, the Torsion Bar must be insert from the rear of the lower wishbone main beam.
The splined joints should go together without force. If you need to use a big hammer, there is something wrong.
Regards,
Bill
| Link: | |
| BBcode: | |
| HTML: | |
| Hide post links |
-
Freddie116
Topic author - Posts: 31
- Joined: Tue Jul 12, 2016 7:51 pm
#16 Re: Torsion bar removal
Many thanks everyone. You have all been tremendously helpful. The main revelation for me is that I can remove the lower wishbone without needing to disconnect the torsion bar at the rear in order to replace my bushes which is all I really need to do. I will report back…
| Link: | |
| BBcode: | |
| HTML: | |
| Hide post links |
#17 Re: Torsion bar removal
It will be hit or mis if the torsion bar stays in place at the rear.....when you free off the lower wishbone you will have to tap it off the front splines of the torsion bar after removeing the thin retaining bolt....there is nothing retaining the rear spline so as you tap the wishbone forward its quite possible for the rear spline to come out....Steve
Steve
69 S2 2+2 (sold) ..Realm C type replica, 1960 xk150fhc
69 S2 2+2 (sold) ..Realm C type replica, 1960 xk150fhc
| Link: | |
| BBcode: | |
| HTML: | |
| Hide post links |
#18 Re: Torsion bar removal
Ha, yes of course Bill - I can remember hitting somethingangelw wrote: ↑Mon Nov 17, 2025 10:46 amRory Wrote:Hello Rory,Even so, on mine, and this is with original components restored to as new condition, and greased, driving the torsion bar rearwards through the front block requires some conviction, a good drift, and a big hammer.
What are you talking about? The Torsion Bar doesn't pass through any block at the front, only the Main Beam of the lower wishbone.
Have gone back and corrected that nonsense - it’s indeed in the arm and not in the block. However, whilst the front of the bars engage relatively easily (the parts being in a condition similar to the ones you show), even with an un-loaded arm and torsion bar it requires some brute force on my car, and on both sides, to slide the front splines backwards again once I have advanced them to free off the tear-drops.
If this means it’s all out of alignment then please don’t tell me.
Rory
3.8 OTS S1 Opalescent Silver Grey - built May 28th 1962
3.8 OTS S1 Opalescent Silver Grey - built May 28th 1962
| Link: | |
| BBcode: | |
| HTML: | |
| Hide post links |
#19 Re: Torsion bar removal
I have never needed force to refit torsion bars....to dismantle sometimes yes.....but nefor refitting all the splnes should be cleaned up and tested to endure they can be pushed in by hand with possibly a few light taps of a mallet.....Steve
Steve
69 S2 2+2 (sold) ..Realm C type replica, 1960 xk150fhc
69 S2 2+2 (sold) ..Realm C type replica, 1960 xk150fhc
| Link: | |
| BBcode: | |
| HTML: | |
| Hide post links |
#20 Re: Torsion bar removal
Steve Wrote:
Do as I suggested, and use a small, two leg bearing puller. The Torsion Bar is equipped with a Centre Hole, which makes this tool perfect for the job. It's a very controlled method, and it won't disturb the rear spline attachment.
Rory Wrote:
I think your procedure must be wrong.If using a setting bar in place of the shock absorber, there is a sweet spot orientation of the front and rear spline. When setting the ride height, with the lower wishbone held at the correct angle, the front and rear spline orientation is made such that the bolt holes in the Tear Drop bracket align with the corresponding holes in the Reaction Plate. In this way there should be no brute force required whatsoever. Any slight misalignment with the bolt holes of the Tear Drop Bracket is rectified with a tapered prodger.
Regards,'
Bill
Hello Steve,there is nothing retaining the rear spline so as you tap the wishbone forward its quite possible for the rear spline to come out
Do as I suggested, and use a small, two leg bearing puller. The Torsion Bar is equipped with a Centre Hole, which makes this tool perfect for the job. It's a very controlled method, and it won't disturb the rear spline attachment.
Rory Wrote:
Hello Rory,even with an un-loaded arm and torsion bar it requires some brute force on my car
I think your procedure must be wrong.If using a setting bar in place of the shock absorber, there is a sweet spot orientation of the front and rear spline. When setting the ride height, with the lower wishbone held at the correct angle, the front and rear spline orientation is made such that the bolt holes in the Tear Drop bracket align with the corresponding holes in the Reaction Plate. In this way there should be no brute force required whatsoever. Any slight misalignment with the bolt holes of the Tear Drop Bracket is rectified with a tapered prodger.
Regards,'
Bill
Last edited by angelw on Mon Nov 17, 2025 9:03 pm, edited 2 times in total.
| Link: | |
| BBcode: | |
| HTML: | |
| Hide post links |