


Hi
I recently replaces the rubber body seal on my S1 FHC, with a seal from one of the main suppliers.
I have subsequently noticed that water is sitting in the seal and also getting into the spare wheel well and on the cavities inside below the tailgate.
Has anyone any picture of a correctly fitted seal, I am concerned I may not of fitted it correctly.
Thanks for any help and advise.
Thanks
FHC tailgate seal


#2
Hi,
I don't currently have a picture, and my car is a Series III so I am not sure if it is the same, but they are difficult to glue in place and you have to make sure it sits down well and sticks all around. When you fitted it, did you check the drain at the lowest point in the channel? This has to be clear and it is possible that when you glued the seal in place, that you actually sealed the drain hole with the glue and seal, if so, the water can't escape and could flow into the car.
This of course assumes the Series 1 has the drain hole, but I think it does. When I fitted mine, I left the lowest section unglued to allow water to escape down it.
Good luck,
Regards,
Regards,
Simon
Series III FHC
Simon
Series III FHC
| Link: | |
| BBcode: | |
| HTML: | |
| Hide post links |

#3
Just to confirm that the S1 FHC does have a drain hole and the seal should be cut away to allow water to drain into the hole.
I'll take a photo if you are still having problems.
Nick
I'll take a photo if you are still having problems.
Nick
| Link: | |
| BBcode: | |
| HTML: | |
| Hide post links |
#4
Hi
I would appreciate a shot of the cut away. I have loosened the seal around the hole, but didnt think it would be enough!!!
Thanks
I would appreciate a shot of the cut away. I have loosened the seal around the hole, but didnt think it would be enough!!!
Thanks
| Link: | |
| BBcode: | |
| HTML: | |
| Hide post links |
#5
Where does the hole in the body drain to?
There seems to be a gap between the hole in the rubber channel and the exit point above the number plate
There seems to be a gap between the hole in the rubber channel and the exit point above the number plate
S1 4.2 Roadster in Resale Red
| Link: | |
| BBcode: | |
| HTML: | |
| Hide post links |
#6
Sorry for late response. A couple of photos attached. On my car there is a metal tube connecting the seal drain hole and the opening above the number plate. The connecting tube appears to be the same tube that projects out above the number plate. Inside the car access to the connection is behind trim though, so difficult be certain.
Someone out there must have a stripped bodyshell & can add further info.
Nick


Someone out there must have a stripped bodyshell & can add further info.
Nick
| Link: | |
| BBcode: | |
| HTML: | |
| Hide post links |
#7
This is useful information. I wondered for a while if my car had the drain set up installed. now i know where to look but i fear i may be dissapointed
Tim
Tim
| Link: | |
| BBcode: | |
| HTML: | |
| Hide post links |
#8
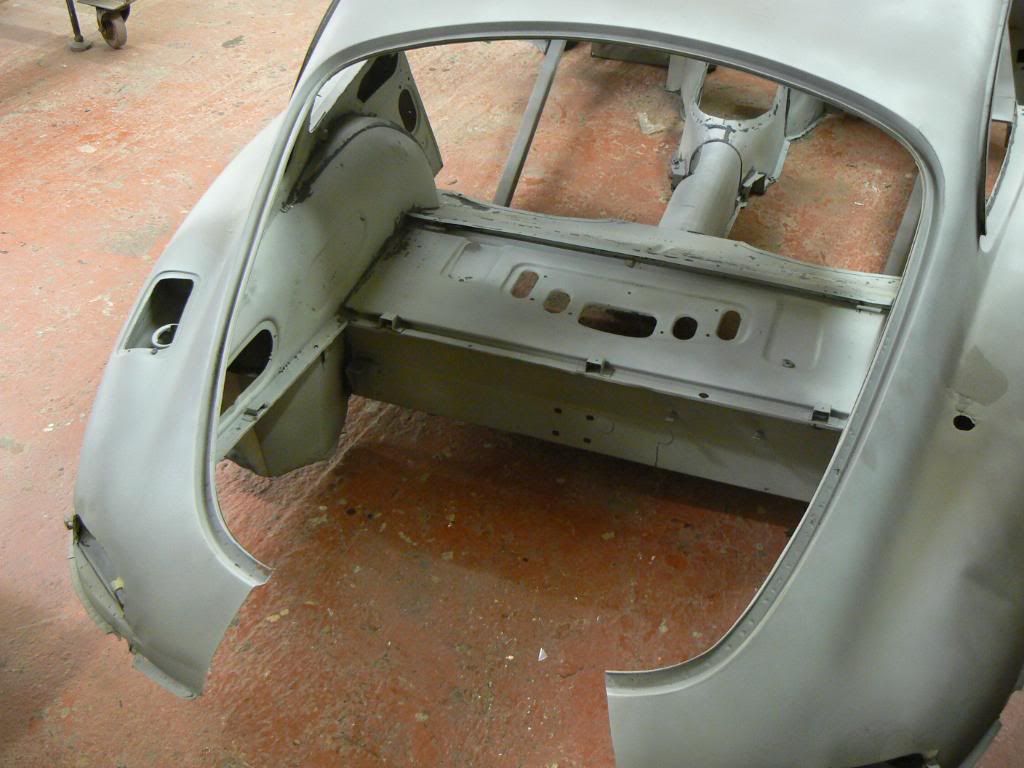
My car is a stripped shell but I cannot see or feel a link between the hole/tube in the channel where the rubber sits and the tube/outlet above the number plate.
There's a missing link
There's a missing link
S1 4.2 Roadster in Resale Red
| Link: | |
| BBcode: | |
| HTML: | |
| Hide post links |
-
 PeterCrespin
- Posts: 4561
- Joined: Fri Mar 05, 2010 8:22 pm
- Location: Gaithersburg, Maryland.
- Contact:

#9
It is, or was when it left Browns Lane, a short but solid continuous steel tube. You cn poke around with a stiff wire to check the walls are continuous all the way down from seal channel to outlet orifice. If your shell has had a rear impact or rot repairs (the channel does sometimes rust through) then all bets are off.
1E75339 UberLynx D-Type; 1R27190 70 FHC; 1E78478; 2001 Vanden Plas
| Link: | |
| BBcode: | |
| HTML: | |
| Hide post links |
#10
Just what I was dreading
This was my car 5 months agao
This was my car 5 months agao
S1 4.2 Roadster in Resale Red
| Link: | |
| BBcode: | |
| HTML: | |
| Hide post links |

#11
I havnt yet fitted the hatch seal so hopefully this picture helps in some way. This is the hole that needs to be clear for the water to leave the hatch channel. Apologies for the picture orientation I could not work out how to rotate it on my phone.
I can confirm that the water runs through that hole and out the tube above the number plate. Any other openings in that area are merely the panel joints and not an exit for the water.
When I purchased repair panels for that area the tube wasnt included but to be fair I didnt have to remove the whole tailgate section just the number plate area panels.
1964 FHC 4.2
Etype restoration blog http://connor.org.uk
Etype restoration blog http://connor.org.uk
| Link: | |
| BBcode: | |
| HTML: | |
| Hide post links |
#12
Chris...have you fitted you window rubber channels yet...the grooves that go around the aperture?
S1 4.2 Roadster in Resale Red
| Link: | |
| BBcode: | |
| HTML: | |
| Hide post links |
#13
no sir... still doing the electrics although i envisage that i will be doing the quarter lights shortly. why do you ask?
1964 FHC 4.2
Etype restoration blog http://connor.org.uk
Etype restoration blog http://connor.org.uk
| Link: | |
| BBcode: | |
| HTML: | |
| Hide post links |
#14
Would like to know how you attack them.
I've been sizing them up.........think they were riveted on from memory with very small rivets
What do you think?
I've been sizing them up.........think they were riveted on from memory with very small rivets
What do you think?
S1 4.2 Roadster in Resale Red
| Link: | |
| BBcode: | |
| HTML: | |
| Hide post links |
#15
Assuming we are talking quarter lights...they were indeed riveted on - and from memory thin screws about 15mm long were also placed through the lower part of the metal trim and into the interior trim to hold that in place.. and THEN the rubber went in.
The metal strip was also 'glued' in place with some sort of sealer.
We are a bit off topic here though :)
The metal strip was also 'glued' in place with some sort of sealer.
We are a bit off topic here though :)
1964 FHC 4.2
Etype restoration blog http://connor.org.uk
Etype restoration blog http://connor.org.uk
| Link: | |
| BBcode: | |
| HTML: | |
| Hide post links |
#16
Thanks Chris that how I remember it.
Need small rivets though
Sorry back on topic :?
Need small rivets though
Sorry back on topic :?
S1 4.2 Roadster in Resale Red
| Link: | |
| BBcode: | |
| HTML: | |
| Hide post links |

#17 Odd solution
I will check on my 2 S1 FHC, but they are not with me at the moment, BUT I see a similarity on the trunklid seal of my BMW coupes (1965-75), in that the seals and shape of the metal are the same. Yes, they were glued by the factory, and most people glue the replacements, BUT this still allows water to remain between the seal and the metal. What I do is leave the rubber unglued. After a drive in the rain (which I avoid at all costs) or a wet wash, which I also avoid (having switched to a pink liquid by Meguiars which I use with a micro fibre cloth), I simply remove the seal and dry the metal groove with a towel and let the seal hang dry somewhere before installing it again. The latter takes about 30 secs, if not less.
| Link: | |
| BBcode: | |
| HTML: | |
| Hide post links |