


All,
Could someone please tell me the size of the special Allen bolt in the front wishbone, securing the torsion bar ?
Felix has my Laptop with all the data and parts books, being a Minecraft drug addict.
SNG does not list it, no longer abailable. Limora sells it, but for 2 bolts its a no-brainer.
I do have found 2 long and thin screws, but the feel loose in the hole and are non- Allen.
It was an Allen bolt, was it ? I could not find any other imperial bolt to fit in that hole in all of the hardware I kept restoring the car (its all plated).
Now, I thought, the thin bolt I have found, say 3 mm, is loose inside, the next imperial size is too thick - maybe it was an M4 bolt ?
Is there a thread inside ? I can't see it, so i am a bit unsure here.
Thanks !
Carsten
Torsion bar / lower wishbone bolt
#1 Torsion bar / lower wishbone bolt
Jag E '66 S1 2+2, 74’Citroen DS 23 Pallas iE, 73’ Citroen SM 3.0, 54’ Citroen 11 BL, 71‘ Velosolex, 88‘ Unimog U1650
| Link: | |
| BBcode: | |
| HTML: | |
| Hide post links |


#2
Hi Carsten...it is not a allen key bolt.... it is a long thin bolt with a short thread on the end and a nut...looking at the SC parts catalogue p73...it shows 3/16unf x 1 7/8 bolt and 3/16 unf nut so bolt through wishbone nut on other side...no tnread in wishbone
Steve
69 S2 2+2 (sold) ..Realm C type replica, 1960 xk150fhc
69 S2 2+2 (sold) ..Realm C type replica, 1960 xk150fhc
| Link: | |
| BBcode: | |
| HTML: | |
| Hide post links |
#3
Carsten,
I just dismanreld the left wishbone and tb. It's not an Allen. See pm for pics. The long screw is set from the bottom up, the nut is on the top. No washers.
Martin
I just dismanreld the left wishbone and tb. It's not an Allen. See pm for pics. The long screw is set from the bottom up, the nut is on the top. No washers.
Martin
Martin Scherz
Late S2 1970 OTS US LHD
Late S2 1970 OTS US LHD
| Link: | |
| BBcode: | |
| HTML: | |
| Hide post links |
#4
Hi Martin,
No PM (yet).
Imam now pretty sure that what I found is the original bolt- will compare.
Carsten
No PM (yet).
Imam now pretty sure that what I found is the original bolt- will compare.
Carsten
Jag E '66 S1 2+2, 74’Citroen DS 23 Pallas iE, 73’ Citroen SM 3.0, 54’ Citroen 11 BL, 71‘ Velosolex, 88‘ Unimog U1650
| Link: | |
| BBcode: | |
| HTML: | |
| Hide post links |
#5
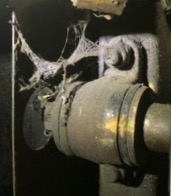
Sorry somehow goofed up the mail? Here pics: Sorry for the huge pics I don'r understand how to get them smaller from


Martin Scherz
Late S2 1970 OTS US LHD
Late S2 1970 OTS US LHD
| Link: | |
| BBcode: | |
| HTML: | |
| Hide post links |
#6
Those pics are from the right-hand lower wishbone, not the left. The pic with the bolt on top was made on the bench with the wishbone upside down. I'm working on getting future pics posted smaller.
Martin Scherz
Late S2 1970 OTS US LHD
Late S2 1970 OTS US LHD
| Link: | |
| BBcode: | |
| HTML: | |
| Hide post links |


#7
3/16 UNF by 2".
As these are hard to get and easy to damage they are often replaced with allen head setscrews.
As these are hard to get and easy to damage they are often replaced with allen head setscrews.
Andrew.
881824, 1E21538. 889457. 1961 4.3l Mk2. 1975 XJS. 1962 MGB. 1979 MGB.
http://www.projectetype.com/index.php/the-blog.html
Adelaide, Australia
881824, 1E21538. 889457. 1961 4.3l Mk2. 1975 XJS. 1962 MGB. 1979 MGB.
http://www.projectetype.com/index.php/the-blog.html
Adelaide, Australia
| Link: | |
| BBcode: | |
| HTML: | |
| Hide post links |
#8
This is exactly what I have, 2x.
Now, I found, on the Rh side, I forgot to take it out.
Ist there any way to remove it without eiter cutting it's head of and re-weld later or disassembling the whole caboodle again ?
Carsten
Now, I found, on the Rh side, I forgot to take it out.
Ist there any way to remove it without eiter cutting it's head of and re-weld later or disassembling the whole caboodle again ?
Carsten
Jag E '66 S1 2+2, 74’Citroen DS 23 Pallas iE, 73’ Citroen SM 3.0, 54’ Citroen 11 BL, 71‘ Velosolex, 88‘ Unimog U1650
| Link: | |
| BBcode: | |
| HTML: | |
| Hide post links |
#9
All they do is stop the TB from moving forward or backwards. They should be easy to tap out with a punch even if you have the suspension assembled.Durango2k wrote:This is exactly what I have, 2x.
Now, I found, on the Rh side, I forgot to take it out.
Ist there any way to remove it without eiter cutting it's head of and re-weld later or disassembling the whole caboodle again ?
Carsten
Andrew.
881824, 1E21538. 889457. 1961 4.3l Mk2. 1975 XJS. 1962 MGB. 1979 MGB.
http://www.projectetype.com/index.php/the-blog.html
Adelaide, Australia
881824, 1E21538. 889457. 1961 4.3l Mk2. 1975 XJS. 1962 MGB. 1979 MGB.
http://www.projectetype.com/index.php/the-blog.html
Adelaide, Australia
| Link: | |
| BBcode: | |
| HTML: | |
| Hide post links |
#10
With the mounted wishbone the only way for the bolt to go in is from the bottom up. If you have the bolt in the wishbone the wrong way around beforehand when mounting (from the top down) it will hit the bottom frame coming out because its such a long bolt. Is that your problem? If so I think you have already anssered yourself.
Martin
Martin
Martin Scherz
Late S2 1970 OTS US LHD
Late S2 1970 OTS US LHD
| Link: | |
| BBcode: | |
| HTML: | |
| Hide post links |
#11
... I think I answered myself, yes, sadly.
Maybe I'll just let it there until I have to moove th TB - I mean it does its job anyway...
Carsten
Maybe I'll just let it there until I have to moove th TB - I mean it does its job anyway...
Carsten
Jag E '66 S1 2+2, 74’Citroen DS 23 Pallas iE, 73’ Citroen SM 3.0, 54’ Citroen 11 BL, 71‘ Velosolex, 88‘ Unimog U1650
| Link: | |
| BBcode: | |
| HTML: | |
| Hide post links |
#12
Just one more question out of mere curiosity: in which sequence did you mount the tb and the lower wishbone? I don't see how you can get the bolt in from the top?
Martin Scherz
Late S2 1970 OTS US LHD
Late S2 1970 OTS US LHD
| Link: | |
| BBcode: | |
| HTML: | |
| Hide post links |
#13
Oh in fact that is very easy.
I did take out the upper triangle- remove the pin front nut, unscrew the two rear bolts, and swivel the triangle out.
Lift the car on the frontmost frame using a strap from the ceiling (!), and then you can swing down the whole axle carrier waaaay down. Then, the rear "eye" (toggle ?) on the TB can be bolted on with straight bolts- if you try it any other way the bolts sit non - straigt (schief...), and would kill their threads and the whole thing would become loose lateron. This would then ruin the holes kn the frame triangles- mine where egg- shaped.
Then, after you bolted the rear egg, you have to hammer (yes! A large hammer is involved !) the TB backwards, until this small pin just slides in.
Then, you forget about the bolt doing the other side, and after successfully having forgotten it, you re-bolt the axle carrier by lifting it with a hydraulic jack, swivel the triangle pin in its front mounting, hold the rear upper triangle mount to the front frame, and bolt it on. That is a bit fiddly, but if the triangle is in the correct height, and you use another strap, its safe.
Now, some may moan- why did you not use the official method and split the lower ball joint- because I don't own a ball joint splitter, and they are new, so I don't want to destroy their threads. The way shown above works fine as well.
Carsten
Jag E '66 S1 2+2, 74’Citroen DS 23 Pallas iE, 73’ Citroen SM 3.0, 54’ Citroen 11 BL, 71‘ Velosolex, 88‘ Unimog U1650
| Link: | |
| BBcode: | |
| HTML: | |
| Hide post links |
#14
The way shown above does not work well......you are haveing to use a hammer to push the torsion bar back....dosent this tell you something is wrong.. why not get a manual and follow the instructions, it will cause a lot less problems
Steve
69 S2 2+2 (sold) ..Realm C type replica, 1960 xk150fhc
69 S2 2+2 (sold) ..Realm C type replica, 1960 xk150fhc
| Link: | |
| BBcode: | |
| HTML: | |
| Hide post links |
#15
Problem is that my torsion bars do not slide easily. They only do when I fully prevent them from being in the wrong angle.
And the way described works nicely, at least for me. It sometimes is about what equipment you have- and with no ball joint splitter and working in night-shifts its not that bad to take the upper triangle out.
So, I see no real problems- there are ways which lead to Rome...
Carsten
And the way described works nicely, at least for me. It sometimes is about what equipment you have- and with no ball joint splitter and working in night-shifts its not that bad to take the upper triangle out.
So, I see no real problems- there are ways which lead to Rome...
Carsten
Jag E '66 S1 2+2, 74’Citroen DS 23 Pallas iE, 73’ Citroen SM 3.0, 54’ Citroen 11 BL, 71‘ Velosolex, 88‘ Unimog U1650
| Link: | |
| BBcode: | |
| HTML: | |
| Hide post links |
#16
Hi Carsten....did you use a setting link to ensure the correct ride height when you fitted the torsion bars
Steve
69 S2 2+2 (sold) ..Realm C type replica, 1960 xk150fhc
69 S2 2+2 (sold) ..Realm C type replica, 1960 xk150fhc
| Link: | |
| BBcode: | |
| HTML: | |
| Hide post links |
#17
Yes of course....
Carsten
Carsten
Jag E '66 S1 2+2, 74’Citroen DS 23 Pallas iE, 73’ Citroen SM 3.0, 54’ Citroen 11 BL, 71‘ Velosolex, 88‘ Unimog U1650
| Link: | |
| BBcode: | |
| HTML: | |
| Hide post links |
#18
Congratulations Carsten,
Good work on not loosing stuff! I just happened to run across an old post of yours from 2010, when you took these bolts out and vowed not to loose them. You obviously succeeded! Heres part of the post to pekka:
"Hi Pekka,
yes, the TBs went out with a 4 kilo Hammer. BANG, 4 hits, out they
where. And I kept the small bolt ! not to loose it later ... it's
not metric, obviously."
Martin
Martin Scherz
Late S2 1970 OTS US LHD
Late S2 1970 OTS US LHD
| Link: | |
| BBcode: | |
| HTML: | |
| Hide post links |
#19
Hahhh !
Thanks for time travel, Martin.
I have two sheds, the smaller one being the workshop where the E sits.
I did remove any metric material from it, and nothing leaves without knowing where it goes. Iiirc I only lost very few items- one is the large spring under the gearbox, if there was one after all. Oh and I threw the foam piece away not knowing what it was, darn.
Am currently assembling the head- got shims from SNG, but one is too large (diameter) so it sits on the valve cup instead on the valve.
Will write to SNG, its about 1 mm too wide. Strange, but I can proof the fact comparing it to any other shim I have.
Carsten
Jag E '66 S1 2+2, 74’Citroen DS 23 Pallas iE, 73’ Citroen SM 3.0, 54’ Citroen 11 BL, 71‘ Velosolex, 88‘ Unimog U1650
| Link: | |
| BBcode: | |
| HTML: | |
| Hide post links |