


air filter mounting
#1 air filter mounting
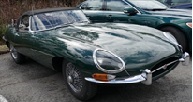
I have difficulty understanding how the air filter box is fitted. I see it is a bracket on the side that goes somewhere onto the chassis and another bracket that goes in the bottom between somewhere. But I find no holes that seems likely. I have scrolled thorugh the pictures but have difficulty to see how these brackets fit so if anyone has picture from that part it would be appreciated. Below I post one picture showing the side bracket on a similar car but on my car it is now logic place to fix it.

Restauration project of a serie 1 1963 model OTS now running proudly
| Link: | |
| BBcode: | |
| HTML: | |
| Hide post links |

#2
In the picture you posted you can just see on the right one end of the bar that sits underneath the air filter box. It bolts on between the bulkhead and the mudguard panel.
As you say the the other support bracket is bolted to the air cleaner box and also has 2 bolts where it fixes to the chassis. If you cannot find the bolt holes then presumably someone has filled them in because they were not using the factory air cleaner.
Here is the view from the parts catalogue

As you say the the other support bracket is bolted to the air cleaner box and also has 2 bolts where it fixes to the chassis. If you cannot find the bolt holes then presumably someone has filled them in because they were not using the factory air cleaner.
Here is the view from the parts catalogue

Steve
S1 4.2 FHC 1966
S1 4.2 FHC 1966
| Link: | |
| BBcode: | |
| HTML: | |
| Hide post links |
#3
Yes, I know, but how is the bracket 6 being fixed to the chassis. Is it any bracket being a part of the chassis on the side there where it is screwed in?
Restauration project of a serie 1 1963 model OTS now running proudly
| Link: | |
| BBcode: | |
| HTML: | |
| Hide post links |
#4
Perhaps you can say whether you have both the brackets 6 and 7 because with them you can pretty much see where they fit.
The bracket 6 bolts onto the bar running along the chassis. The bar has 2 threaded bolt holes in it, positioned towards the front of the car . As I said previously if the holes are not obvious then either they have been filled in or the chassis metalwork must have been replaced and the new metalwork does not have any holes.
The picture shows the the bolt heads of all the 4 bolts of bracket 6.
Hope this helps.

Steve
S1 4.2 FHC 1966
S1 4.2 FHC 1966
| Link: | |
| BBcode: | |
| HTML: | |
| Hide post links |

#5
This is what you should have. It's not a major job to retro fit two rivnuts.

Simon
Simon
| Link: | |
| BBcode: | |
| HTML: | |
| Hide post links |
#6
Thank you so much. This is very helpful. I have both brackets but I lack the bar on the chassis. I will check if SNG has it. Otherwise I will have to make one.
Restauration project of a serie 1 1963 model OTS now running proudly
| Link: | |
| BBcode: | |
| HTML: | |
| Hide post links |
#7
It appears the bar is an off-catalogue item at SNG so this should be solved easily.
Restauration project of a serie 1 1963 model OTS now running proudly
| Link: | |
| BBcode: | |
| HTML: | |
| Hide post links |