


My question is related to bottom of the wing to the top of the sill, I am replacing my sills with Hutsons panels and my thoughts are any advice on preparing the old lower wing area where its been lead loaded in order that I can stitch weld these two panels. Is there a simple way of removing the lead.
hopefully someone has encountered this
thanks Chris
Advice on Lead loading
-
ChrisCtype
Topic author - Posts: 49
- Joined: Thu Apr 06, 2017 7:34 am


#2 Re: Advice on Lead loading
Heat it up and scrape it off. Make sure you are wearing appropriate safety gear.
Modern fillers are more than up to the job and to be honest I'm surprised anyone is offering panels loaded with such a toxic compound.
Modern fillers are more than up to the job and to be honest I'm surprised anyone is offering panels loaded with such a toxic compound.
Andrew.
881824, 1E21538. 889457. 1961 4.3l Mk2. 1975 XJS. 1962 MGB. 1979 MGB.
http://www.projectetype.com/index.php/the-blog.html
Adelaide, Australia
881824, 1E21538. 889457. 1961 4.3l Mk2. 1975 XJS. 1962 MGB. 1979 MGB.
http://www.projectetype.com/index.php/the-blog.html
Adelaide, Australia
| Link: | |
| BBcode: | |
| HTML: | |
| Hide post links |
#3 Re: Advice on Lead loading
As Andrew says. Heat with a torch and it will melt and can be scraped off. Melts at about 328 deg C....assuming the lead is pure and not alloyed with other metals such as tin to reduce its melting point. Lead is toxic if ingested but so long as you are wearing a mask and gloves the risk is infinitesimally small. Minor point Andrew....lead is an element not a compound 
As an addendum modern fillers are usually epoxy based and until set hard are Probably more toxic than lead....and far less easily recycled than lead is....IMO lead is actually rather better than plastic filler...although MUCH harder to apply.
As an addendum modern fillers are usually epoxy based and until set hard are Probably more toxic than lead....and far less easily recycled than lead is....IMO lead is actually rather better than plastic filler...although MUCH harder to apply.
Julian the E-type man
1962 FHC
1966 MGB....fab little car too
1962 FHC
1966 MGB....fab little car too
| Link: | |
| BBcode: | |
| HTML: | |
| Hide post links |
-
ChrisCtype
Topic author - Posts: 49
- Joined: Thu Apr 06, 2017 7:34 am
#4 Re: Advice on Lead loading
Thanks for responses but perhaps I wasn't clear enough in my question, I have removed the existing lead but obviously the surface of the old wing area is tinned so this is what I'm asking for advice about how have others prepared that panel ready for stitch welding as otherwise I'll get contamination in the weld. Hope I have clarified my question
Chris
Series 2 FHC, + C type replica
Series 2 FHC, + C type replica
| Link: | |
| BBcode: | |
| HTML: | |
| Hide post links |
#5 Re: Advice on Lead loading
Chris Wrote:
What do you mean by the "old wing area"? Do you mean the lower area of the wing that has a wired edge (parallel with the sill when the bonnet is closed), or the sill in the vicinity of the lower section of the wing. There should be no lead in the wing in that area.
However, to remove the remaining lead after the bulk has been got rig of, use a propane, or oxy-acetylene flame, or any other heat source able to quickly bring the residual lead/tin alloy to a molten state. Heat the area in small sections until you see the lead/tin alloy take on a shiny appearance, then use a cloth (cotton is best) to wipe the surface. This process will leave such a small residual that it will have zero affect when in the area. You may have to repeat the process a couple of times.
The wiping metal used won't have been pure lead, as it would be a pig to try and apply. It would have a texture like moist sand when in the plastic state.
Regards,
Bill
Hell Chris,Thanks for responses but perhaps I wasn't clear enough in my question, I have removed the existing lead but obviously the surface of the old wing area is tinned so this is what I'm asking for advice about how have others prepared that panel ready for stitch welding as otherwise I'll get contamination in the weld. Hope I have clarified my question
What do you mean by the "old wing area"? Do you mean the lower area of the wing that has a wired edge (parallel with the sill when the bonnet is closed), or the sill in the vicinity of the lower section of the wing. There should be no lead in the wing in that area.
However, to remove the remaining lead after the bulk has been got rig of, use a propane, or oxy-acetylene flame, or any other heat source able to quickly bring the residual lead/tin alloy to a molten state. Heat the area in small sections until you see the lead/tin alloy take on a shiny appearance, then use a cloth (cotton is best) to wipe the surface. This process will leave such a small residual that it will have zero affect when in the area. You may have to repeat the process a couple of times.
The wiping metal used won't have been pure lead, as it would be a pig to try and apply. It would have a texture like moist sand when in the plastic state.
Regards,
Bill
| Link: | |
| BBcode: | |
| HTML: | |
| Hide post links |
-
ChrisCtype
Topic author - Posts: 49
- Joined: Thu Apr 06, 2017 7:34 am
#6 Re: Advice on Lead loading
Bill, the areas I'm taking about is A and B most area where I will weld the new sill to the wing areas. My concern and maybe I'm over worrying the issue is wiping down lead will leave a tinned surface on the old metal area, hence causing contamination with my weld. So I was looking for advice on this such as rotary wire brush in a drill or sand the area with DA pads to remove this tinning
Chris
Series 2 FHC, + C type replica
Series 2 FHC, + C type replica
| Link: | |
| BBcode: | |
| HTML: | |
| Hide post links |
-
christopher storey
- Posts: 5698
- Joined: Sun Mar 09, 2008 3:07 pm
- Location: cheshire , england
#7 Re: Advice on Lead loading
Chris : a blowlamp on low flame should do the job for you . Heat the bulkhead area where the lead is and use a wire brush - preferably stainless steel to brush the lead off. It usually rolls off easily under the action of gravity. If you are in any doubt ask Andy at hutsons who will tell you how to deal with any problems
| Link: | |
| BBcode: | |
| HTML: | |
| Hide post links |
#8 Re: Advice on Lead loading
Chris Wrote:
You should avoid any method that will create airborne particles of Lead/Tin alloy, even hand wire brushing. Wiping with a rag works well. Further, as you will be removing the sills, you will be able to use this method right into the joint where the join between the sill and the body at the A and B pillar area.
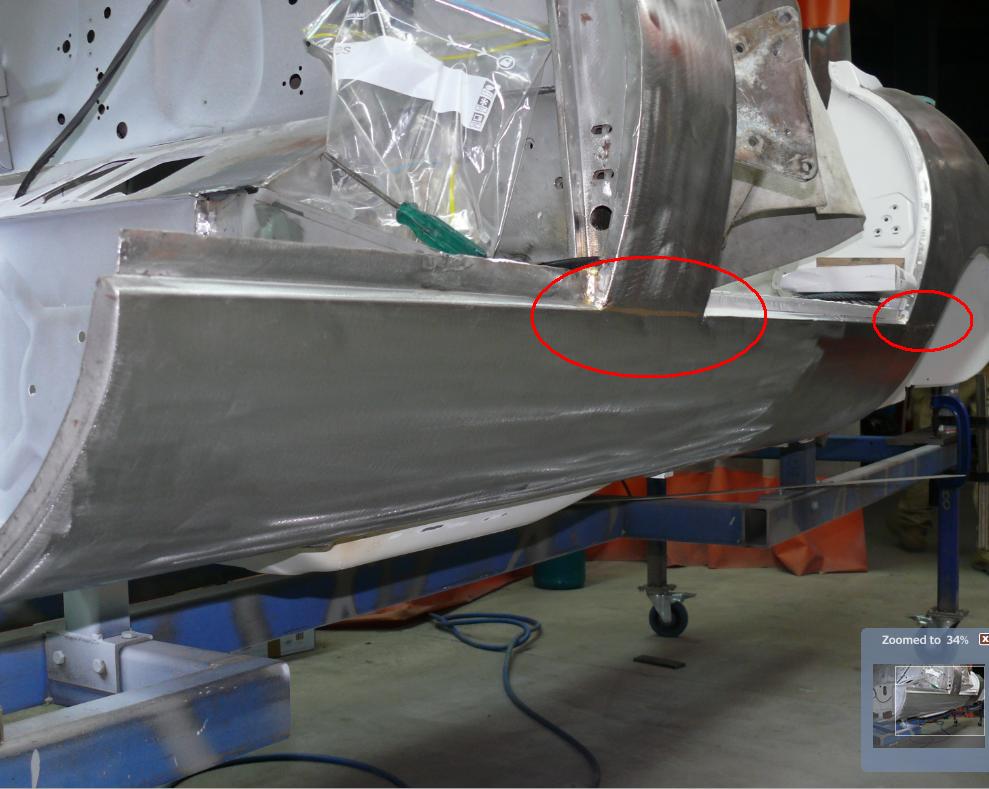
These joints were only stitch welded in the factory, which is not the best joint preparation for Lead or Plastic filling. I routinely complete these joints by TIG brazing, as shown in the following, and no filler whatsoever, Lead or Plastic, is used. I have no issues with the minuscule residue of Lead/Tin that may be left.
Regards,
Bill
Hello Chris,So I was looking for advice on this such as rotary wire brush in a drill or sand the area with DA pads to remove this tinning
You should avoid any method that will create airborne particles of Lead/Tin alloy, even hand wire brushing. Wiping with a rag works well. Further, as you will be removing the sills, you will be able to use this method right into the joint where the join between the sill and the body at the A and B pillar area.
These joints were only stitch welded in the factory, which is not the best joint preparation for Lead or Plastic filling. I routinely complete these joints by TIG brazing, as shown in the following, and no filler whatsoever, Lead or Plastic, is used. I have no issues with the minuscule residue of Lead/Tin that may be left.
Regards,
Bill
| Link: | |
| BBcode: | |
| HTML: | |
| Hide post links |
-
christopher storey
- Posts: 5698
- Joined: Sun Mar 09, 2008 3:07 pm
- Location: cheshire , england
#9 Re: Advice on Lead loading
Well, Bill, that is a quite exquisite job. But I imagine the skill required is not acquired very easily ?
| Link: | |
| BBcode: | |
| HTML: | |
| Hide post links |
-
ChrisCtype
Topic author - Posts: 49
- Joined: Thu Apr 06, 2017 7:34 am
#10 Re: Advice on Lead loading
Bill
Thanks for your response I might practice tig brazing, I had thought I might give that a go
Any tips welcome for setup to braze
Cheers Chris
Thanks for your response I might practice tig brazing, I had thought I might give that a go

Any tips welcome for setup to braze
Cheers Chris
Chris
Series 2 FHC, + C type replica
Series 2 FHC, + C type replica
| Link: | |
| BBcode: | |
| HTML: | |
| Hide post links |

#11 Re: Advice on Lead loading
Hi Chris, the most important thing ( in my experience) is that you use 100% Argon. The wire is much softer than steel so getting the wire feed set up correctly is also important. Hopefully your MIG has a euro torch with a teflon liner and you can adjust the tension on the feed rollers. If you are using a conventional transformer MIG, keep to a low setting and play with the feed speed to get a hotter pool of braze. Too cool and it will look black and too hot it will distort the panel. Good lighting and a decent mask help too. By no means a definitive guide just what works for me.
Other than that just practice on some scrap and after many years your brazing could look like Bill's
Edit. Just noticed you want advice on TIG brazing. Ask Bill.
Other than that just practice on some scrap and after many years your brazing could look like Bill's
Edit. Just noticed you want advice on TIG brazing. Ask Bill.
Simon
1969 S2 OTS
1969 S2 OTS
| Link: | |
| BBcode: | |
| HTML: | |
| Hide post links |
-
ChrisCtype
Topic author - Posts: 49
- Joined: Thu Apr 06, 2017 7:34 am
#12 Re: Advice on Lead loading
Hi Simon
I have both Tig and Mig welders so yes I have pure Argon and 5% mix bottles, I thought it might be easier using Tig,rather than Mig, I do have a euro nozzle with ptfe liner.
thanks for all the advice
Chris
I have both Tig and Mig welders so yes I have pure Argon and 5% mix bottles, I thought it might be easier using Tig,rather than Mig, I do have a euro nozzle with ptfe liner.
thanks for all the advice
Chris
Chris
Series 2 FHC, + C type replica
Series 2 FHC, + C type replica
| Link: | |
| BBcode: | |
| HTML: | |
| Hide post links |
#13 Re: Advice on Lead loading
Chris Wrote:
MIG is a little easier than TIG where brazing is concerned, as, as you would know, the filler wire is added automatically. Accordingly, you only need to do some experimentation to get the wire feed and amperage settings correct to give an acceptable result. However, I prefer TIG in this application as it puts less heat into the workpiece.
As Simon points out, you use pure Argon with the MIG when brazing and normally, pure Argon will be used with TIG for most applications. If you decide to use TIG, ensure that the filler rod used contains no Zinc, as the Zinc will burn producing a chalky fume that will foul the nozzle of your TIG gun and the workpiece. Typically, Silicon Bronze filler rod is the alloy to use when TIG brazing and it can also be used for Oxy-Acetylen brazing applications. Manganese Bronze is a typical filler rod alloy that's used in Oxy-Actelylene brazing and it contains Zinc.
Brazing with TIG or MIG is quite different to the technique employed when Oxy-Acetylene brazing. With the latter, the parent metal is heated until hot enough to melt the filler rod on contact. However, if the parent metal is too hot, the Zinc in the alloy will be burnt resulting in the chalky fumes I referred to with the TIG. The big difference between the TIG and Oxy applications is that a larger area is heated with the Oxy and as its primarily the parent metal that melts the filler rod, the brazing alloy is drawn into a close fitting joint via capillary action. With TIG, the heat zone is more localized, with the action being that you heat an area to a heat that will cause the filler material to melt and run to the extent of the hot shot when the filler rod is introduced to the arc. You then move on to the next stop and repeat. Done well and with consistent moves, the result is the look of overlapping, laid down coins. You get very little, if any, capillary action distribution of the filler material because the heat zone is so local.
Regards,
Bill
Hello Chris,I have both Tig and Mig welders so yes I have pure Argon and 5% mix bottles, I thought it might be easier using Tig,rather than Mig, I do have a euro nozzle with ptfe liner.
MIG is a little easier than TIG where brazing is concerned, as, as you would know, the filler wire is added automatically. Accordingly, you only need to do some experimentation to get the wire feed and amperage settings correct to give an acceptable result. However, I prefer TIG in this application as it puts less heat into the workpiece.
As Simon points out, you use pure Argon with the MIG when brazing and normally, pure Argon will be used with TIG for most applications. If you decide to use TIG, ensure that the filler rod used contains no Zinc, as the Zinc will burn producing a chalky fume that will foul the nozzle of your TIG gun and the workpiece. Typically, Silicon Bronze filler rod is the alloy to use when TIG brazing and it can also be used for Oxy-Acetylen brazing applications. Manganese Bronze is a typical filler rod alloy that's used in Oxy-Actelylene brazing and it contains Zinc.
Brazing with TIG or MIG is quite different to the technique employed when Oxy-Acetylene brazing. With the latter, the parent metal is heated until hot enough to melt the filler rod on contact. However, if the parent metal is too hot, the Zinc in the alloy will be burnt resulting in the chalky fumes I referred to with the TIG. The big difference between the TIG and Oxy applications is that a larger area is heated with the Oxy and as its primarily the parent metal that melts the filler rod, the brazing alloy is drawn into a close fitting joint via capillary action. With TIG, the heat zone is more localized, with the action being that you heat an area to a heat that will cause the filler material to melt and run to the extent of the hot shot when the filler rod is introduced to the arc. You then move on to the next stop and repeat. Done well and with consistent moves, the result is the look of overlapping, laid down coins. You get very little, if any, capillary action distribution of the filler material because the heat zone is so local.
Regards,
Bill
Last edited by angelw on Sun Feb 21, 2021 10:38 am, edited 4 times in total.
| Link: | |
| BBcode: | |
| HTML: | |
| Hide post links |
-
ChrisCtype
Topic author - Posts: 49
- Joined: Thu Apr 06, 2017 7:34 am
#14 Re: Advice on Lead loading
Bill thanks for the response
I have ordered myself some silicon Bronze filler wire to try out the Tig so fingers crossed I master, well get an acceptable joint
thanks
Chris
I have ordered myself some silicon Bronze filler wire to try out the Tig so fingers crossed I master, well get an acceptable joint
thanks
Chris
Chris
Series 2 FHC, + C type replica
Series 2 FHC, + C type replica
| Link: | |
| BBcode: | |
| HTML: | |
| Hide post links |