


There have been numerous posts over the years for these two topics, but not so much as together.
The engine occasionally pops up to a 1500-1800 idle speed and when hot, after 60mins or more of driving, starting is hard if not impossible.
The normal method of foot flat down to clear the carbs of any vaporised fuel just does not seam to be working, only when the engine really cools down does it fire first time and then all is well.
The Carburettors have been recently overhauled, complete strip down and re-assemble. Also the engine was overhauled, new head gaskets, upgraded distributor, coil & resistor and vacuum system with new hoses etc so no leaks.
there is a bit of smoke/steam&exhaust from the right hand two tail pipes, one of the reasons why I originally wanted to give the engine an overhaul in the first place was to get rid of this.
The Carb dashpots have oil in them and all linkages are clear and not sticking. Timing etc is correct.
Any thoughts as to reasons be greatly appreciated.
one thought i had was if the needles were sticking raised or not lowering properly, this would cause a fast idle and also flood the engine?
Thanks in advance
Andy
Poor hot starting and high idle
-
 Mountain King
Topic author - Posts: 96
- Joined: Mon Dec 19, 2011 6:22 pm


#2
Hi Andy,
My first thought is, have you really checked thoroughly for air leaks? There is a mind boggling amount of potential leak points in the V12 inlet and air cross balancing systems. Air leaks will give high idles and can affect starting. I had air leaks around the rubber hoses in the cross balance pipes - the clips were tight but not actually compressing the hoses sufficiently, they just slid off without undoing the clamps. I ended up using new clamps which closed more fully and using a very small amount of black RTV sealant on each hose connection.
The other thing is, is the vacuum retard unit diaphragm torn? You can check by removing and blowing through the vacuum pipes. They are notorious for tearing, my new unit lasted less then a year and I ended up being very inventive, opening the vacuum unit and replacing the diaphragm - supposedly impossible but I assure you it can be done and seemed worthwhile as my new unit lasted such a short time. A torn diaphragm effectively gives an air leak.
Regards,
Simon
My first thought is, have you really checked thoroughly for air leaks? There is a mind boggling amount of potential leak points in the V12 inlet and air cross balancing systems. Air leaks will give high idles and can affect starting. I had air leaks around the rubber hoses in the cross balance pipes - the clips were tight but not actually compressing the hoses sufficiently, they just slid off without undoing the clamps. I ended up using new clamps which closed more fully and using a very small amount of black RTV sealant on each hose connection.
The other thing is, is the vacuum retard unit diaphragm torn? You can check by removing and blowing through the vacuum pipes. They are notorious for tearing, my new unit lasted less then a year and I ended up being very inventive, opening the vacuum unit and replacing the diaphragm - supposedly impossible but I assure you it can be done and seemed worthwhile as my new unit lasted such a short time. A torn diaphragm effectively gives an air leak.
Regards,
Simon
Regards,
Simon
Series III FHC
Simon
Series III FHC
| Link: | |
| BBcode: | |
| HTML: | |
| Hide post links |
-
Mountain King
Topic author - Posts: 96
- Joined: Mon Dec 19, 2011 6:22 pm
#3
Thanks Simon,
I will go through the pipe work again.
By the balance pipes do you mean the breather pipes from each carburettor C34924, C34932 etc to the engine, or do you mean the pipe from the induction manifolds, C34637, which is not fitted on mine.
ill also check the resistance 3ohm/11kohm on the coil, but it is brand new...
I will go through the pipe work again.
By the balance pipes do you mean the breather pipes from each carburettor C34924, C34932 etc to the engine, or do you mean the pipe from the induction manifolds, C34637, which is not fitted on mine.
ill also check the resistance 3ohm/11kohm on the coil, but it is brand new...
1973 Series 3 OTC
| Link: | |
| BBcode: | |
| HTML: | |
| Hide post links |
#4
Hi Marcus,
I had a very quick look at C34924 in the catalogue, but didn't find it - I know it will be there but I gave up after a minute of too as I was too lazy...!
Actually, I gave up because the real answer is that you need to look for any pipe/hose/joint which could potentially allow air into the inlet or carburetors but which is after the point at which fuel is injected into the carburetor throat. Thus anything after the needle (including the pivot points of the throttles) onward. I counted potential leak points (joints) and gave up counting when I reached nearly 50 and that was not including possible failure points, including the vacuum unit diaphragm. ANY pipe, the part numbers and combinations vary considerably with year and market of original sale of the car, can give leaks and I found this given away when, in the case of hoses joined to pipes, there was a small amount of oil which had got between the hose and the pipe (or tube) even though the hose clamp was tight. If oil could creep down these joints, then air could also get in. Some were looser than others but I used a very small amount of RTV between each. I also removed inlet manifolds and carburetors and used new gaskets and used very small amounts of RTV here too. Be very careful not to use too much as it will ooze out and may end up in the engine, which may or may not cause a problem depending on exactly where it finishes up.
Results were a definite improvement despite the care I took originally, although it has to be said I also found the torn diaphragm in the vacuum unit too. Mind you, the slight hesitation I had experienced was there more or less from the first drive and I assume the vacuum unit did at least seal at first, until the tear occurred later on.
Regards,
Simon
I had a very quick look at C34924 in the catalogue, but didn't find it - I know it will be there but I gave up after a minute of too as I was too lazy...!
Actually, I gave up because the real answer is that you need to look for any pipe/hose/joint which could potentially allow air into the inlet or carburetors but which is after the point at which fuel is injected into the carburetor throat. Thus anything after the needle (including the pivot points of the throttles) onward. I counted potential leak points (joints) and gave up counting when I reached nearly 50 and that was not including possible failure points, including the vacuum unit diaphragm. ANY pipe, the part numbers and combinations vary considerably with year and market of original sale of the car, can give leaks and I found this given away when, in the case of hoses joined to pipes, there was a small amount of oil which had got between the hose and the pipe (or tube) even though the hose clamp was tight. If oil could creep down these joints, then air could also get in. Some were looser than others but I used a very small amount of RTV between each. I also removed inlet manifolds and carburetors and used new gaskets and used very small amounts of RTV here too. Be very careful not to use too much as it will ooze out and may end up in the engine, which may or may not cause a problem depending on exactly where it finishes up.
Results were a definite improvement despite the care I took originally, although it has to be said I also found the torn diaphragm in the vacuum unit too. Mind you, the slight hesitation I had experienced was there more or less from the first drive and I assume the vacuum unit did at least seal at first, until the tear occurred later on.
Regards,
Simon
Regards,
Simon
Series III FHC
Simon
Series III FHC
| Link: | |
| BBcode: | |
| HTML: | |
| Hide post links |

#5 poor hot starting and hot idle
Hi
Many people, including myself, run the car without the vacuum advance/retard unit connected.
Don't quote me, but I understand it was only used to meet the US pollution regulations, the car runs great without it.
The same goes for those air diverters in the air intake trumpets.
It seems to me that the less vacuum piping the better.
Cheers
Many people, including myself, run the car without the vacuum advance/retard unit connected.
Don't quote me, but I understand it was only used to meet the US pollution regulations, the car runs great without it.
The same goes for those air diverters in the air intake trumpets.
It seems to me that the less vacuum piping the better.
Cheers
Mark Brown
1971 S3 Etype, now sold, sadly.
1971 S3 Etype, now sold, sadly.
| Link: | |
| BBcode: | |
| HTML: | |
| Hide post links |
#6
Hi,
In principle, I agree that less vacuum piping sounds good. However, I like my cars to function correctly - it's part of the challenge. I am not going to try to talk you out of making the retard unit work, all I will say is there is a lot of documentation on the net talking of how to deal with the issue, including blocking the pipe completely, converting to an advance unit and the like. After reading it, I went with original is best and that's the way it is.
As to the pre-heat devices on the inlet, I finally got around to this earlier this year and bought new sensors, vacuum hose and some copper pipe to make a (relatively) quick and easy release for removing the filter boxes. The result is a noticeable decrease in warm up time and I can push the choke fully in much earlier. This improves overall fuel economy, although this is hardly a big impact to the V12 (!). More importantly, it reduces the amount of raw fuel going into the chambers and washing the oil lubrication of the side walls of the cylinders, thus reducing cold start wear.
Overall, I think I will stick with my fully operational vacuum system as designed and fitted, it's just the way I like to work I guess.
Regards,
Simon
In principle, I agree that less vacuum piping sounds good. However, I like my cars to function correctly - it's part of the challenge. I am not going to try to talk you out of making the retard unit work, all I will say is there is a lot of documentation on the net talking of how to deal with the issue, including blocking the pipe completely, converting to an advance unit and the like. After reading it, I went with original is best and that's the way it is.
As to the pre-heat devices on the inlet, I finally got around to this earlier this year and bought new sensors, vacuum hose and some copper pipe to make a (relatively) quick and easy release for removing the filter boxes. The result is a noticeable decrease in warm up time and I can push the choke fully in much earlier. This improves overall fuel economy, although this is hardly a big impact to the V12 (!). More importantly, it reduces the amount of raw fuel going into the chambers and washing the oil lubrication of the side walls of the cylinders, thus reducing cold start wear.
Overall, I think I will stick with my fully operational vacuum system as designed and fitted, it's just the way I like to work I guess.
Regards,
Simon
Regards,
Simon
Series III FHC
Simon
Series III FHC
| Link: | |
| BBcode: | |
| HTML: | |
| Hide post links |

#7 poor hot starting
Hi i had same problem vac retard unit should not work when engine is hot the vac pipe goes through a thermostat on end of right manifold water jacket if thats shot it retards timing 10deg that is enough to stop it starting when hot disconect vac pipe block it of so no air can leak into manifold set timing 12deg btdc at tickover off u go plus engine runs far better if u want to keep it standard replace stat unit
| Link: | |
| BBcode: | |
| HTML: | |
| Hide post links |
#8 Re: Poor hot starting and high idle
Mountain king........IGNITION, IGNITION, IGNITION.
GTJOEY1314
GTJOEY1314
| Link: | |
| BBcode: | |
| HTML: | |
| Hide post links |
#9 Re: Poor hot starting and high idle
Gtjoey
Are you suggesting there is a better ignition system for Jaguar V12s?
If so, please post details as we would like to see details.
Thanks
Are you suggesting there is a better ignition system for Jaguar V12s?
If so, please post details as we would like to see details.
Thanks
Regards,
Simon
Series III FHC
Simon
Series III FHC
| Link: | |
| BBcode: | |
| HTML: | |
| Hide post links |
#10 Re: Poor hot starting and high idle
Welsh had a great complete kit which I think SNG has now.
It completely replaced the original opus.
Last year installed in a v12 with fuel injection xj12c
Its the same set up.
The wires must match as well.
I dont remember the part number. but both have it.
Good luck.
gtjoey1314
It completely replaced the original opus.
Last year installed in a v12 with fuel injection xj12c
Its the same set up.
The wires must match as well.
I dont remember the part number. but both have it.
Good luck.
gtjoey1314
| Link: | |
| BBcode: | |
| HTML: | |
| Hide post links |
-
Craig Balzer
- Posts: 93
- Joined: Fri Mar 03, 2017 2:02 am

#11 Re: Poor hot starting and high idle
Simon
Part C24934 is one of the "horseshoe" shaped pipes (this one with a long extraction) that connected two adjacent carbs and is then subsequently connected to the other pair. Part #1 on attached diagram.
I was unsuccessful in finding the special part number and had to open and scan the proper diagram
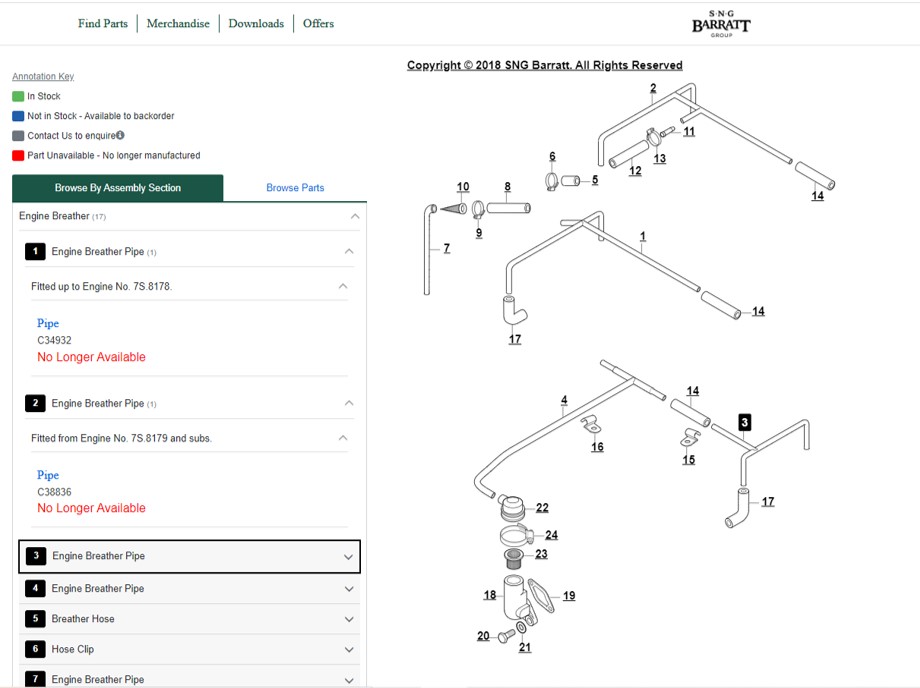
Part C24934 is one of the "horseshoe" shaped pipes (this one with a long extraction) that connected two adjacent carbs and is then subsequently connected to the other pair. Part #1 on attached diagram.
I was unsuccessful in finding the special part number and had to open and scan the proper diagram
Craig Balzer
Colorado Springs, CO, USA
1972 Series III OTS, 4-Speed (soon-to-be a Guy Broad 5-Speed), A/C, CWW
Colorado Springs, CO, USA
1972 Series III OTS, 4-Speed (soon-to-be a Guy Broad 5-Speed), A/C, CWW
| Link: | |
| BBcode: | |
| HTML: | |
| Hide post links |